Problem
The process of cleansing and transforming big datasets in the data lake has become an increasingly popular and critical step in a Modern Enterprise’s Data architecture. Microsoft has introduced several big data analytics and orchestration tools to serve the need for big data lake Extract-Load-Transform (ELT). Customers are seeking cloud-based services that can easily cleanse, transform and aggregate extremely big data sets with ease, coupled with a low learning curve and ease of use. They are seeking to understand what tools and technologies could potentially fit the bill for big data lake cleansing and transformations.
Solution
Azure Data Factory’s Mapping Data Flow, which is currently in preview, has become a promising solution for big data lake cleansing and transformations. In my article, Azure Data Factory Mapping Data Flow for Datawarehouse ETL, I discussed the concept of a Modern Datawarehouse along with a practical example of Mapping Data Flow for enterprise data warehouse transformations. In this article, I will continue to explore additional data cleansing and aggregation features of Mapping Data Flow, specifically to process big data files stored in Azure Data Lake Store Gen 2 as hierarchical files.
Prerequisites
For this demo, we will need the following Azure Resources, which can be created from the Azure Portal:
- Azure Data Lake Store Gen 2: There are many benefits to ADLS Gen2’s hierarchical namespace, which we will be using for the files and folder structures. For more detail on Hierarchal Namespace, read Azure Data Lake Storage Gen 2 Hierarchal Namespace.
- Azure Data Factory v2: We will be leveraging Mapping Data Flows within ADF. For more information, read What are Mapping Data Flows?.
Add Files and Folders to Azure Data Lake Store Gen 2
Structuring a Data Lake Store correctly by using best practices is key. When data is stored in Data Lake Storage Gen2, the file size, number of files, and folder structure have an impact on performance.
File Size
Depending on what services and workloads are using the data, a good size to consider for files is 256 MB or greater. If the file sizes cannot be batched when landing in Data Lake Storage, you can have a separate compaction job that combines these files into larger ones.
Folder Structure
The folder and file organization structure can help some queries read only a subset of the data which improves performance by optimizing for the larger file sizes and a reasonable number of files in each folder. For more information on performance tuning and optimization, along with folder and file structure recommendations, read Tuning Azure Data Lake Store Gen1 for performance.
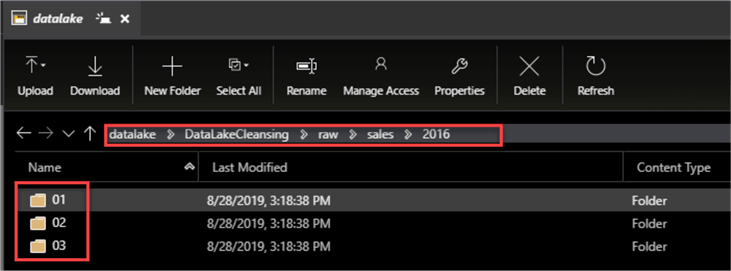
For this demo, I will create an ADLS Gen2 container named datalake, along with few additional folders which will organize the data by the year 2016.
As we can see from the image below, within the 2016 Sales folder, I have organized additional folders by month number.
Within each month, I have .txt files organized and saved by day.
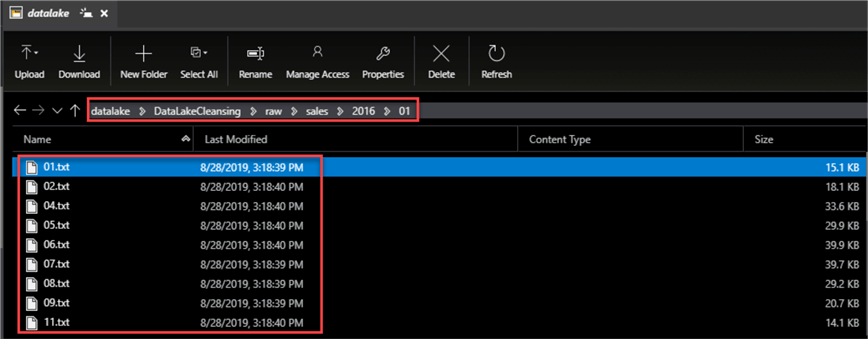
And finally, when I open one of the text files, I can see the structure of the data consisting of the following columns selected below:

Create Azure Data Factory Resources
Now that I have my Data Lake files and folders structured, it is time to create the necessary Azure Data Factory Resources.
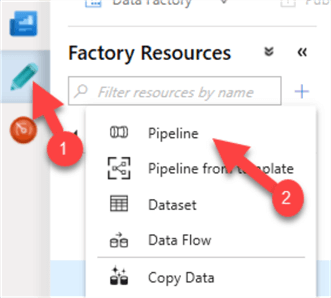
Once my Data Factory is open, I will start by creating a new pipeline.
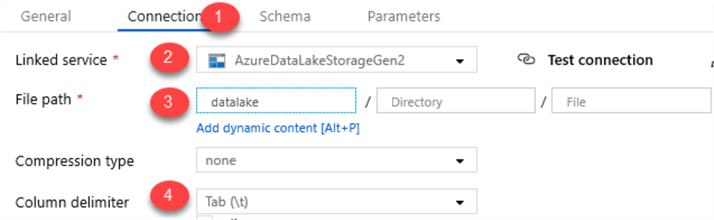
I will also add a new Dataset which will reference the datalake container with the following connection properties. Notice that I left the Directory and File properties empty as this can be dynamically set in the Mapping Data Flow properties. I also set the column delimited to Tab(\).
Once I publish my resources, I will have the following Factory Resources.

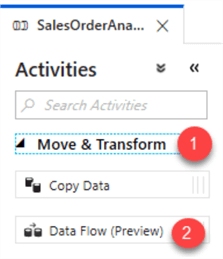
Within the newly created pipeline, expand Move & Transform from Activities and then drag Data Flow(preview) onto the canvas.
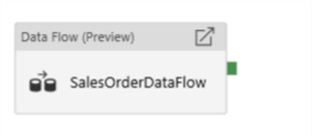
Create the Mapping Data Flow
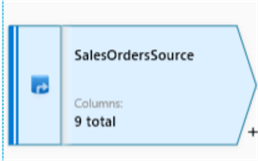
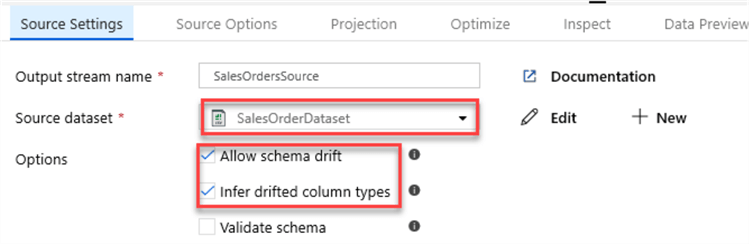
I am ready to create my Data Flow and will start by adding a source connection to my SalesOrderDataset created in the previous section.
I will also Allow schema drift as there may be columns that change in the files. Additionally, I will Infer drifted column types to allow auto-detection of drifted column types.
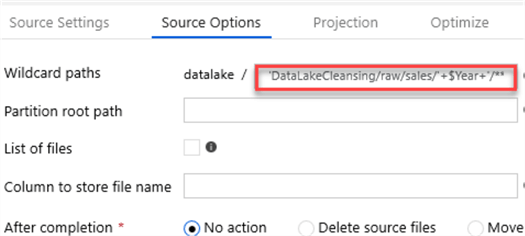
Under source options, I will add the path to my 2016 Sales folder in Wildcard paths. This setting will override the folder path set in the dataset, starting at the container root.
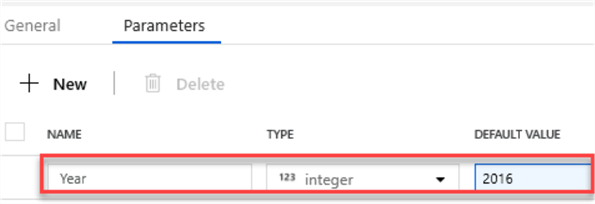
I will parameterize the year 2016 so that I can maintain these values outside of the hard-coded path. To add parameters, click the white space in the Mapping Data Flow Canvas, and then select and add the desired parameters.
After my parameter is added, I will return to my Source Options and add the following wildcard path:
'DataLakeCleansing/raw/sales/'+$Year+'/**/*.txt'
The ** will allow for recursive directory nesting. Lastly, I will specify that I want all text files by using *.txt
In the Projection section, I can verify and alter the column schema.

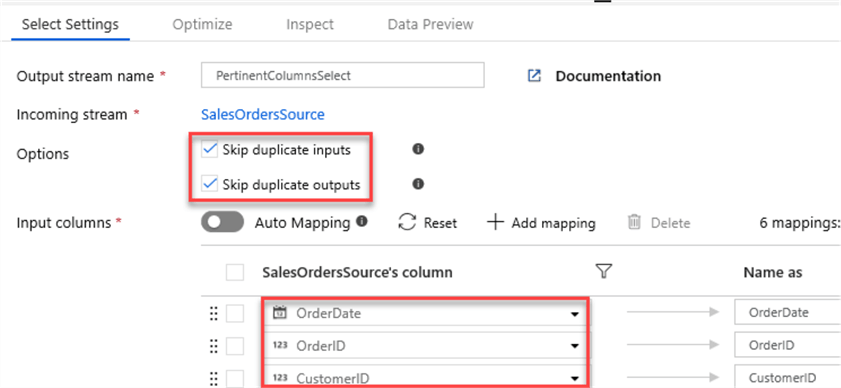
Next, I will add a Select schema modifier to prune the columns that I need.
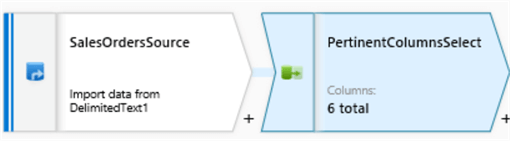
I will also select options to skip duplicates.
Next, I will add a Derived Column schema modifier to add two new columns: 1) Order month number based on OrderDate and 2) Year number also based on OrderDate.
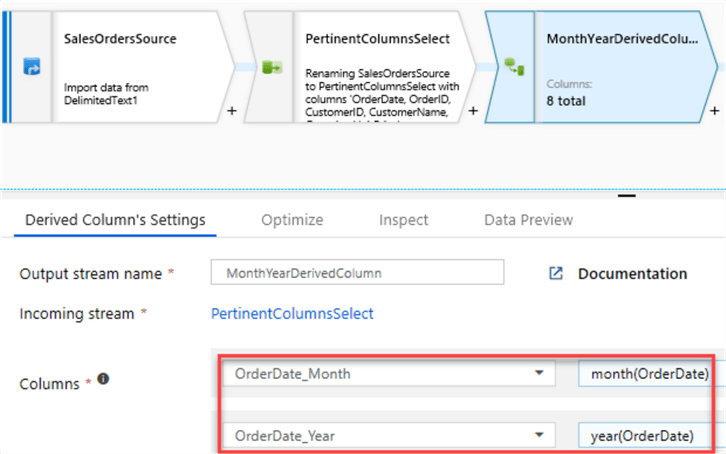
Derived columns are great for data cleansing through the power of expressions:
Regular Expressions (Regex)
- RegexReplace(mystring,`^a-zA-Z\d\s:`,''): Removes all non-alphanumeric characters.
- RegexReplace(Address,`[ ]{2}|\.`,' '): Takes the Address field, which contains street address strings, and replace any occurrence of 2 spaces or dots “.” with a single space.
- Regex_extract(Address1, `^(\d+)`, 1): Uses street address to extract just the house number.
Soundex
Soundex is a phonetic algorithm for indexing names by sound, as pronounced in English. The goal is for homophones to be encoded to the same representation so that they can be matched despite minor differences in spelling.
This can be a great expression to use when working with semi or unstructured data in a lake to overcome issues with joining and cleansing data without keys.
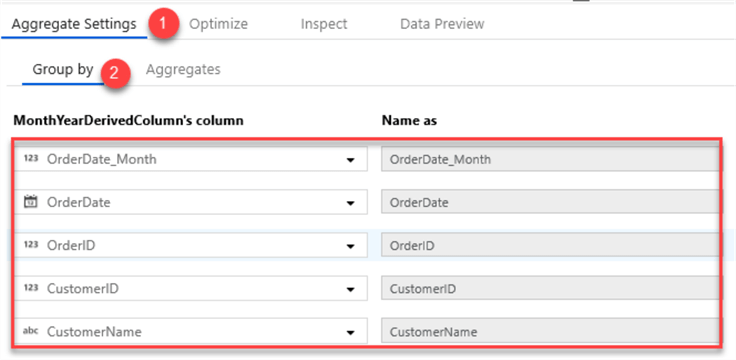
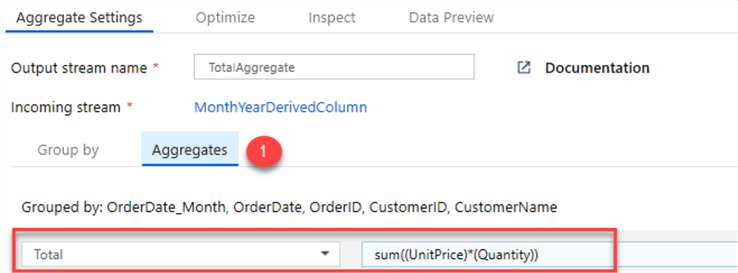
I will then add an Aggregate schema modifier to aggregate the sum of the unit price * quantity.

I will group this aggregation by the following columns.
Here is where I enter the Total Sum calculation.

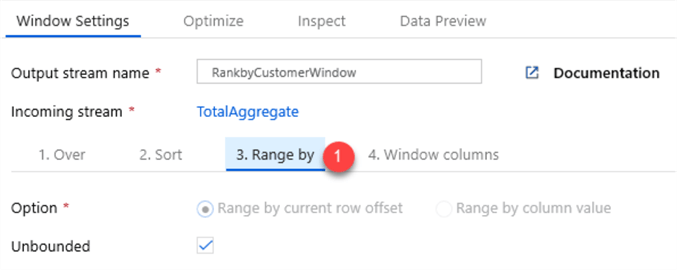
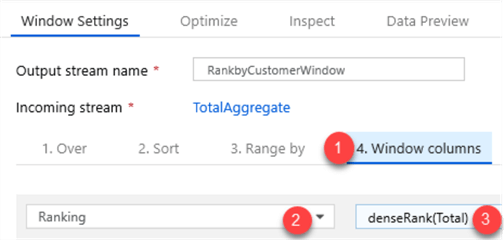
Now that my aggregation is complete, I will add a Windows schema modifier to rank the totals by Customer Name.

I will also sort the Total in descending order to sort and rank the Totals from highest to lowest.

I will leave the Range by as Unbounded.
For more information on Window functions and settings, read Azure Data Factory Window Transformation.
Next, I will add a dense rank function to the total. Note that there are a few rank and row number functions that fit specific needs and use cases.
RANK Function
The RANK function is used to retrieve ranked rows based on the condition of the ORDER BY clause.
DENSE_RANK Function
The DENSE_RANK function is like RANK function however the DENSE_RANK function does not skip any ranks if there is a tie between the ranks of the preceding records.
ROW_NUMBER Function
Unlike the RANK and DENSE_RANK functions, the ROW_NUMBER function simply returns the row number of the sorted records starting with 1.
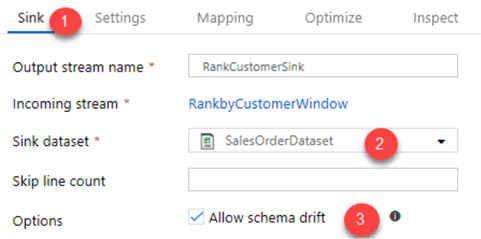
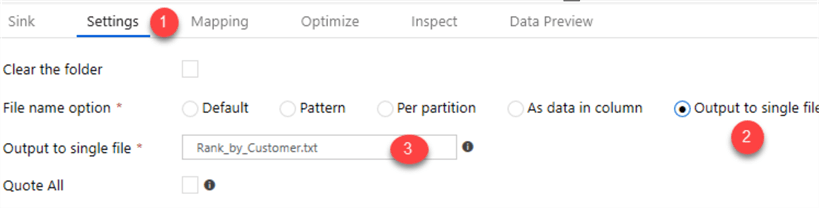
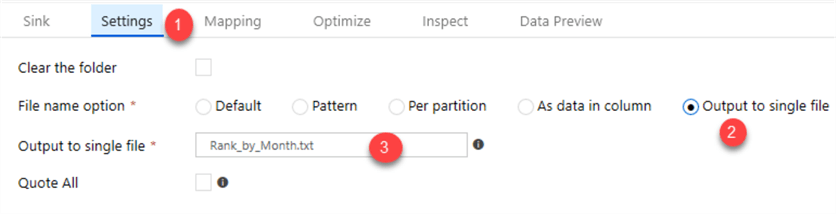
Once my window function is complete, I will add a sink to store my enriched results in the data lake.

I will use the following sink and settings.
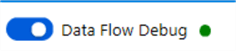
One of the benefits of Mapping Data Flows is the Data Flow Debug mode which allows me to preview the transformed data without having the manually create clusters and run the pipeline.
Remember to turn on debug mode to preview the data and then turn it off before logging out of Azure Data Factory. Note that the debug mode will auto terminate after a period.
Read Mapping Data Flow Debug Mode for more detail.
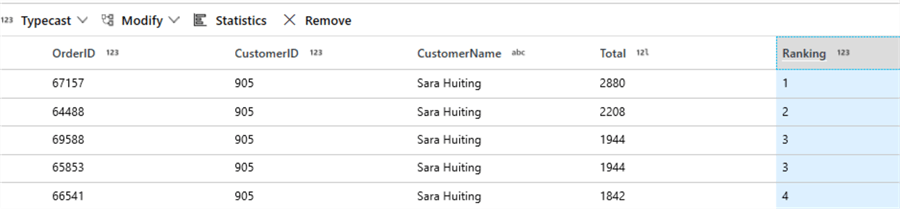
The ranked total results by customer will look like this.
I also wanted to demonstrate that I can split my Total Aggregate into a new branch to create a new file with a different Window Function, this time ranking the totals by month and outputting the results to a different file in the data lake.
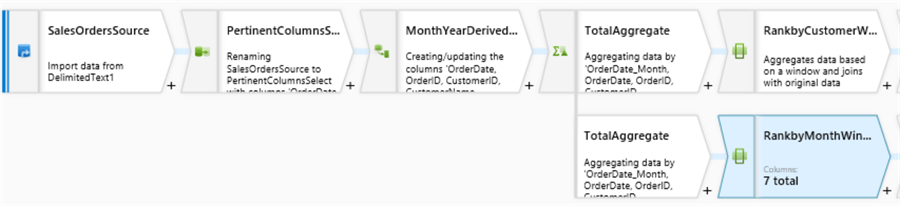
Once the Mapping Data Flow is complete, it will look like this.

To recap, in this article, I created a dataset pointing to my data lake container. Next I added a parameterized wild card path to all text files in the 2016 Sales folder. I then selected the pertinent columns, added a few key derived columns, performed aggregations, added window functions, split branches and exported my results to enriched text files in my data lake.
The output dataset contains an aggregated and descending ranked total (Unit Price * Quantity) by customer name and by month.
All of this was done by utilizing Azure Data Factory’s Mapping Data Flow feature and tested with the Data Flow Debug functionality.
Next Steps
- Explore Similarities and Differences among SQL based RANK, DENSE_RANK and ROW_NUMBER Functions
- Explore the various Data Transformation expressions in Mapping Data Flows, including SoundEx for fuzzy matching and RegEx for complex pattern matching.
- Check out Best practices for using Azure Data Lake Storage Gen2.

Ron C. L’Esteve is a Data and AI Leader and professional Author residing in Chicago, IL, USA. He is well-known for his impactful books and article publications on Azure Data & AI Architecture, Engineering, and Leadership. Ron holds a Master of Business Administration (M.B.A.) and Master of Science in Corporate Finance (M.S.F.) from Loyola University Chicago. Ron possesses deep technical skills and experience in designing, implementing, leading, and delivering modern Azure Data & AI projects for numerous clients around the world. He is a Motorola Certified Six Sigma Green Belt, a Microsoft Global Challenger, and also holds numerous additional Microsoft, Snowflake, and Databricks professional certifications in Big Data Engineering, Artificial Intelligence, Apache Spark and Data Platform Architecture.
- MSSQLTips Awards: Champion (100+ tips) – 2023 | Author of the Year – 2020-2021 | Rookie of the Year – 2019