Problem
At our company, we use the cloud Snowflake database to host our data warehouse. We are heavily invested in the Azure data platform and we like to create data pipelines in Azure Data Factory. However, it seems there’s no native connector in Data Factory for Snowflake. How can we execute SQL statements on Snowflake, orchestrated in Data Factory?
Solution
Snowflake is a database vendor who offer a cloud native data warehouse solution. This data warehouse can be hosted on all major cloud platforms (Azure, AWS and Google Cloud). For an introduction to Snowflake and their offerings, I refer to their website.
Since there’s no native connector in Azure Data Factory (ADF), we need to use a work around. A possibility is to use custom tasks. Another method would be to use Azure Functions, which offer serverless compute for small applications. This article gives an overview of the main differences between the two versions.
Once the Azure Function is finished, it can be integrated into Azure Data Factory, but that’s a subject for another tip. In this part of the tip, we’ll write the Azure Function in Visual Studio and configure the connection string securely. In the second part, we’ll deploy it to Azure and test it in the Azure Portal.
Creating the Azure Function
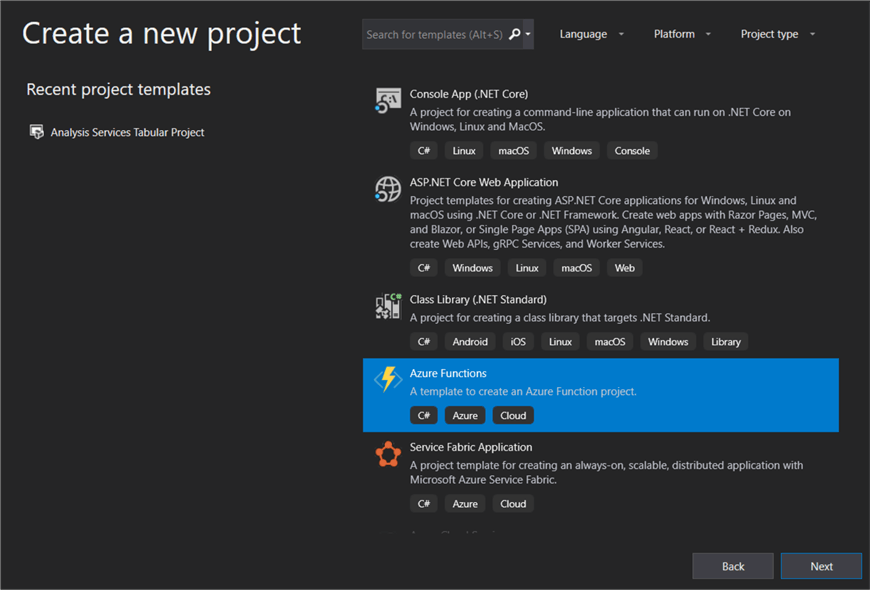
Although it’s possible to create a Function in the Azure Portal, the development experience is much better in Visual Studio, where you have syntax highlighting, autocomplete and the possibility to easily add NuGet packages. When you start a new project in Visual Studio, choose the Azure Function project template:
If you don’t have this project template, make sure the Azure development toolkit is installed in your Visual Studio environment:

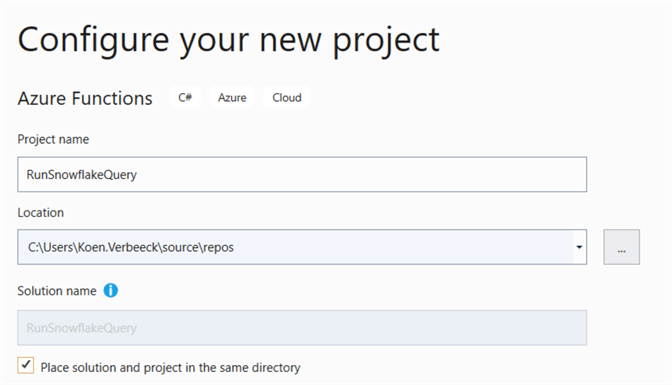
Specify a name for the project and/or solution and a location to save it. The name of the project will also be the same as the App service in the Portal.
The next step is to set some basic configurations for our Azure Function:
- We need to specify how our Function is going to be triggered. Since we want to integrate it into ADF later on, we’re choosing the HTTP trigger.
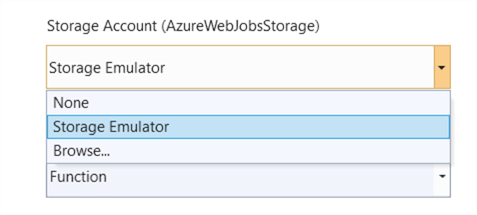
- We also need to specify a storage account since the Function runtime requires it (although HTTP triggers don’t need one). More info can be found in the documentation.
- The Authorization level. We’re going to stick with the default: Function.

These are the possible authorization levels you can choose from:

You can either browse for an existing storage account, not choose an account or use an emulator:
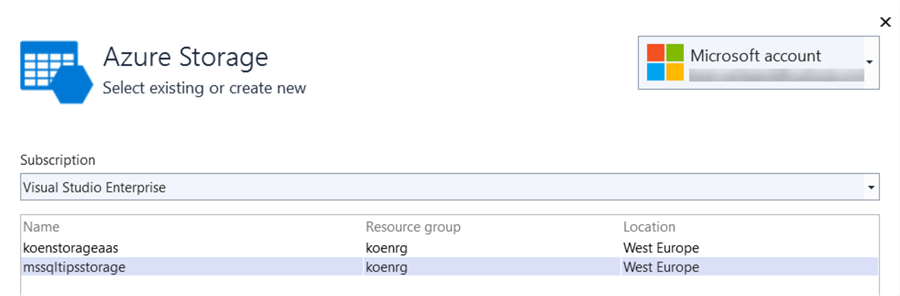
If you’re choosing an existing storage account, you need to specify a subscription from the account (the one logged in into Visual Studio):
Now we can finally create the Visual Studio project. One of the first things we need to do now is add some prerequisites. We’re going to use the Snowflake connector for .NET, which is available as a NuGet package. Right-click the Dependencies node in Solution Explorer and choose Manage NuGet Packages…

Search for Snowflake and select the Snowflake.Data package. Choose Install on the right side of the screen.

It’s possible you might have to accept some license agreements:

After installation, you can find the NuGet package under Dependencies:

Before we start on the actual function, we’re going to add a helper class called SnowflakeClient. Right-click on the project and choose Add and then New Item…

In the dialog, choose Class as the file type and name it SnowflakeClient.cs.

The code is as follows:
using Snowflake.Data.Client;
using System;
using System.Collections.Generic;
using System.Data;
using System.Text;

namespace RunSnowflakeQuery
{
    ///<summary>
    /// A client for submitting queries to Snowflake.
    ///</summary>
    public class SnowflakeClient
    {
        private readonly string connectionString;

        ///<summary>
        /// Initializes a new instance of the SnowflakeClient class.
        ///</summary>
        public SnowflakeClient(string connectionString)
        {
            this.connectionString = connectionString;
        }

        ///<summary>
        /// Executes a sequence of Snowflake statements that are not expected to return a result set.
        /// Snowflake is not able to execute multiple SQL statements in one batch.
        ///</summary>
        public int ExecuteNonQuery(params string[] statements)
        {
            using (IDbConnection conn = new SnowflakeDbConnection())
            {
                conn.ConnectionString = this.connectionString;
                conn.Open();

                IDbCommand cmd = conn.CreateCommand();

                int affectedRows = 0;
                foreach (string command in statements)
                {
                    cmd.CommandText = command;
                    affectedRows = cmd.ExecuteNonQuery();
                }

                return affectedRows;
            }
        }
    }
}
The code can also be found on the Github of Jess Pani. The class has a connection string as property. It also has a method called ExecuteNonQuery. This method – provided by the Snowflake connector for .NET – will take an array of strings containing SQL statements and execute them against Snowflake. It’s called “NonQuery” since no result set is expected, just the number of rows affected by the query. An array of strings is passed since Snowflake cannot execute multiple SQL statements in a single batch. The statements need to be executed one by one over the same connection.
Now we can start on the actual function. These are the necessary namespaces for making our function work:
using System;
using System.IO;
using System.Threading.Tasks;
using Microsoft.AspNetCore.Mvc;
using Microsoft.Azure.WebJobs;
using Microsoft.Azure.WebJobs.Extensions.Http;
using Microsoft.AspNetCore.Http;
using Microsoft.Extensions.Logging;
using Newtonsoft.Json;
using Microsoft.Extensions.Configuration;
using System.Collections.Generic;
Then we have our namespace (which is the name of the project and the App service), the class with the name of the function (rename if necessary) and the Run method which is called by the HTTP trigger. This method accepts an HTTP request and an ILogger. Since we’re going to use configurations for our Snowflake connection string, we’re also passing an ExecutionContext (conveniently called context).
namespace RunSnowflakeQuery
{
    public static class SnowflakeExecuteQuery
    {
        [FunctionName("SnowflakeExecuteQuery")]
        public static async Task<IActionResult> Run(
            [HttpTrigger(AuthorizationLevel.Function,"get", "post", Route = null)] HttpRequest req,
            ILogger log,
            ExecutionContext context)
        {
In the next lines, we fetch the connection string from the configuration and use it to create a new instance of the SnowflakeClient class:
var config = new ConfigurationBuilder()
        .SetBasePath(context.FunctionAppDirectory)
        .AddJsonFile("local.settings.json", optional: true, reloadOnChange: true)
        .AddEnvironmentVariables()
        .Build();

string myConnectionString = config["SQLConnectionString"</span>];

var client = new SnowflakeClient(myConnectionString);
You might’ve noticed a JSON file called local.settings.json is added as a configuration. This JSON file will store the connection string. This file is not published along with the rest of the function when it is published to Azure, but it’s a good idea to not include it in source control as well, especially if you have a public repository. The advantage of using a configuration file is you don’t have to store the connection string (with password) in your code, which would impose a security risk.
The JSON file is automatically added to the project upon creation:

It has the following structure (with the connection string already added to it):
{
  "IsEncrypted": false,
  "Values": {
    "AzureWebJobsStorage": "DefaultEndpointsProtocol=https;AccountName=mssqltipsstorage;AccountKey=xxx;BlobEndpoint=https://mssqltipsstorage.blob.core.windows.net/;TableEndpoint=https://mssqltipsstorage.table.core.windows.net/;QueueEndpoint=https://mssqltipsstorage.queue.core.windows.net/;FileEndpoint=https://mssqltipsstorage.file.core.windows.net/",
    "FUNCTIONS_WORKER_RUNTIME": "dotnet",
    "SQLConnectionString": "account=xxx;host=xxx.azure.snowflakecomputing.com;user=xxx;password=xxx;db=TEST;schema=DBO;warehouse=COMPUTE_WH"
  }
}
After publishing the function, the connection strings need to be added to the application settings (more on this in part 2 of this tip).
Next, we retrieve the body from the HTTP request (which is JSON) and parse it into an object called command. We then create a new list called statements and add the contents of the attribute Query (from the body of the HTTP request) into the list.
string requestBody = await new StreamReader(req.Body).ReadToEndAsync();
dynamic command = JsonConvert.DeserializeObject(requestBody);

var statements = new List<string>();
statements.Add(command.Query.ToString());
A sample body could look like this:
{
    "Query":"TRUNCATE TABLE myDB.dbo.myTable;"
}
The final step is to create an integer variable to store the numbers of affected rows and then execute the query against Snowflake. The call is wrapped into a try-catch block. If the statement executes successfully, the number of affected rows is returned in the body of an OK object result. If something fails, the error is logged and the error message is returned in a Bad Request object result.
int affectedRows;

try
{
    affectedRows = client.ExecuteNonQuery(statements.ToArray());
}
catch (Exception e)
{
    log.LogError(e, "Error processing request"</span>);
    // return req.CreateResponse(HttpStatusCode.InternalServerError, e.Message);
    return new BadRequestObjectResult(e.Message);
}

// return req.CreateResponse(HttpStatusCode.OK);
return new OkObjectResult(new { rowcount = affectedRows });
To wrap-up, here’s the entire code for the Azure Function:
using System;
using System.IO;
using System.Threading.Tasks;
using Microsoft.AspNetCore.Mvc;
using Microsoft.Azure.WebJobs;
using Microsoft.Azure.WebJobs.Extensions.Http;
using Microsoft.AspNetCore.Http;
using Microsoft.Extensions.Logging;
using Newtonsoft.Json;
using Microsoft.Extensions.Configuration;
using System.Collections.Generic;

namespace RunSnowflakeQuery
{
    public static class SnowflakeExecuteQuery
    {
        [FunctionName("SnowflakeExecuteQuery")]
        public static async Task<IActionResult> Run(
            [HttpTrigger(AuthorizationLevel.Function,"get", "post", Route = null)] HttpRequest req,
            ILogger log,
            ExecutionContext context)
        {
            var config = new ConfigurationBuilder()
                 .SetBasePath(context.FunctionAppDirectory)
                 .AddJsonFile("local.settings.json", optional: true, reloadOnChange: true)
                 .AddEnvironmentVariables()
                 .Build();
            string myConnectionString = config["SQLConnectionString"</span>];
            var client = new SnowflakeClient(myConnectionString);
            string requestBody = await new StreamReader(req.Body).ReadToEndAsync();
            dynamic command = JsonConvert.DeserializeObject(requestBody);
            var statements = new List<string>();
            statements.Add(command.Query.ToString());
            int affectedRows;

            try
            {
                affectedRows = client.ExecuteNonQuery(statements.ToArray());
            }
            catch (Exception e)
            {
                log.LogError(e, "Error processing request"</span>);
                // return req.CreateResponse(HttpStatusCode.InternalServerError, e.Message);
                return new BadRequestObjectResult(e.Message);
            }

            // return req.CreateResponse(HttpStatusCode.OK);
            return new OkObjectResult(new { rowcount = affectedRows });
        }
    }
}
Keep tuned for part 2, where the function is published and tested!
Next Steps
- Try it out yourself! There’s a free community edition of Visual Studio you can use. If you don’t have Snowflake, you can either get a free trial or just use any other database system.
- If you want to connect to SQL Server, check out the article Use Azure Functions to connect to an Azure SQL Database
- Official documentation on Azure Functions:
- A nice blog post on how to use configurations with Azure Functions: How to access Azure Function App’s settings from C#?
- For more Azure tips, check out this overview.

Koen Verbeeck is a seasoned business intelligence consultant with over a decade of experience with the Microsoft Data Platform. He holds several certifications, including Azure Data Engineer. He’s a prolific writer, with over 375 articles on technologies such as Microsoft Fabric, SSIS, ADF, SSAS, SSRS, MDS, Power BI, Snowflake and Azure services. He has spoken at various events such as PASS, SQLBits, dataMinds Connect and many others. He frequently delivers educational webinars on MSSQLTips.com. For his efforts, Koen has been awarded the Microsoft MVP data platform award for many years.
- MSSQLTips Awards:
- Leadership Award (200+ Tips) – 2021
- Author of the Year – 2014/2020/2022
- Author Contender – 2024/2025


