Problem
The development life cycle of an Extract, Translate and Load (ETL) process encompasses many phases. The Business Intelligence developer gathers the requirements from the business line and designs a package to transfer the data from point A to point B adhering to the time window that was specified. Usually, only a subset of the data is used during modular testing. After deployment to production, any misjudgments made during development might result in a problem. These problems can be categorized as either performance or runtime errors.
How can we easily obtain reports on runtime statistics and execution errors that might occur in SQL Server Integration Services (SSIS)?
Solution
Microsoft introduced the SSIS catalog in SQL Server 2012 to satisfy runtime tracking requirements of packages. The incremental package deployment option in SQL Server 2016 eliminate duplicate code from being copied to the catalog. Both enhancements have truly made SQL Server Integration Services a world class product.
Historically, SQL Server 7.0 introduced Data Transformation Services to the world as an ETL tool that was part of the database stack. Buying a license for the server meant that the ETL product was essentially free. Back then, developers used Active X scripting to extend the packages with custom Visual Basic (VB) code. The package was either stored in the MSDB database or on the file system as a binary object.
Integration Services was introduced with the release of SQL Server 2005. This was a major change in design philosophy with programming tasks divided into control flows and data flows. Many third party companies such as CozyRoc and ZappySys have stayed current with the times. Companies who have chosen a hybrid cloud architecture can connect to services for multiple cloud vendors. Software as a service vendors (SAAS) such as SalesForce or ServiceNow play an important role in reducing operating costs. The SAAS connections can be used to interchange data or collate data into one place for reporting.
Fast forward twenty years, some companies are finally upgrading from SQL Server 2008 to the latest version of the database engine. Extended support has officially ended in the summer of 2019. I hope you are not dealing with the problem of re-writing DTS packages that could run with SQL Server 2008 database engine. The lift and shift path forward to the Azure cloud only allows for SSIS packages. Otherwise, the ETL process has to be rewritten with a cloud tool such as Azure Data Factory pipelines or Azure Data Bricks.
Now a days, there are three different places that the SSIS catalog can reside: local install of the database engine, Azure SQL Database and Azure Managed Instance. The last two deployments leverage the Azure Data Factory and the Azure SSIS integration runtime. Packages even run on Linux using the dtexec utility! However, the SSIS catalog does not exist for this environment and the packages only support a subset of the overall functionality.
Today, we are going to talk about how deploy and use the SSIS catalog for a local database install. The other two install patterns will be address in future articles.
Business Problem
The scrapping of data from web pages has been a common practice since the invention of the internet. However, custom code can easily break or produce unexpected results if the source web pages are changed. In a prior article, we examined how to replace the import and transform process in Power Query (M Language) to an SQL Server integration Services package and database table. The final package was executed and tested in the Visual Studio 2019 development environment.

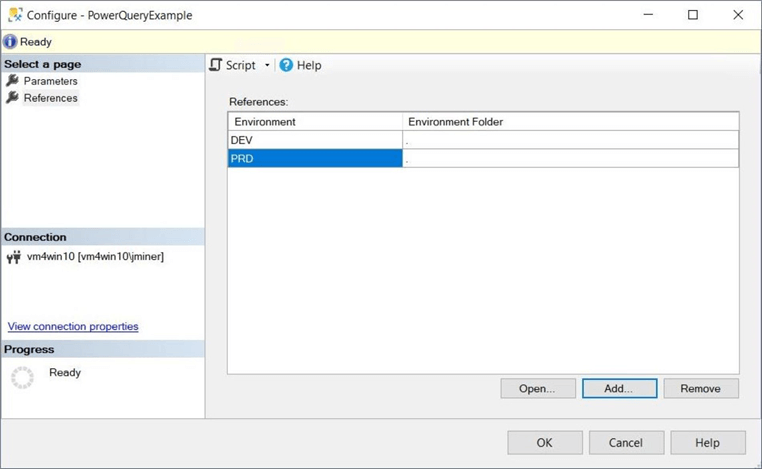
The above environment is a conceptual architecture of the proposed system. In the past, integration services packages mostly dealt with local data sources and local files. Many organizations are dealing with hybrid solutions since the source data, the computing power, and the destination data might not reside in the same data center. In this article, we will explore how to leverage the SSIS catalog to support multiple environments for the PowerQueryExample project. This will include updating the database for both the development and production environments.
SSIS Catalog and Package Deployment
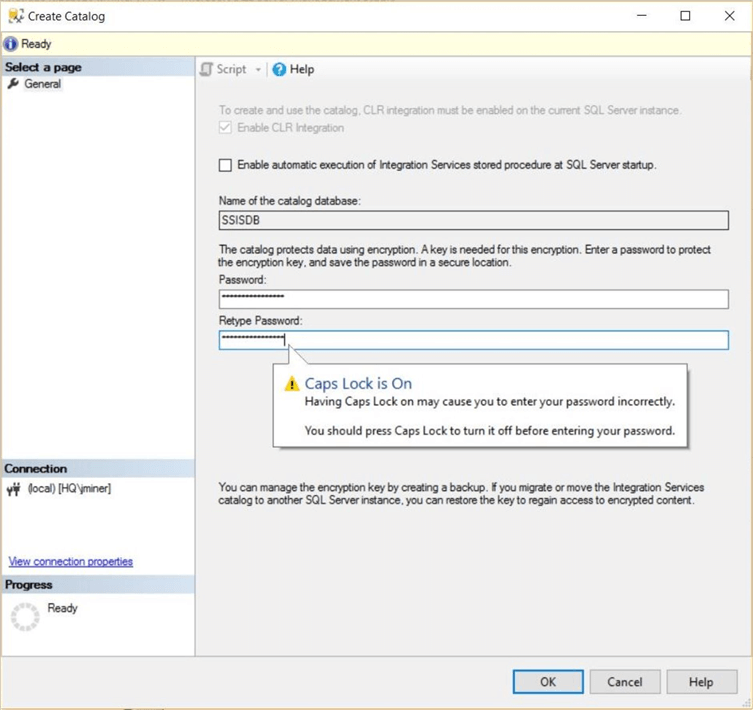
The deployment of the SSIS catalog and SSIS package is extremely easy for a local install of the database engine. Find the Integration Services Catalogs object in the object explorer. Right click the object and select the create catalog option. The enablement of CLR integration is an requirement for the catalog. One can change the name of the catalog database if they want. However, I usually just leave the default the name. Last but not least, a password is required to create an encryption key for the catalog. Please save this password in a secure location.
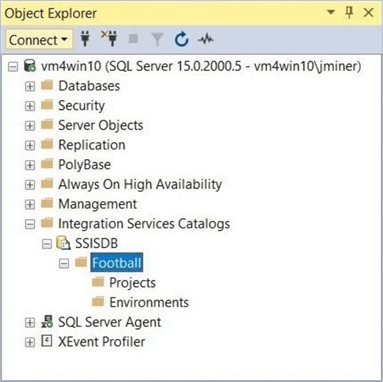
The integration catalog starts with an empty root folder named SSISDB. Right click and choose the create folder action. Name the new folder with the word Football. This is the directory that we are going to deploy the existing PowerQueryExample package to. The image below shows the new folder with two subfolders. The Project folder is where the packages from the SSIS project are deployed. In the past, a project deployment meant every package was updated in the catalog. Since SQL Server Integration Services 2016, only changed packages are deployed to the catalog. The Environments folder is where parameters can be defined for our development and production systems. We will talk about parameters later on.
Visual Studio 2019 allows for deployment of packages to the catalog within the application. When an application is built, the compilation results in the ispac file being created are in the bin directory. The next three images goes over the project deployment process.
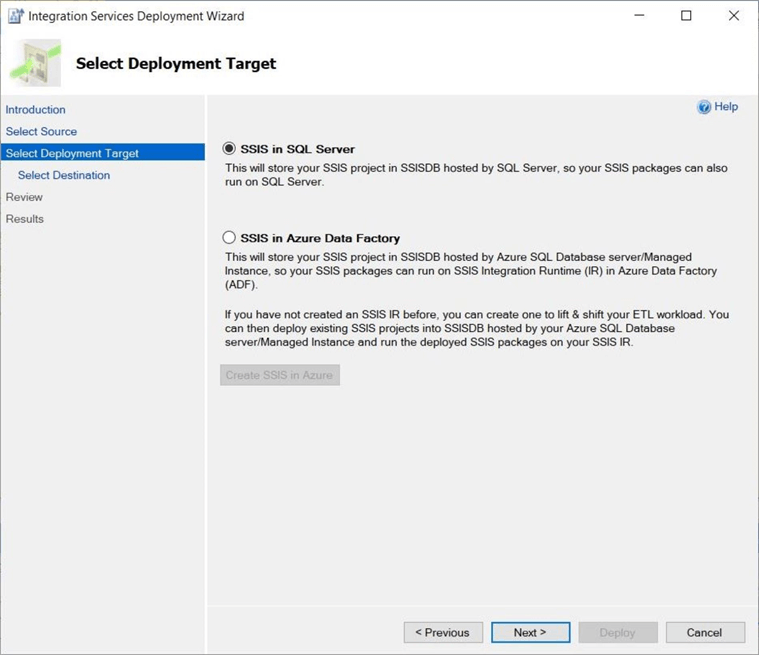
Choose the SSIS in SQL Server deployment option and click the next button. Since Visual Studio and SQL Server are installed on the same virtual machine, the server name and authentication mode are already filled in. Click the connect button to validate the authentication. Use the browse button to select the Football folder as the deployment target location. Click the deploy button to start the process.

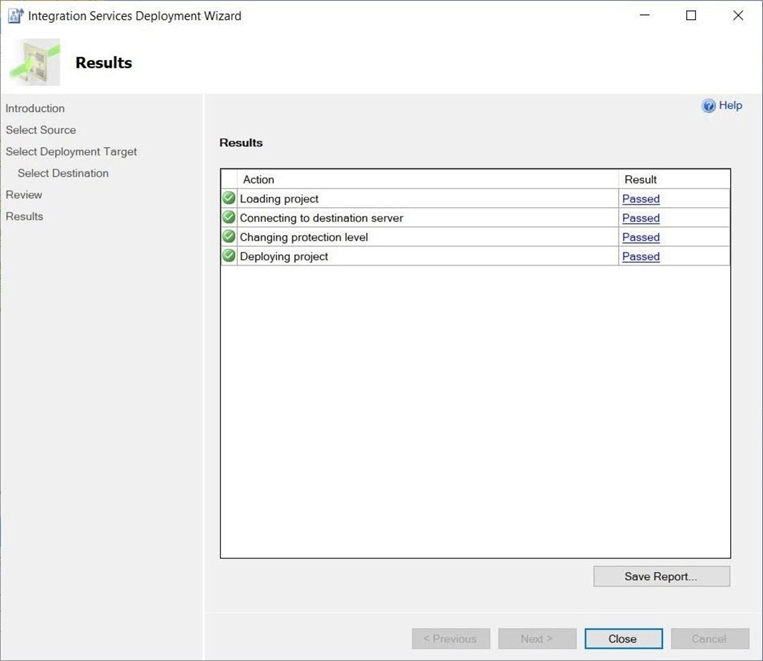
The results window shows the status of the deployment tasks. If the results of each action are colored green, then the deployment was a success.
To recap, the deployment of the SSIS catalog is initiated from SQL Server Management Studio. The Common Runtime Library (CLR) Integration must be activated for the catalog to work. The deployment of the SSIS package can be done with one step inside Visual Studio. This is very convenient for on premise systems.
For systems with locked down virtual networks, it is a two step process. The ispac file is first generated by a build action in Visual Studio. The ispac file is uploaded to a machine within the virtual network. The deploy project option of a user defined catalog folder can be used to import the project. We will talk more about this deployment pattern when Azure Managed Instance is covered in a future article.
Manual Package Execution
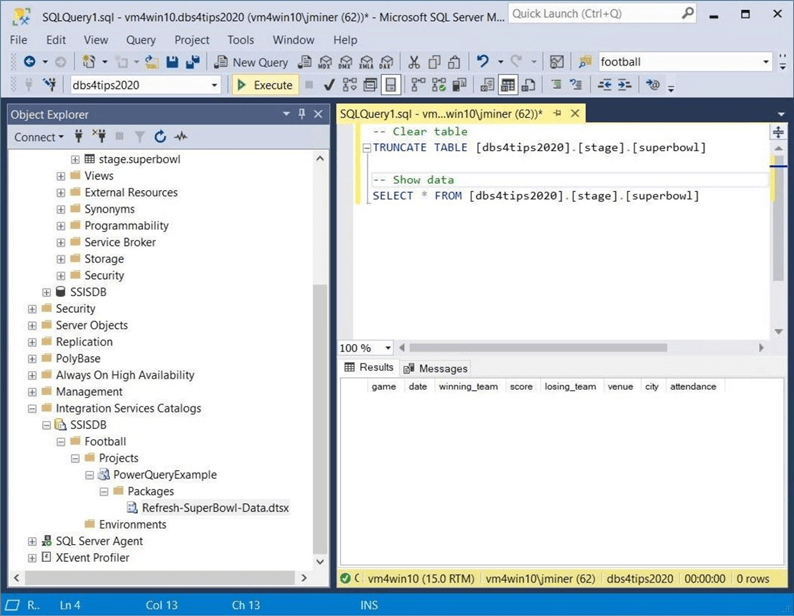
Validating the execution of the deployed package might be one of the first tasks a developer will under take. However, this execution will use all the connection information that was stored during development. Since the last settings of package was for the development environment, we should examine the database table before and after execution. The image below shows the target table being truncated and queried for results. The image below shows no data residing in the staging table.
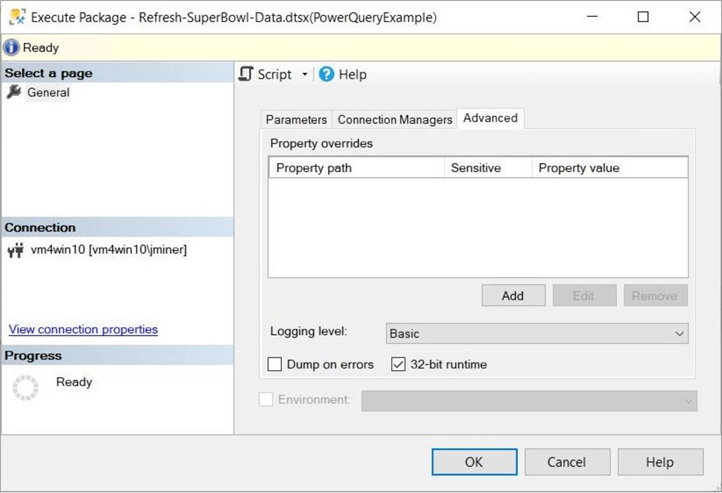
Either the project or the package can be executed by using the right click action when exploring the SSISDB folders. If our project has multiple packages, then multiple packages could be executed. Since our project has one package, both actions produce the same result. The most important part of the execute window is to choose the correct runtime engine. Visual Studio 2019 and the SSIS extensions were configured for the 32-bit runtime. Therefore, select the correct check box on the advance tab as seen below. Click the OK button to start the execution process.
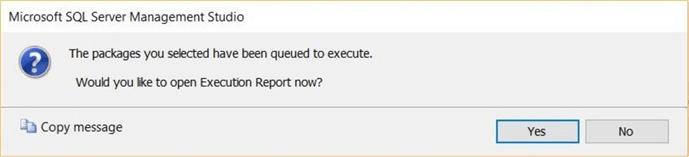
The start of the package execution triggers a dialog box in SSMS to be display. Please see image below. The dialog box asks the user if he or she wants to view the execution report. Of course, we want to look at message and performance logs.
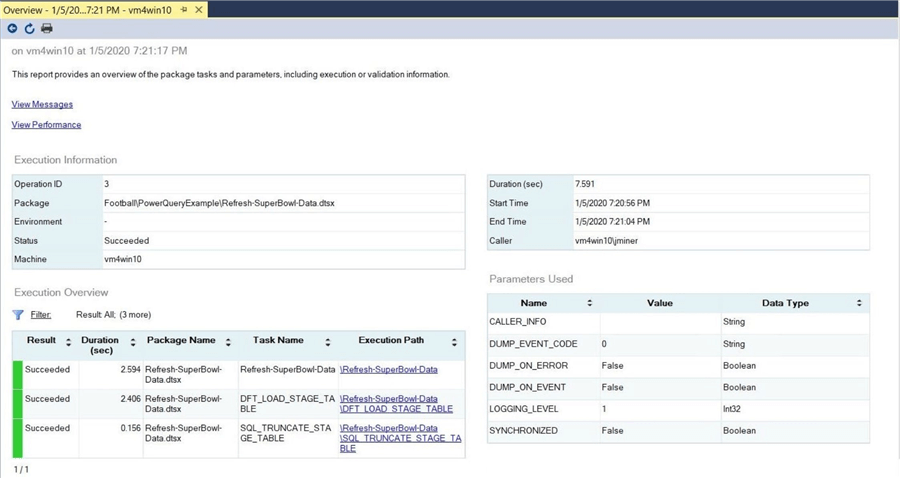
The report is broken into three parts. The summary part shows the execution path and overview. The example package had two active tasks in the control flow. We can see that the package finished in about 5 seconds. The operation id shows this is the third package that has executed on the server. The view messages shows the gritty details behind how a package is executed. Either choose the basic or performance level of logging during normal production execution. When debugging a faulty package, you might want to change the logging level to verbose. Just remember, more logging bloats the SSIS catalog.
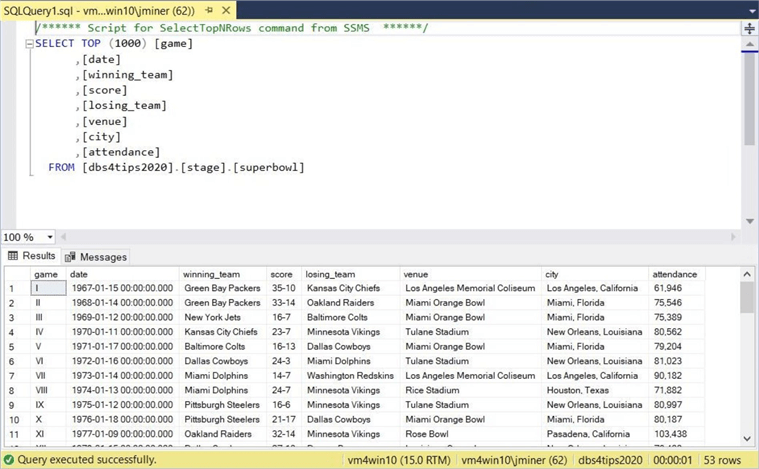
To complete the validation of the executed package, we need to look at the data that was imported into the staging table. We can see below that 53 records were imported into the target table.
The manual execution of the package showed how the SSIS catalog not only logs each step but also captures the runtime execution statistics. Many companies create either reports or alerts for package executions that exceed the standard deviation of the average execution time. The support team wants to know about scheduled processes that execute in too short or too long of a period of time.
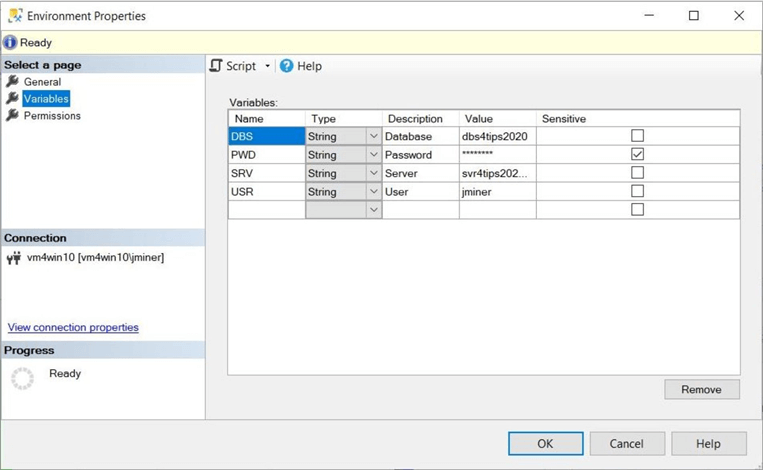
Defining Environmental Properties
Most companies have two or more environments that are used in the Software Development Life Cycle (SDLC). The development environment is where coding is usually done. The quality assurance environment is where modular and system testing might be performed. The production environment is where the code executes continuously on a given schedule. For the Power Query example, we defined a local development environment and a cloud production environment.
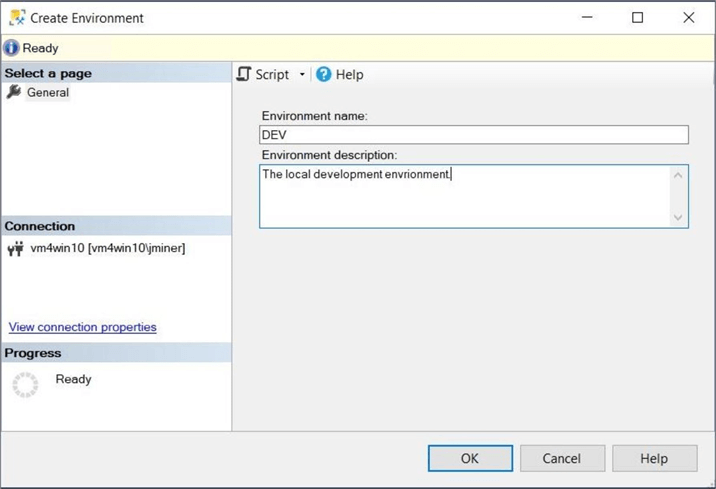
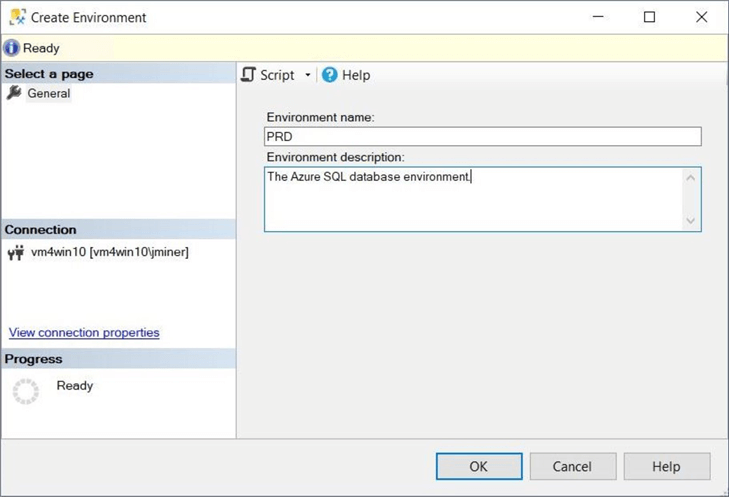
The above image shows the deployment of the DEV environment and the below image shows the deployment of the PRD environment. I think of an environment as a logical container for properties that can be passed to the SSIS package at execution time.
The image below was taken after the two environments were defined. Right click on the name of the environment to bring up an actions menu. Choose the properties option to start entering variables and values that change between environments.
There are four variables that we want to define:
- SRV - Server name
- DBS - Database name
- USR - User name
- PWD – Password in sensitive format
The four variables shown in the image below are defined for the development environment. I am using the system admin account to connect to the local database. In real world practice, an application account would be defined with read and write access control rights.

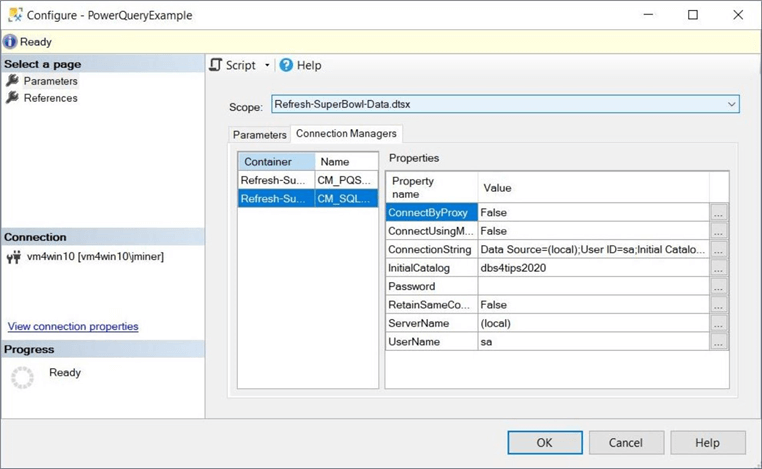
The next screen shot is taken from the production environment that is an Azure SQL database. We can see that 3 out of 4 of the variables are different.
Now that we have defined consistent variables between the two environments, we can edit the configuration of the package to leverage these variables. The image below shows the default values that were stored with the package during development and deployment.
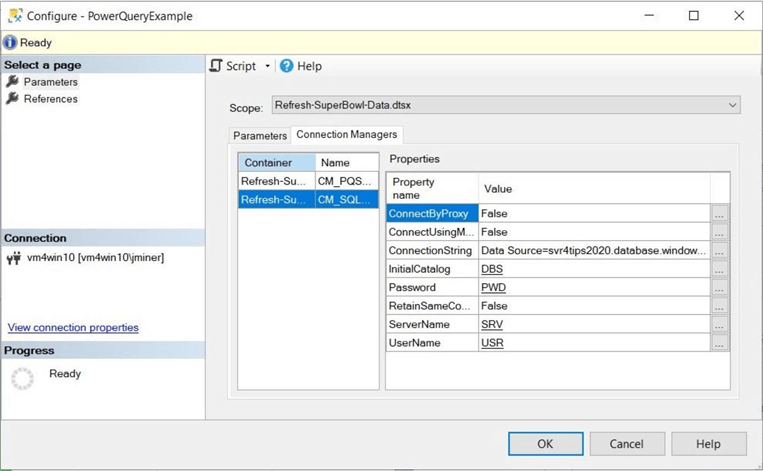
The ellipse button can be used to change the value of the connection properties. Perform the appropriate mapping between connection properties and environment properties (variables). The image below shows the completed mapping.
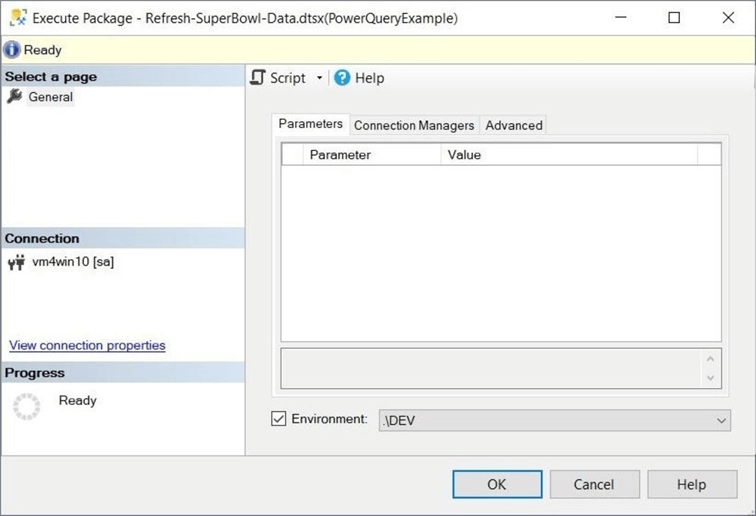
In a nutshell, the environments are containers for properties or variables that can override the default connection properties. The selection of the environment must happen during the manual execution process or be chosen ahead of time for job steps. Next, we are going to execute the package using these configured environments.
Multiple Environment Executions
Once a package is given environment parameters, the graphical user interface of SQL Server Management Studio automatically prompts for the environment. The OK button cannot be pressed until at least one environment is selected. The image below shows a manual execution in the development environment.
The standard execution report can be checked for successful execution. The image below shows the logging and performance of the package executing locally.

Repeat the manual execution. This time choose the production environment as the target. The image below shows the logging and performance of the package executing remotely.

To wrap up this section, the selection of an environment allows the connection parameters to be changed. In our case, the destination table is switched from a SQL Server 2019 database to an Azure SQL database.
SQL Server Agent Job
There are many ways to schedule a DTSX package. We could use Windows scheduler just like the Linux engine does by calling the dtexec utility. However, we would be missing out on all the logging and runtime metrics in the catalog. We could modify our approach to call a the SQLCMD utility. There are stored procedures in the SSIS catalog that support parameter passing and execution. Again, this is a lot of work to do. In addition, we would be missing out on email alerting. The easily way to schedule package for a local database install is to use a SQL Server Agent Job.
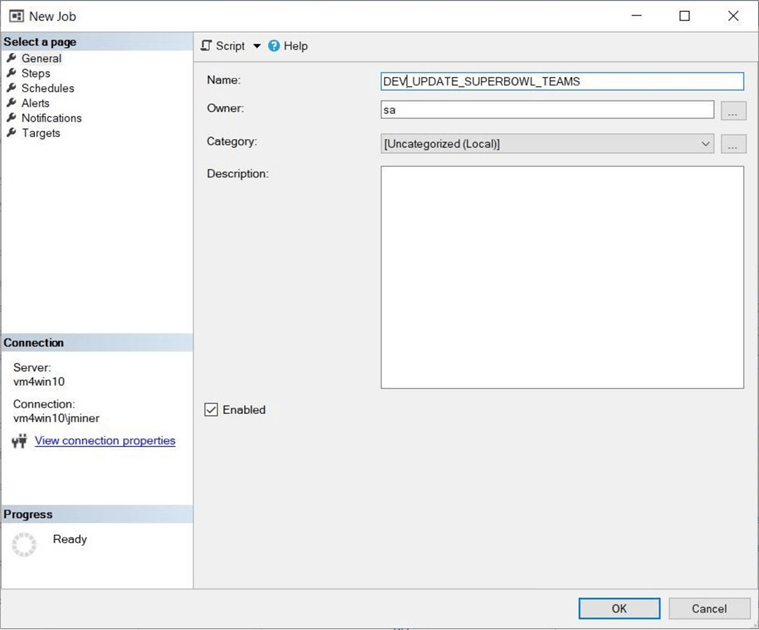
I suggest using a naming convention that makes sense for your organization. Do you want to see all the DEV jobs next to each other. Or do you want to see all the jobs related to FOOTBALL next to each other. The correct naming convention allows for the list of jobs to be ordered. The image below shows the DEV_UPDATE_SUPERBOWL_TEAMS job with is owned by sa. Proceed to the next dialog box by clicking OK.
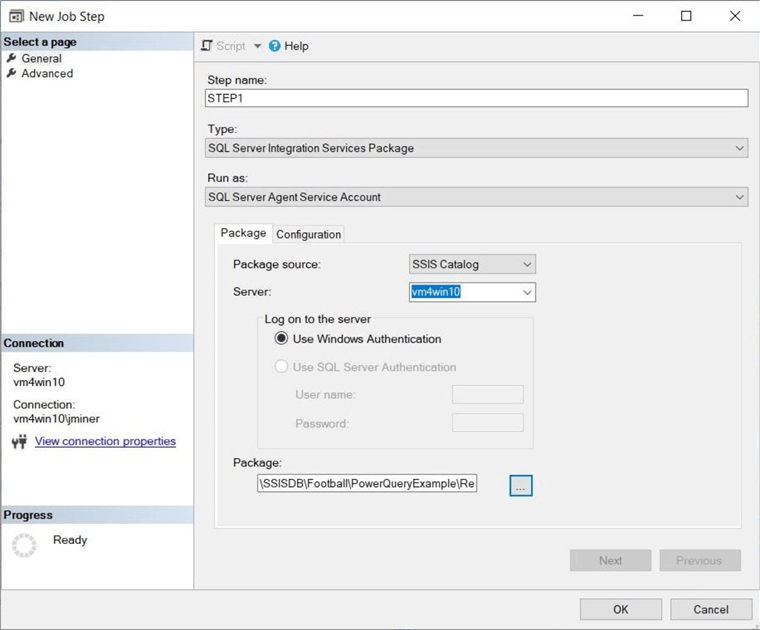
Each job can have multiple steps. We only need to call our SSIS package in this job. The step name should contain the order and purpose of the task. Please choose the SSIS package type and SQL Agent account to run as. The package source can be retrieved from a file, msdb database or the SSIS catalog. Choose the catalog and the local server now. We are going to use windows authentication to setup the job. Choose the package that you want to execute. The configuration tab is very import when environmental parameters are involved.
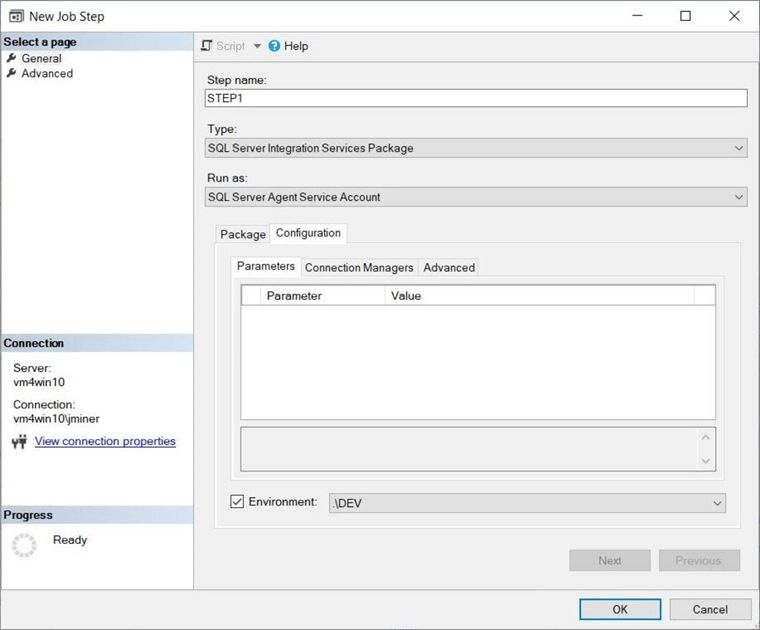
Two last steps must be filled in before the package will execute correctly. I am choosing to run the package from the DEV environment and I am choosing to execute with the 32 bit run-time engine. The image below shows the chosen configuration options.
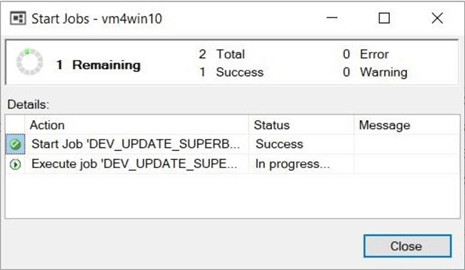
The job should be listed under the agents node in the object explore within SSMS. Right click the job to find additional actions that can be executed. We want to choose the execute at step option to start the job. The execution status will be shown in a dialog box. This dialog box only appears for manual executions.
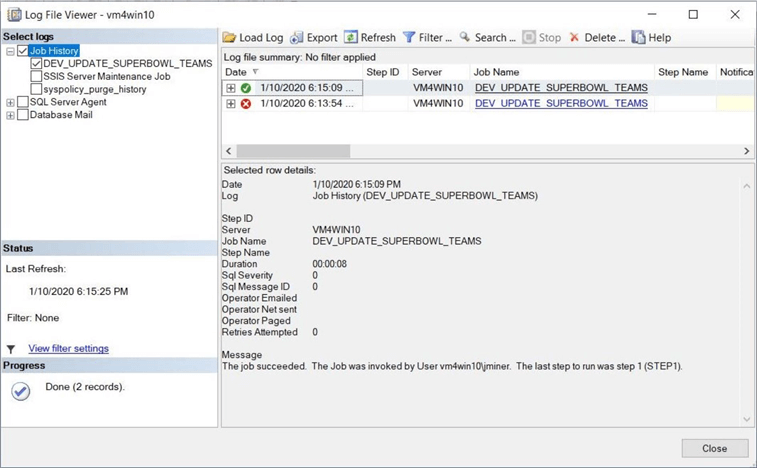
Just like the SSIS catalog, the msdb database contains the execution history of the SQL Agent jobs. It does contain execution times as well as step logging. However, the details are not as fine grained as the catalog. We can see that the first job failed execution. Even experienced professionals like myself sometimes forget a step. The selection of the runtime engine is the easiest step to miss. However, it will produce a fatal execution error.
To summarize this section, the SQL Agent allows for the creation of multi step jobs. The SSIS package type is one of the many execution types that are supported by the SQL Agent job. Do not forget to fill in all the appropriate blanks. I did not go over operators (who to notify) and alerting (how to notify). But they should be enabled if packages are going to be executed on a schedule. Our last topic of the day is how to schedule that SQL Agent Job?
Job Scheduling
Most of the time, a package is scheduled on a recurring basis. Some packages run every minute while other packages run every month. Most packages execute somewhere in between. Choose the schedule page to start the data entry.
One important fact is that a schedule is independent of the job. Therefore, the same schedule can be used by multiple jobs. On the other hand, a job might have multiple schedules. In most cases, a one to one mapping of a unique schedule to unique job is more than adequate. The image below shows the package executing every day and every minute.

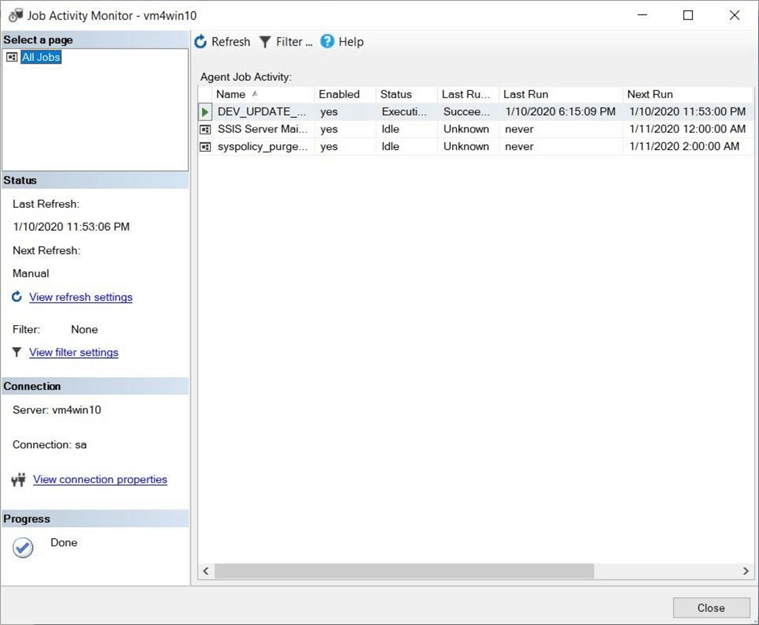
Once the OK button is chosen, the schedule is assigned to a job. The only way to catch an executing job is to use the job activity monitor. This window shows every job with the status of the job, last execution status, the last run date and the next run date. I was lucky to catch the execution of our job as seen below.
A brief summary of this section includes the fact that one or more schedules can be associated with a given job. Use the job activity monitor to see job in flight executing. Of course, there are no fine grain details about the job. That is why the SSIS catalog is so important.
Summary
The ability to create and execute an extract, translate and load program has been in the SQL Server stack for a long time. Between 1996 and 2005, the data transformation services was used to create ETL jobs. This process place both control and data flow tasks into one drawing pane. Complete DTS programs looked like a map of a metropolitan subway rail system. In short, productivity was hard to achieve with this tool.
The SQL Server Integration Services was released with SQL Server 2005. The file extension for this new package type is DTSX. This was a major change in design philosophy with programming tasks divided into control flows and data flows. DTS packages that were crammed onto one drawing pane could be replaced with multiple data flows call by one control flow.
The next major milestone in the product was the introduction of the SSIS catalog with the SQL Server 2012 engine. This catalog satisfied runtime-tracking requirements of SSIS packages. Not only could detailed information be logged, but run time execution statistics were captured. A lot of developers do not realize a limited number package versions are saved in the catalog. These historical versions can be promoted to current if needed.
I decided to write this series on the many different places of the SSIS catalog because there is still a lack of adoption. I have seen many companies with historical packages still not using the catalog. It is one of the best ideas that has happened to the tool. I would compare it to the Query Store for the database engine. A flight data recorder is always worth having! There are many more ways to execute a SSIS package. I might introduce a couple more in the future articles on this topic.
I hope you liked this article. Stayed tuned next for talk about deploying the SSIS catalog to an Azure SQL database.
Next Steps
- Install Azure SSIS for Azure Data Factory and Azure SQL database
- Install Azure SSIS for Azure Data Factory and Azure SQL MI
- What is new in the Azure Feature Pack for SSIS 2019

John Miner is a Senior Data Architect at Insight Digital Innovation helping corporations solve their business needs with various data platform solutions.
He has over thirty years of data processing experience, and his architecture expertise encompasses all phases of the software project life cycle, including design, development, implementation, and maintenance of systems.
His credentials include undergraduate and graduate degrees in Computer Science from the University of Rhode Island. Also, he has earned certificates from Microsoft for Database Administration (MCDBA), System Administration (MCSA), Data Management & Analytics (MCSE), Data Science (MPP), Databricks Certified, and Fabric Certified.
John has been recognized with the Microsoft MVP award nine times for his outstanding contributions to the Data Platform community.
When he is not busy talking to local user groups or writing blog entries on new technology, he spends time with his wife and daughter enjoying outdoor activities. Some of John’s hobbies include wood working projects, crafting a good beer and playing a game of chess.
- MSSQLTips Awards: Author of the Year – 2019, 2022, 2023 | Champion (100+tips) – 2023
Well done John!