Problem
SQL Server Integration Services (SSIS) is one of the major components of the Microsoft Business Intelligence (MSBI) stack. It’s the Extract, Transform and Load (ETL) tool that consolidates data from different sources, transforms it, and loads it to a destination. SSIS replaced Data Transformation Services (DTS) in SQL Server 2005. SSIS is included with the Standard, Business Intelligence and Enterprise editions of SQL Server. How do you install SSIS as part of a SQL Server installation or add it to an existing instance? Provide a step by step guide showing how to install SSIS.
Solution
We’ll walk through each of the steps for installing SSIS 2019. For our example we have SQL Server 2019 Standard Edition already installed on Windows Server 2019. These steps also work for SQL Server 2022.
Minimum Hardware and Software Requirements
The minimum hardware and software required to install SQL Server are:
- Windows Server 2016 or Windows 10 TH1 1507
- 6 GB of available hard disk space
- 4 GB memory
- 1.4 GHz minimum 64-bit CPU
SSIS Installation Steps
SSIS can be installed along with or added to an existing install of SQL Server.
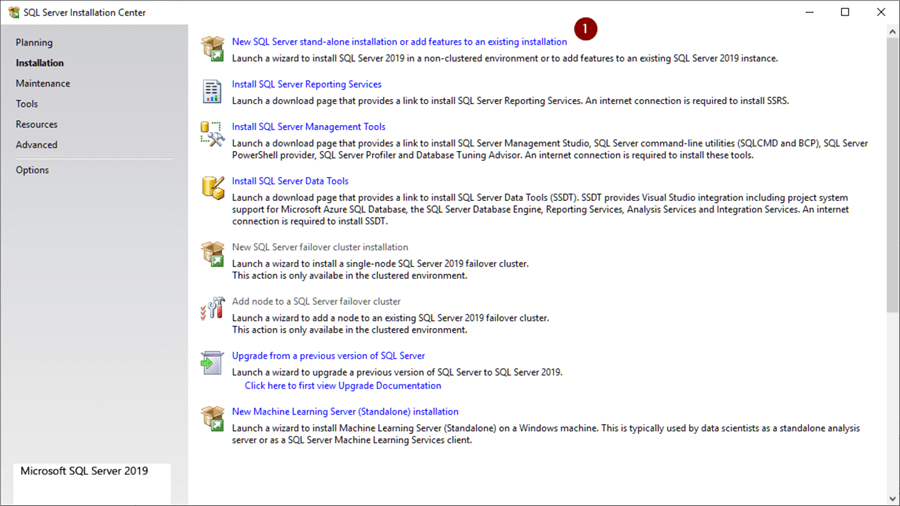
- To start the install, double click setup.exe on your installation media and the first screen will open

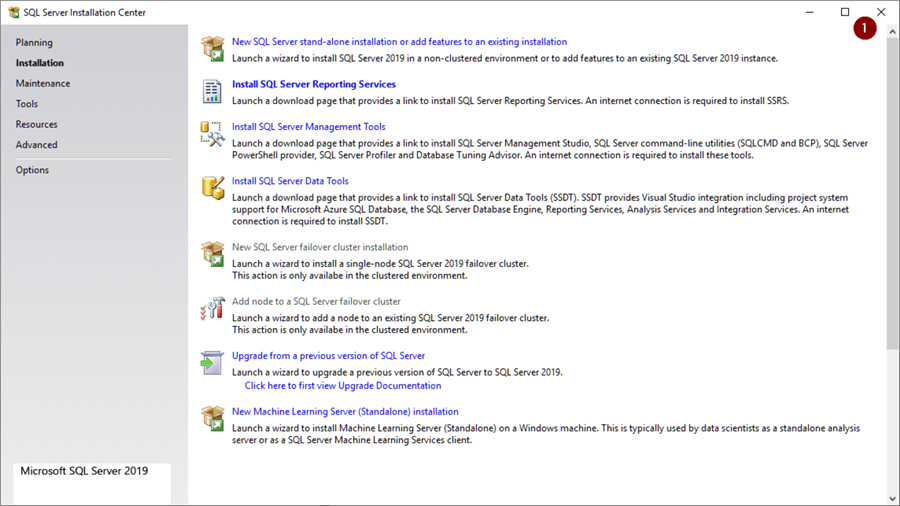
SQL Server Installation Center
The SQL Server Installation Center screen has links to a number of related tools and is where we start the install.
- Choose ‘Installation’ from the list on the left side to go to the next screen

This step is the same whether we’re doing a new SQL Server installation or adding to an existing one.
- Choose ‘New SQL Server stand-alone installation or add features to an existing installation’ from the list on the right side
License Terms
- Check off ‘I accept the license terms and…’
- Next

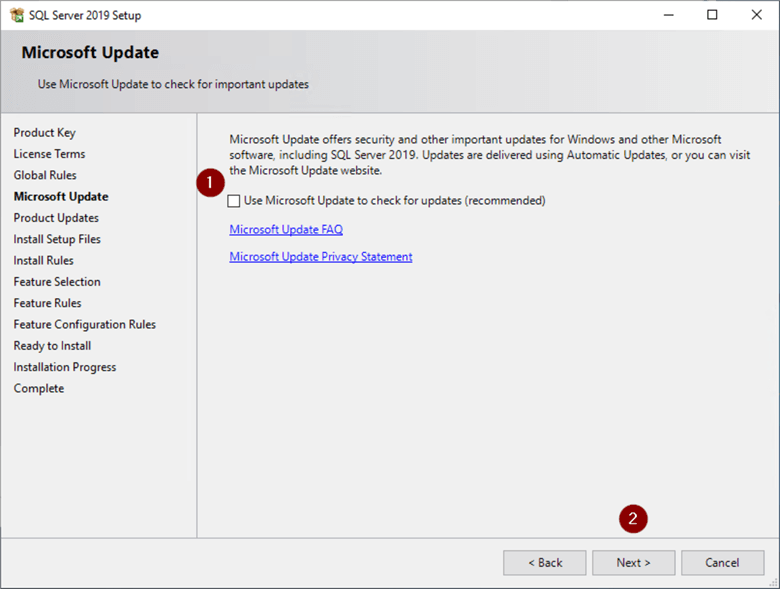
Microsoft Updates
Note: You probably would have a more controlled method in place for SQL Server updates and not want them automatically done but you have the option.
- Check ‘Use Microsoft Update to check for updates’ if you want to automatically check, otherwise leave unchecked
- Next
Install Rules and Type
- Click on Warning to get a link to what ports need to be open if the Windows Firewall service is running on the machine that you’re installing the SQL Server on
- Next

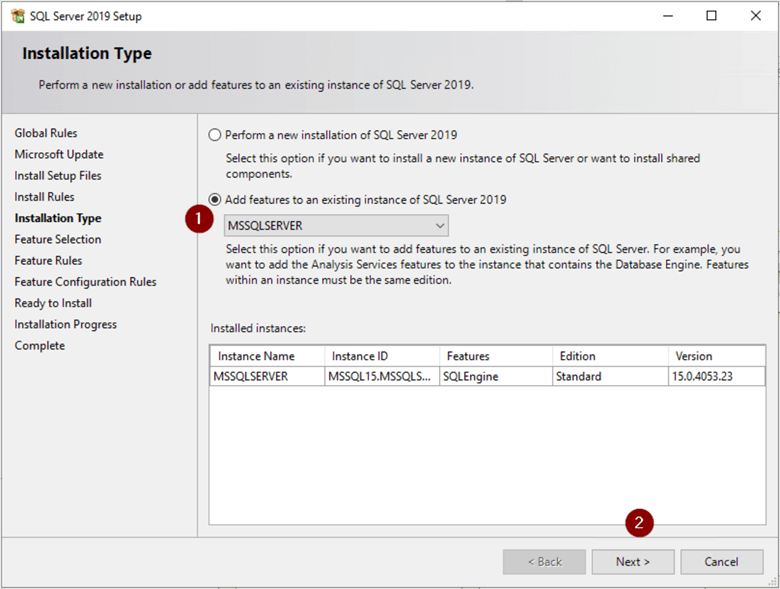
Note: If we were installing a new SQL Server, we would leave the ‘Perform a new installation of SQL Server 2019’ radio button selected.
- Select the ‘Add features to an existing instance of SQL Server 2019’ radio button and choose the instance we’re adding to in the dropdown
- Next
Feature Selection
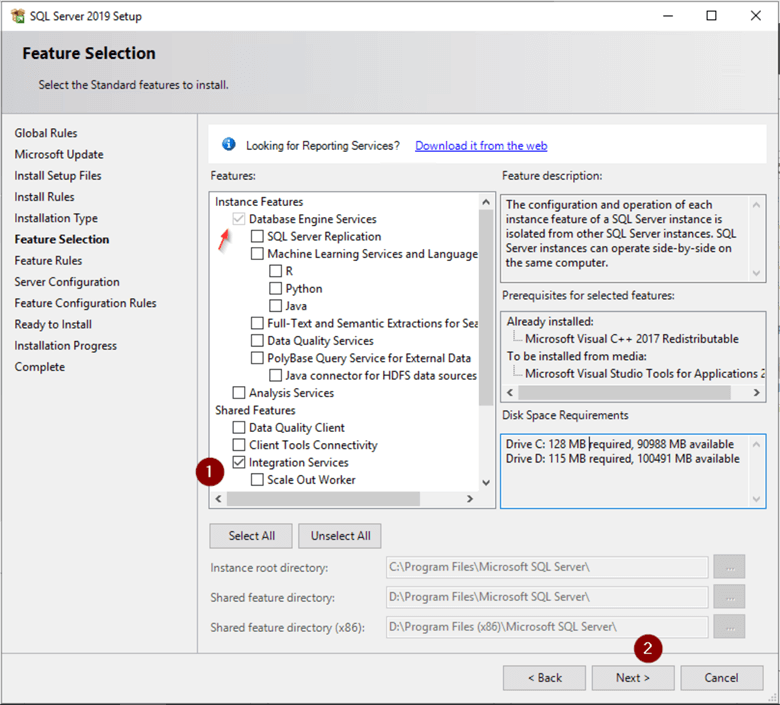
Note: If we were installing a new SQL Server, we would check the ‘Database Engine Services’ box it’s already installed as indicated by the grayed-out checkbox.
- Check Integration Services
- Next
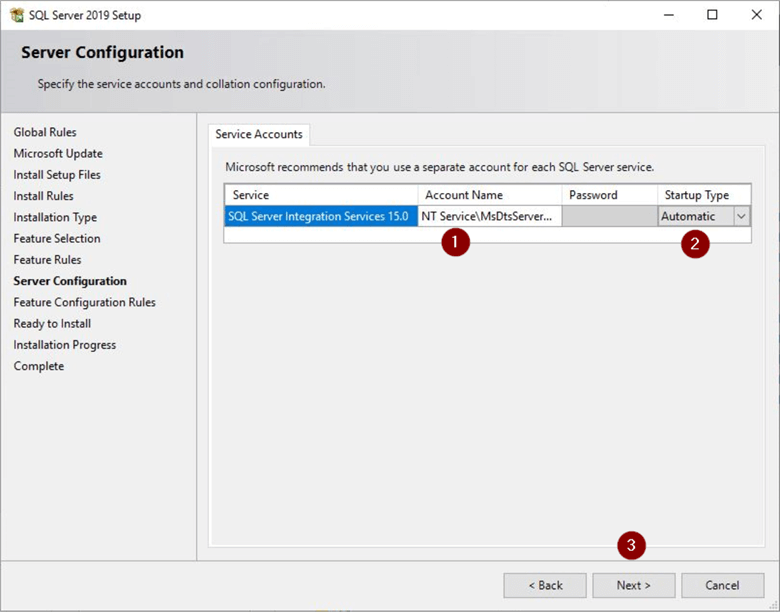
SSIS Server Configuration
Note: Best practice is to not use the default account to run any of the SQL Server services. Microsoft Docs has more information here: Configure Windows Service Accounts and Permissions
- Choose service account to run the SSIS service
- Verify ‘Startup Type’ is Automatic
- Next
SSIS Installation
We have the opportunity to review a summary of what we’re installing here.
- Verify Summary
- Install

At this point the installation is done and we now have SSIS installed.
- Verify install was successful
- Review log file

- Close setup screen
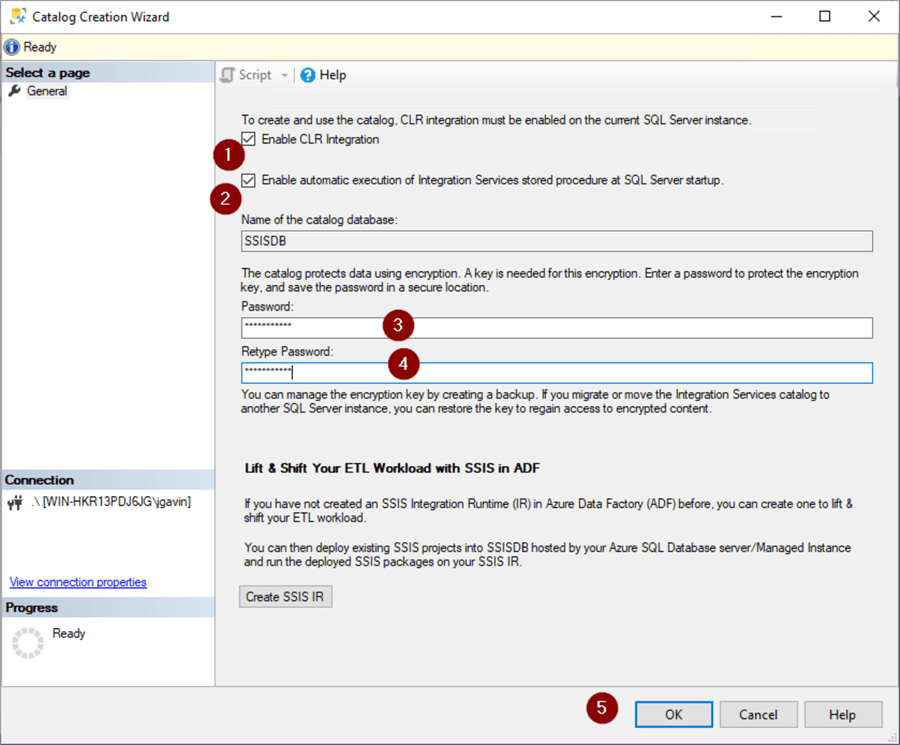
Create Integration Services Catalog
At this point we have the base install of the SSIS engine done. Now we need to manually create the Integration Services Catalog. The Catalog is where SSIS projects are deployed to and managed. The Integration Services Catalog is stored in the SSIS database that is created as part of this process.
Open SQL Server Management Studio (SSMS) and connect to the SQL Server we just installed SSIS on.
- Expand server dropdown
- Right click on ‘Integration Services Catalog’
- ‘Create Catalog…’ to open the Catalog Creation Wizard

- Check ‘Enable CLR Integration’ checkbox to enable Common Language Runtime (CLR) so SSIS can run CLR stored procedures
- Check ‘Enable automatic execution of Integration Services stored procedure at SQL Server startup’ so the state of operations for the SSISDB catalog is performed when the service is started.
- Enter strong password (and be sure save in your password manager)
- Retype password
- OK to create Catalog
SSISDB in SQL Server Management Studio
Now, if we expand the Database and Integration Services dropdowns in SSMS, we see the SSISDB database (note: name cannot be changed) and Integration Services Catalog have been created.

This next step is optional but depending on how active your SSIS server will be you may want to change the SSIS history retention to manage the size of the SSISDB database as it can grow rather large.
First, run the following to verify cleanup is enabled and to obtain the number of days of retention:
-- is cleanup enabled and number of retention days
SELECT [property_name], [property_value]
FROM [SSISDB].[internal].[catalog_properties]
WHERE property_name IN ('OPERATION_CLEANUP_ENABLED', 'RETENTION_WINDOW');
We see that OPERATION_CLEANUP_ENABLED = TRUE because we checked ‘Enable automatic execution of Integration Services stored procedure at SQL Server startup’ during the engine install and RETENTION_WINDOW = default = 365 days.

The default RETENTION_WINDOW is probably OK if the SSIS server won’t be that active. However, if it will be active and you’re concerned with the SSISDB database getting too large and there is no requirement to keep 365 days of history it’s very easy to change with the It’s done with the [catalog].[configure_catalog] stored procedure in SSISDB by telling it what to change and what to change it to.
In this example we’ll change the RETENTION_WINDOW to 90 days.
-- change number of retention days
EXEC [SSISDB].[catalog].[configure_catalog] RETENTION_WINDOW, 90;
Run the following to verify the change:
-- verify change
SELECT [property_name], [property_value]
FROM [SSISDB].[internal].[catalog_properties]
WHERE property_name IN ('RETENTION_WINDOW');
And we see it’s been changed to 90.

SSIS Cumulative Updates (CU)
Cumulative Updates, if applicable, are installed as part of the SQL Server CU. Click here for more information about SQL Server versions.
Next Steps
Now that we have SSIS installed and catalog created here are some links to get you started with creating and executing SSIS Packages:
- SQL Server Integration Services SSIS 2016 Tutorial
- Running a SSIS Package from SQL Server Agent Using a Proxy Account
- SQL Server Integration Services SSIS Performance Tuning Techniques
- Managing the size of the SQL Server SSIS catalog database
- Extract, Import and Migrate SSIS Project
- SQL Server Integration Services Development Tips

Joe Gavin is from Greater Boston and has worked in technology as a Field Service Engineer for an automotive dealer computer system vendor, a Technical Consultant and Operations Analyst with Sybase and SQL Server based database applications in financial services and now works as a SQL Server Database Administrator.
- MSSQLTips Awards:
- Achiever Award (75+ Tips) – 2024 | Author of the Year – 2021 | Author Contender – 2024 |
- Rookie Contender – 2018
This saved me a lot of trouble. I have not been able to access the import and export wizard. This step by step guide saved me the trouble after spending several hours trying to solve the issue. Thank you very much sir.
Hi Sir,
We have recently upgraded SQL Server from 2016 to 2019 along with SSIS 2016. SQL upgrade completed successfully.
I can see both SSIS 13 and SSIS 15 services running in servies.msc
When I connect to SSIS via Management Studio, it is connecting to SSIS 13 version only.
Could you please advise whether my existing SSIS upgraded to SSIS 2019 or not. Thank you
Very, very helpful. Easy to follow. Thx Jay!
Pavan, you install from your SQL Server media.
Need the setup file to install
Thank you Jay.
Thank you for this tip! It’s exactly what I needed to do, and it worked exactly as you described.