By: John Miner | Comments | Related: > Azure Integration Services
Problem
The development life cycle of an SSIS package encompasses many phases: gathering requirements, designing control flows, coding data flows and testing overall execution. After deployment to production, any misjudgments made during development might result in a problem. These problems can be categorized as either performance or runtime errors. Microsoft introduced the SSIS catalog in SQL Server 2012 to satisfy runtime tracking requirements of packages. Many companies are thinking about migrating systems to the Azure cloud.
How can we lift and shift packages to the Azure cloud and still keep the runtime tracking requirements of the package?
Solution
Microsoft announced at the Ignite conference in 2017 that Azure Data Factory will be able to host SSIS packages for execution in the cloud. This process involves the creation of an Azure Data Factory object and the deployment of an Azure SSIS integration runtime engine. This runtime engine runs on PAAS servers that can be started and stopped at will. Both licensing and compute costs are charged for the runtime engine. Initially, the SSIS catalog was only deployable to Azure SQL database. Support for Azure Managed Instance was introduced in later. Please see this announcement by Sandy Winarko, Principal Program Manager on June 27, 2018 for details.
Today, we are going to talk about how create an Azure SSIS integration runtime engine that uses a SSIS catalog which resides within an Azure SQL database.
Business Problem
The scrapping of data from web pages has been a common practice since the invention of the internet. However, custom code can easily break or produce unexpected results if the source web pages are changed. In a prior article, we examined how to replace the import and transform process in Power Query (M Language) to an SQL Server integration Services package and database table.
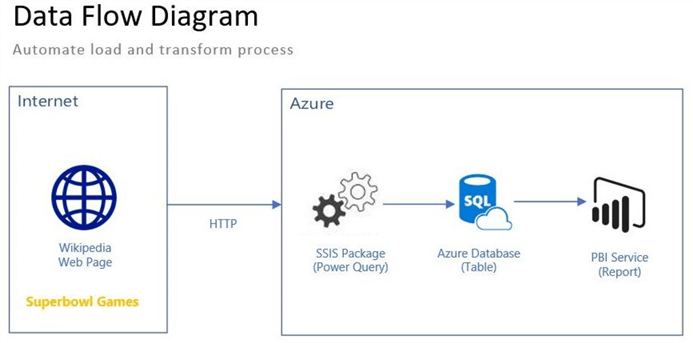
The above diagram is a conceptual architecture of the proposed system. In this article, we will create an Azure Data Factory with an Azure SSIS integrated runtime engine. Both the user defined and the SSIS catalog databases will be deployed to a logical Azure SQL Server. The package within the PowerQueryExample project will be saved to the catalog and scheduled to run from Azure Data Factory.
I am assuming that the reader has already built a development system using Visual Studio 2019, SQL Server 2019 and the Power Query Source control. A working package is a requirement for testing the newly deployed catalog. Both a logical Azure SQL Server named svr4tips2020 and Azure Data Factory named adf4tips2020 are key components of the system. The database named dbs4tips2020 will contain the table to capture the Superbowl Championship information. Once all those components are built and deployed, we are ready to install the Azure SSIS integration runtime.
Catalog Deployment
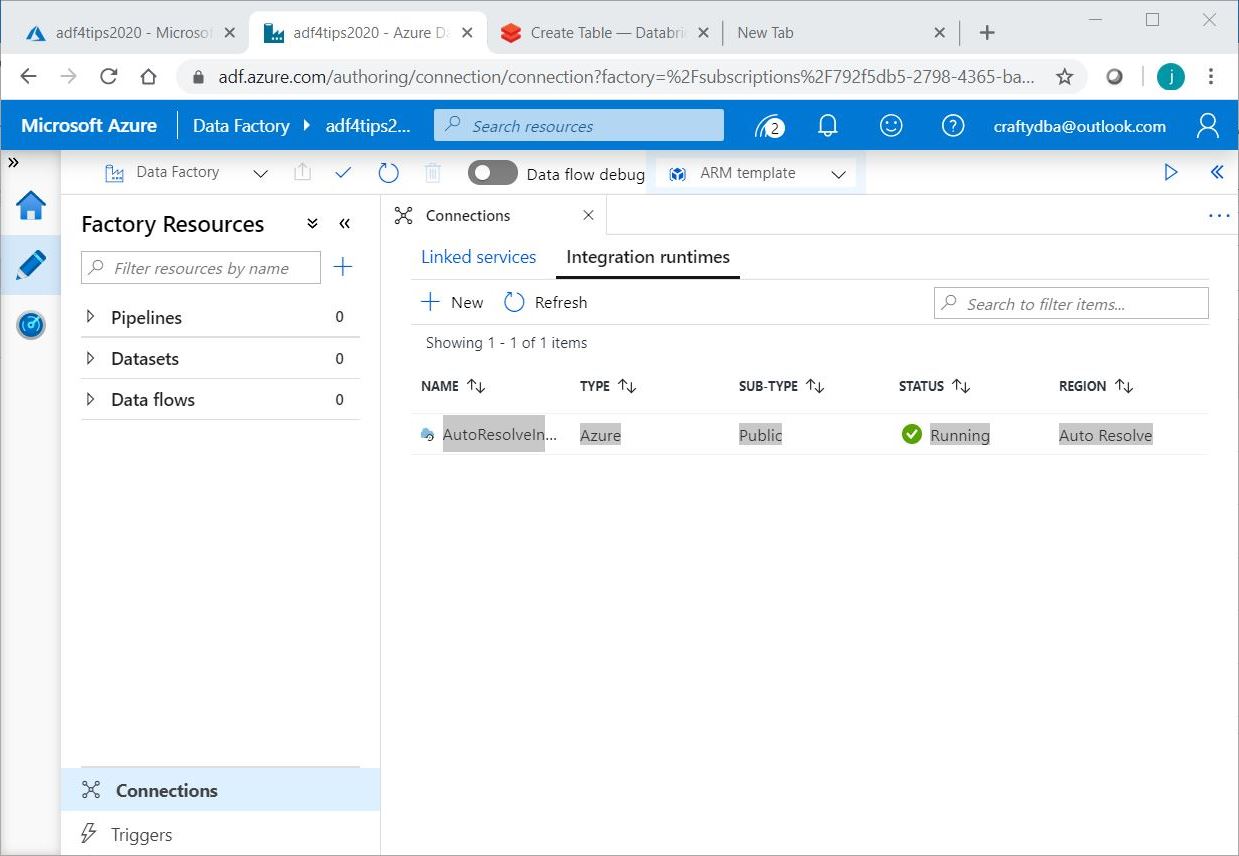
There are two types of integration runtime deployments. The first option, is a self hosted integration runtime (SHIR), offloads the data movement and dispatch activities to external computing resources. This deployment is very important when you want to use Azure Data Factory in a hybrid environment. The second option allows for the lift-and-shift of existing packages to the cloud. This dialog box can be found under the author workspace within the connections menu. This menu can be used to define both linked services and/or integration runtimes. Please see Microsoft documentation for details.
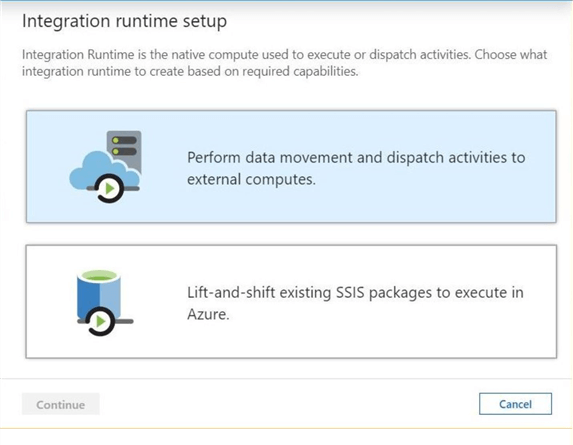
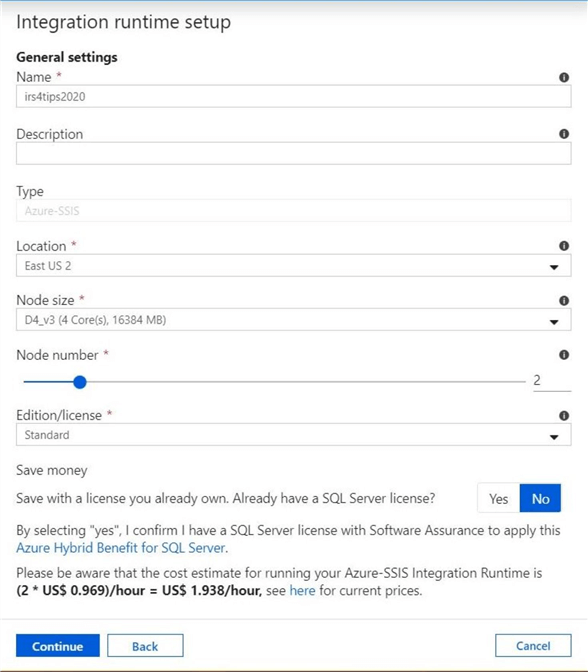
Please select the lift-and-shift setup and click the continue button. The next screen seen below asks the user for general settings. I am choosing to name the object irs4tips2020 and deploying the object in the same data center (East US 2) as my database server. The integration runtime needs both licensing and computing resources. The D4_v3 server image has 4 logical cores and 16 GB of memory. For high availability, choose 2 nodes so that your SSIS packages with not fail. With one node, a patching update to the computing resource might cause a failure. The computing cost for two nodes per hour is only $1.93 per hour.
The main cost of this service is the SQL Server licensing. If you have purchased the Azure Hybrid Benefit for SQL Server, on premise licenses can be used in the cloud. Please read the licensing agreement for details.
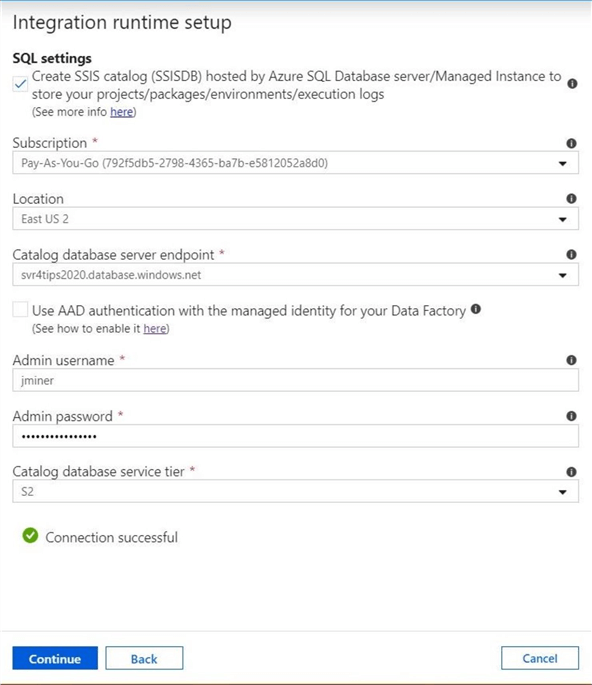
The SQL settings for the Integration runtime have not caught up with the product offerings. Only the basic, standard and premium tiers can be selected. There are no virtual core (v-core) offerings at this time. Please choose your Subscription, Location and Azure SQL Server now. Use the admin user and admin password to setup the runtime connection. This is the combination that was used to deploy the Azure SQL Server.
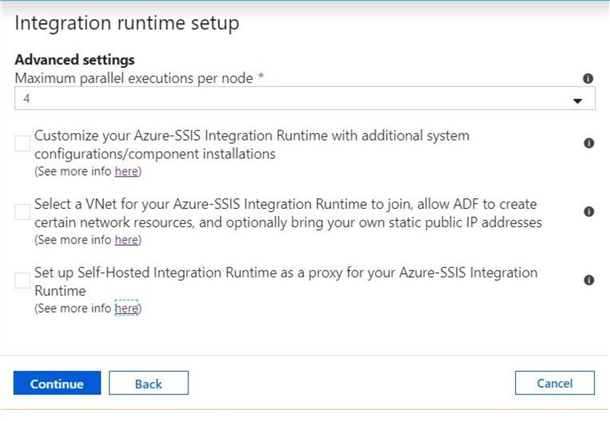
There are three advanced settings that one can use to configure the runtime. First, additional components such as third party tools can be added to the PAAS service. Second, the runtime can be joined to a Virtual Network. This option is important when using Azure SQL Managed Instance. Third, the proxy setup is for companies that have overly complex networking rules and will not allow you to join the runtime engine to the domain. This proxy uses a two stage process in which blob storage is used as an intermediate staging area. In short, do not select any check boxes for a default install.
The last setting on this page defines the number of parallel executions per node. I choose the number 4 for this setting. That means a total of 8 processes between the nodes can be run at one time. Each process has one virtual cpu. If we reduce this number to 2, then up to 4 processes with run on two number with each package getting two virtual cpus.
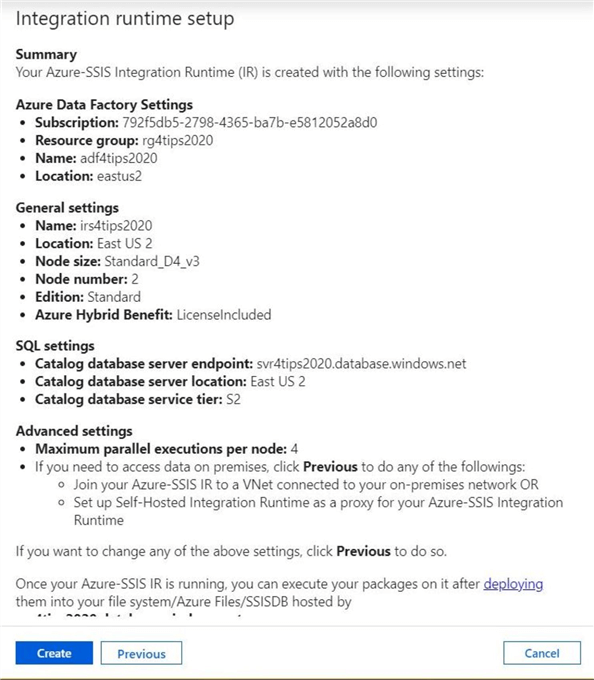
Almost all Azure deployments using the wizards in the portal have a confirmation page. This page shown below shows the user the choices that were made and asks the user to confirm this information before creating the service. If the information seen below is accurate, then click the create button to deploy the runtime.
To recap, the deployment of a default Azure SSIS integration runtime requires five forms to be entered with fill in the blank questions. Next, we will look at the two node computing resources that we have deployed within ADF.
Integration Runtime
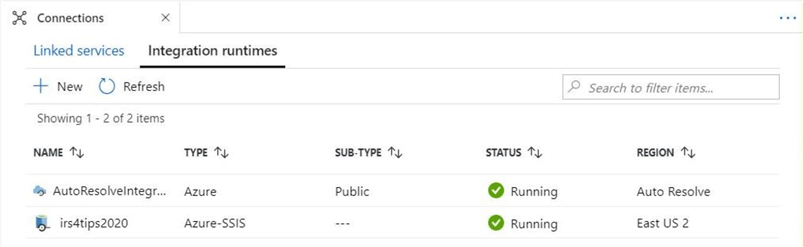
There are not that many options that you are able to perform within this service. You can monitor, start, stop and delete the runtime engine. After deployment, the starting of the runtime engine might take several minutes to find two computing nodes. The image below shows our new Azure-SSIS running in Azure Data Factory.
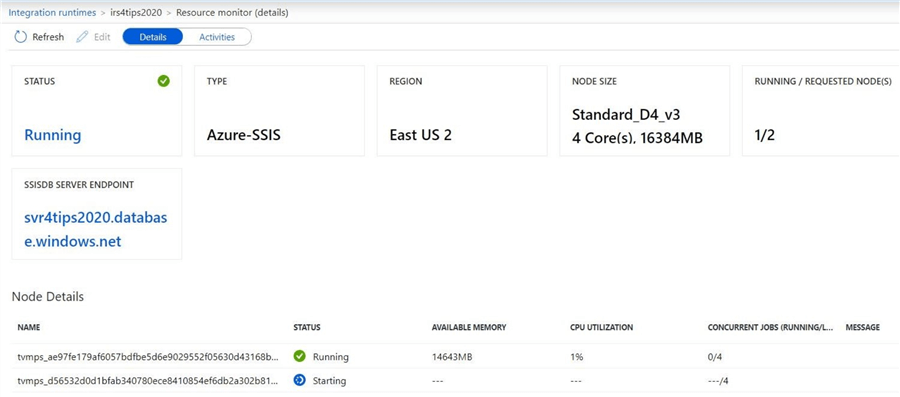
The resource monitor for the runtime engine contains details about the two nodes. The screen shot below shows the temporary names of the two virtual machines that are hosting the integration runtime engine. We can see statistics such as total CPU utilization and number of concurrent jobs (executing packages).
In a nutshell, there are not many actions that can be performed on the integration runtime. This is not surprising since there are not that many ways to configure the on-premise SSIS executable.
Deploying Packages
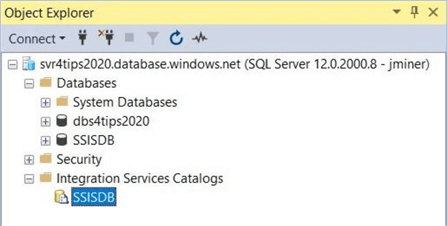
Package deployment can be done many different ways. I am going to deploy the package to the SSIS catalog using Visual Studio 2019. After deploying the integration runtime within Azure Data Factory, there should be a SSISDB database and Integration Services Catalogs option shown within the object explorer. Older versions of SQL Server Management Studio (SSMS) required the default database be set to the SSISDB for these to appear. Shown below is a screen shot of the newest SSMS program. This requirement has been removed in this version.
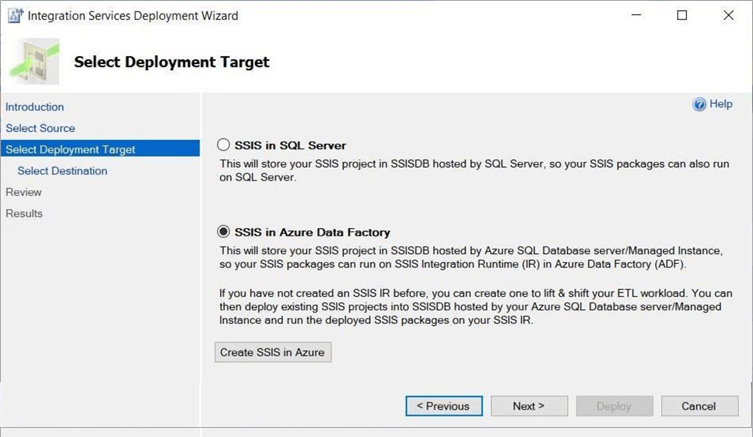
The deployment wizard within Visual Studio is shown below. Almost the same menus can be seen when using SSMS to deploy an ISPAC file. There are two destinations in which a package can be deployed: SSIS in SQL Server or SSIS in Azure Data Factory. Please choose the second option and click the next button.
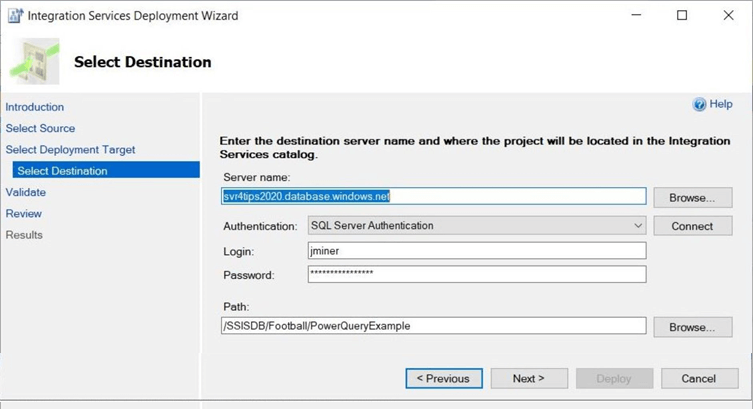
We need to connect to the server using the correct authentication, user name and user password. I am using the admin account that deployed the Azure SQL database. You can change this account if the correct privileges are given out. Make sure you create a Football folder within the SSISDB folder structure. This should be done in SSMS before deployment. The path is the fully qualified location in which the package will be deployed.
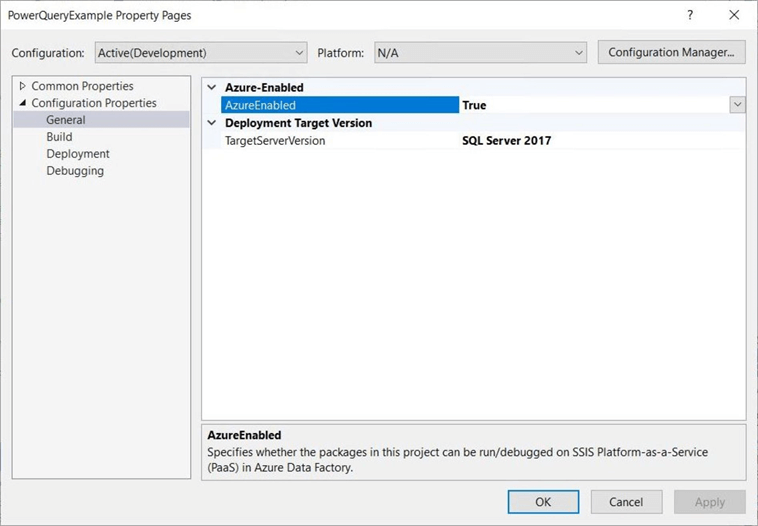
As an afterthought, you should have the configuration properties set for the cloud. This means the Target Server Version must be SQL Server 2017 and the Azure Enabled option must be true. Again, this should be done before deployment.
The image below shows many details about our deployment. First, the Refresh-Superbowl-Data.dtsx package is shown in the SSIS catalog. The target table, stage.superbowl was truncated before a manual execution of the package. Last but not least, the top 5 most records are shown in the results window.
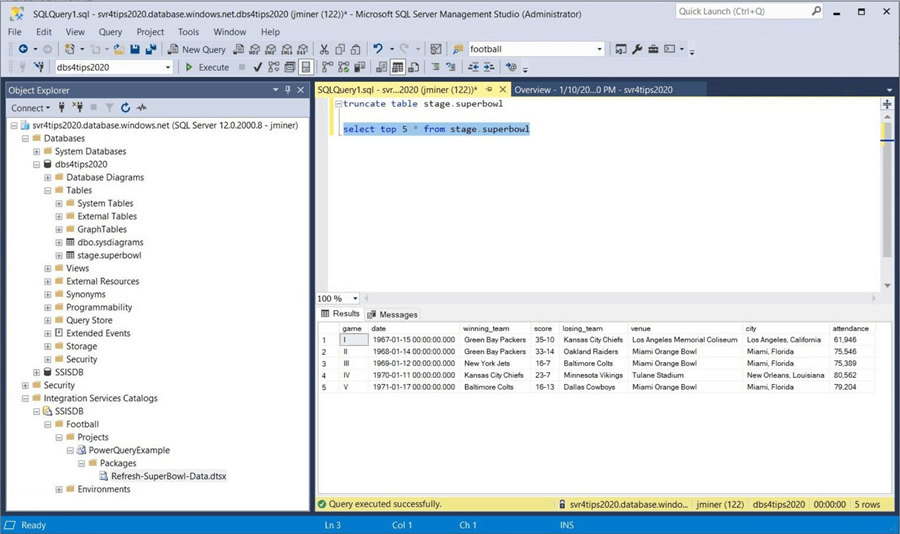
The manual execution of a package is just like on premise. The default values are used in the connection manager when executing the package. In the development environment, we were pointing to a local copy of the user defined database. We can either update the values in the package before deployment or change the values when manually executing the package. Either way, the server, database, user and password must point to the Azure SQL database named dbs4tips2020.
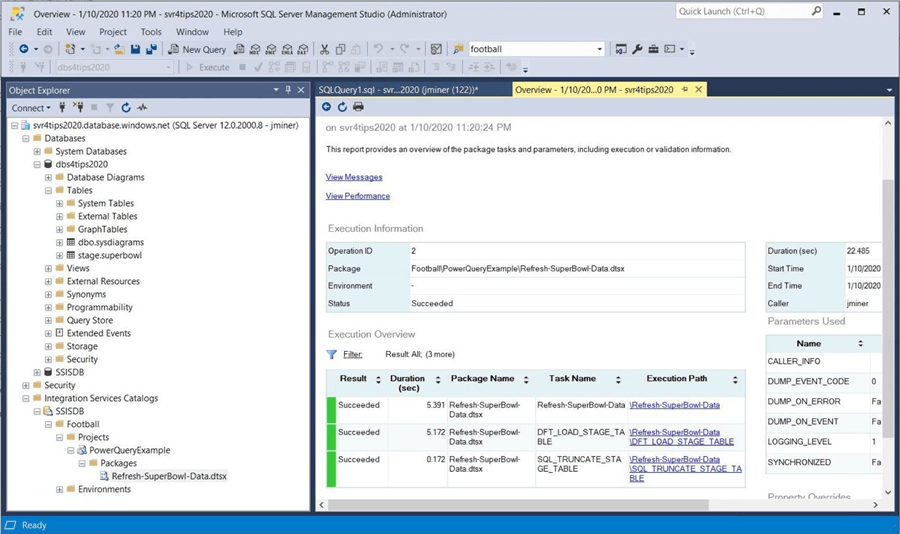
The above screen shot shows the execution report. We can see that the azure integration runtime takes twice as long to execute as the on premises one. However, the same result is achieved. The next question that a developer might have is "How do we schedule the execution of the package in the Azure SSIS environment?".
Pipeline Creation
The Azure SQL database does not have any way to execute a job on a schedule. We could write a Power Shell workbook that calls the catalog system stored procedures with the appropriate parameters; However, this would be a lot of work. In addition, we would have to schedule the workbook using an Azure Automation job. I am just mentioning this option since there are many ways to solve a business problem.
The most straight forward way to schedule the execution the SSIS package is to create a pipeline and an trigger within Azure Data Factory. The execute SSIS package activity allows for the execution of a given package. Drag the activity to a new pipeline workspace.
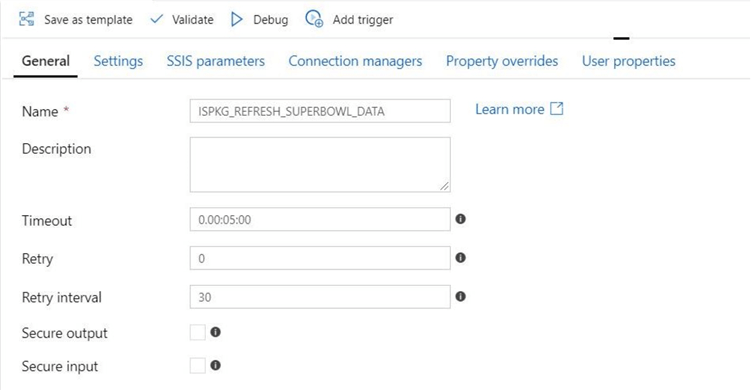
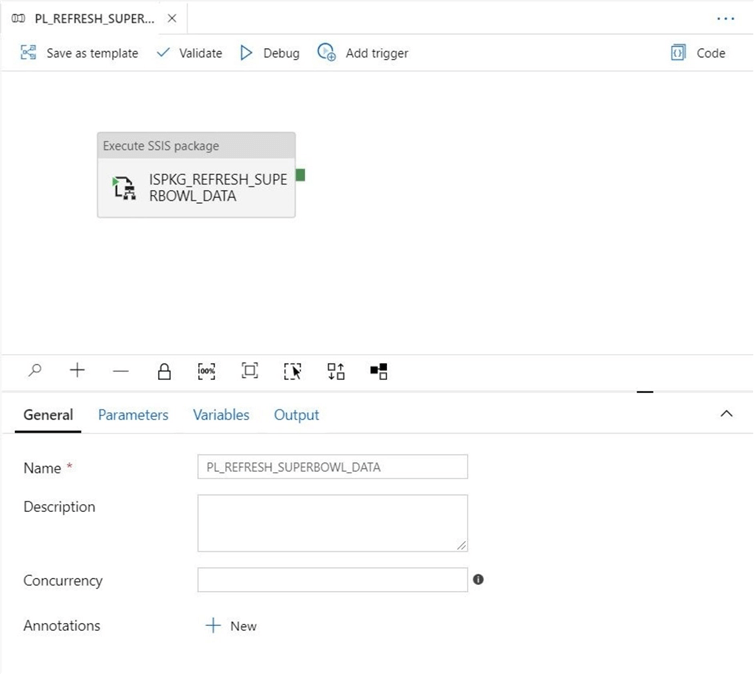
There is always a general tab within the designer. I am going to use a naming convention and name the activity ISPKG_REFRESH_SUPERBOWL_DATA. Many developers do not know that the timeout is defaulted to 7 days. I want to give a time out warning in 5 minutes. The retry count is zero and the retry interval is set to 30 seconds. The image below shows the chosen general settings.
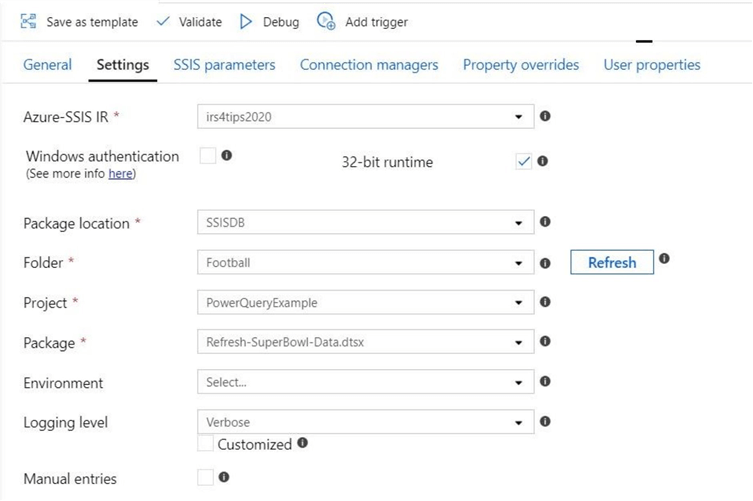
The setting tab within the designer is where the details of the package are selected. Please see the image below. The irs4tips2020 is the runtime engine is setup to execute our package. The package is located in the SSIS catalog. Choose the correct folder, project and package to finish entry of the required parameters.
The last step in finishing the package is to choose the name. Move to the general tab for the package and enter the name PL_REFRESH_SUPERBOWL_DATA. Make sure you save or publish the pipeline before moving away from the workspace. Unsaved pipelines will be discarded. You will be prompted if you forget this step.
Triggering Executions
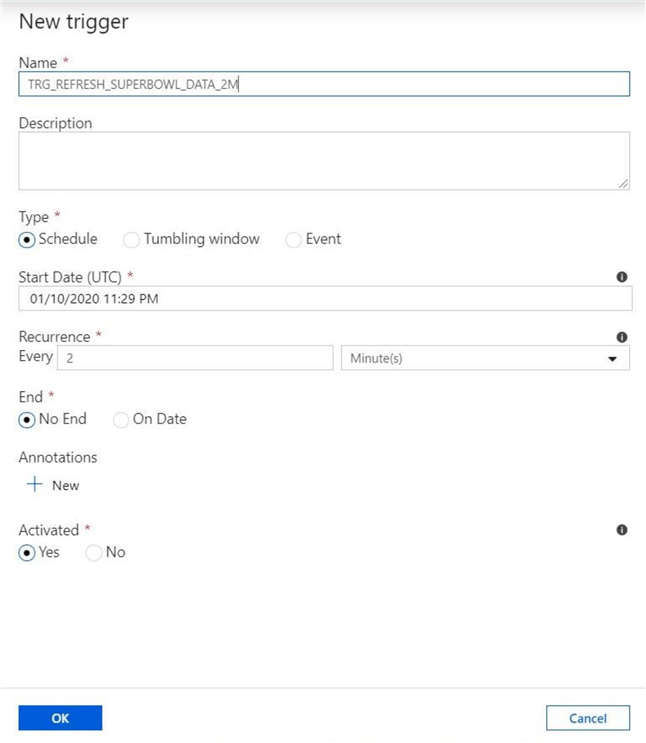
The add trigger button on the pipeline can be used to launch the new trigger screen. The typical information is required to create a schedule and associate it with the pipeline package. We are going to look at the easiest trigger that a developer can define. One that executes on a given schedule. The name of the trigger is TRG_REFRESH_SUPERBOWL_DATA_2M. Logically, we want the pipeline will execute every 2 minutes. This is not a real life example of scheduling. However, I do not want to wait for hours to test my schedule. The details of the trigger are shown below.
Azure data factory has three main menus. The house icon brings the user to the main menu. The pencil icon allows the designer to create new linked services, pipelines or datasets. I am not going to talk about data flows, which are relatively new to the service. The gauge icon brings the user to the monitoring menu. Let's click this menu to view recent runs of our pipeline.
I have to confess; I was bored waiting for the pipeline to finish. Therefore, I changed the execution time interval to 1 minute. The image below shows two successful executions of the pipeline. In turn, the pipeline calls the SSIS package and executes the logic to read data from a web page and store the results in a table.

To the right of the pipeline name, there are two actions that can be performed. The pipeline icon brings up the details of the execution. The play button inside a circle with arrows allows the re-execution of the package. Let's take a look at the execution details.

The above image shows the total execution time of the package being 17 seconds. For complex pipelines, a Gantt chart can be used to see the details. Since we have only one activity, a simple list will suffice. There are two actions on the execution line of the activity. The first icon will show the inputs pass to the integration engine. They are in XML format and basically reiterate the parameters chosen for the activity. The second icon shows the outputs passed to the Azure Data Factory services. Again, the XML document tells the execution time of the package. This might come in handy when an error occurs. It should contain the error message.
Cleanup Actions
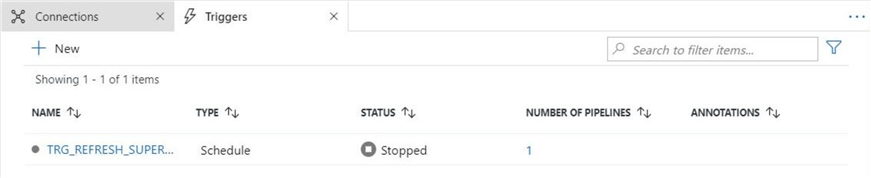
Since this package deployment was only temporary, I am going to walk thru some off actions that can be used with triggers and runtimes. First, any trigger can be stopped. To restart, just click the play icon. The image below shows the disabled trigger.
I am not going to show how to delete objects in Azure Data Factory. Either a trash can or ellipses can be found on any given object. Find and click the delete action. Confirm the action for the object to be truly deleted. I always remove objects in the reverse order of creation. Thus, the trigger should be deleted before the package. The runtime should be deleted after all packages that reference the object are deleted.
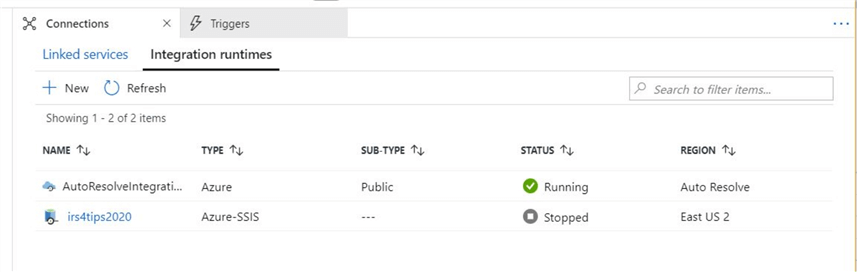
The image above shows the integration runtime in a stopped state. Again, this action can be found by clicking the ellipses icon. After stopping the runtime, use the garbage can icon to remove the setup from ADF. The image below shows only the default, auto resolving runtime that is part of Azure Data Factory.
To sum it up, triggers and integration runtimes can be placed into a stopped status. To save money, Power Shell code can be used to turn off and turn on a given runtime from Azure Automation. This action only makes sense if the cost of the computing virtual machines is very high. Last but not least, you should delete objects from ADF in the reverse order in which you define them.
Summary
The ability to create and execute an extract, translate and load program has been in the SQL Server stack for a long time. There is a lot of existing legacy code developed for SQL Server Integration Services 2005 and above. Therefore, it might be feasible for an existing company to lift and shift the code to the cloud using the Azure SSIS integrated runtime, which is part of Azure Data Factory.
An extensive review of the connection managers should be undertaken before the migrating to Azure. Many times, developers used the raw file destination to save intermediate work between package steps. This technique can leverage the temporary directory that is available on each node of the Azure SSIS integrated runtime. If files were used between packages, then blob storage might need to replace the local storage that was once used. Connections to each source and destination should be confirmed from Azure Data Factory. If you cannot create a dataset within ADF, more than like the lift-an-shift package will have the same issue. Resolving data pathways is the most consuming part of the migration.
Today, we deployed the catalog to an Azure SQL database to satisfied runtime-tracking requirements of an existing package. Not only could detailed information be logged, but also run time execution statistics can be captured. I did not cover environmental properties and connection string mappings; However, the same techniques can be used within the Azure SSIS catalog as well as the Azure Data Factory activity. I leave this exploration to you, the reader.
The main point to remember is that the deployment of the catalog to Azure SQL database lacks the SQL Agent. Therefore, the creation and scheduling of jobs have to be replaced with pipelines and triggers with ADF. The Execute SSIS Package activity allows for the selection of different environmental properties per pipeline. Always remember to use the correct number of bits (32 or 64) when executing a package. ADF has similar functionality that replaces the job history log and job activity monitor. Both of these reports are replaced by monitoring which gives details on pipeline runs, trigger runs, and alerts. In short, almost every that can be done on premise can be done in the cloud.
I hope you liked this article. Stayed tuned next for talk about deploying the SSIS catalog to an Azure SQL Managed Instance. This platform as a service offering allows jobs to be crafted using the SQL Server Agent.
Next Steps
- Install Azure SSIS for Azure Data Factory and Azure SQL MI
- Customizing the Azure SSIS Integration Runtime with third party components
- Using the Azure SSIS proxy to work around complex networking security


About the author
 John Miner is a Data Architect at Insight Digital Innovation helping corporations solve their business needs with various data platform solutions.
This author pledges the content of this article is based on professional experience and not AI generated.
View all my tips
