By: Scott Murray | Comments | Related: > Power BI
Problem
Not all data should be viewable by all users and this is often a requirement when building reports. Instead of creating different reports based on what users can and cannot see, how can row level security be utilized in Power BI?
Solution
Security is on everyone's mind as data from many sources continues to grow. With having so much data, we need to create guidelines as to what data can and cannot be viewed by the users. Security in Power BI comes in several different forms. First, the license (pro vs. premium) is required to access the Power BI Service in the cloud (or for related on-premises resources in Power BI Report Server). Next, access has to be granted to datasets, reports, and more appropriately the application housing the dashboard, reports, and datasets. This level of access is centered on access to the whole application and its report or dashboard. This access is similar to permission granted to a particular folder in a file system; either you have access to the folder, or you do not.
Furthermore, permissions can also be assigned within individual workspaces; however, workspace permissions generally center on member and contributor (edit), viewer, and admin privileges within the workspace and is not directly related to row level permissions. Instead, the member and contributor permissions provide the ability for a report consumer to actually edit the report within the Power BI Service (which in turn means they could adjust the Row Level Security options). To the contrary, the viewer permissions allow a user to just view the workspace and related reports (not datasets), but that same user cannot edit the reports within a workspace. Finally, the admin role allows a user to fully administer a workspace including updating and deleting it. Again, all these permissions only indirectly will impact Row Level Security and only within the context of being able to edit a report.
The final layer of access at the data set level centers around row level security. Although a bit of a misnomer as it is not truly row level entirely (due to possible aggregations and such at the data level), the row level security features do work on a line by line level by providing a way to restrict access at the data level based on specific values in a dataset. Certainly, with this sort of access, some limitations do exist which we will outline later in this tip. In a previous tip we outlined setting up Row Level Security based on the roles that were created for each data category area which we were wanting to limit access. For instance, we could create roles based on sales territories; then we could assign users or AD groups to these roles in the Power BI Service. That method was outlined in this tip.
In this tip, we switch the Row Level Security to dynamically use the user who is signed into the Power BI Service and compare it to a value in a table. That user is cross referenced against a table in the database to determine what data points (rows) that user will have access to. Although the concept is the similar to the fixed roles method, this method can be driven off of other security-based systems which insert access data into tables in the database. Some folks call this method dynamic or database role level security as opposed to the fixed roles’ method. Additionally, the fixed method requires each role to be pre-defined in the Power BI file (or changes required to be made after the fact) whereas the table-based methods only requires updates or inserts into a table to effect a change.
The best way to see the benefits of using table-based row level security is through an example. Before we get started you should download the latest version of Power BI desktop. We will also use the WideWorldImportersDW database for our data sources which can be downloaded from here. For a refresher on getting data into Power BI check out this tip.
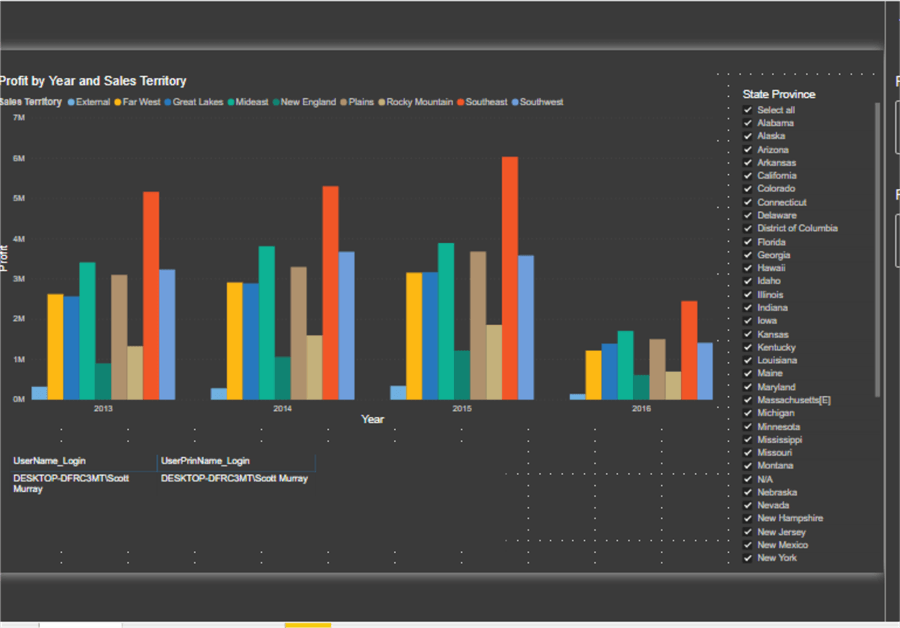
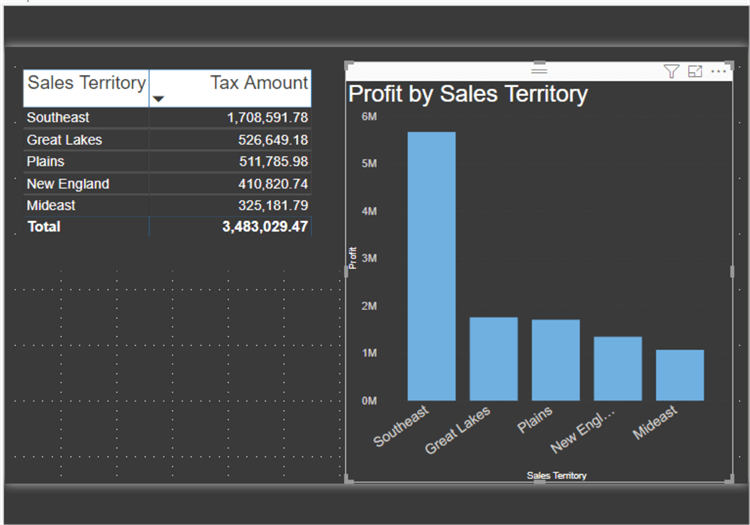
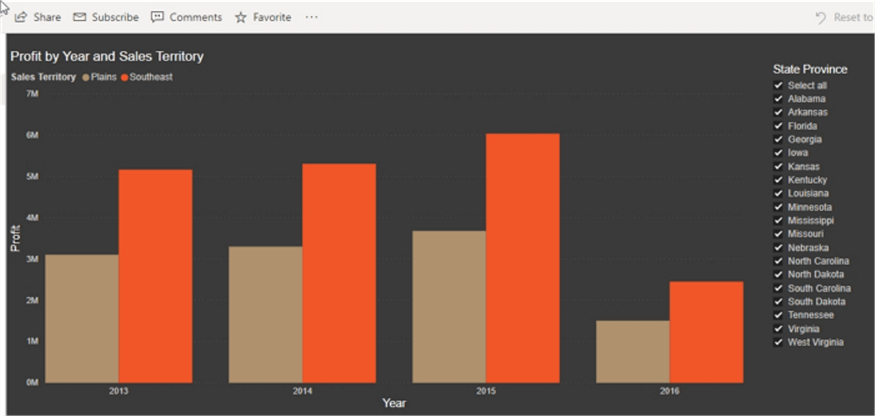
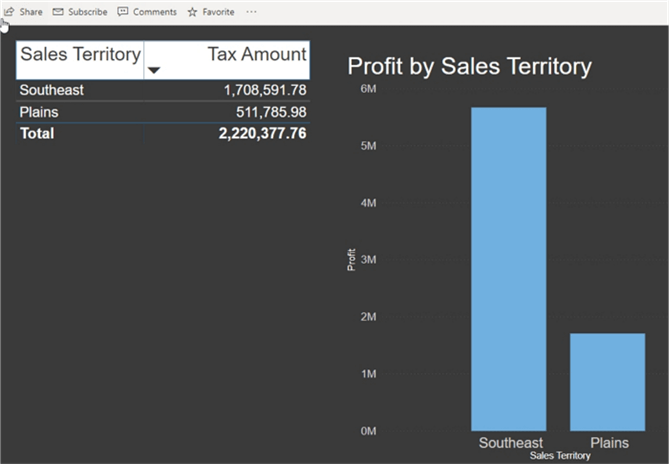
I created a Power BI report and added two tabs to the report. The first tab contains a bar chart and slicer while the second tab includes a matrix and another bar chart, as shown in the next two screenshots.
Now that the report is setup, the next step is to identify the user who is interacting with the report. Within Power BI, two different DAX functions provide user information:
- USERNAME()
- USERPRINCIPALNAME()
USERNAME() provides the domain name and the username of the user that connected to Power BI within Power BI Desktop. This information is returned in the format of Domain / UserName, similar to what you would see in most Active Directory networks. Similar, but not exactly the same, USERPRINCIPALNAME() also provides the user information in Power BI Desktop in the format of Domain / Username. However, both functions provide the login email address of the user connecting to Power BI Services when reviewing the report or dashboard online. These values will be important shortly.
To see the actual values that are returned by these two functions, we will first add new columns to our fact table.
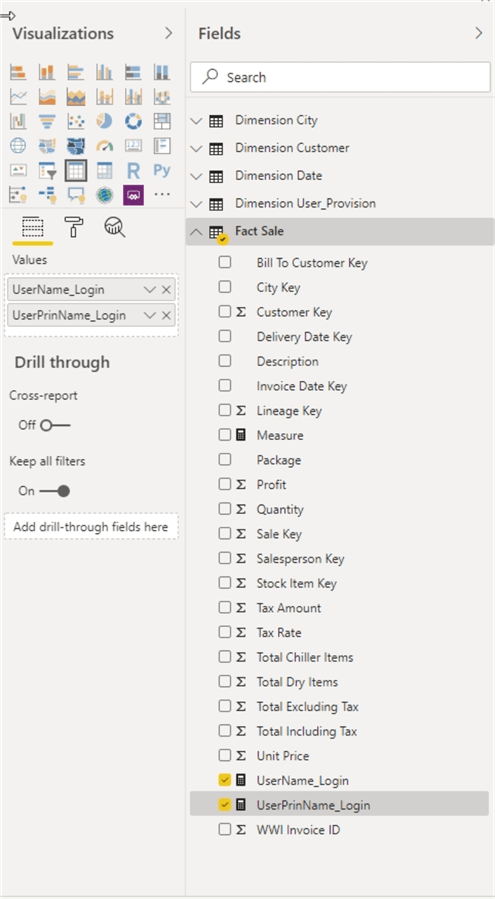
The first field is UserName_Login, and it simply uses the USERNAME() function.

The second field to be added retrieves the USERPRINCIPALNAME() DAX function.

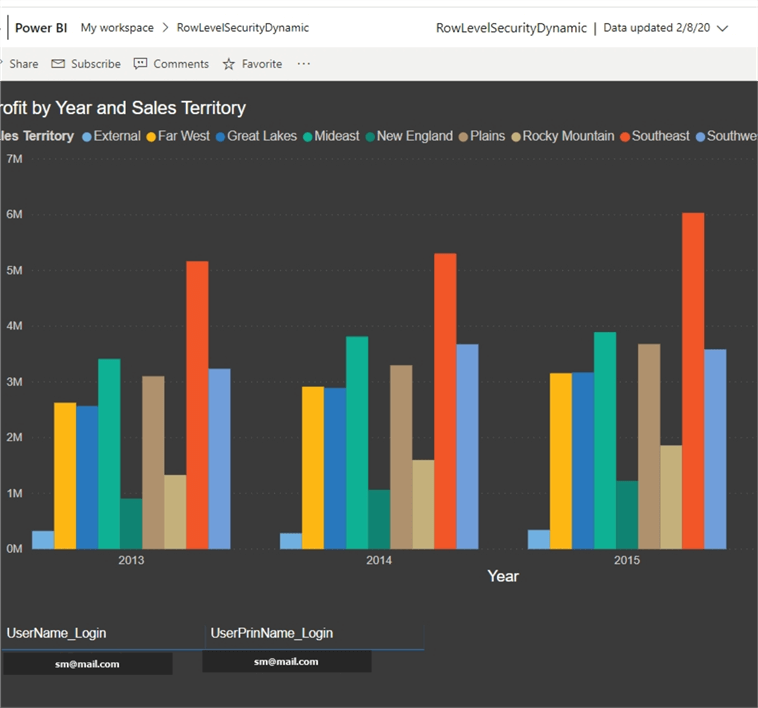
Adding a simple table to the design grid, and then adding these two fields to that table, shown below, reveal the Power BI Desktop format.
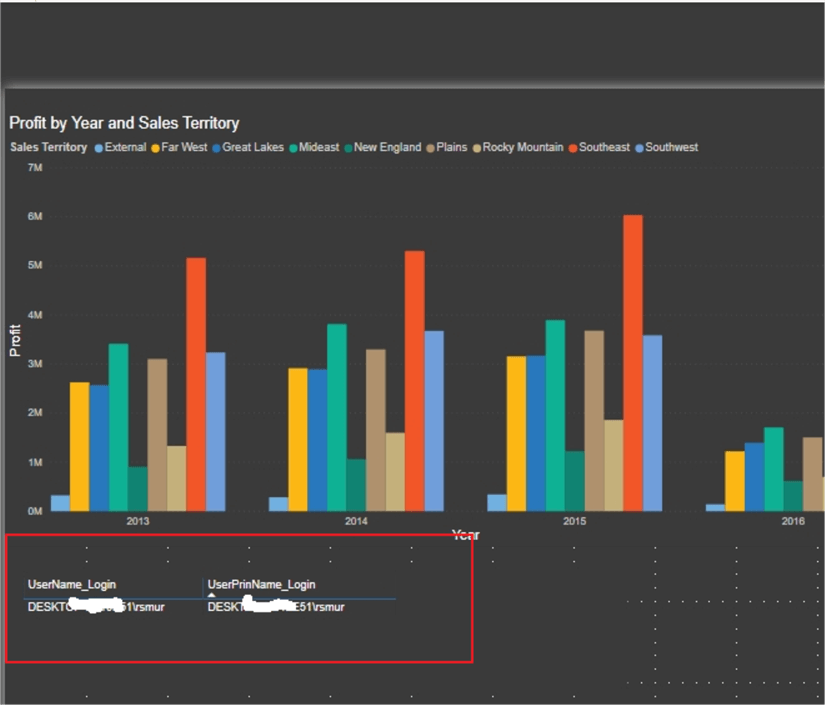
Reviewing the same report online shows that both these fields return the email address of the user who logged into the Power BI service online.
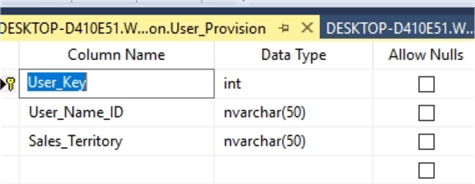
We next need to create the database backend that will drive our row-level security. The table at a minimum needs to contain two items: 1) username and 2) the related category value which will differentiate access. The username must match the username that is resolved on the Power BI service. Hopefully, you can now see why we showed the two views of the username and userprincipalname DAX functions. The username should reflect the email format of [email protected]. The category field is the item that differentiates a user's access. It could be things like branch offices or sales region or maybe a department. The value can be text or some identity integer. It will depend on the data in the fact table that is being used.
In the below example we created a simple user permissions table which includes an integer ID column called User_Key, an email username field called User_Name_ID, finally a sales territory field called appropriately, Sales_Territory.
With the table created, it now must be populated with the appropriate users that need access. In the below illustration we add some example users and their related sales territory.
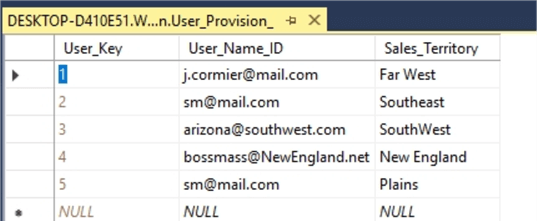
Note that a row is required for each access data point. Thus, if a user needs access to 3 sales territories, using our example, a row for each user sales territory combination must be inserted. Of course, there are many ways to automatically populate the table from, for instance, active directory or some other application. If you have many users this setup could, of course, grow quickly.
At this point, we must switch back to Power BI desktop. The newly created user permission table must be added to the model.
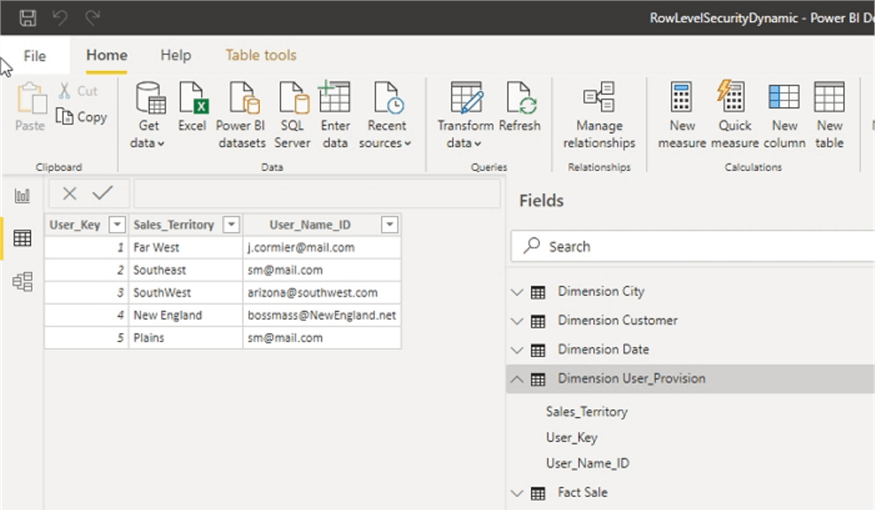
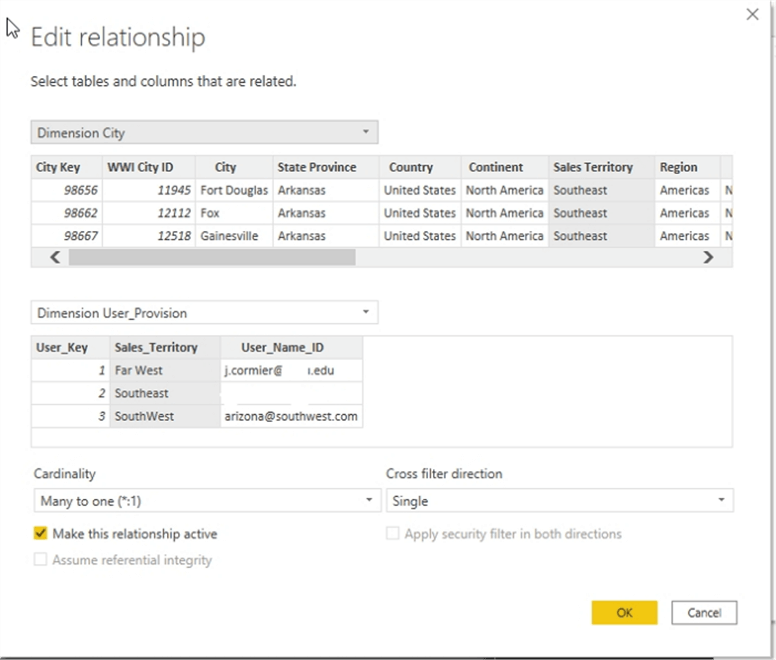
Finally, the relationship between the fact table or category dimension and the user permissions table must be set. As illustrated below the join is created between the Sales Territory in the Dimension City table and the sales territory in the user permission table.
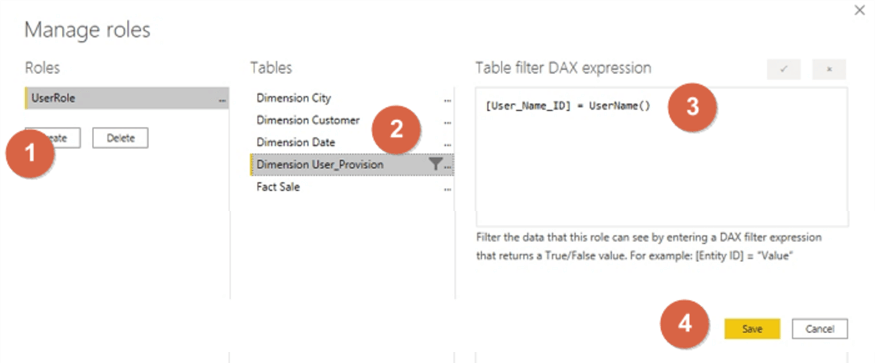
Our final step in Power BI Desktop, we also must create a role that checks the User_Name_ID in the Dimension User_Provision table and compares it with a call to the DAX UserName function.
Based on the above details surrounding how the DAX functions resolve the Username in Power Bi Desktop, you may surmise that testing the role based on your username in Power BI Desktop will not resolve to the correct username listed in the permissions table. Remember Power BI Desktop resolves to domain/username whereas the service resolves to [email protected]. Thus, to complete the setup process, the Power BI file must be published to the Power BI Service.
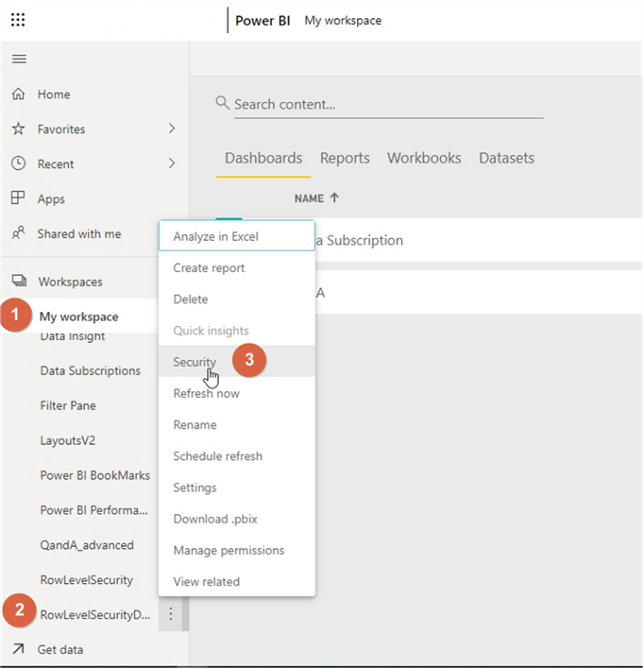
After publishing to the Power BI Service, we have one additional step to complete the Row Level Security process. To complete this process, first you will go to workspaces, find the report dataset and go to Security.
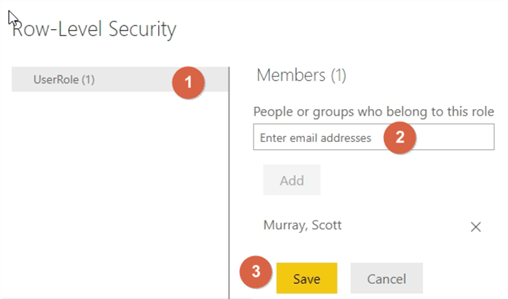
On the Row-Level Security screen, you will need to add any users or more appropriately any distribution list or groups who should access the report. This list only allows the Power BI Service to see the user list and does not grant access to the data.
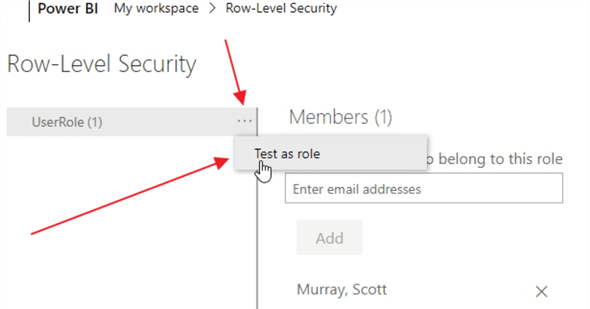
Finally, we can test out our access using the Test as Role available in the Row-Level security screen.
Within the database, my user ID was associated with the Southeast and the Plains Sales Territories (two rows). As shown in the below screen print, the dashboard report shows me only data from the Southeast and Plains Sales Territories. You will notice the State Province Slicer is also appropriately filtered.
The second tab in our dashboard also shows only the two assigned sales territories.
Using table-based row level security adds additional flexibility to a Power BI dashboard’s security infrastructure. This method allows for a more scalable method of limiting users view of sensitive data and can be integrated with other security processes.
Next Steps
Learn more about Power BI in this 3 hour training course.
About the author
 Scott Murray has a passion for crafting BI Solutions with SharePoint, SSAS, OLAP and SSRS.
This author pledges the content of this article is based on professional experience and not AI generated.
View all my tips


