Problem
Data security in all organizations is a top priority; thus, having sensitive information and limiting access to such information is especially important. Therefore, creating criteria that ensure sensitive data can only be available to authorized personnel or groups is in high demand. For a system to be highly secure, it should have the following features: safeguarding sensitive information, access control with granularity, and adherence to regulations.
Microsoft Power BI is an interactive data visualization tool primarily designed with business intelligence in mind. Apart from being a visualization tool, it also has some built-in security features that we will discuss in this article.
Solution
Microsoft Power BI is fast becoming the number one choice for most data professionals worldwide for visualization and analysis. However, with reports and dashboards being a new way to communicate insight to the management team, having a restricted way where authorized groups can only see certain information is very important.
Power BI comes with different security features such as “row level security,” “column level security,” “object level security,” “role access control,” and many more. The extra security depends mainly on the report’s developer and the dataset type.
Section A: Row-Level Security in Power BI
What is Row-Level Security?
The row-level security (RLS) is a process of restricting access to a database row, thereby allowing users access to information for which they have been granted permission. In contrast, security at the database or table level regulates access to specific databases or tables, respectively.
Power BI RLS is broken into two types: static and dynamic security. These security levels restrict certain users’ access by creating filters within roles to limit data access.
In Power BI Desktop, you can set up RLS for data models for data imported. On datasets that make use of DirectQuery, such as SQL Server, you can also configure RLS. The RLS can also be created on the Power BI services using the Datamarts feature for premium license users.
Create Static Row-Level Security
Let’s create static RLS in Power BI Desktop.
Let’s assume there is a sales report of certain goods and we want to restrict certain people from seeing the report data based on their roles in the organization.
Step 1: Define Roles. Using the report, let’s assign roles to different individuals in the organization depending on their hierarchy.
From Power BI Desktop, click the Modeling tab and select Manage roles. This will open another window where you set the roles.

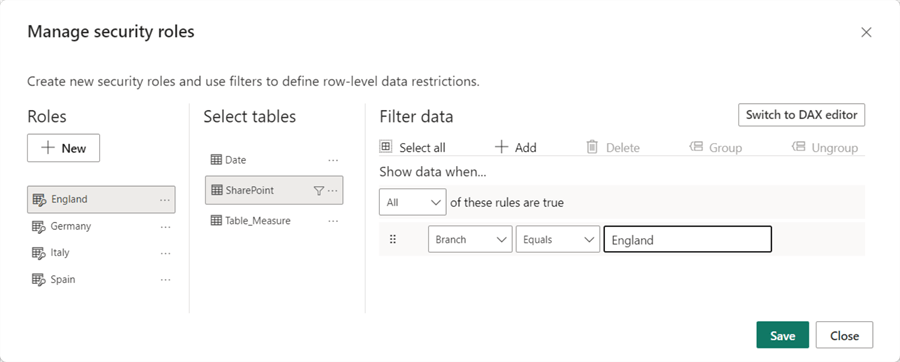
Step 2: Create Roles. In the Manage Roles window, you will notice it has three panes: Role, Table, and Filter.
Click Create, and type in the name of the role you want to create. Then, in the role name you just typed, click on the three dots (more options) and select the data table on which you want to base your restriction.
Choose the SharePoint table, select the three dots again, click Add filter, and select the column/field you want to base the row-level security. We will create our security for this project on the “Branch” column.
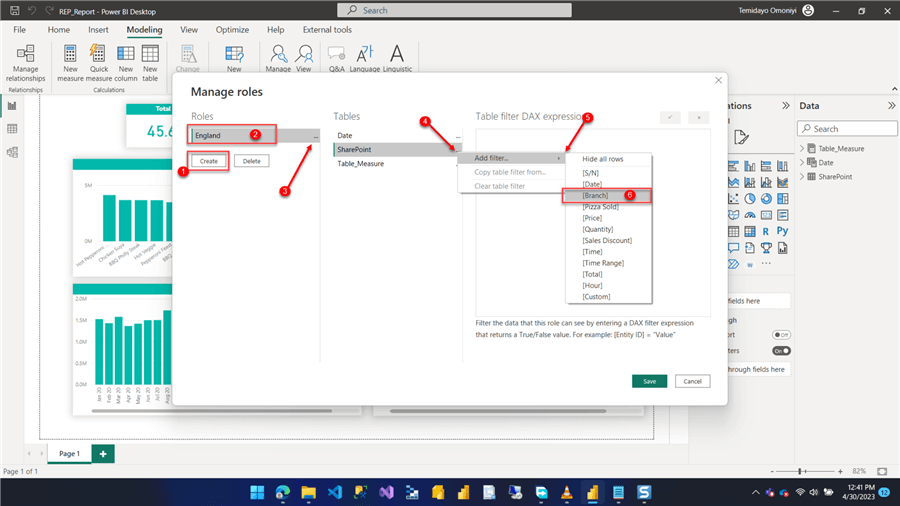
In the Branch column, you are expected to put the name of the data you want to filter based upon. For example, since you created the role in England, I will need to change the value to England and click on the check box at the top right corner. Repeat the same process for as many roles as you want to create by following the same method used in making the England role as shown below.
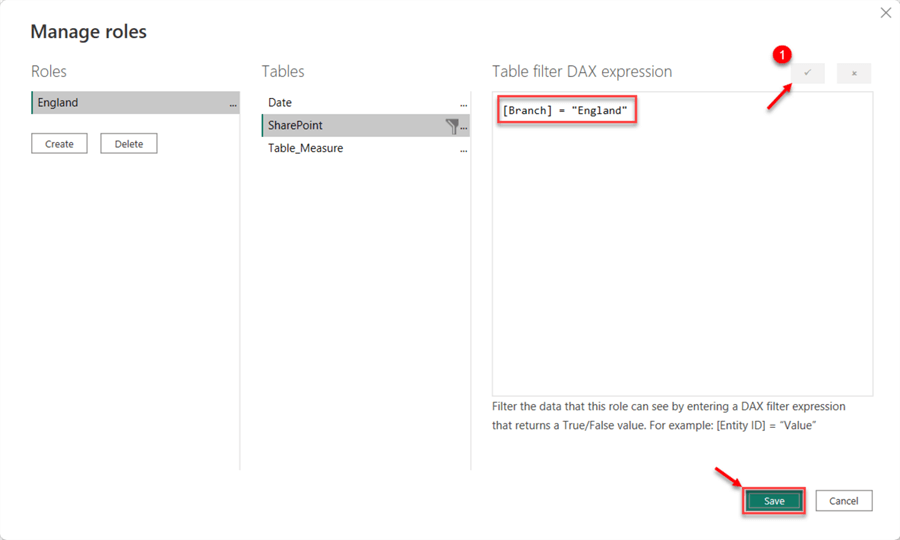
Lastly, click Save to save the changes.
Step 3: Test Created Roles. Now that we have successfully created the different roles for multiple locations, we need to test those roles and see the data filter for the correct position.
In Power BI Desktop, select the Modeling tab and click View as. This will open a new window where you can select which role you want to view. In addition, we select multiple roles to consolidate the data.

Activate Enhanced Row-Level Security Editor
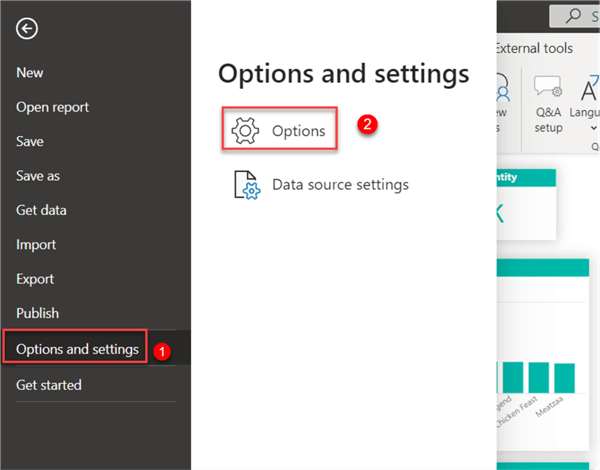
The enhanced row-level security editor is a new feature allowing users to establish row-level security roles and filters quickly and effectively in Power BI Desktop. This editor can switch between a DAX interface and the standard drop-down interface. The job definitions are also published when you publish to Power BI. To activate the enhanced row-level security feature on Power BI Desktop, click File at the top right corner, select Options and Settings, and then select Options.
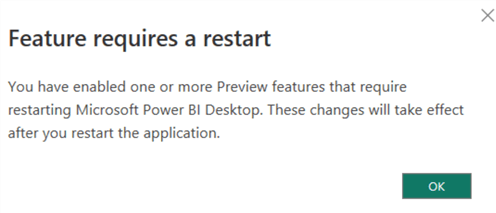
In the new window, select Preview features to show all available preview features in Power BI Desktop. Navigate to the Enhanced row-level security editor, click on its checkbox, and click OK.
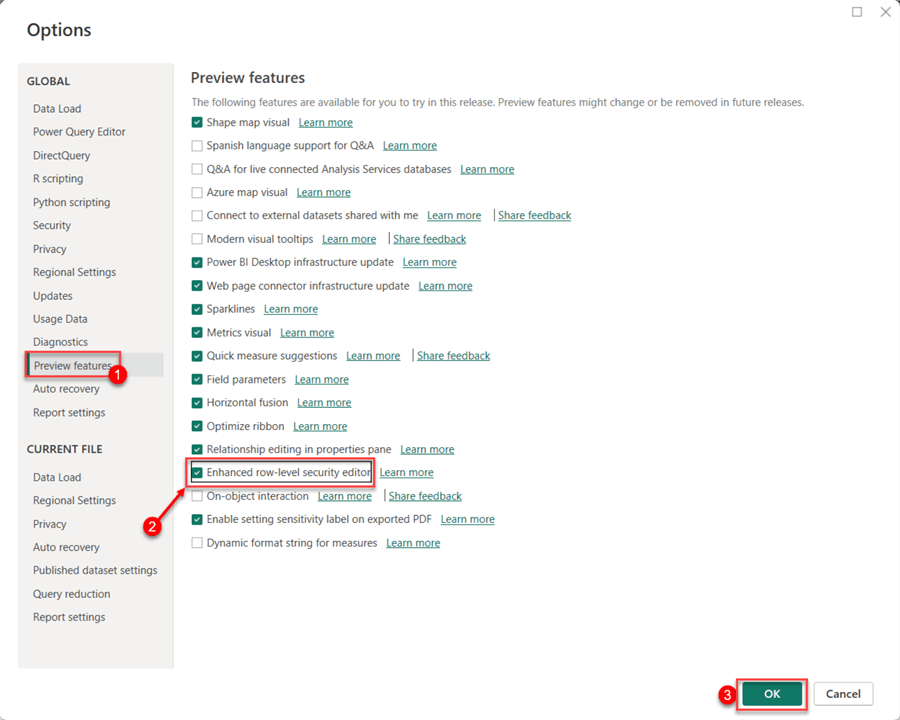
You will need to save your report and close Power BI Desktop to activate the new feature fully, as noted below.
Open Power BI Desktop again, click Modeling, and select Manage roles. Notice that the whole row-level security interface has changed. In this view, you can also switch to the DAX editor.
Assign Roles in Power BI Service
Assigning different roles to users is typically done in Power BI Service. A workspace must be created where the Power BI Desktop report will be published.
Power BI Services
Microsoft Power BI service is a cloud-based software as a service (SaaS) business analytics and data visualization service that allows users to visualize and analyze data more quickly, effectively, and comprehensibly. It connects users to a wide range of data through simple-to-use dashboards, interactive reports, and eye-catching visualizations that bring data to life.
Power BI Workspace
Microsoft Power BI workspace is a shared environment for a group under a tenant. They serve as containers for Power BI dashboards, reports, apps, workbooks, datasets, and dataflows.
The Power BI service has two types of workspaces: My Workspace and Workspaces.
- My Workspace is usually referred to as your personal workspace. Only the user can access this space, and it does not allow collaboration with other users in your organization. You can also share dashboards and reports from your My Workplace.
- Coworkers can collaborate and exchange information in Workspaces. Collaborate with others on dashboards, reports, apps, workbooks, and datasets by inviting them to your workspaces. Participants must have a Power BI Pro or Premium Per Use license to achieve each workspace.
We will create a Workspace for this tip to house the report and dataset.
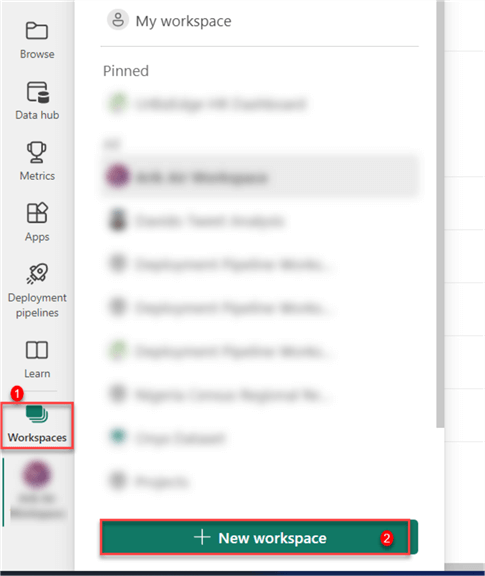
Step 1: New Workspace. In your Power BI Service, click Workspaces at the button left corner, then select New workspace. This should take you to the workspace environment.
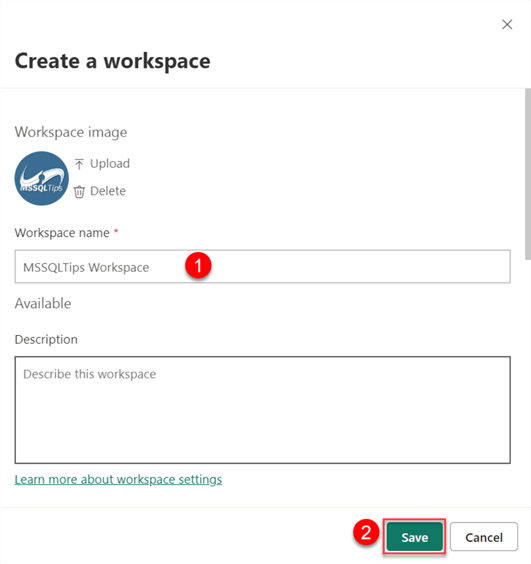
Step 2: Workspace Settings. In the new window, input the settings necessary to configure your workspace, as seen in the screenshot below, and click Save.
Publish Report
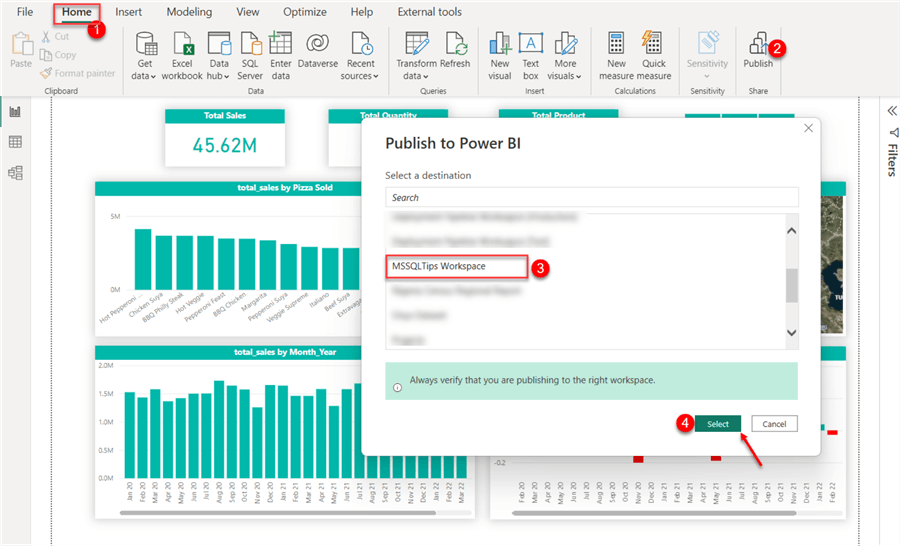
Now that you have successfully created your workspace, we need to publish the report from the Power BI Desktop to the Power BI service workspace.
Select the Home tab on Power BI Desktop and click Publish in the right corner. This will open a new window for selecting the workspace we created in the service.
Note: Always ensure you publish the report to the correct workspace.
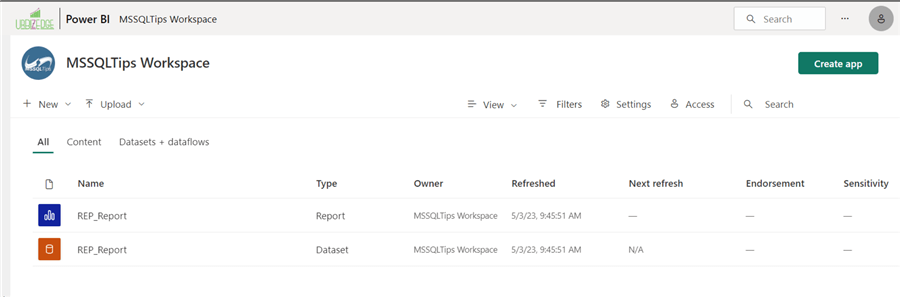
Once successful, a pop-up window will appear saying, “Publishing successful.” Now navigate to your https://app.powerbi.com and go to the workspace we created. The workspace might be empty at first; refresh your web browser to see changes.
In your Power BI workspace, you will have “Report and Dataset” in the workspace.
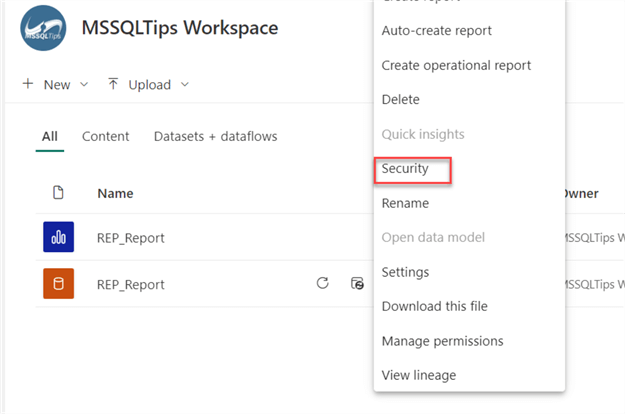
Set Dataset Security
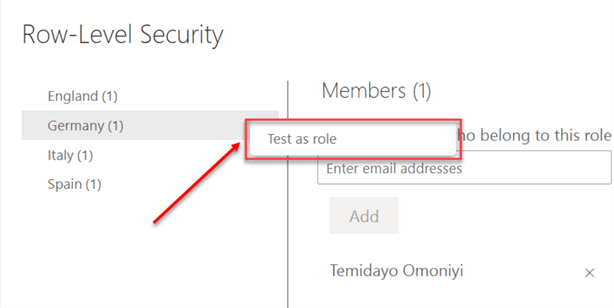
In the workspace created, click on the three dots in the dataset and scroll to Security. Here you will assign different roles to different people in your organization under the same tenant.
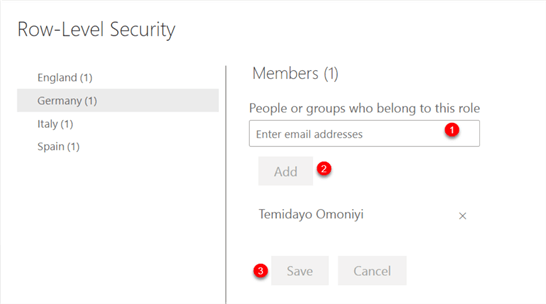
In the new window, select the different roles you want certain users in your organization to have access to and put in their email. After assigning the different roles, click Save for every assigned role.
Test as Role. Click on the three dots of the different roles created and select Test as role. This shows how the report will be viewed when sent to the people in your organization.
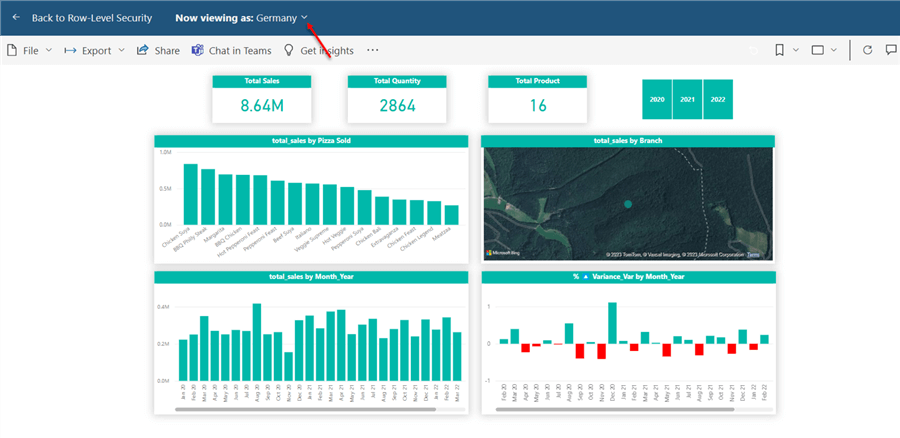
From the image below, the blue bar indicates the sales in Germany. You can also switch countries by clicking on the dropdown. Finally, click on Back to Row-Level Security to escape this view.
Share
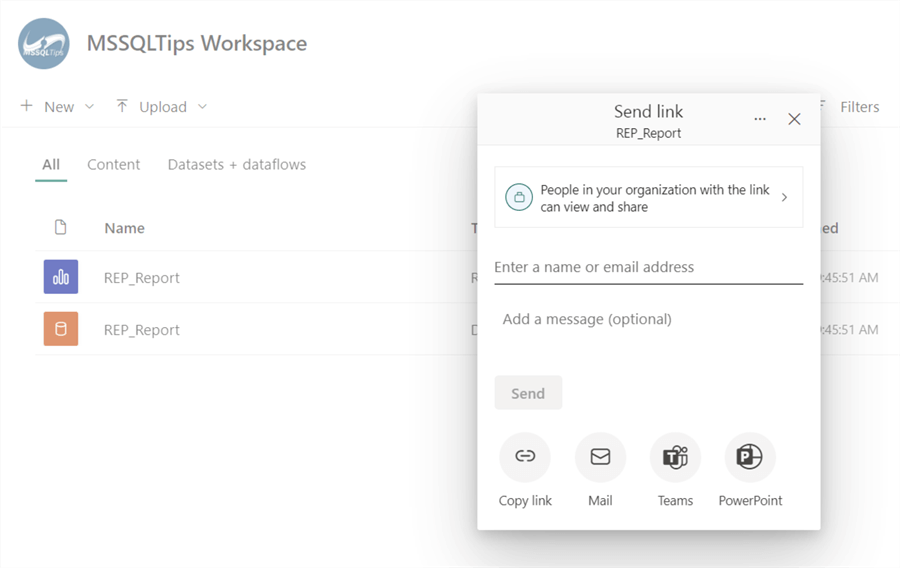
Now satisfied with the security parameters, you can share the report with the people in your organization by going back to the Workspace or report and clicking Share.
Dynamic Row-Level Security
Static RLS can be stressful when you want to add a new role. Users must repeat the same process of adding roles from the Power BI Desktop or Power BI service using Datamarts.
Unlike static RLS, which requires users to set the credential roles manually, dynamic RLS users’ access to various dashboards and reports depends on their login information and dataset. In another view, the security is based on the dataset.
In creating the dynamic RLS, you will need the following:
- User Table: This contains the various credential emails.
- Role Table: This usually is a dimension table containing the roles.
Step 1: Create a Relationship Between the User and the Role Table. You need to create a relationship between the user and role tables as shown below. To achieve this, head to the Modeling tab of the Power BI Desktop application.
The screenshot below shows that the cross filter direction is set to both, allowing both tables to filter each other.

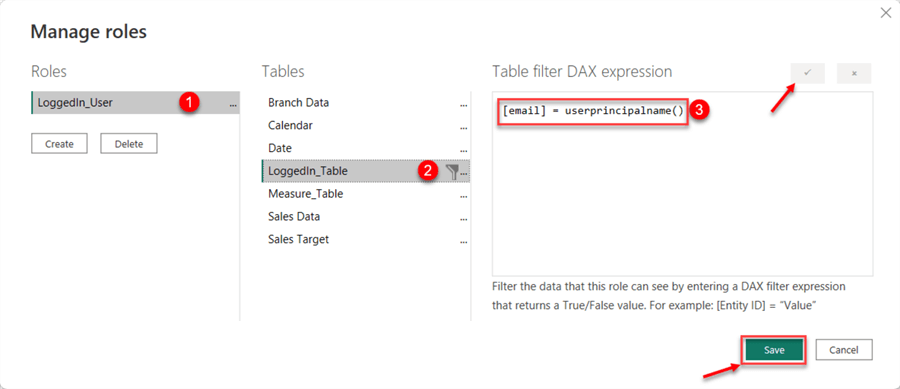
Step 2: Set Role Using DAX Formula. We need to create a new role called LoggedIn_user. The role will be in the email column of the “LoggedIn_Table.”
For the DAX formula, we will use the userprincipalname. The userprincipalname is used to return the name of a data user with an email column.
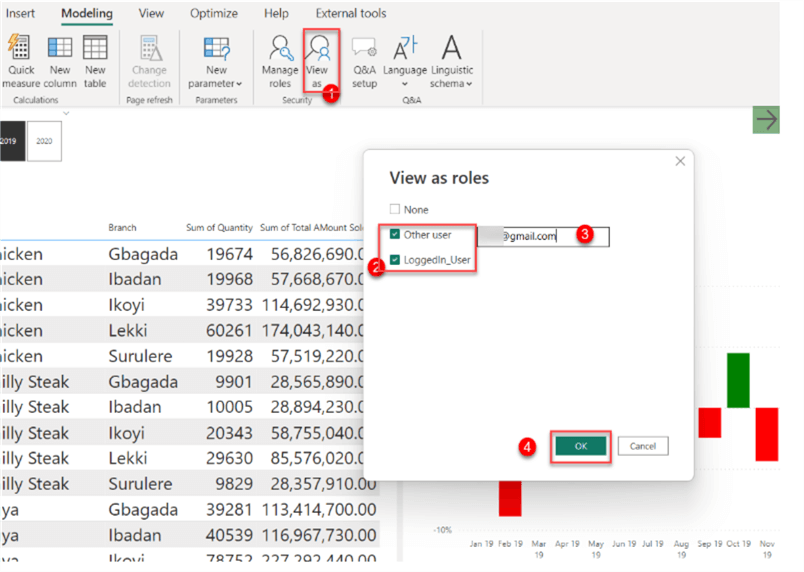
Step 3: Test Role. In Power BI Desktop, click View as and check both the Other user and LoggedIn_User. You will need to enter the email you want to use as your logged-in credential and then click OK.
Section B: Column and Object Level Security
What is Column and Object Level Security?
The Column and Object level security feature allows BI developers to hide specific tables or columns from report viewers. An example of column level security (CLS) is where a particular column in a table contains sensitive information like a password or other information. You want only selected users to read and interact with that column. You can also impose restrictions on object names and metadata. This is called object level security (OLS). Users without the necessary access permissions are prevented from viewing business-critical or sensitive personal information, such as employee or financial data, thanks to the additional layer of security.
Create a Column and Object Level Security
To create the CLS and OLS, you will need a third-party application such as Tabular Editor. At the time of this writing, Power BI Desktop only supports RLS.
Configure Security Using Tabular Editor
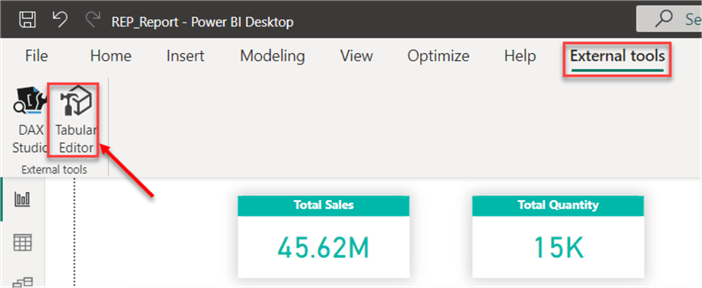
After downloading and installing Tabular Editor, open Power BI Desktop and navigate to the External tools tab and you will find Tabular Editor. It is best to restart Power BI Desktop if it isn’t shown.
Step 1: Create a New Role. We need to create a new role where we will assign both the CLS and OLS. Like the RLS process, click the Modeling tab and create a new role. For the new role, you do not have to assign it, you will do this in the Tabular Editor.
Step 2: Set Column Level Security. The Tabular Editor in Power BI Desktop should automatically open where you need to expand the table folder and the dataset and select the column you want your CLS configured. We will put our CLS in the “Total” column.
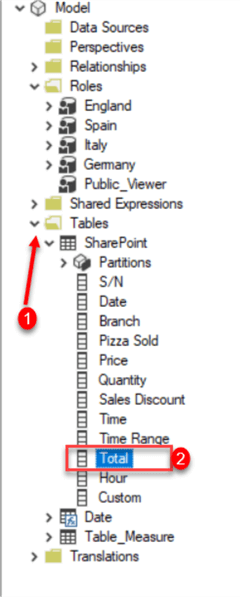
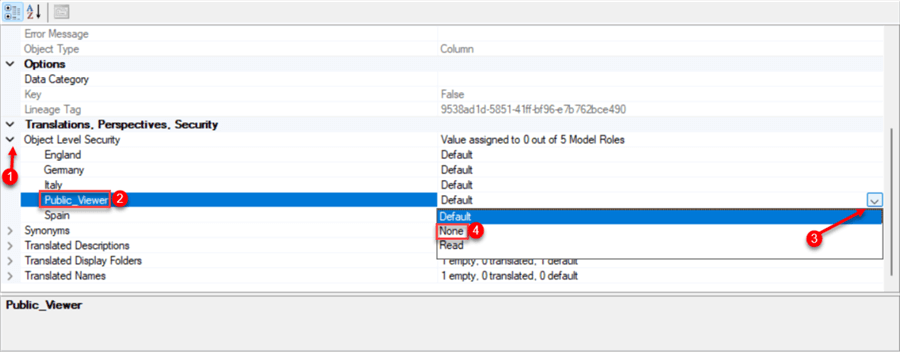
Step 3: Change the Default Status of Security. After clicking the “Total” column, the column settings will open in the right pane of the Tabular Editor.
In the security area, expand the “Object Level Security” and the “Public_Viewer” role we created in Power BI Desktop. From the dropdown menu, change the type from “Default” to “None.” You need to save the setting we just created in the Tabular Editor. This will also be reflected in Power BI Desktop.
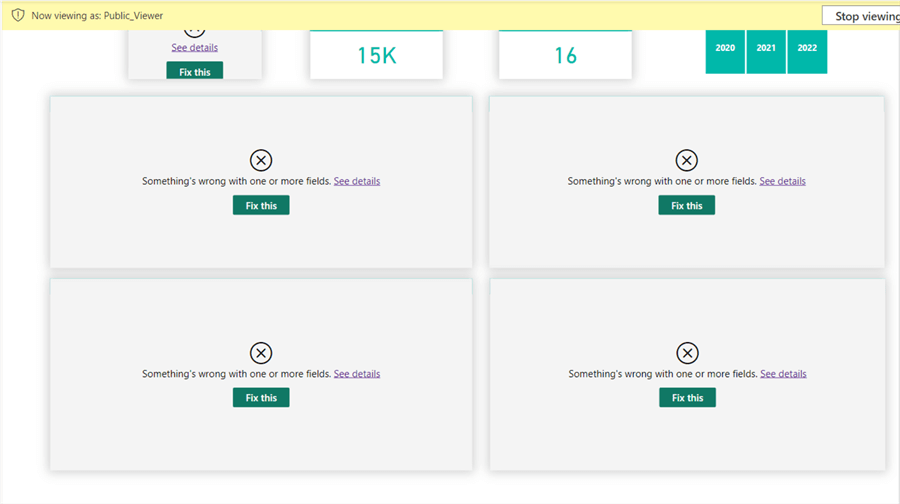
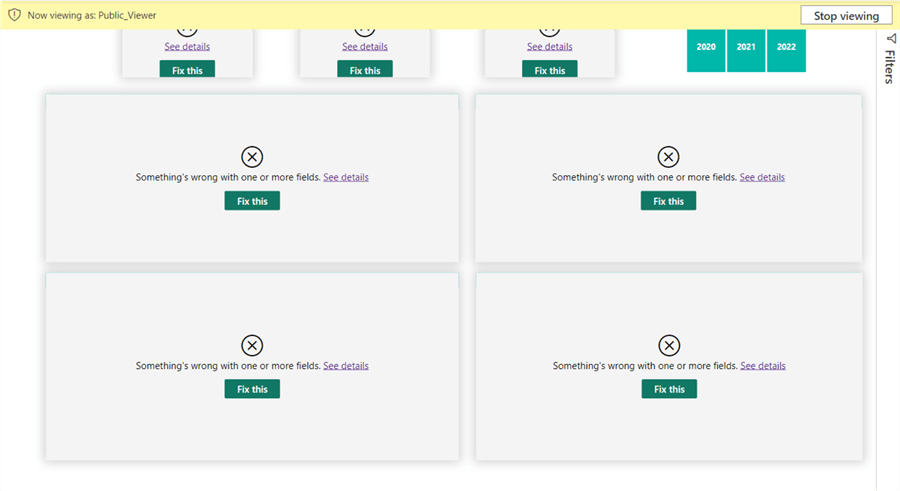
Step 4: Test CLS. In Power BI Desktop, click on Modeling and select View as. Then, select the role we created, the “Public_Viewer.” This will filter the report that has “Total” in its visual.
Configure For Object Level Security
The same process applies here as column-level security, but we will place security on the entire dataset.
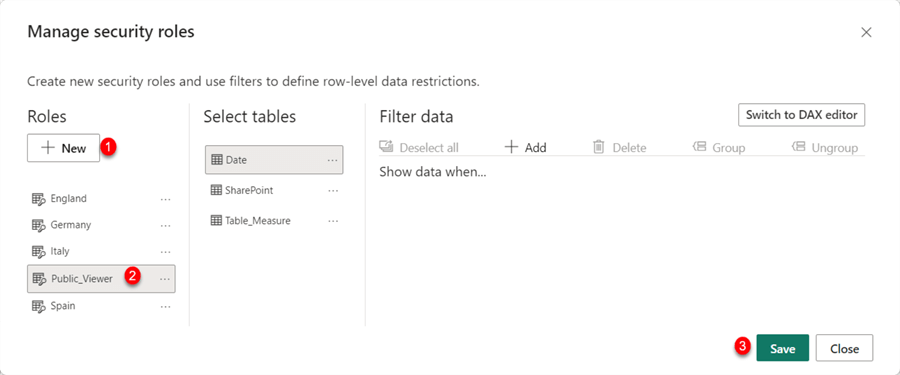
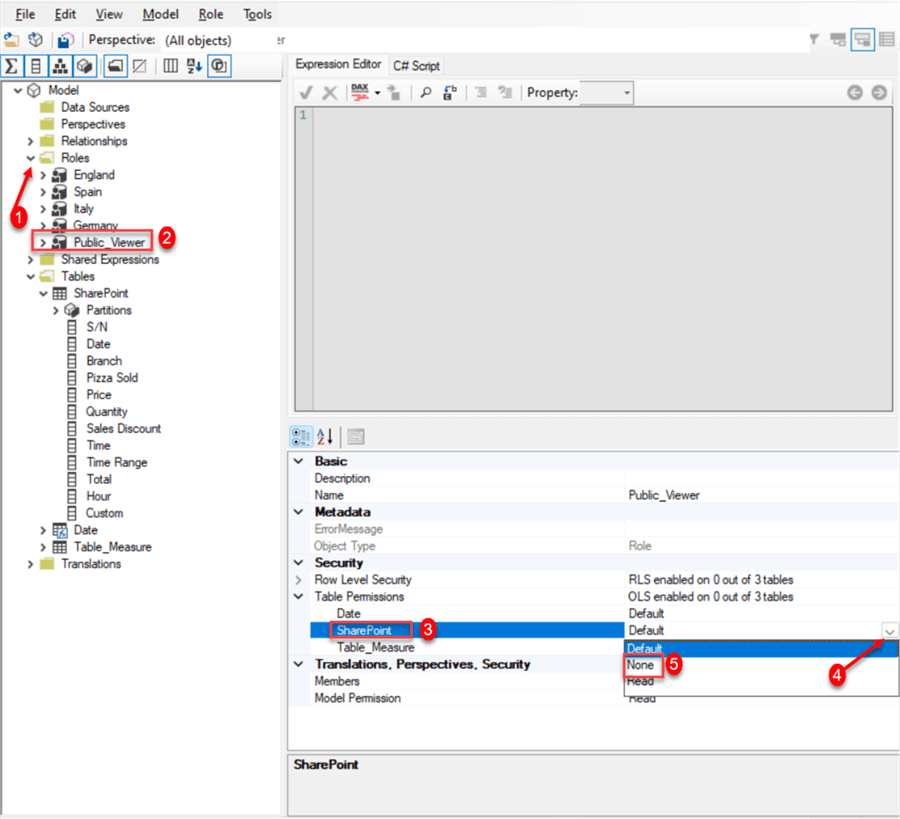
Step 1: Table Permission. Expand the “Roles” folder in Tabular Editor and click on the “Publier_Viewer” role. Now, navigate to the Table Permission and expand it. Finally, click on the dataset you want to place security upon.
In the SharePoint dataset, change from “Default” to “None” and save the setting. This will automatically update the Power BI Desktop.
Step 2: Test OLS. In Power BI Desktop, repeat the process we did for CLS by clicking on the Modeling tab and View as. You will notice from the report that most of the visuals are empty. These are the visuals containing the SharePoint dataset.
Section C: Workspace Access
Power BI Workspace Access
As stated earlier, workspaces are shared environments for a group of people under a particular tenant. It serves as a place for collaboration with members where they can compile collections of dashboards, reports, databases, and paginated reports.
Workspace Roles
Microsoft Power BI workspace comprises different roles, each with different abilities. We will discuss the different roles and what they can do.
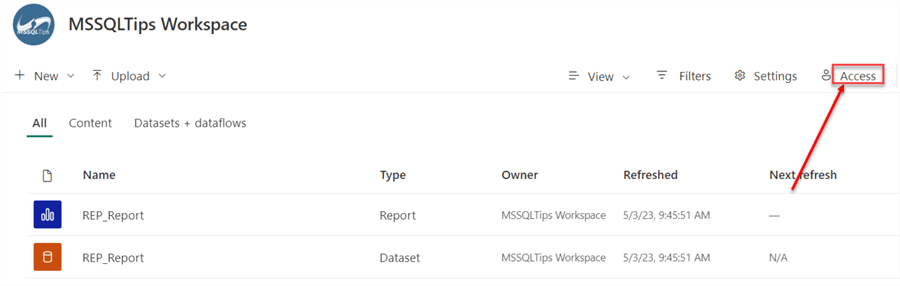
In your Power BI workspace, click the Access tab in the top right corner.
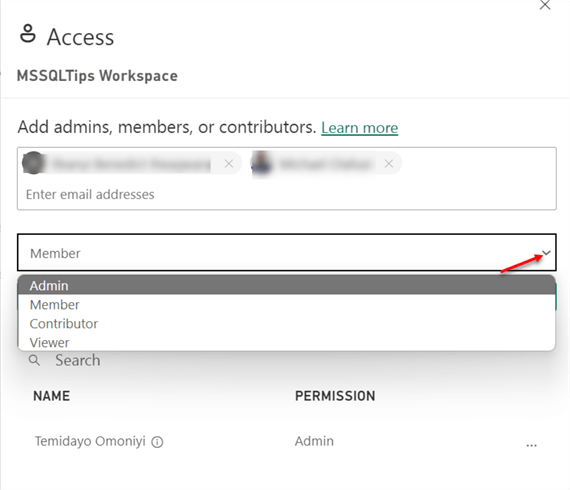
In the new window, click on the member dropdown to view all the available roles.
Viewer Role
- This is a minor role in the Power BI workspace. Users can only view and access all reports and dashboards in the workspace but need access to the dataset, dataflow, or even analysis in Microsoft Excel. The Viewer role only allows readers to access the content.
Contributor Role
- In this role, individuals can access reports and dashboards, including datasets and dataflows. In addition to deleting it, they can edit the content. As a result, they can complete their development work but not create Power BI Apps.
Members Role
- This role is similar to the Contributor role, with the addition of users having the ability to publish, unpublish, and update an App. This role also allows adding other users to the Viewer or Contributor roles.
Admin Role
- This is the highest level of access to the workspace. The Admin can change or delete the workspace and perform all of the Member’s role functions. Only an admin can remove other admins in a workspace.
Conclusion
In this article, we have learned about the different security available in Microsoft Power BI. We discussed static and dynamic RLS, creating a Power BI workspace, and publishing your report from Power BI Desktop to the service. We discussed how to assign different roles based on user logged-in credentials. We also covered the Column and Object level security based on the data table.
It should be noted that the data used is dummy data and no real-world data was used for this tutorial.
Next Steps
- What is Power BI embedded analytics?
- What is Azure Active Directory and Why You Need It
- SQL Server 2016 Row Level Security Example
- Power BI Row Level Security
- Power BI Workspace Permissions and Roles

Temidayo Omoniyi is a Microsoft Certified Data Analyst, Microsoft Certified Trainer, Power Platform Developer, Azure Data Engineer, Content Creator, and Technical writer with over three years of experience.
Currently, he works as a data and business intelligence analyst for a training and consulting company in Lagos, Nigeria.
Temidayo enjoys creating educative content on YouTube, LinkedIn, Twitter, and other online platforms. He loves sharing his knowledge and writing about systems, applications, tools, and processes.
Apart from training, writing, and coding, you will find him watching and reading Anime. He is a big fan of DC Comics.
- MSSQLTips Awards: Trendsetter (25+ tips) – 2025 | Author of the Year – 2023, 2024


