Problem
Azure Synapse Analytics comes with several exciting data exploration features. In previous tips (Explore SQL databases with Azure Synapse Analytics and Explore Spark databases with Azure Synapse Analytics) we investigated Azure Synapse Analytics’ data exploration features related to the SQL and Spark databases.
In this tip, we are going to learn how to use the Spark notebooks to explore the data in the Azure Cosmos DB containers.
Solution
Azure Cosmos DB Overview
Azure Cosmos DB is Microsoft’s managed NoSQL service, which supports non-tabular data models, like document, key-value, graph, and column-family. It provides globally distributed, scalable and low-latency data services. Cosmos DB guarantees low latency read and writes, which allows building flexible near-real-time applications based on the network of connected databases around the world.
Although Cosmos DB is very good at providing low-latency response for queries returning small data sets, its ability to run large-scale analytical queries are limited. Up until now, to run complex aggregations you needed to build ETL tools which would extract the data and then use other tools to perform aggregations outside Cosmos DB. However, with the emergence of Azure Synapse Analytics, we can now analyze data inside Cosmos DB, without the need to build ETL tools.
Another analytics feature is analytical store for Cosmos DB, which is currently in a preview. When enabled, this feature creates a read-only tabular copy of the transactional data in Cosmos DB containers and continuously keeps both versions in synch.
In the next sections, we will create a Cosmos DB account, upload a sample JSON document into it, link it to the Synapse workspace and analyze data using Synapse tools.
Create Azure Cosmos DB Account and Container
For the purpose of this demo, I’ve used an open source weather data, provided by US National Oceanic and Atmospheric Administration. I applied some transformations and converted it to a JSON format, which you can download from here.
Let us create a Cosmos DB account, using an Azure portal (see this Quickstart for more details). Provide the resource group name, account name, region and select the Core (SQL) option from an API drop-down list. Select Provisioned throughput option in the Capacity mode and enable free tier by selecting the Apply button under the Apply Free Tier Discount section, as follows:
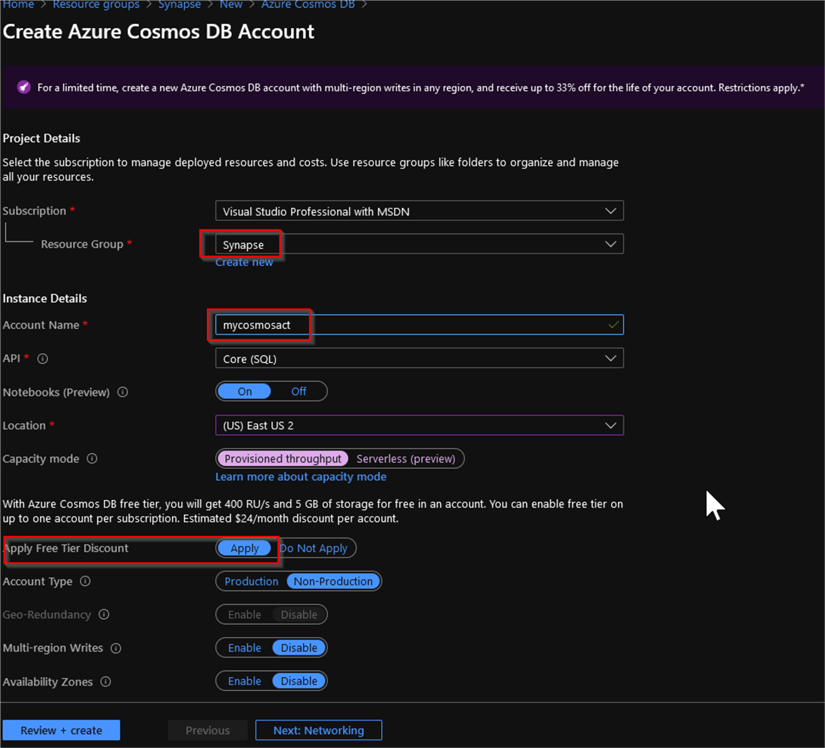
Figure 1
Once the Cosmos DB account is created, open the account page, select Data Explorer command, and click the Enable Azure Synapse Link button, as follows:

Figure 2
Next, to understand differences, we will create three containers: two with the analytical store enabled and one without it.
Create a container using the New Container button in the center of this screen, and provide a database name, container id and partition key, and ensure that the Analytical store feature is set to on, as follows:
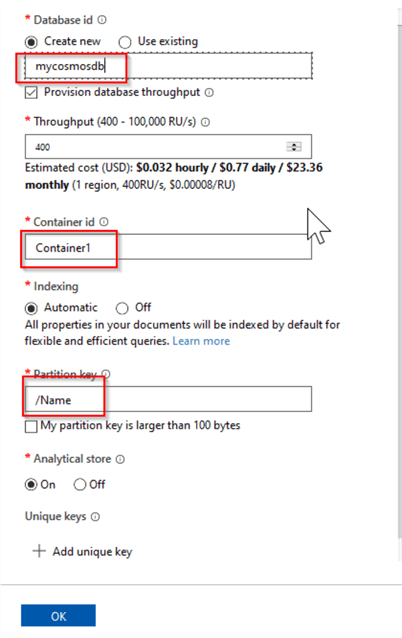
Figure 3
Note that although I have selected the Name field as a partitioning key, any other field from your data could be used for this purpose.
Once the container and database provisioned, expand the database items in the Cosmos DB’s object explorer, select the Items command, and use the Upload Item button to upload the weather JSON file, mentioned above.
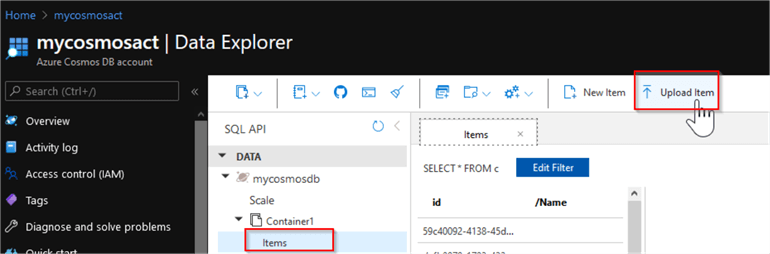
Figure 4
Once the data is uploaded, select one of the items and review its content as follows:
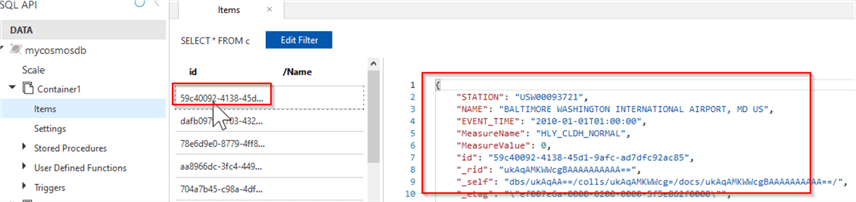
Figure 5
Next, create another container named Container2, using similar steps except do not upload the file – we will populate it from the Synapse.
Finally, create a container named Container3 without an analytical store, as follows:
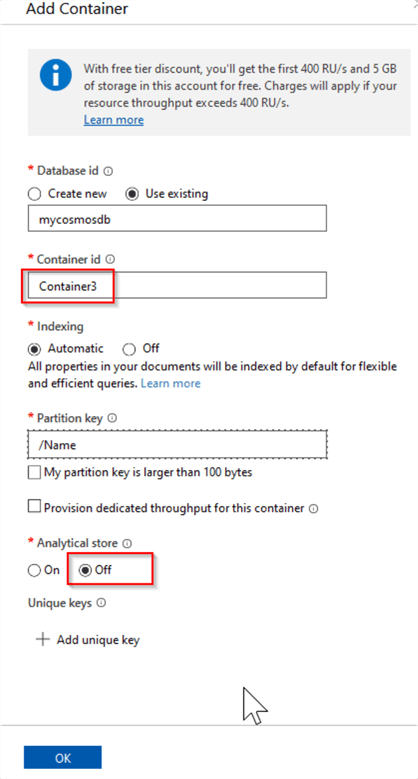
Figure 6
Once the Container3 provisioned, upload the weather data into it, using the above-mentioned steps.
Link your Synapse account with the Cosmos Db account
Now that we have a Cosmos DB account and container, let’s open the Synapse Studio, navigate to Data tab, switch to the Linked tab, and add a new resource using the top-right button and Connect external data commands, as follows:

Figure 7
Next, select the Azure Cosmos DB (SQL API) option, as follows:

Figure 8
Provide the name for the link, select your subscription, Cosmos DB account and database from the drop-down lists, and click the Create button, as follows:

Figure 9
Once the Cosmos DB link has been provisioned, the object explorer will display the containers created in the previous section, as follows:

Figure 10
Notice that Container3 has a different icon than the other two containers, because it does not have analytical store enabled.
Exploring the data from the container with the analytical store
Now we can explore the data inside these containers, using the Spark notebooks. Let us select Container1, then select the New notebook and Load Dataframe commands, as follows:
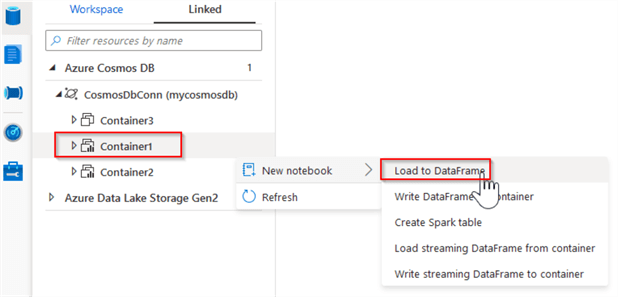
Figure 11
This will create a notebook with the following code:
df = spark.read\
    .format("cosmos.olap")\
    .option("spark.synapse.linkedService", "CosmosDb1")\
    .option("spark.cosmos.container", "Container1")\
    .load()
display(df.limit(10))
Notice that Synapse has chosen cosmos.olap as data source format, because this is an analytical store enabled container.
Execute these commands using the combination of Shift and Enter keyboard commands and review the results:

Figure 12
These commands illustrate how easy it is to convert the data from its original JSON format into tabular format, without even requiring its schema. Another thing to note that we did not need to provide any credentials, the Synapse has created the required connections transparently for us!
The data included here represents multiple measurements coming from different weather stations, and as you may have noticed, it is in a key-value format. Let us apply a pivoting transformation to convert it into the horizontal shape and write it back into Cosmos DB’s Container2 container, using the following commands:
dfPivoted=df.groupBy('STATION','NAME','EVENT_TIME').pivot('MeasureName').sum('MeasureValue')

dfPivoted.write\
    .format("cosmos.oltp")\
    .option("spark.synapse.linkedService", "CosmosDb1")\
    .option("spark.cosmos.container", "Container2")\
    .option("spark.cosmos.write.upsertEnabled", "true")\
    .mode('append')\
    .save()
Now we can switch back to the Cosmos DB’s Data Explorer and ensure that data has indeed landed in the Container2 and it is in a horizontal shape:
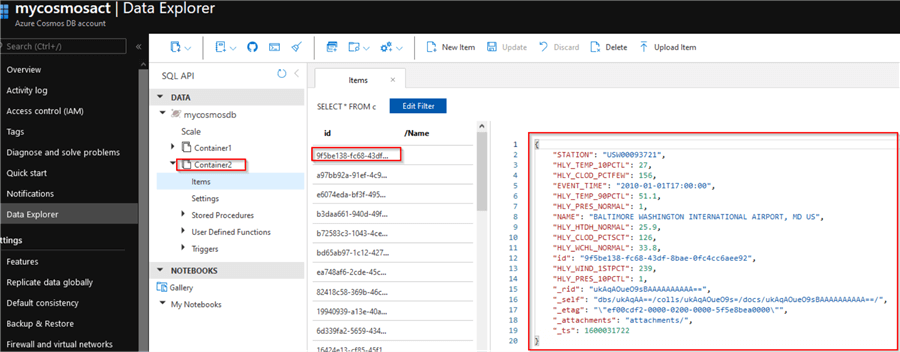
Figure 13
Importing Cosmos DB data into Spark tables
Creating a new Spark table and populating it with the data from Cosmos DB is very easy – all you need to do, is to select the container and choose the Create Spark table command, as follows:
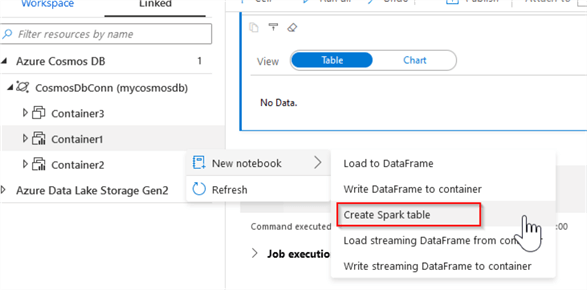
Figure 14
This will generate following command:
create table weather using cosmos.olap options (
    spark.synapse.linkedService 'CosmosDbConn',
    spark.cosmos.container 'Container1'
)
Run this command and add the following code to inspect the results:
%%sql
select * from weather limit 10
Querying the data from the container without analytical store
If we select Container3 and open the list of available commands, you will notice that fewer options are available, in compare to the analytical store enabled containers:

Figure 15
Specifically, Load to Dataframe command is not available, which is probably because containers without analytical stores are considered transactional data sources and as such, it is not expected to run analytical batch processes on them.
However, we can still browse this container’s content, using streaming data frames. Selecting the New notebook and Load streaming Dataframe from container commands will produce the following command:
dfStream = spark.readStream\
    .format("cosmos.oltp")\
    .option("spark.synapse.linkedService", "CosmosDbConn")\
    .option("spark.cosmos.container", "Container3")\
    .option("spark.cosmos.changeFeed.readEnabled", "true")\
    .option("spark.cosmos.changeFeed.startFromTheBeginning", "true")\
    .option("spark.cosmos.changeFeed.checkpointLocation", "/localReadCheckpointFolder")\
    .option("spark.cosmos.changeFeed.queryName", "streamQuery")\
    .load()
Notice that Synapse has recognized this data source as a transactional and selected the cosmos.oltp option, accordingly.
We will investigate Synapse’s streaming capabilities in one of the upcoming tips.
Summary
In this tip, I have demonstrated how easy it is to read and write from/to Cosmos DB, using the Synapse Studio.
If you have reviewed my previous tips related Azure Synapse Analytics’ integration with SQL, Data Lake and Spark, you know that they all are based on the following common principles:
- Seamless integration, requiring no credentials within the code. Synapse takes care of the secure connections to the required services behind the scenes.
- Little or no coding required, in many cases Synapse generates the code automatically, making data exploration and the code development easier.
- The centralized tooling, we could achieve most of our goals using Synapse Studio.
Next Steps
- Read: Welcome to Azure Cosmos DB
- Read: Quickstart: Create an Azure Cosmos account, database, container, and items from the Azure portal
- Read: What is Azure Cosmos DB Analytical Store (Preview)?
- Read: Azure Synapse Analytics Overview

Fikrat Azizov (MCSE Data Platform and MCSE Azure Solutions Architect) has been working with SQL Server since 2002. Fikrat’s main passions are SQL Server performance optimization, cloud data technologies and machine learning. Fikrat is currently working as a Solutions Architect at Slalom Canada.
- MSSQLTips Awards: Author of the Year Contender – 2019-2022 | Rising Star (50+ tips ) – 2021