Problem
Azure provides a cloud solution for storing data using Azure Blob Storage. We need to export SQL Server data and store it in Azure blob storage. How can we do so? This tip will cover the following topics.
- A brief overview of Azure storage.
- Setup Azure storage account, containers.
- Configure an SSIS package for data upload into the blob storage.
- Download the data from blob storage into the local storage.
Solution
Azure Blob Storage Overview
Azure Storage provides a scalable, reliable, secure and highly available object storage for various kinds of data. You get the following kinds of data storage:
- Azure Blobs: An object-level storage solution similar to the AWS S3 buckets. You can store the file and access it through a URL. It can be used for streaming audio, video, documents, binary log files, images, etc.
- Azure Files: Use this to configure the file shares for on-premises or the cloud deployments.
- Azure Queues: Store a large number of messages for communication between application components.
- Azure tables: Azure tables can store the structured NoSQL data in the cloud. It is suitable for structured and non-relational data.
- Azure disks: Azure disks are used as storage volumes for the Azure Virtual machines.
In this tip, we are working with the Azure Blobs for storing the exported data from SQL Server.
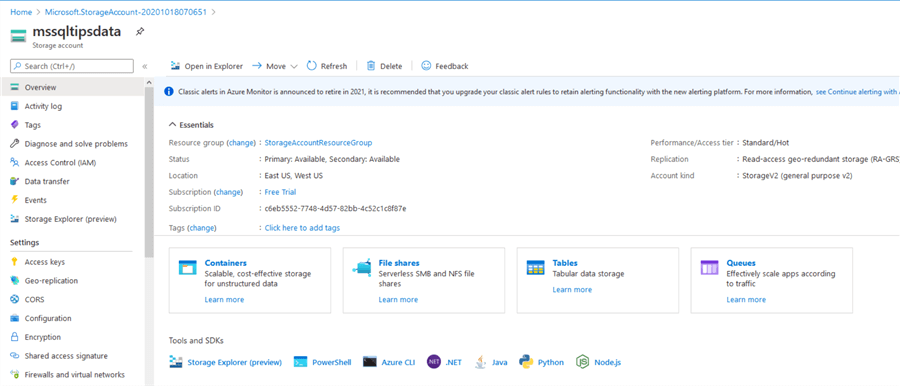
Azure Storage Account
Log in to the Azure Portal by specifying your Azure subscription credentials. If you do not have access, use this link to Create your Azure free account.
Once you login to the Azure portal, a dashboard is launched for all Azure services.

Click on the Storage accounts under the Azure services. As shown below I do not have a configured storage account in my subscription.

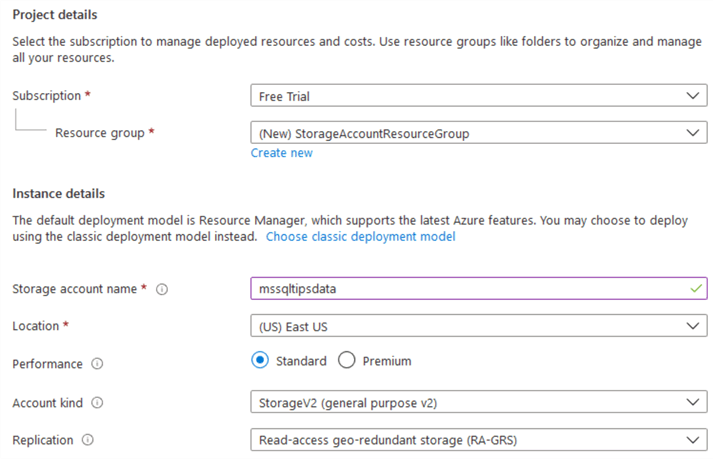
Click on Create storage account. In the below storage account configuration, enter the following values.
- Resource group: A resource group is an Azure container for Azure resources. Choose an existing resource group or create a new group. Here, I use the new resource group – StorageAccountResourceGroup.
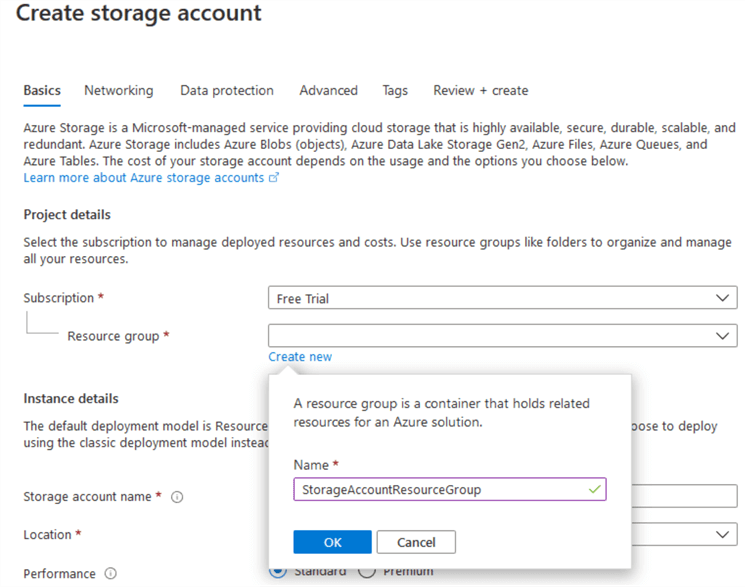
- Storage account name: Enter a unique storage account name.
- Location: Select the Azure region from the drop-down. You should choose the nearest region to avoid network latency.
We can go ahead with default values for the other configurations.
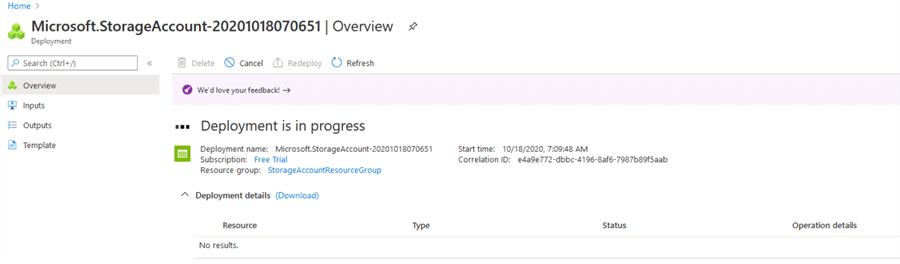
First, validates all configurations for the storage account. Once the validations pass, select Create.

Next, the deployment will start for the storage account.
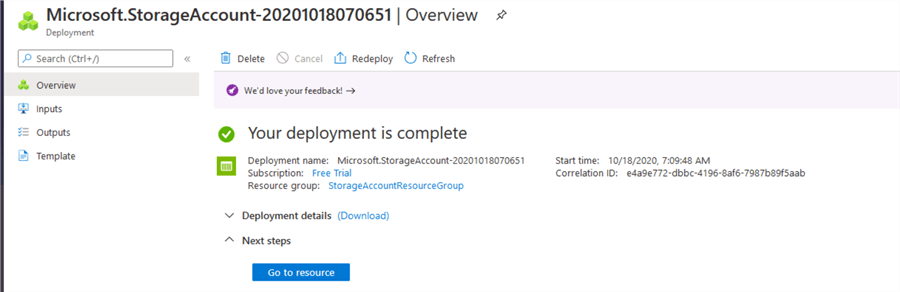
A storage account is created quickly. Click on Go to resource to open the storage account.
In the storage account you can see storage options as described earlier.
Create a Container in the storage account
We need to create a container for blob storage. Select "Containers". If there are any existing containers you can view them or create a new container.

Select this "Container" and specify a name for your container. Here, we specify the container name - datauploadssis.

Our container datauploadssis now exists in the mssqltipsdata storage account.

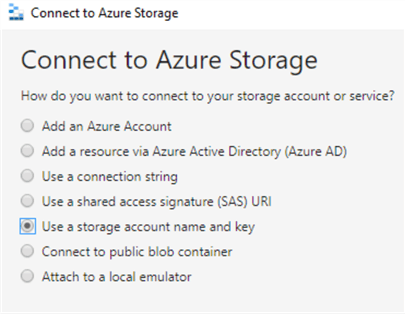
Install Azure Storage Explorer
The Azure Storage Explorer tool manages the storage account and works with Azure blobs, files, queues, tables, Azure Cosmos DB and Azure Data Lake Storage entities.
Launch the Azure Storage Explorer and choose the option Use a storage account name and the key to connect to the storage account.
To connect with the storage account, use the access keys. You can click on the access keys option and it shows the following information:
- Storage account name
- Access keys

Note the access keys and enter the next screen to connect to the storage account.

Click Next. Review your storage account name, display name and access key.
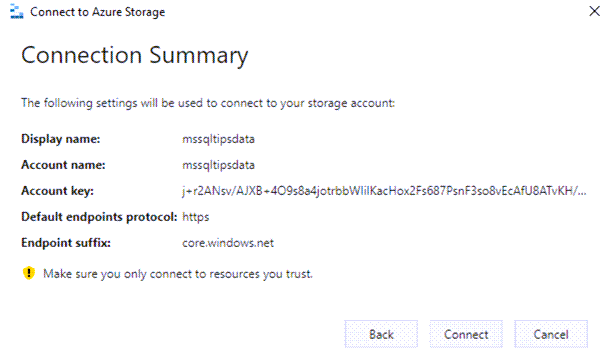
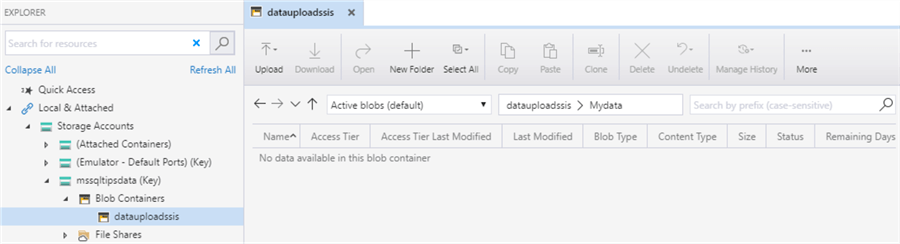
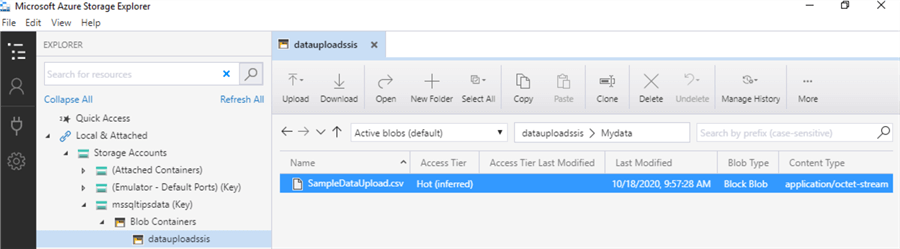
Click on Connect. Here, we see the storage account and Container.

We can create a new directory in the Container for uploading files. Click on New Folder shown above and enter a folder name as shown below.

In the Azure storage explorer you can view the connected storage account, container (datauploadssis) and directory (Mydata).
Download Azure Feature Pack for Integration Services
We need to install the Azure feature pack for Integration Services to work with the Azure resources in the SSIS package. Before you install the Azure feature pack, make sure to have the following environment for this article.
- Visual Studio 2019 with SQL Server integration service projects. Refer to Install SQL Server Integration Services in Visual Studio 2019 for instructions.
- SQL Server database engine: In this tip, we use SQL Server 2019.
- Running Integration Services.
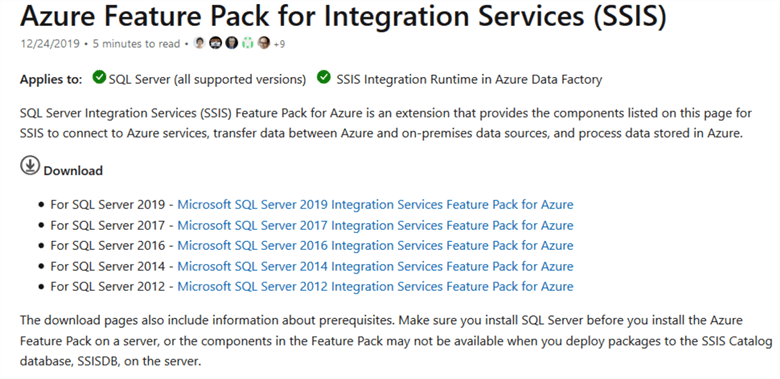
Download and install the SSIS feature pack as per your integration service version.
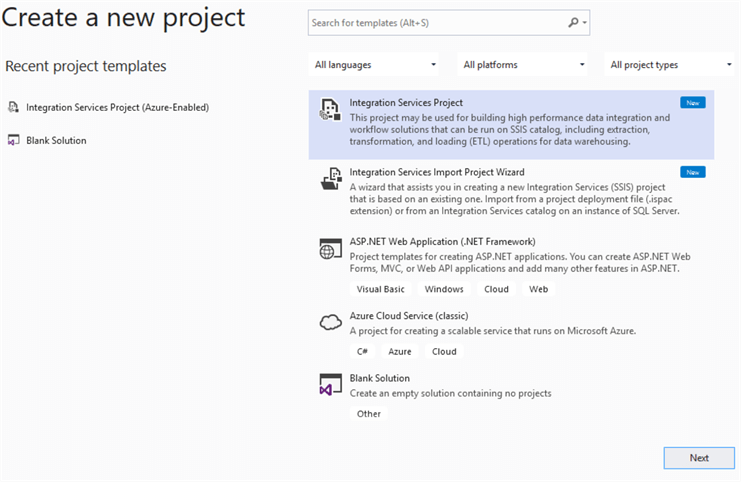
Create a new SSIS Package for Azure Blob Storage Upload
Launch Visual Studio 2019 and create a new Integration Services Project.
Specify a project name and directory to store the package files.

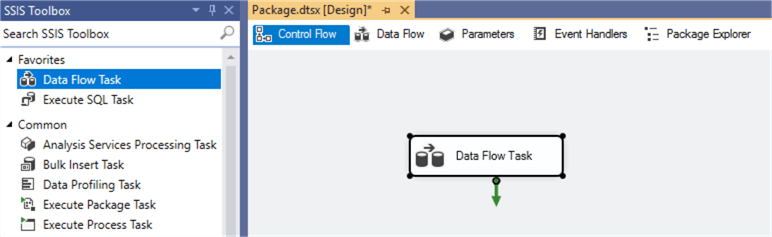
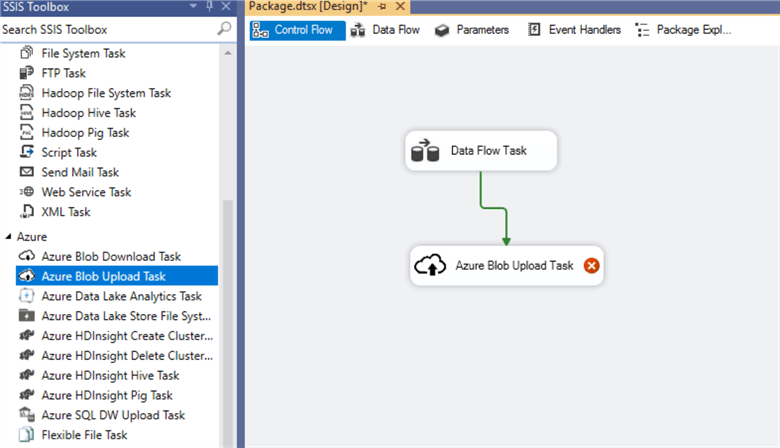
In the SSIS toolbox we see the Azure blob tasks as highlighted in the square box.

To export the data from a SQL database table, add a data flow task.
In the data flow task, add an OLE DB Source (renamed as Source SQL Data) and destination (renamed as Destination CSV). We will not discuss in further detail the configuration of these OLE DB sources and destinations in this tip. You can follow these integration services tips for detailed steps.
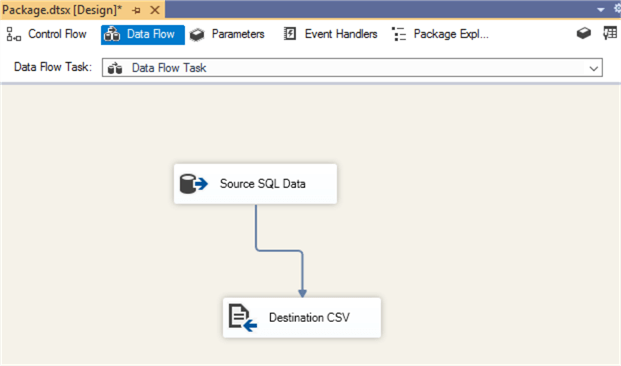
For reference purposes, my OLE DB source details are as below:
- SQL instance: SQLNode2\INST1
- Source Database: AdventureWorks2019
- Table for export: dbo.orders
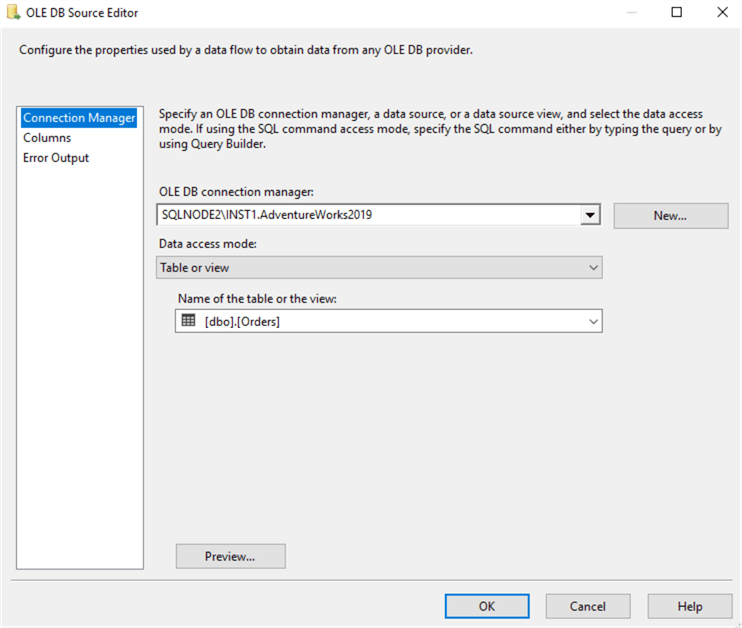
The configuration for the Flat file destination is as below:
- Flat file format: CSV
- File name: C:\Test\SampleDataUpload.CSV

Add the Azure Blob Upload Task and join it with the Data flow task as shown below.
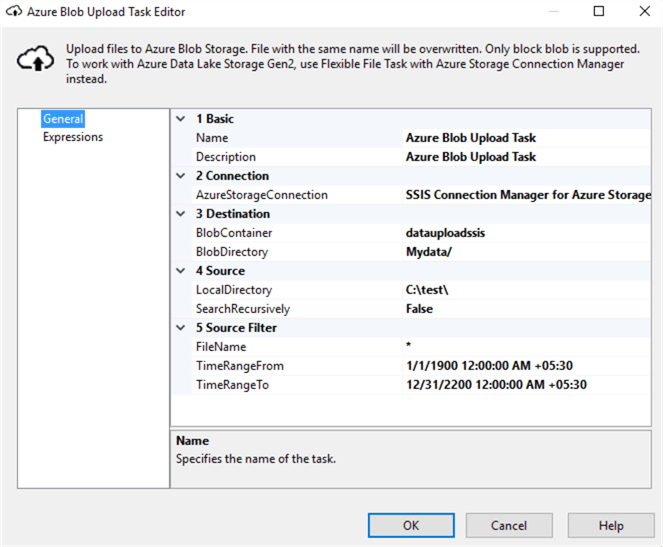
We need to configure the Azure Blob Upload task. In the task editor, perform the following configurations.

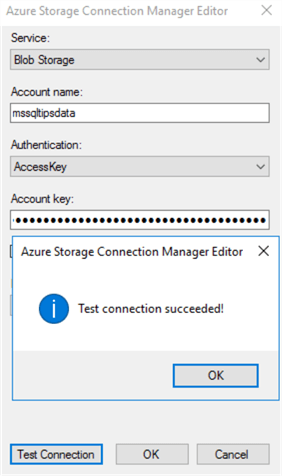
AzureStorageConnection: Add a new storage connection by specifying the storage account name, authentication (access keys), and account key (access key).

Select "Test Connection" to verify the connection with the storage account.
Once the storage account connection is successful, enter the blob container and directory as we configured earlier.
In the source folder, enter the path for the CSV file. This is the output of the data flow task.
Click OK to finish the configuration. Execute the SSIS package and it should run successfully.

Refresh the Azure Storage container and you should see the uploaded CSV using the SSIS Package.
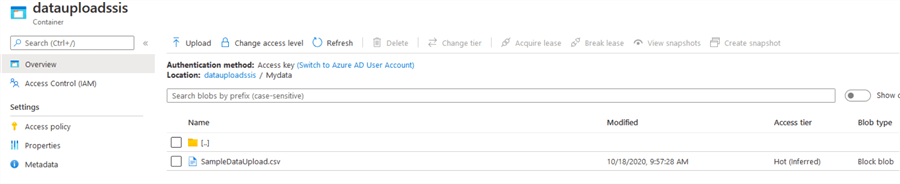
You can view this using the Azure Storage Explorer.
SSIS Package for Azure Blob Storage Download
Similar to the Azure Blob Upload Task, use Azure Blob Download Task for downloading files from Azure blob storage as shown below.
In the below package, we also use an Execute SQL task in between the Azure Blob Upload Task and Azure Blob Download Task.

This Execute SQL task is to introduce a wait between a blob upload and download. If you have a large file to upload into the storage container, it might take some time depending upon the network bandwidth. Therefore, the wait might solve the issue if you want to download the same file.
Below is the configuration for the Execute SQL task.

Below is the configuration for the Azure Blob Download task.

Execute the SSIS package and see all tasks completed successfully.

Next Steps
- Go through existing tips on Microsoft Azure.
- Read more about the Azure Storage services in Microsoft docs.

Hi! I am Rajendra Gupta, Database Specialist and Architect, helping organizations implement Microsoft SQL Server, Azure, Couchbase, AWS solutions fast and efficiently, fix related issues, and Performance Tuning with over 14 years of experience.
I am the author of the book “DP-300 Administering Relational Database on Microsoft Azure.” I can be reached at: Rajendra.gupta16@gmail.com for any consulting help.
- MSSQLTips Awards:
- Author of the Year – 2022 | Author Contender – 2021/2023/2024 | Champion Award (100+ tips) – 2020


Hi Rajendra,
I was using azure feature pack in ssis to upload files in blob storage. After following all these steps mentioned in the blog post, upload task failed. Looks like it failed due to the path error. path2 (the file name part including backslashes to the path). here is the error message:
“[Azure Blob Upload Task] Error: Upload task has stopped with exception: Upload file failed at path test/upload/\packages.txt.”
to remove path error, I used expression for the local directory and file name. still ssis concatenating backslash (\) at the beginning of path2.