Problem
In this second part of this series, we look at how to setup an Availability Group between two different Windows Failover Clusters in two different datacenters. I recommend reading the first part of this article to better understand the goals of this article. In this first part, I explained the need to have an HA and DR solution for SQL Server databases. I also explained the design under which we are going to configure the Availability Group on top of SQL Server failover cluster instances. In this article, I explain the steps to deploy the design.
Solution
In the first article, I gave a brief detail about our requirements for SQL Server databases in order to fulfill HA & DR capability. Below is the configuration of what we are trying to achieve.

Now, let’s go to the deployment steps.
Configure Availability Group between Failover Cluster Instances Deployment
I explained in my last article that this deployment can be done in 4 stages:
- Configure Windows Clustering between all 4 nodes. Ensure to add shared storage disks between their respective nodes.
- Install SQL Server Cluster Instance in Primary Datacenter between nodes hosted in this datacenter with their set of shared storage.
- Install SQL Server Cluster Instance in Secondary Datacenter between nodes hosted in this datacenter with their set of shared storage.
- Configure an Always On Availability Group between both installed SQL Server cluster instances between both datacenters.
The Windows clustering part is usually done by your platform team, whereas the rest of the steps are usually covered by DBAs. Let’s start with verifying the pre-requisites followed by the deployment.
Pre-requisites
- Verify that all nodes have the same version of the Windows Server operating system and software updates installed. If not, first get them to the same version before going to the next step.
- All nodes must be part of the same WSFC as shown in the below image.

- Choose the optimal quorum configuration with proper votes assigned to nodes or quorum witnesses based on your configuration. You can check this by running the below PowerShell command.
--Get cluster quorum configuration setting
Get-ClusterQuorum
You can also use this SQL Server query to check the quorum settings of WSFC by running the below T-SQL statements post installation.
--Get cluster quorum configuration type using T-SQL query
SELECT cluster_name, quorum_type_desc, quorum_state_desc
FROM sys.dm_hadr_cluster;
- Ensure the account you are using has sysadmin rights on these nodes.
- The recommendation is to have identical drive letters in both datacenters between their set of nodes. You can choose different drive letters as well, but ensure to use the MOVE command while restoring databases and in the configuration.
- Ensure possible owners of the both FCIs are set correctly, i.e., possible owners for instance hosted in primary datacenter should be Node1, Node2; and the possible owners for instance hosted in DR or secondary datacenter should be Node3, Node4. You can check the Failover Cluster Manager.
Install SQL Server Cluster Instance in Primary Datacenter
- You must be using a sysadmin account to perform this installation.
- Validate both nodes hosted in the primary datacenter configured with failover clustering have their own set of shared storage disks on which SQL Server databases will be hosted. Test that failover is working fine between both nodes.
- Possible owners for shared storage disks must be Node1 & Node2. You can validate this through Failover Cluster Manager. You can get this information by accessing the storage disk properties of the assigned storage. You can see below I have launched the properties window of one of the production disks and the possible owner is set to only two nodes associated with this instance.

- Now we will start the SQL Server Installation. Go to the folder where you have copied the SQL Server setup files. It should be on the node where you must install it. Right click the setup file and click run as administrator to launch the installation window.
- You need to select New SQL Server failover cluster installation option on the primary node. Enter your product key and click on next to proceed.
- I am not giving the step by step process to install SQL Server cluster instance in the primary datacenter as it is a straightforward cluster installation between Node1 & Node2 with their set of shared storage disks. Follow all steps that you do for standard cluster installation. You can follow steps given in attached links SQL Server 2019 cluster installation, SQL Server 2016 cluster installation or SQL Server 2014 cluster installations as per your target SQL Server version to install cluster instance between Node1 and Node2.
- I will give the step by step process for installation done in secondary datacenter as it requires some changes.
- Once you installed SQL Server cluster instance on Node1, then the next step is to add Node2 as part of this cluster installation. Follow SQL Server installation window to get this added to the above installed instance. You can follow these links for SQL Server 2019 cluster – Node Addition, SQL Server 2016 cluster – Cluster Addition or SQL Server 2014 cluster- Node Addition to understand the step by step process to add a secondary node to the cluster instance.
Install SQL Server Cluster Instance in Secondary Datacenter
- You must be using sysadmin account to perform this installation.
- Validate both nodes hosted in secondary datacenter configured with failover clustering having their own set of shared storage disks on which SQL Server databases will be hosted. Test the failover is working fine between both nodes.
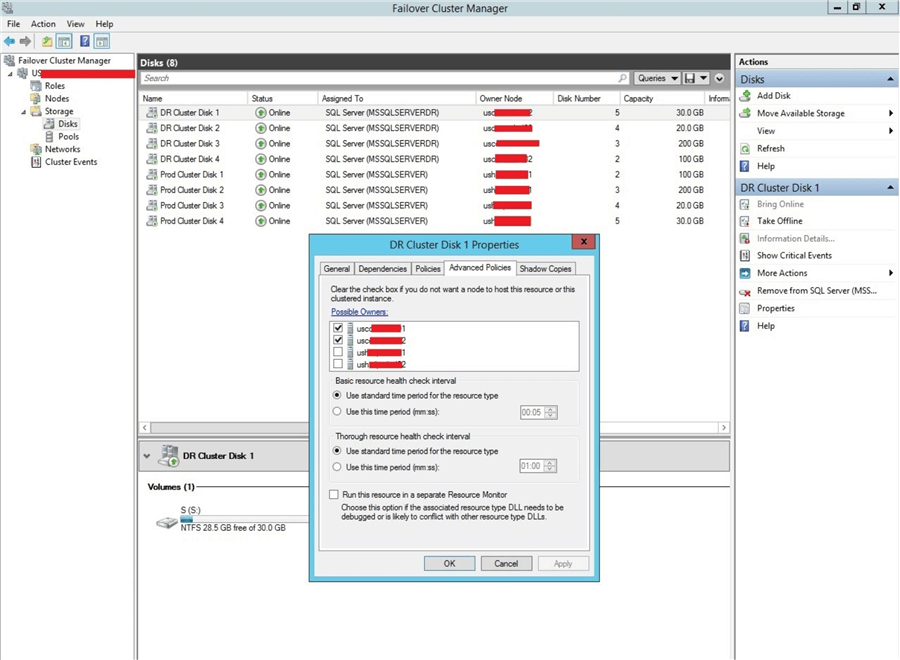
You can see all cluster storage disks in the below image. There are two set of storage disks. One is named as DR** and the other is named as Prod**. You can also see Prod** named storage disks are assigned to the first set of SQL Server cluster installation that we just completed in the above section in the primary datacenter. Similarly, DR** storage disks will be assigned to the other failover cluster installation that we will do in this section.

- Possible owners for shared storage disks must be Node3 & Node4. You can validate this through Failover Cluster Manager. You can get this information by accessing the storage disk properties window. I have taken this screenshot post installing both SQL Server cluster instances that is why you can see all storage disks are assigned to their respective installation, but you can get this information anytime from Failover Cluster Manager.
- Ensure the DR nodes don’t have any assigned vote values, it should be zero.
- Now we will start the SQL Server installation. Go to the folder where you copied the SQL Server setup files. It should be on the node where you must install it. Right click the setup file and click run as administrator to launch the installation window.
- You need to select New SQL Server failover cluster installation option on the primary node. Enter your product key and click on the next button to proceed.
- The next screen will appear to accept the licensing terms. Click the checkbox to accept the licensing agreement and click next to proceed.
- Microsoft Update will be the next window. If you want to use this feature to receive SQL Server updates, then click the check box and proceed otherwise just click next without performing anything in this window.
- Setup files will proceed to install. Next, failover cluster rules will run to check whether your cluster installation will be successful or not. If any rule fails or shows a warning message, then it is recommended to first fix that issue and then proceed with installation.
- Once all rules pass successfully, click next to proceed. The next window allows you to select the setup role. As we need to install the SQL Server database engine, we will choose the SQL Server feature installation option.
- As we have selected the feature installation, the next window will let us select what features we need to install. Choose as per your needs. You also need to enter the instance root directory along with binary directories where SQL Server will install these features.

- After choosing the features that you want to install and the installation directories, click next to proceed. The next window will let us enter the SQL Server Cluster instance and Network name. Enter the SQL Server Network name that will be used to make connections along with the Instance name. Leave default if you want to install a default instance or if you have already installed a default instance on your first FCI in the primary datacenter then you must use a named instance.

- If you proceed with the same cluster instance name that you had installed in the primary datacenter, then you will get the below error during the installation because all four cluster nodes are part of same WSFC. You will need to enter a different cluster instance name in the window above to be able proceed.

- Click on next button after entering the correct cluster instance name for the DR instance in the secondary datacenter. You will get the below window showing the instance name. You can see the default SQL Server instance is also showing in the below image that we had already installed in the primary datacenter.

- The next screen is for cluster disk selection. As we know both datacenters have different sets of shared storage disks that will be present to their respective nodes. Here, you can see only the DR storage disks that are attached to Node3 and Node4 are enabled to select because we have already installed SQL Server cluster instance on the first set of storage disks for the Prod cluster attached to Node1 and Node2.
Click the check boxes for each shared disk to designate for this cluster.

- We have selected all four disks, so click next to proceed.

- The next page will let us do the network configuration. Enter the subnet IPs and the SQL Server network name IP here. Ensure that this IP is not being used anywhere else.

- Click next after entering the network IP details.

- The next window will let’s configure the service accounts. Enter the service accounts and passwords along with the desired collation for the SQL Server installation. Ensure to use the same collation in both installations.

- On the next screen, there are a few more server level configurations, like authentication modes and the sa password. Choose mixed mode or Windows mode as per your needs. Add your current account as an administrator to have access to the SQL Server instance.

- On the next screen, configure the database file directories. You can see in the below image how data directories are segregated for database files over multiple drives. Click the FILESTREAM tab if you have a requirement to use filestream otherwise click next to proceed.

- This screen shows the final installation window where you can validate the configuration values. If all looks good, click install to start the installation.

- The SQL Server installation will be initiated and you can see the progress bar as shown below.

- Login to Node4 and launch the SQL Server installation and choose “Add a node to a SQL Server failover cluster” to add this node as a cluster node for the DR datacenter cluster.

- Follow the installation instructions, you will get the below popup during the installation. Just click yes to proceed. The node will be added to the DR SQL Server cluster.

- Test the installation by failing over to this newly added node.
Configure Always On Availability Group between Both Cluster Instances
Here, we will configure AOAG between the above installed SQL Server clusters.
- Enable Always On Availability Groups feature on both cluster instances hosted in both datacenters. Remember, you must restart the instance for this feature to be enabled.
- Launch SQL Server service properties window in SQL Server Configuration Manager.
- Select the Always On High Availability tab in the Properties dialog box and click the check box to enable Always On Availability Groups.
- Click OK to restart the SQL Server service.
- Create your database on the SQL Server cluster instance hosted in the primary datacenter or restore your database from whatever system you are using. You can also do this step post configuration of AOAG by just adding the restored database to the availability group. Migrate all objects that are needed for your application like jobs, logins, and permissions, etc. As migration is not in scope of this article, I am not covering these steps.
- Take a backup of database hosted on the primary cluster in the primary datacenter between Node1 and Node2 (if you have performed any transactions on this database do log backups as well) and restore it to the secondary cluster using the NORECOVERY option. Apply subsequent log backup restores if needed.
- Always use SQL Server Network names of both cluster installations to configure the AOAG. Get the Listener IP before creating the availability group.
- Once you have all the details, start creating AOAG between both cluster instances. You can set the availability mode to asynchronous or synchronous, depending upon the design of your environment.
- Right-click on the Availability Groups folder and select the New Availability Group Wizard… option launching the New Availability Group Wizard in SQL Server Management Studio on the primary cluster hosted in the primary datacenter.
- Click Next to enter the name of the Availability Group in the Availability group name field.
- Select the checkbox beside the database to be included in the Availability Group within the Select Databases page. The selected databases must be in a Full Recovery mode prior to joining them in the Availability Group. Click Next.
- Under the Replicas tab within the Specify Replicas page, click Add Replicas and connect to the other SQL Server cluster instance. Use the SQL Server Network name of the DR instance.
- Verify that the port number value is 5022 in the Endpoints tab.
- Configure listener option within the Listener tab. Ensure to have separate IPs as both DCs are in different subnets.
- You can do Data Synchronization before or after configuring the AOAG. So, select the appropriate configuration here.
- Validation checks will be executed on the Validation page. Click Next to proceed. The AOAG will be should be created successfully at this step.
- Once the AOAG is created, you can add databases if you have not done so during the AOAG configuration.
- Now, you can launch the Availability Group dashboard to check the status. Here you can see our configuration is working fine and all have green checkmarks.

Next Steps
Read these related articles:
- Read more articles on SQL Server Clustering & SQL Server Availability group in attached links.
- You can also read more article on SQL Server Management Studio
- Explore more knowledge on SQL Server Database Administration Tips

Manvendra is a passionate database lover currently working as a Technical Architect at one of the top MNCs. He has extensive experience on all versions of SQL Server since 2000 and has built Big Data skills. He has lead projects on the following database features: Database Mirroring, Always ON, Replication, Log Shipping, Geo-Clustering and Performance Tuning and delivered many SQL Server projects on consolidation, upgrades, heterogeneous replication, HA / DR solutions, automation and major performance tuning projects. You can also follow Manvendra on his blog, Twitter, LinkedIn and Facebook.
- MSSQLTips Awards: Champion (100+ tips) – 2018 | Author Contender – 2015-2018, 2021-2022