By: Kenneth A. Omorodion | Updated: 2021-10-06 | Comments (3) | Related: > Power BI
Problem
In a recent article, I have written about how to schedule pdf export of report pages in Power BI service which is sent via email to end users using Power Automate
But what if we need to export and email pdf versions of reports which has been created with role level security (RLS) applied. How do we go about scheduling the export and email of these reports to each individual role as applied in the RLS? For sure, it would not be reasonable to use either the full reports export functionality in Power BI service to schedule this export or the method I described in my other article (although this can still work, but not a very efficient approach).
Since RLS are applied to reports to create security on the report based on the roles of the end users, it is essential to create a solution that maintains the integrity of the RLS as applied on the Power BI reports. Good news is that we can achieve this using Power Automate as would be demonstrated in this article.
Solution
To demonstrate this, I have separated the steps followed as follows.
STEP 1: Ensure Prerequisites are in place
It is essential to ensure that the prerequisites detailed in this article are adhered to when creating automated export of Power BI reports with RLS via Power Automate. I have written the above steps with the assumption that:
- You must have created a Power BI report with Role Level Security applied/configured on it. If you haven't done this, you would need to create the report and apply RLS before continuing the steps in this article. See how you can implement RLS in a Power BI report in this Microsoft documentation.
- The Power BI report has been published to a premium workspace in Power BI service.
STEP 2: Create the scheduled cloud flow from scratch
To create the scheduled flow, you would need to login to Power Automate using flow.microsoft.com. After successful login, you would need to do the following.
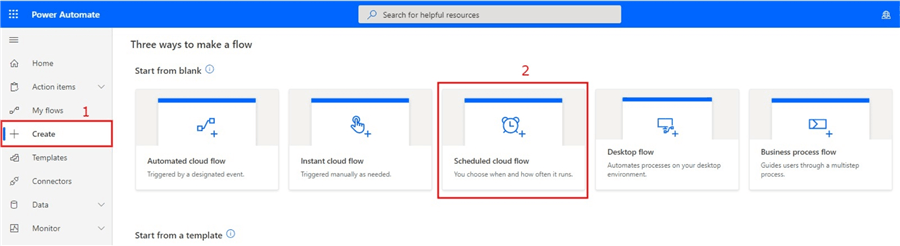
Click on the "Create" on the left blade as seen in the diagram below. Then, select "Scheduled cloud flow" to start creating the flow from scratch.
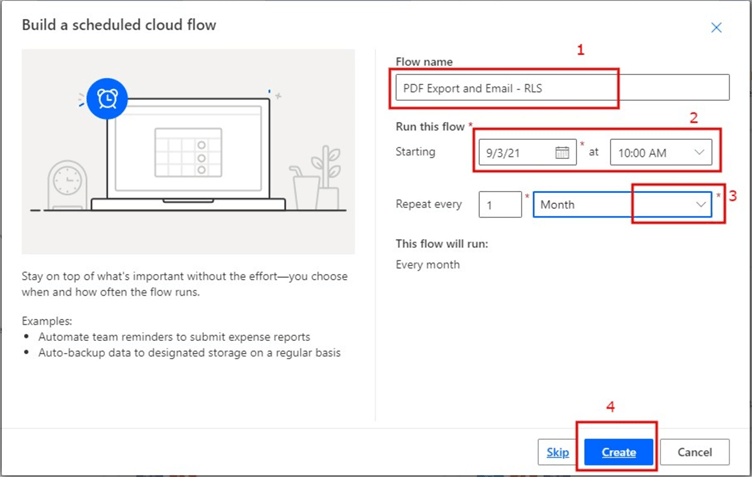
On the new opened window, you would need to give your flow a name. I have given this demo flow "PDF Export and Email - RLS".
Next, on the "Run this Flow" section choose a Starting date and a time for the flow to run as well as the frequency of running. I have chosen it to repeat every month. You can choose it to run each day, or week etc.
Then click "Create" as seen in the diagram below.
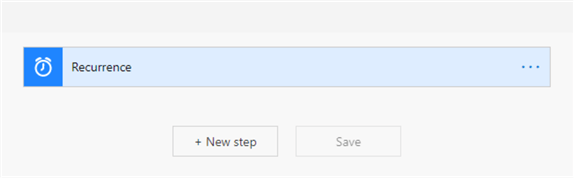
Once created, the first step of the Scheduled cloud flow should look like the diagram below.
STEP 3: Configure the recurrence flow step
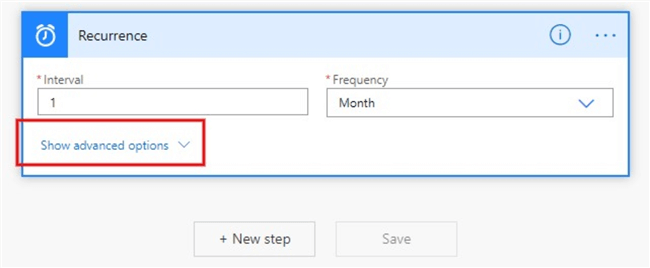
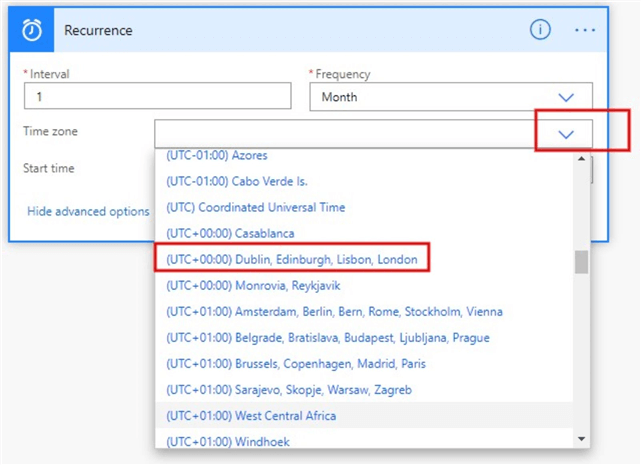
On this step, we need to configure the recurrence flow step to ensure it matches the time zone we require. To do this you need to click on the "Show advanced options" as shown in the diagram below.
Then, click on the dropdown on the "Time zone" section to select your preferred time zone. I have selected UTC + 00:00 as I live in London, United Kingdom as seen in the diagram below, yours might be other time zones you need the recurrence flow to be triggered at.
STEP 4: Create the Export to File for Power BI Reports operation
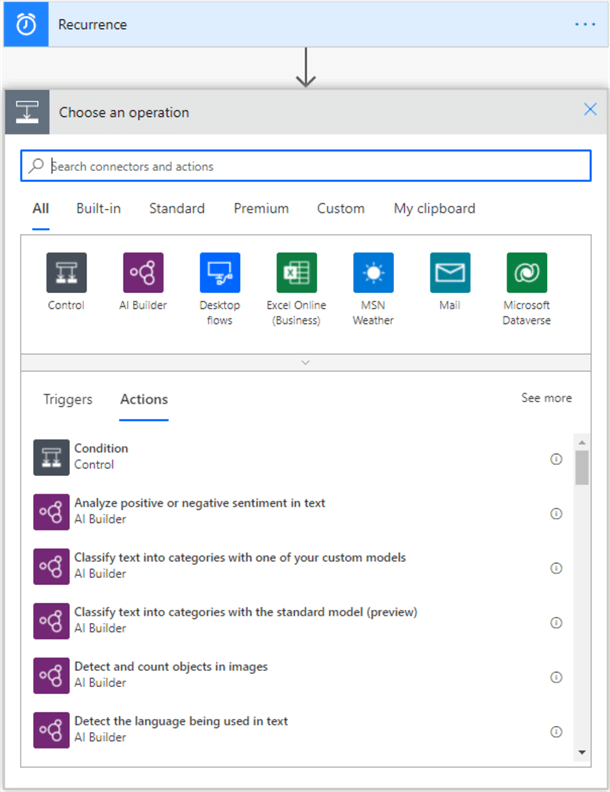
In this step, you need to click on the "New step" button at the bottom of the Recurrence step to create another flow step. In this case, we need to create the Export to File for Power BI reports operation step where we will be configuring the RLS roles that need to receive the report.
To do this, click on "New step" and you should be able to see the "Choose an operation" window open as seen in the diagram below.
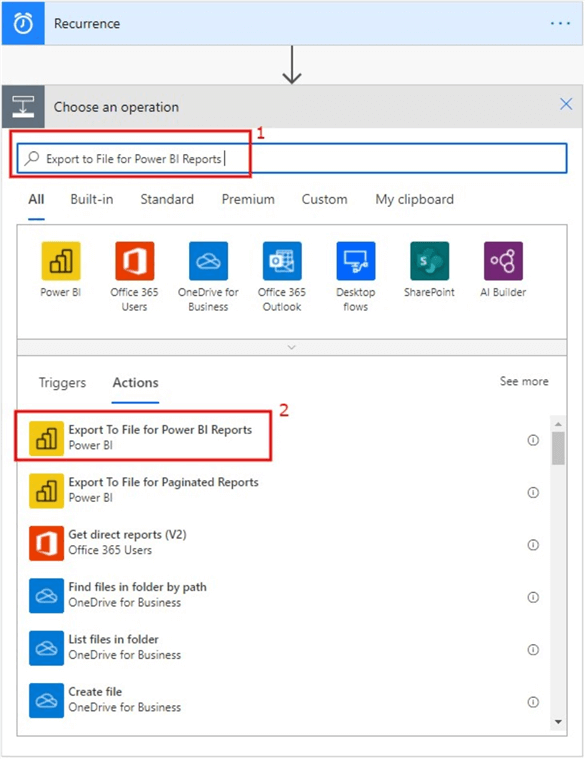
On the search bar of the "Choose an operation" you need to enter "Export to File for Power BI Reports" for the new step as seen in the diagram below.
Once you select the Export to File for Power BI reports a window to configure the step will open as seen in the diagram below.
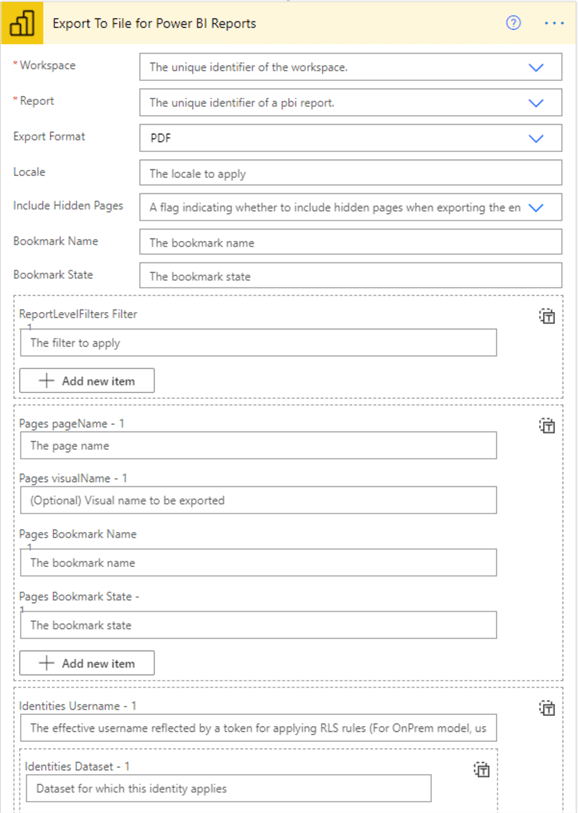
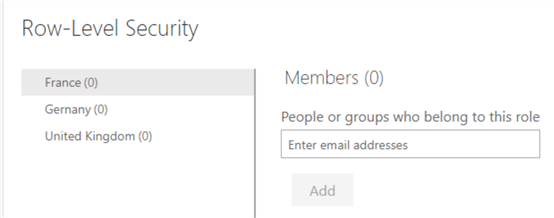
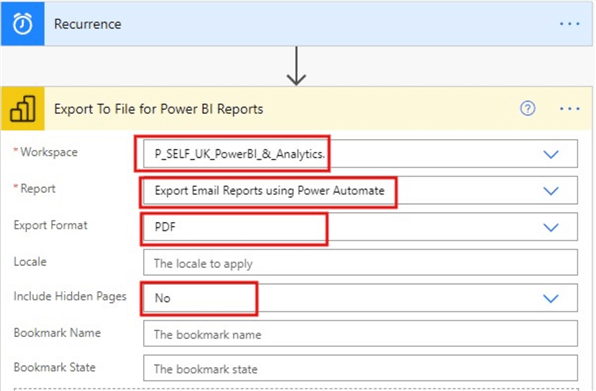
Now, we need to configure the step. First, we need to click on the dropdown on the "Workspace" section and select the Workspace holding the report with RLS in Power BI service. For this demo, I have created a sample report and implemented RLS for France, Germany and United Kingdom as seen in the report's security settings in Power BI service snapshot below.
The above report with RLS is within the workspace I will select. So after selecting the workspace, the next is to do the same and select the particular report within the workspace which in this demo it is "Export Email Reports using Power Automate".
Next, for the "Export Format" section I am leaving it as "PDF" format, but you can likewise choose PPTX, PNG or enter a custom value format.
I will leave out the "Locale" section and choose "No" in the "Include Hidden Pages" section so that no hidden pages are included in the export (but you can leave that as "Yes" if you prefer hidden pages to be sent along). I have also left the "Bookmark Name" and "Bookmark State" blank in this demo.
All the above configurations can be seen in the diagram below.
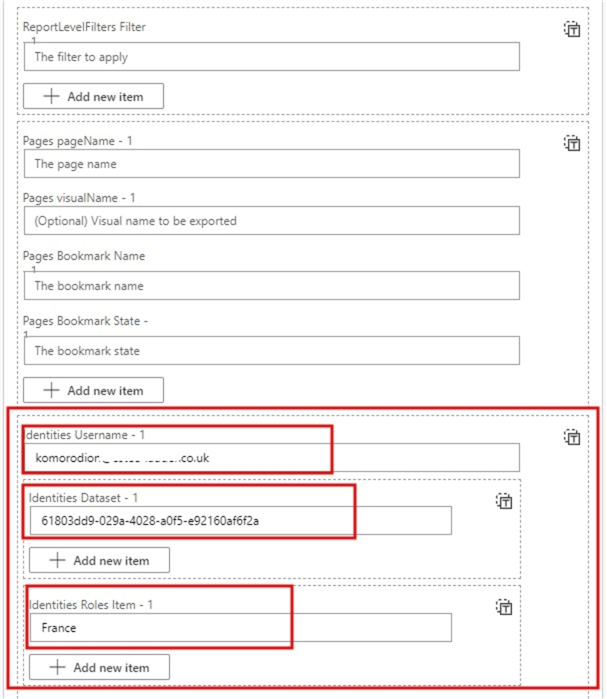
Next, we need to configure the RLS aspects of this flow step. To do this we need to scroll down to the section that states "Identities Username – 1" which is the effective username reflected by a token for applying role-level security rules. Note also that the Identities Username can be up to 256 characters long and should not contain spaces. In this section I have entered my AD username.
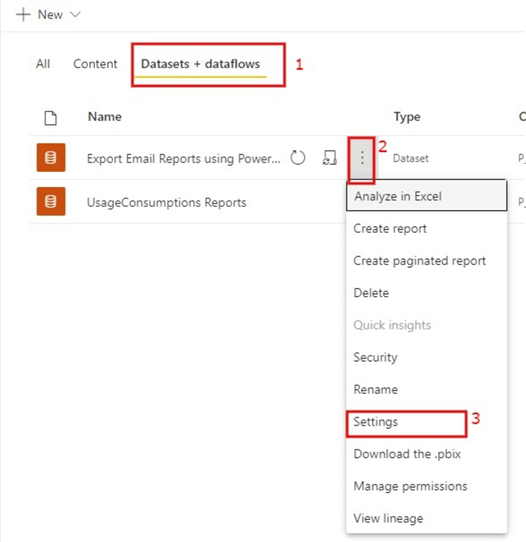
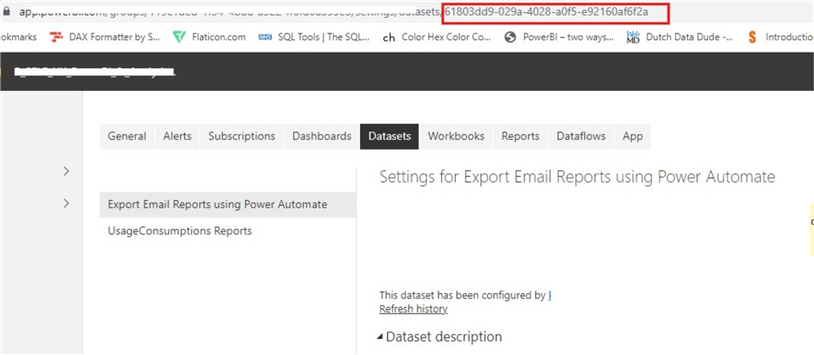
Next, we need to enter values for the "Identities Dataset – 1" section. To get this value you need to go to the settings of the dataset in Power BI service as seen in the diagram below.
Then copy the dataset ID from the address bar, as shown in this example and in the diagram below.
Next, we enter a value for the "Identities Roles Item – 1" section. The value to enter here should be the RLS name defined in the report. If you recall we have defined three RLS names in the report (Germany, France, and United Kingdom). So, we need to enter one of them here (assuming this is a report to be sent to members defined on that RLS name. In this demo I have used the France RLS name.
Do see the diagram below for a summary of all the points mentioned above.
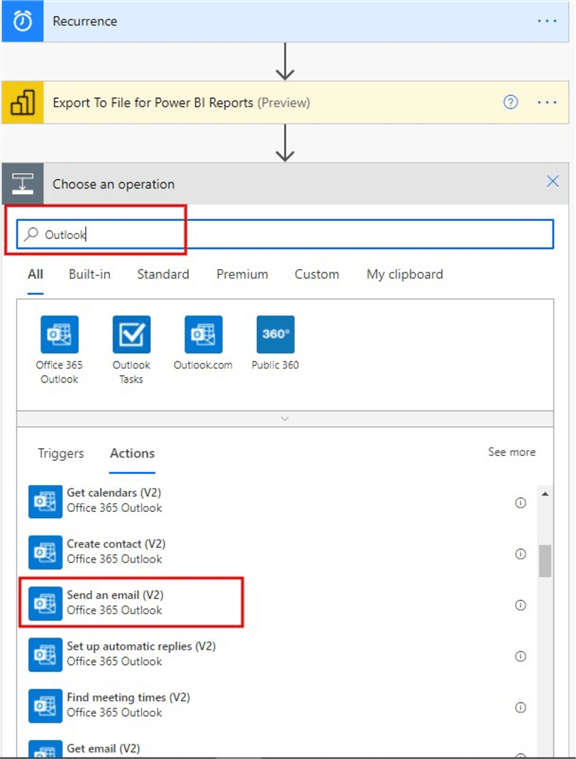
STEP 5: Create the Send an Email to outlook operation
After Step 4 above, click on the "New step" at the bottom of the step to close the flow step and open a new window for the next flow step as seen in the diagram below.
On the search bar for "Search connections and actions" enter "Outlook" and search for "Send an email v2" as seen in the diagram below.
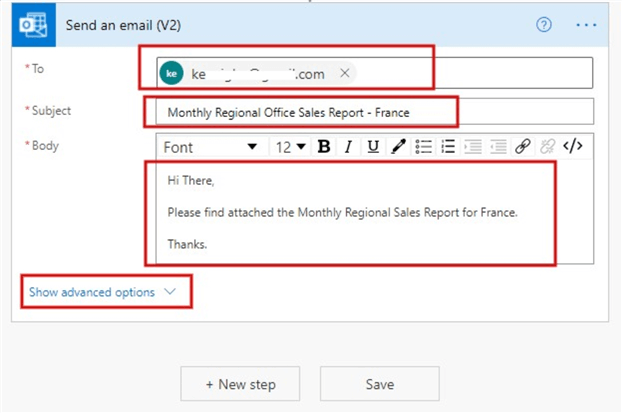
Once the flow window opens, complete the To, Subject, and Body fields for your email as seen in the diagram below. You can enter as many email addresses as required separated by semicolons. In this demo I have only used a single email address. You can also provide any name as subject as well as enter any custom message for the body of the email as you desire.
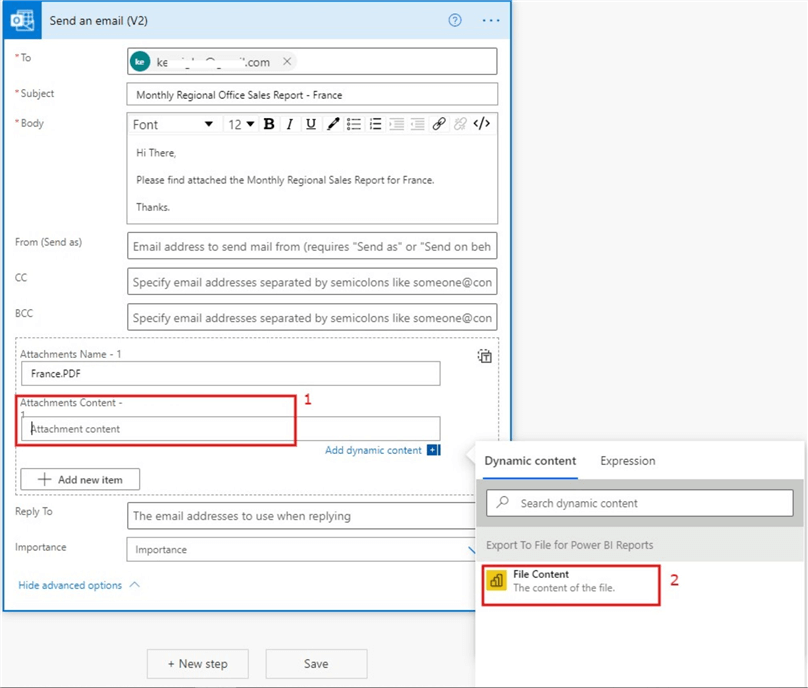
Select "Show advanced options" as seen in the diagram above. In "Attachments Name – 1", you need to enter a name for your attachment and add a file extension to the file name (for example, .PDF) that matches your desired Export Format. See diagram below for example on this.

Next, click on the "Attachment Content", choose "File Content" from among the dynamic content that pops up to attach your exported Power BI report as seen in the diagram below.
After these, save the flow by clicking on "Save" at the bottom of the flow step.
STEP 6: Test and verify the complete Flow
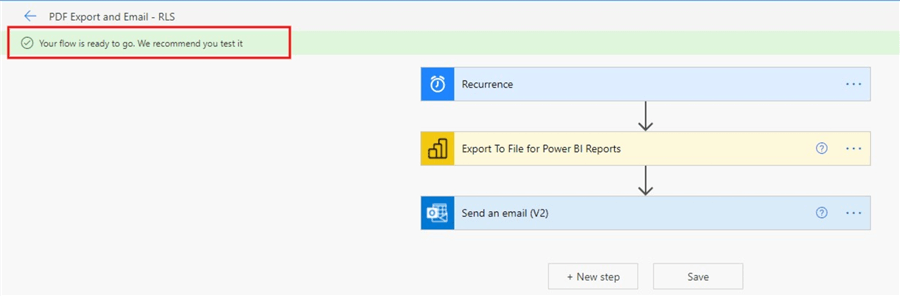
At this step you need to test the flow after saving. Power Automate will create and evaluate the flow, and let you know if there are any errors. Where there are errors, select "Edit flow" to fix the problem. Otherwise, proceed to select the Back arrow to view the flow details and run the complete flow.
If your flow is error free, after saving you should see a message on green background as seen in the diagram below. The message should also advise you to test your flow.
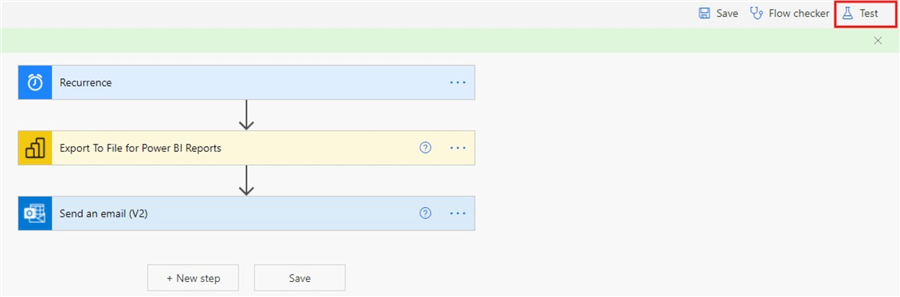
To test your flow, follow the steps detailed below and shown in the diagrams below.
Click on "Test"
Next, select "Manual" and click on Test at the bottom.
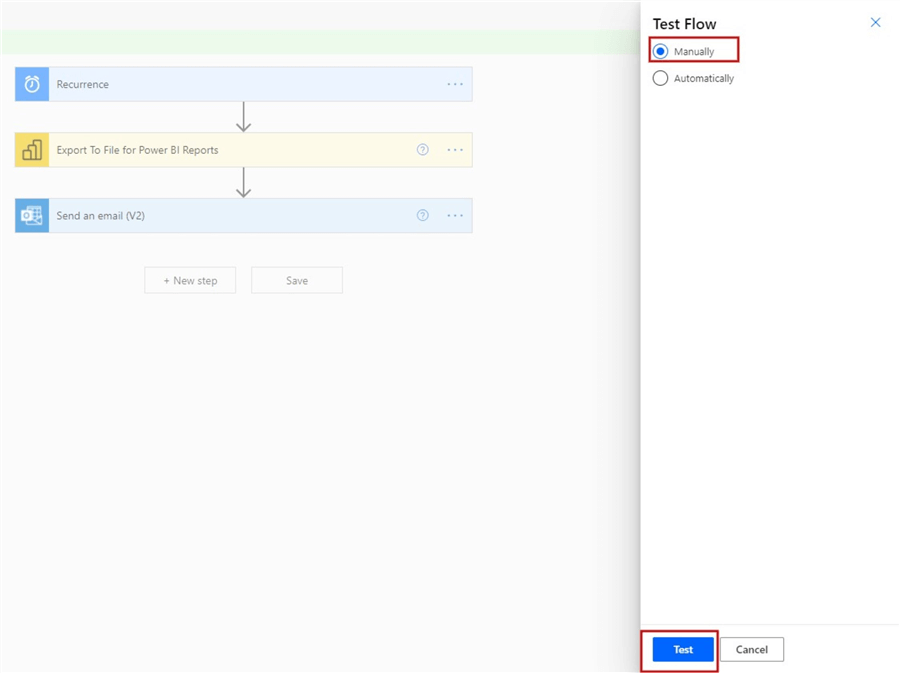
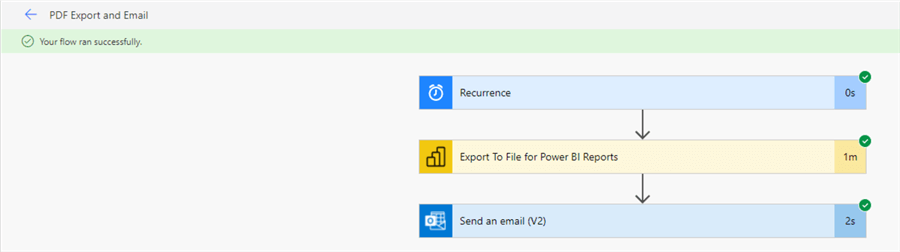
Next, click on "Run Flow" and "Done". Once you click on "Done" the flow starts running and when completed you should see something like the diagram below.
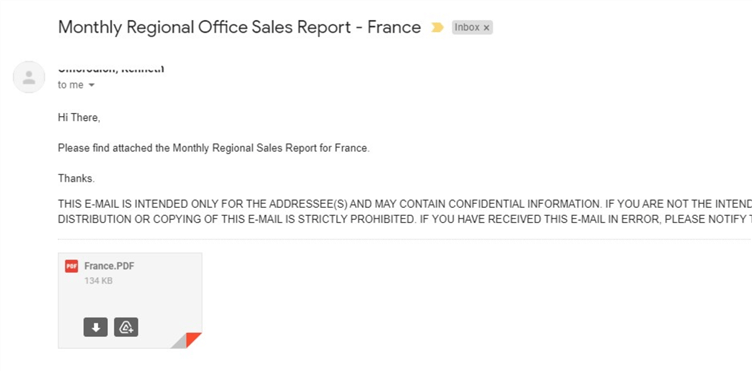
When you check your email box (or the email box of the users you have sent scheduled this attachment to be sent to) you should be able to see the PDF attachment with the pages of the report you have configured earlier. As this is a report with RLS implemented, only France would be sent in the PDF as configured. This can be seen in the diagram below.
In your case, you might want to send this PDF export to more than one office if we use the other offices in this demo for example.
- First option is to create additional steps for each region offices like United Kingdom and Germany in addition to this completed one.
- Second option is to create each flow steps separately.
- Third option is to export each page to an email address or directly to SharePoint, then create additional Power Automate flows to send the files from SharePoint or email attachment to the RLS roles email addresses.
Next Steps
- See this Microsoft documentation for more information here.
- See my other article in this series here.
- Try this tip out in your own data as business requires.
Learn more about Power BI in this 3 hour training course.


About the author
 Kenneth A. Omorodion is a Business Intelligence Developer with over eight years of experience. He holds both a bachelor’s and master’s degree (Middlesex University in London). Kenneth has the MCSA, Microsoft Data Analyst - Power BI and Azure Fundamentals certifications. Kenneth is a Microsoft Certified Trainer and has delivered corporate training on Power BI, SQL Server, Excel and SSRS.
This author pledges the content of this article is based on professional experience and not AI generated.
View all my tips
Article Last Updated: 2021-10-06
