Problem
Snowflake, a modern cloud data warehouse platform, can be integrated with the Azure platform and does not require dedicated resources for setup, maintenance, and support. Snowflake provides a number of capabilities including the ability to scale storage and compute independently, data sharing through a Data Marketplace, seamless integration with custom built applications, batch and streaming ELT capabilities, complex data manipulation functions, features, and more. These capabilities make Snowflake a strong complementary choice during the design and implementation of the Lakehouse Paradigm since it offers unique capabilities which include reasonably priced big data storage and compute resources, multiple secure data sharing offerings, secure and protected integration Azure services, and more. Customers are often-times unaware of the various capabilities of Snowflake along with how they could get started with exploring these capabilities.
Solution
There are many benefits to Snowflake including its elastic ability to scale up its virtual warehouse to improve performance and speed and scale down afterwards. There are also a variety of SQL based functions and support options to combine both structured and semi-structured data for analysis and ELT. Snowflake’s multi-cluster architecture is built for highly concurrent workloads and easy accessibility for multiple stakeholders. Snowflake’s architecture enables data sharing among Snowflake users and external customers with ease. Snowflake also offers high availability and security on Azure. It is SOC 2 Type II certified, and supports additional levels of security for HIPAA customers, and encryption across all network communications. In this article, you will learn about the various capabilities of Snowflake which include its security, governance, and replication / failover feature sets. In addition, you will learn more about Snowflake’s capabilities around data sharing, data applications, and its data import, export and transformation integrations with Azure resources. The topics you will learn will help with applying it towards practical Lakehouse decisions, implementations, and ELT integrations with Azure.
Architecture
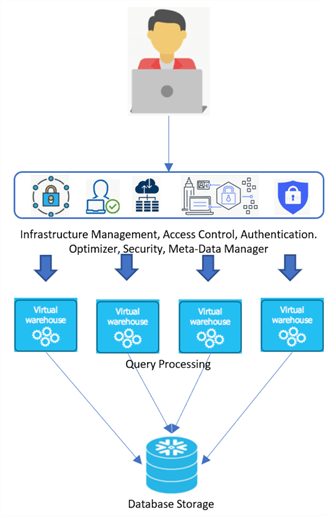
Snowflake’s architecture runs on cloud infrastructure and includes a new SQL query engine. Snowflake uses a central data repository for persisted data that is accessible from all compute nodes in the platform which is beneficial for data management, known as shared disk architecture. Snowflake also processes queries using MPP compute clusters where each node in the cluster stores a portion of the entire data set locally, also known as shared nothing architecture, which is beneficial for performance management. Multiple compute clusters are grouped together to form virtual warehouses. Multiple virtual warehouses can be created to access the same storage layer without needing multiple copies of the data in each warehouse. These virtual warehouses can be scaled up or down with minimal downtime or impact to storage. Snowflake also provides a variety of services including infrastructure, security and meta-data management, optimizers, and robust authentication and access control methods. These services manage the storage and compute layers and ensure security and high availability of the platform.
When data is loaded into Snowflake, it is optimized, compressed as AES-256 encryption, and stored in cloud storage. Queries are processed using virtual warehouses, which are basically MPP compute clusters with multiple nodes. From a connectivity perspective, Snowflake provides a variety of connection options including its robust UI, command line clients such as Snow SQL, ODBC / JDBC drivers, Python / Spark connectors, and list of 3rd party connectors. Snowflake’s architecture also includes and supports Zero Copy Cloning, Time-Travel, and Data Sharing. With Zero copy cloning, the CLONE command allows users to create copies of their schemas, databases, and tables without copying the underlying data while have access to close to real time production data in various environments. With Time Travel, historical data that has been changed or deleted can be retrieved within a defined time period. With data sharing, Snowflake producers and consumers can easily share and consume data from a variety of unique avenues without having to physically copy or move the data. Snowflake costs are based on usage; therefore, users only pay for storage and compute resources that are used.
Cost
Before we dive into cost, it is important to note that Snowflake offers a 30-day free trial with up to $400 of usage so from a cost perspective this may help with building out a use case to test certain storage and compute features. Snowflake’s pricing model is based on storage and compute resource usage. Storage is priced per terabyte of compressed data per month and compute is based on processing units (credits) that are billed on usage per second. In the US, storage costs begin at $23/terabyte and $0.00056/ second for each credit used. Since virtual warehouses come in many sizes, Snowflake supports the following compute credit usage per hour. The costs for storage and compute are also determined by the edition (Standard, Enterprise, Business Critical), the region, and whether the account is on-demand (no long-term licensing requirements) or capacity (up-front commitment). The warehouses can be configured to auto-suspend when no queries are being run and it is in idle state, which contributes to further cost savings. This is quite a paradigm shift from tradition on-premises systems, along with a variety of other cloud data warehouses.

The annual pricing of Snowflake typically depends on the number of users, pipelines and data. The following figure shows the estimated annual Snowflake cost based on these various factors. As with any cloud-based service, it is important to prevent misuse of any Snowflake features which may run up the bill, such as long and inefficient running compute jobs, the warehouse running 24/7, failing to enable auto-suspend and query timeout features, replicating very large datasets and more.

Security
Snowflake has a suite of strong security for both data and account users. From its vast compliance support features to its data and object security capabilities, Snowflake standard and advanced security features for its various editions and offerings. Snowflake also offers private connectivity to a variety of external services and cloud providers including Azure via Azure Private Link for its Business Critical or higher editions. Snowflake uses SCIM (System for Cross-domain Identity Management) to manage user identities and groups and supports Microsoft Azure Active Directory as a SCIM identity provider. From a user and authentication point of view, Snowflake supports MFA, oAuth, and SSO authentication types in addition to Key-Pair Authentication as an alternative to basic authentication and key-pair rotation to support multiple active keys. Additionally, Snowflake offers tight access control and data encryption capabilities. In this section, we will take a closer look at Snowflake’s integration with Azure native tools, specifically Key Vault and Private Link
Azure Key Vault
With Snowflake’s Business Critical Edition, data encryption with customer-managed keys for Azure can be enabled with an Azure Key Vault that Snowflake has access to use. After customers create an RSA 4K key in their Azure tenant, they can grant a Snowflake service principal access to use the key for a variety of activities. Within Azure Data Factory, Snowflake database credentials can also be stored in Key Vault and configured in the Snowflake connector’s linked service in ADF.
Azure Private Link
Azure Private Link enables private connectivity and access to Snowflake through a private IP address with traffic being routed from the customer virtual network (VNet) to the Snowflake VNet using Microsoft rather than the public Internet.
Azure Private Link on Snowflake can be enabled either through a virtual machine or through peering, which can then connect to the Azure Private Link endpoint in your virtual network, which then connects to the Private Link Service and routes to Snowflake.
Applications
Snowflake integrates well with data applications that use Snowflake as the analytical engine. The Snowflake SQL API allows users to access and update data, along with executing queries, DDL and DML statements in Snowflake DB. Snowflake also offers a number of connectors (Kafka, Python, Spark) and drivers (JDBC, .NET, Node.js, ODBC, PHP) to support and enable building custom data, reporting, and analysis applications. These custom-tailored solutions extend even further with User Defined Functions (UDFs) to perform custom operations with either SQL, JavaScript, or Java. Snowflake also supports creating UDF in Azure Functions to simplify the integration with other external APIs. Branching and looping programming methods are supported in Snowflake Stored Procedures since it is combined with JavaScript.
Replication and Failover
Replication can be enabled for existing databases and will set the database as primary. Only databases are supported for replication. The secondary replica database would typically reside in a separate region and all DML and DDL operations will be run against the primary database, with data being refreshed on a defined period from snapshots of the primary database. During replication, Snowflake encrypts the database files in-transit from source to target. Limitations around replication include 1) restrictions on refreshes when external tables exist on the primary database and, 2) prevention of replication for databases created from shares.
Once replication is enabled for a primary database with at least one secondary replica database along with an active refresh schedule, failover can be enabled at that point. Here is script that can be run to enable failover. To begin, you can run a command to show the replication accounts and databases and then enable failover to one or multiple accounts. Db1 in the script below is the primary database. Finally, a secondary (replica) database can be switched to a primary using the last script in this section.
-- show replication accounts and databases
show replication accounts;
show replication databases;

-- enable failover to multiple accounts
alter database db1 enable failover to accounts org.account2, org.account3;

-- change a secondary database to the primary database.
alter database db2 primary;
Data Integration with Azure
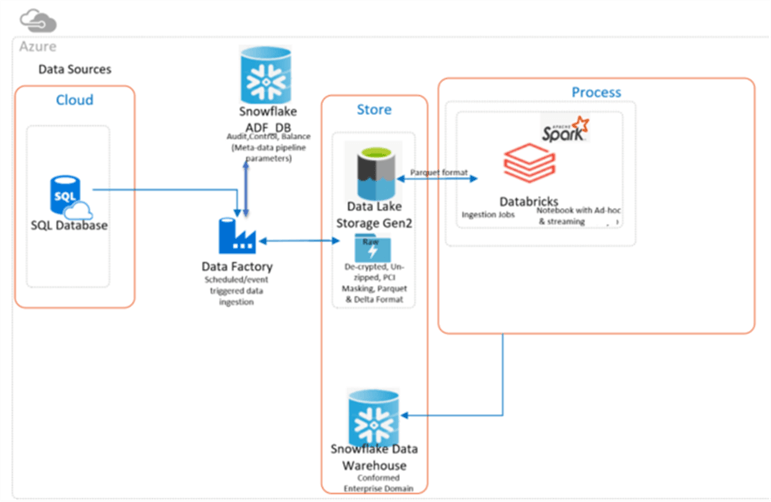
While Snowflake is external to the Azure Platform, it does integrate quite well from a security, identity, and data integration perspective. Between connectors, drivers, and plug-ins, both Snowflake and Azure support cross platform integrations quite seamlessly. In this section, I will discuss some of these integration capabilities between Azure and Snowflake. The following Figure illustrates an architectural pattern for integrating Snowflake with ADLSgen2, Data Factory, and Databricks. This is a common pattern which uses Data Factory for data ingestion of source data, Snowflake for the ABC (audit, balance, control) framework, Databricks for transformations, and another Snowflake database for the final data warehouse.
Data Lake Storage Gen2
Often times, customers intend to store their data in a cloud-based storage service such as Amazon S3 or Azure Data Lake Storage Gen2. Snowflake provides ways for connecting to these services. For Azure Data Lake Storage Gen2, Snowflake supports both SAS Key and service principal identity access, with the general recommendation being to use the latter service principal identity access since it avoids having to use a key. The following script demonstrates an example of how to begin creating an ADLSgen2 storage integration with Snowflake. It begins by creating the storage integration and a stage to the ADLS gen2 account and container with parquet file format using SAS token credentials. The next part of the code shows how to copy data into a Snowflake table from the ADLS gen2 stage using pattern matching. Finally, the last section of the script shows two options for copying data from the Snowflake table into ADLS gen2.
-- create a storage integration
create storage integration azure_int
  type = external_stage
  storage_provider = azure
  enabled = true
  azure_tenant_id = 'TENANAT-ID'
  storage_allowed_locations = ('azure://myaccount.blob.core.windows.net/mycontainer1/mypath1/', 'azure://myaccount.blob.core.windows.net/mycontainer2/mypath2/')
  storage_blocked_locations = ('azure://myaccount.blob.core.windows.net/mycontainer1/mypath1/sensitivedata/', 'azure://myaccount.blob.core.windows.net/mycontainer2/mypath2/sensitivedata/');

-- create a stage with SAS token and parquet file format
create or replace stage ADLS2
  url='azure:// myaccount.blob.core.windows.net/ mycontainer1'
  credentials=(azure_sas_token='SASTOKEN')
  file_format = PARQUET_FILE_FORMAT;

-- copy into Snowflake Table from ADLS2 Stage
copy into SnowflakeTable1
  from @ADL2
  pattern='.*sales.*.parquet';

-- copy into ADLS2 stage and new folder called d1 from Snowflake Table
copy into @ADLS/d1 from SnowflakeTable1;

-- copy into specified ADLS gen2 account, container, and folder from Snowflake Table
copy into azure://myaccount.blob.core.windows.net/data/Table1/ from SnowflakeTable1 storage_integration = myint;
Real-time Data Loading with ADLS gen2
Snowflake’s Snowpipe enables loading of real-time data from ADLS gen2 as soon as it is available in a stage. When a Snowpipe is created, it leverages the COPY INTO statement to load data. The following script shows how to create a notification integration using an Azure Event grid subscription. It then moves on to describe how to create a Snowpipe with a number of parameters including the auto_ingest parameter which whether to automatically load data files from the specified external stage when event notifications are received from a configured message service. The last part of the Snowpipe script specifies the COPY INTO commands along with file formats.
-- create a notification integration
CREATE NOTIFICATION INTEGRATION notification_int
  ENABLED = true
  TYPE = QUEUE
  NOTIFICATION_PROVIDER = AZURE_STORAGE_QUEUE
  AZURE_STORAGE_QUEUE_PRIMARY_URI = '<queue_URL>'
  AZURE_TENANT_ID = '<directory_ID>';

-- create a Snowpipe
create pipe azure_pipe
  auto_ingest = true
  integration = 'notification_int'
  as
  copy into db_snowpipe.public.table
  from @db_snowpipe.public.stage
  file_format = (type = 'JSON');
Data Factory
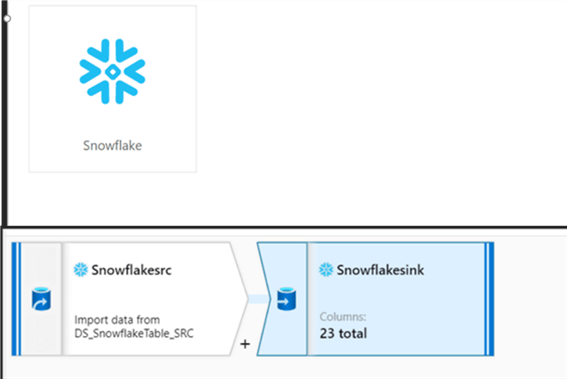
Snowflake continues to integrate well with other Azure services including Data Factory v2. With its built in Snowflake connector, developers can instantly connect to Snowflake using account credentials along with database and warehouse names. ADF supports Snowflake as both a source and sink and can be used with ADF’s Mapping Dataflows activities to enhance the level of transformations with the pipeline.
Databricks
Databricks offers connectors and scripts for reading and writing to Snowflake in both Scala and Python languages. These notebooks can then also be integrated with Data Factory activities, processes, and for scheduling. The script below shows an example of how to read and write data to Snowflake. The script begins by setting the ADLSgen2 context and keys. It goes on to show how to set the various Snowflake options. Finally, it shows how to write a sql query to read from Snowflake and to write 5 rows into Snowflake. Note that the select query can be more complex to accommodate complex joins as well.
-- connecting to ADLS2 account
spark.conf.set(
  "fs.azure.account.key.rl001adls2.dfs.core.windows.net",
  "ENTER-KEY"
)


-- setting Snowflake options
# snowflake connection options
options = {
  "sfUrl": "snow.east-us-2.azure.snowflakecomputing.com",
  "sfUser": "accountadmin",
  "sfPassword": "Admin123!",
  "sfDatabase": "snowflake_sample_data",
  "sfSchema": "tpcds_sf10tcl",
  "sfWarehouse": "COMPUTE_WH"
}
-- executing a query to read from Snowflake table
df = spark.read
.format("snowflake")
.options(**options)
.option("query",  "select * from snowflake_sample_data.tpcds_sf10tcl.item").load()
 df.show()

-- writing to Snowflake
spark.range(5).write
.format("snowflake")
.options(**options2)
.option("dbtable", "TEST_DEMO")
.save()
Data Transformation
Since there are numerous methods of transforming data before, during, or after it lands in Snowflake, this section will discuss some of these various transformation options and their capabilities. DBT (Data Build Tool) is an open-source tool which manages Snowflake’s ELT workloads by enabling engineers to transform data in Snowflake but simply writing SQL select statements, which DBT then converts to tables and views. DBT provides DataOps functionality and supports ETL and data transformation using the standard SQL language. These models can be versioned and unit tested within Snowflake.
Snowflake also supports transforming while loading it into a table using the COPY INTO command in order to avoid using numerous staging or temp tables. Some features supported by the COPY INTO command include casts using SQL select statements, column re-ordering, adding sequence columns, including auto-increment identity columns, and more. Snowflake also supports loading of semi-structured data into separate columns. An example of transforming data while loading it using the COPY INTO command can be seen in this script shown below which basically replaces the ~ character from the columns before loading it from ADLS gen2 into Snowflake.
-- Transforming data while loading it into Snowflake from ADLS gen2

COPY INTO AUTHOR (AUTHOR_CODE, DESCRIPTION)
FROM
(SELECT REPLACE($1,'~',''),REPLACE($2, '~','')
FROM @MY_ADLS2_ACCOUNT/raw/AUTHOR.txt)
FILE_FORMAT = AUTHOR_FILE_FORMAT;
Snowflake also supports the FLATTEN command, which produces a lateral view of a VARIANT, OBJECT, or ARRAY column. The following script shows an example of flattening JSON and XML data. It begins by showing you how to create a table with VARIANT data type, along with scripts for creating both JSON and XML file formats. It then provides sample XML, JSON, and nested JSON data along with the corresponding SQL statements containing the FLATTEN commands. These SQL statements can also be used in the COPY INTO command to transform and FLATTEN data while loading it into a Snowflake table from your ADLS gen2 account.
-- Creating a new Snowflake table with VARIANT column

CREATE TABLE "DEMO_DB"."PUBLIC"."FLATTEN_RAW_JSON_TABLE" ("FLATTEN_RAW_COL" VARIANT)
COMMENT = 'Store JSON Data';

-- Creating a JSON file format

CREATE FILE FORMAT "DEMO_DB"."PUBLIC".JSON
TYPE = 'JSON'
COMPRESSION = 'AUTO'
ENABLE_OCTAL = FALSE
ALLOW_DUPLICATE = FALSE
STRIP_OUTER_ARRAY = TRUE
STRIP_NULL_VALUES = FALSE
IGNORE_UTF8_ERRORS = FALSE;

-- Creating an XML file format

CREATE FILE FORMAT "DEMO_DB"."PUBLIC".XML
TYPE = 'XML'
COMPRESSION = 'AUTO'
PRESERVE_SPACE = FALSE
STRIP_OUTER_ELEMENT = TRUE
DISABLE_SNOWFLAKE_DATA = FALSE
DISABLE_AUTO_CONVERT = FALSE
IGNORE_UTF8_ERRORS = FALSE;

-- Sample XML data

<?xml version='1.0' encoding='UTF-8'?>
<dataset>
 <AUTHOR AUTHOR_UID = 1>
    <FIRST_NAME>Ron</FIRST_NAME>
    <MIDDLE_NAME/>
    <LAST_NAME>LEsteve</LAST_NAME>
 </AUTHOR>
 <AUTHOR AUTHOR_UID = 2>
    <FIRST_NAME>Sam</FIRST_NAME>
    <MIDDLE_NAME>Smith</MIDDLE_NAME>
    <LAST_NAME>Broadwhick</LAST_NAME>
 </AUTHOR>
 <AUTHOR AUTHOR_UID = 3>
    <FIRST_NAME>Kathy</FIRST_NAME>
    <MIDDLE_NAME>L</MIDDLE_NAME>
    <LAST_NAME>Salisbery</LAST_NAME>
 </AUTHOR>
 <AUTHOR AUTHOR_UID = 4>
    <FIRST_NAME>Levi</FIRST_NAME>
    <MIDDLE_NAME/>
    <LAST_NAME>Bastille</LAST_NAME>
 </AUTHOR>
 <AUTHOR AUTHOR_UID = 5>
      <FIRST_NAME>John</FIRST_NAME>
    <MIDDLE_NAME/>
    <LAST_NAME>Doe</LAST_NAME>
 </AUTHOR>
 <AUTHOR AUTHOR_UID = 6>
    <FIRST_NAME>Kelly</FIRST_NAME>
    <MIDDLE_NAME/>
    <LAST_NAME>Jacobs</LAST_NAME>
 </AUTHOR>
</dataset>

-- Query to FLATTEN the XML data

SELECT
FLATTEN_RAW_COL:"@AUTHOR_UID" as AUTHOR_ID
,XMLGET(FLATTEN_RAW_COL, 'FIRST_NAME'):"
quot;::STRING as FIRST_NAME ,XMLGET(FLATTEN_RAW_COL, 'MIDDLE_NAME'):"
quot;::STRING as MIDDLE_NAME ,XMLGET(FLATTEN_RAW_COL, 'LAST_NAME'):"
quot;::STRING as LAST_NAME FROM FLATTEN_RAW_XML_TABLE; -- Sample JSON data { "id": 55388352846278, "inventory_quantity": 19, "sku": "sku6" }, { "id": 98388391387998, "inventory_quantity": 37, "sku": "sku4" }, { "id": 93394420142283, "inventory_quantity": 16, "sku": "sku2" }, { "id": 95794426007123, "inventory_quantity": 28, "sku": "sku7" }, { "id": 89794429022894, "inventory_quantity": 32, "sku": "sku9" }, { "id": 45694431414982, "inventory_quantity": 28, "sku": "sku6" }, { "id": 23594455597765, "inventory_quantity": 76, "sku": "sku8" }, { "id": 45694459856987, "inventory_quantity": 10, "sku": "sku1" } -- Query to FLATTEN the JSON data SELECT FLATTEN_RAW_COL:id::varchar AS ID, FLATTEN_RAW_COL:sku::varchar AS SKU, FLATTEN_RAW_COL:inventory_quantity AS INVENTORY_QUANTITY FROM FLATTEN_RAW_JSON_TABLE, LATERAL FLATTEN(input => FLATTEN_RAW_JSON_TABLE.FLATTEN_RAW_COL); -- Sample nested JSON data [{ "book_title":"The Definitive Guide to Azure Data Engineering", "year_published":2021, "authors": [ { "first_name":"Ron", "middle_name":null, "last_name":"LEsteve" }, { "first_name":"Sam", "middle_name":"Smith", "last_name":"Broadwhick" } ] } { "book_title":"Baby Talks", "year_published":2021, "authors": [{ "first_name":"Kathy", "middle_name":"L", "last_name":"Salisbery" } ] } { "book_title":"BBQ Recipes", "year_published":2021, "authors": [{ "first_name":"Levi", "middle_name":null, "last_name":"Bastille" } ] } { "book_title":"Game Of Tech", "year_published":2020, "authors": [{ "first_name":"John", "middle_name":null, "last_name":"Doe" } ] } { "book_title":"Corgi Dreams", "year_published":2021, "authors": [{ "first_name":"Kelly", "middle_name":null, "last_name":"Jacobs" } ] } -- Query to FLATTEN the nested JSON data SELECT value:first_name::VARCHAR AS FIRST_NAME, value:middle_name::VARCHAR AS MIDDLE_NAME, value:last_name::VARCHAR AS LAST_NAME, FLATTEN_RAW:book_title::VARCHAR AS BOOK_TITLE, FLATTEN_RAW:year_published::VARCHAR AS YEAR_PUBLISHED FROM FLATTEN_RAW_NESTEDJSON_TABLE ,LATERAL FLATTEN(input => FLATTEN_RAW:authors);Governance
The governance of data assets is a critical need and many organizations are turning to dedicated Data Governance technologies including Purview, Azure’s native Data Governance service offering. While Purview is tightly integrated with Azure’s native toolset, it currently lacks a seamless integration with Snowflake through either its API’s and connector offerings. That said, Snowflake offers a variety of options for governing data assets on their platform for Enterprise editions or higher. These features include the following:
Column-level Security
Within Snowflake, it is possible to apply masking policies to columns within a table or view with the Dynamic Data Masking and External Tokenization. Data Masking selectively masks plain-text data in table and view columns at query time. The data administration of definition of the policies are managed by security or privacy officers and not the object owner. External Tokenization tokenizes data by replacing sensitive data with an undecipherable token before loading it into Snowflake and detokenizes the data at query runtime and uses external functions. Dynamic Data Masking supports data sharing but tokenization does not.
Here is a sample script which details how to create masking policies. Within the External Tokenization script, creditcard_decrypt is the external function needed for the unprotecting the tokenized data. When creating masking policies, regex, timestamps, UDF, and custom decryption scripts are supported.
-- create a custom masking policy admin role
create role masking_policy_admin;

-- grant privileges to masking_policy_admin role.
grant create masking policy on schema <schema_name> to role masking_policy_admin;
grant apply masking policy on account to role masking_policy_admin;

-- Dynamic Data Masking
create masking policy mask_creditcard as (val string) returns string ->
  case
    when current_role() in ('FINANCE') then val
    else '******'
  end;

-- External Tokenization
  create masking policy detokenize_creditcard as (val string) returns string ->
  case
    when current_role() in ('FINANCE') then decrypt_creditcard(val)
    else val -- sees tokenized data
  end;

-- Apply Masking Policy to Column in Table
create or replace table tbl_customer_data (creditcard string masking policy mask_creditcard);
-- Apply Masking Policy to Column in View
create or replace view vw_customer_data (creditcard string masking policy mask_creditcard) as select * from tbl_customer_data;
Row-level Security
With row-level security, policies can be applied to determine which rows to include in a query’s results. These policies can be based on roles and/or mapping tables and can also include conditions and functions to transform the data at runtime when certain conditions are met.
Here is a sample row access policy to allow Regional Managers the ability to view only their region’s sales based on a mapping table called region_manager_mapping. If the manager’s current role is in the mapping table, they will only be able to see data for their respective region. Additionally, the leadership_role is a custom role that would supersede the managers role in terms or privilege, therefore this role would not be bound to a particular region and would have full access to all data for their subordinate Regional Managers.
-- Create manager and leadership roles and grant access to sales table
create role manager_role;
create role leadership_role;
grant select on table sales to role manager_role;
grant select on table sales to role leadership_role;
-- Create row access policy
create or replace row access policy security.sales_policy as (sales_region varchar) returns boolean ->
  'leadership_role' = current_role()
      or exists (
            select 1 from region_manager_mapping
              where manager = current_role()
                and region = region
          )
;
-- Applying newly create row access policy to existing sales table
alter table sales add row access policy security.sales_policy on (region);
Access History
Snowflake provides an ACCESS_HISTORY view containing a record for each query which lists the base table columns that were directly accessed in order to provide insights on frequently accessed tables and columns by the user to support audit of data access for regulatory and governance initiatives. In addition to regulatory compliance auditing, this view can help with discovering unused data for the purpose of archival or deletion.
Here are some sample queries that can be run using the access_history view.
-- Query to obtain user access history
select user_name
       , query_id
       , query_start_time
       , direct_objects_accessed
       , base_objects_accessed
from access_history

-- Query to determine who accessed a sensitive table(object_id) in the last 30 days
select distinct user_name
from access_history
     , lateral flatten(base_objects_accessed) f1
where f1.value:"objectId"::int=<fill_in_object_id>
and f1.value:"objectDomain"::string='Table'
and query_start_time >= dateadd('day', -30, current_timestamp())
;
Object Tagging
Tags enable tracking of sensitive data for compliance, discovery, protection, and resource usage. A tag is a schema level object that can be associated with another Snowflake object. Tags are stored as a key-value pairs (e.g. cost_center = ‘data’)
-- create a custom tag_admin role
use role useradmin;
create role tag_admin;
use role accountadmin;
grant create tag on schema <schema_name> to role tag_admin;
grant apply tag on account to role tag_admin;

-- create a new tag
use role tag_admin;
use schema my_db.my_schema;
create tag cost_center;


-- create a tag on a new warehouse
use role tag_admin;
create warehouse mywarehouse with tag cost_center = 'data';

-- create a tag on an existing table’s column
alter table <table_name> modify column <column_name> set tag <tag_key> = '<tag_value>' [ , <tag_key> = ’<tag_value>’ , ... ];
alter table <table_name> modify column <column_name> unset <tag_key> [ , <tag_key> , ... ];

-- view all available tags
select * from snowflake.account_usage.tags
order by tag_name;
Sharing
Snowflake offers secure data sharing products that include Direct Share, Data Marketplace, and Data Exchange via Secure Data Sharing. With Secure Data Sharing, read-only database objects ranging from tables, secure views, external tables, secure materialized views, and secure UDFs can be shared by a data provider’s account and consumed by a data consumer’s account using underlying meta-data. This means that no actual data is transferred between accounts and therefore the data consumer will not incur storage costs but rather only compute costs to run queries on the shared data. Additionally, data providers will have access to the data consumer’s consumption meta data details. Data providers can provide data consumers that do not have Snowflake accounts what is known as reader accounts. These read only accounts are owned by the data provider and allow the data consumer to access the data without needing a Snowflake account. The limitation with this approach to data consumers is that they cannot perform DML operations since the accounts are read only. This section with briefly describe the various details of the data sharing products offered by Snowflake.
Direct Share
Direct Share supports account-to-account data sharing using Snowflake’s Secure Data Sharing with the benefit of not having to copy the data from account to account. Here is a sample script which demonstrates just how easy it is to create a share, grant usage to database objects, and then allow specified accounts access to the share. Shares can be even more complex to allow sharing of multiple databases across regions and cloud providers. The last script in this section shows how to create a Dynamic Secure View that can then be shared via account-to-account or reader account access. This method enforces row-level security by only allowing consumers access to data that they are permitted to view based on their current account. A well-defined mapping table and appropriate key across tables will be needed for this approach to be setup. Once successfully setup, it allows for seamless data sharing across vendors and clients.
-- create a Share on a database and schema
create share share_data;

grant usage on database db_data to share share_data;
grant usage on schema db_data.dim to share share_data;
grant select on table db_data.dim.customers to share share_data;

-- show grants to the Share
show grants to share share_data;

-- add accounts to the Share
alter share share_data add accounts=Account1, Account2;

-- create a Dynamic Secure View
CREATE or replace SECURE VIEW SHARED_VIEW AS
SELECT
   NAME,
   SALES,
   PRODUCT,
   ID
FROM FACT_SALES fs
JOIN DIM_CUSTOMER dc
ON fs.ID = dc.ID
AND UPPER(SNOWFLAKE_ACCNT) = CURRENT_ACCOUNT();
Data Marketplace
The Snowflake Data Marketplace is location for accessing a variety of datasets and it uses Secure Data Sharing to connect data providers with consumers. As a data consumer, you can access and query 3rd party datasets in your Snowflake account and join it with your own data or other 3rd party datasets. As a data provider, you can publish real-time live datasets securely to the Marketplace to make it available for others to consume, without having to build and maintain APIs and ELT pipelines for customers. Data in the Marketplace can be standard data listings where the data can be available without needing to request permission. Alternatively, it can be personalized data listings that would need approvals for request submissions and may even have a fee for consumption.
Data Exchange
The Snowflake Data Exchange is a private data hub for securely sharing data across a group of members that are invited to discover and consume the data. This differs from the Marketplace in that this Exchange is a private and customized secure avenue to share and consume data with fine grained-permissions for who can produce and consume the data. The Data Exchange can be integrated with Azure’s Private Link as well.
Continuous Integration and Deployment
The principles and architectural patterns of continuous integration and deployment (CI / CD) are prevalent in numerous technologies and domains. The benefits of CI / CD can be realized in a number of platforms to promote code from a development environment to upper environments in order to automatically test and streamline the deployment of production ready code from one environment to another which has traditionally been known as DevOps. Within Snowflake’s data ecosystem, this is called DataOps. Users can create multiple virtual warehouses ranging from DEV to QA to PROD, which can be sized independently and are completely isolated from each other. Developers can also create Feature Branch Databases in a matter of seconds to work on their own use cases and development efforts. With Zero Copy Cloning, production databases can be cloned quickly without having to duplicate actual data. Snowflake also supports auto-scaling of databases to test and validate a variety of tests. In this section, we will go over two methods (Jenkins and Azure DevOps) for integrating and building CI / CD pipelines with Snowflake.
Jenkins
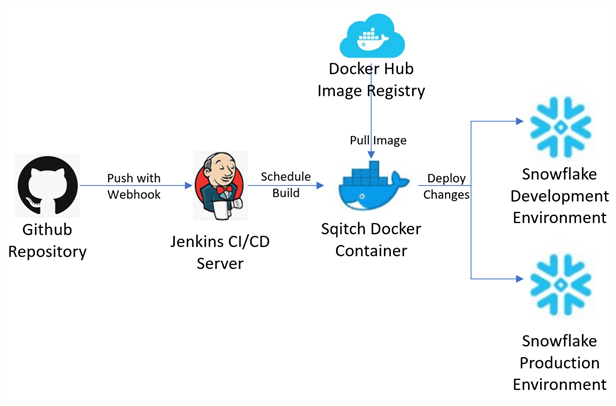
Jenkins is a Java based open-source automation tool which supports CI / CD in a variety of applications including Snowflake. Sqitch is a database change management application used for automating and deploying changes to Snowflake’s various environments. The Figure below describes the architecture for building CI / CD pipelines to promote code from a GitHub source repo to the Jenkins CI / CD server to the Sqitch Docker Container, where the Sqitch docker image for Snowflake is the execution environment. This process then deploys the changes to various environments. A similar process can also be integrated with Azure DevOps, AWS or other cloud providers.
Azure DevOps
Similar to Jenkins, Azure DevOps also supports the CI / CD build and deployment of database changes from one Snowflake environment to another using GIT repositories within Azure DevOps for source control, along with Azure CI and CD pipelines. Schemachange, also called snowchange, is a Python-based tool which can manage all Snowflake database changes and objects and can be integrated and deployed through Azure DevOps YAML pipelines. It is important to note that there are a variety of other database change management tools, much like Liquidbase, that could also be used as an alternative to schemachange. Similarly, GitHub could be used as alternative to Git. There are always multiple architectural customizations that could be applied to custom tailor your Snowflake CI / CD solution in Azure and/or with other cloud providers.

Reporting
The capability of building robust and visually appealing reports, metrics and dashboards is a critical need within the Modern Data Analytics Platform and Lakehouse paradigm. There are a variety of reporting tools available on the market that can connect to data warehouses and platforms such as Synapse and Snowflake. From the perspective of Azure, Microsoft’s Power BI Reporting platform has a variety of connectors including a Snowflake connector along with multiple connectivity modes and authentication methods for Snowflake, which we will explore in this section.
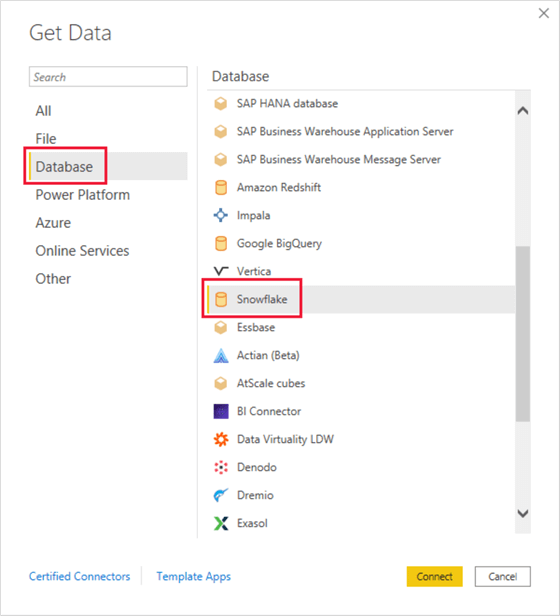
Power BI
Notice the variety of databases that can be connected to Power BI (PBI). This can be setup through Power BI’s get data UI shown in the figure below. Snowflake is one such connection option available that we will explore in this section. Simply select Snowflake and click Connect.
An advanced UI will appear which requires you to enter the Snowflake Server and Warehouse name. In addition, advanced optional values such as role names, timeout settings, and relationship columns allow you specify the granularity of the connection, as needed. Also, notice that both Import and Direct Query data connectivity modes are supported through this PBI Snowflake connector. With Direct Query, your dashboard will directly query the data sources at runtime with faster refreshes at 15-minute increments and no data will be imported into Power BI, thus reducing the overall file’s footprint. This may translate to slower performance since you may have to compete with other users for bandwidth and since compression of the Vertipaq performance engine is not be taken advantage with this Direct Query method. With Direct Query, there may also be some limitations around transformations, specifically DAX functions.
On the other hand, the Import method will cache the data that is being connected to and will create a point in time snapshot of the data and will leverage the Vertipaq storage engine to access the cached source rather than the actual source data, which can lead to improved performance.
Additionally, with this method you’ll be able to use M and DAX functions with no limitations to modeling data and combine various data sources. Disadvantages of this method include a limited number of refreshes per day, at up to 48 for Premium SKUs. Also, import caches are limited to 10GBs per dataset for Premium SKUS. One other thing to keep in mind is the lack of ease in transitioning back to Direct Query mode once you have opted for Import mode.

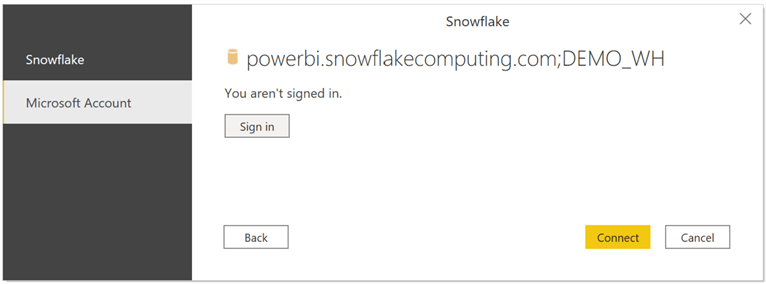
After the Snowflake server and warehouse details along with the data connectivity modes have been configured, this Snowflake PBI connector offers two methods of connecting to your Snowflake Data warehouse. These include 1) basic authentication through a user name and password, and 2) Microsoft Account authentication which we will discuss shortly. For the basic authentication, simply enter your username and password and click ‘Connect’.

For Microsoft Authentication, Power BI can connect to Snowflake using Identity Provider credentials and OAuth for a seamless Single-Sign on (SSO) experience which also prevents the need for on-premises PBI gateways since PBI will use a Snowflake driver instead. When PBI connects to Snowflake it obtains a Snowflake token as part of the connection string which is validated and mapped to the Snowflake user and then creates a session for PBI to access data.
By default, the ACCOUNTADMIN or SECURITYADMIN Snowflake roles are not allowed to instantiate a Snowflake session from PBI. Also, if Network Policies are being used, ensure to include the Microsoft Azure IP ranges for the Azure region where the Snowflake account is hosted. Note that Azure Private Link does not support this process and a Power BI Gateway will need to be used if Azure Private Link is being used.
Here is the script that will need to be run in Snowflake to create the Security Integration. Note that only the ACCOUNTADMIN or a role with global CREATE INTEGRATION permissions will be allowed to run this script.
The <AZURE_AD_ISSUER> value for the external_oauth_issuer parameter includes the TENANT_ID (eg: https://sts.windows.net/TENANT_ID/) and can be found in the About section in your Power BI tenant. Once this script executes successfully, be sure to test connectivity from Power BI to Snowflake using SSO to ensure that you can authenticate and connect successfully.
-- create Power Bi Security Integration
create security integration powerbi
    type = external_oauth
    enabled = true
    external_oauth_type = azure
    external_oauth_issuer = '<AZURE_AD_ISSUER>'
    external_oauth_jws_keys_url = 'https://login.windows.net/common/discovery/keys'
    external_oauth_audience_list = ('https://analysis.windows.net/powerbi/connector/Snowflake')
    external_oauth_token_user_mapping_claim = 'upn'
    external_oauth_snowflake_user_mapping_attribute = 'login_name'
    external_oauth_any_role_mode = 'ENABLE';
Summary
In this article, you learned more about the capabilities of Snowflake and how it has the potential to complement the Modern Data Lakehouse paradigm. Snowflake compares closely to Azure’s Synapse Analytics offerings, more specifically its SQL dedicated pools, also known as SQL data warehouse. Snowflake offers a cost efficient, highly secure architecture with fully managed infrastructure to support a variety of data warehouse use cases including batch and real-time ELT pipelines. It also offers tight integration with Azure resources including Private Endpoints, Functions, Data Lake Storage gen2, DevOps, Power BI and more. With the ability to build highly customized data applications along with continuous integration and deployment solutions across a variety of platforms, Snowflake is becoming a complementary solution option that fits a number of use cases within the Data Lakehouse. Customers are seeing the vast benefits and value from its Data Sharing platforms that allow them to directly consume datasets from a variety of vendors to avoid having to build and maintain interim ELT pipelines which need to land the data into intermediate staging tables, which also adds to storage and compute costs. Overall, Snowflake brings with is a vast variety of features and capabilities that have been challenging architects and organizations to take a closer look at Snowflake to determine and understand its place in the Modern Data Lakehouse paradigm.
Next Steps
- Read more about Azure Private Link & Snowflake
- Read more about Developing Applications with Snowflake
- Read more about Database Replication and Failover/Failback
- Read more about Overview of the Product Offerings for Secure Data Sharing
- Read more about Managing Governance in Snowflake
- Learn more about Transforming Data During a Load
- Explore the Snowflake SQL Command Reference
- Research Automating Snowpipe for Microsoft Azure Blob Storage
- Understand Configuring an Azure Container for Loading Data
- Read more about Managing Security in Snowflake
- Read more about Power BI SSO to Snowflake
- Read more about How to Setup a CI/CD Pipeline for Snowflake using Sqitch and Jenkins
- Visit Snowflake-Labs/schemachange: A Database Change Management tool for Snowflake
- Read more about Building Snowflake CI/CD Pipelines with Azure DevOps
- Read more about Database Change Management Tool: Liquibase with Snowflake Overview

Ron C. L’Esteve is a Data and AI Leader and professional Author residing in Chicago, IL, USA. He is well-known for his impactful books and article publications on Azure Data & AI Architecture, Engineering, and Leadership. Ron holds a Master of Business Administration (M.B.A.) and Master of Science in Corporate Finance (M.S.F.) from Loyola University Chicago. Ron possesses deep technical skills and experience in designing, implementing, leading, and delivering modern Azure Data & AI projects for numerous clients around the world. He is a Motorola Certified Six Sigma Green Belt, a Microsoft Global Challenger, and also holds numerous additional Microsoft, Snowflake, and Databricks professional certifications in Big Data Engineering, Artificial Intelligence, Apache Spark and Data Platform Architecture.
- MSSQLTips Awards: Champion (100+ tips) – 2023 | Author of the Year – 2020-2021 | Rookie of the Year – 2019