Problem
There are a few ways of working with semi-structured data including JSON and XML formats to build ELT data ingestion patterns and pipelines. Among these various methods include Azure Data Factory’s Mapping Data Flows’ Flatten Activity using a GUI based approach to flatten a variety of different. Additionally, there are semi-structured data flattening capabilities available in other Azure technologies such as Synapse Analytics’ custom functions to flatten a nested schema and Databricks’ in-built functions including to_json(), explode() and more. While cloud enthusiasts and customers begin to explore the capabilities of Snowflake as a contender for a variety of ELT pipelines, they are interested in these comparable semi-structured data flattening functions and capabilities in Snowflake. How can we get started with exploring the semi-structured flattening capabilities for XML and JSON by using Snowflake data warehouse?
Solution
The need to work with complex and nested data in a variety of semi-structured formats including JSON, XML and more has become an ever-increasing need for many organizations that frequently manage big data eco-systems and ingestion pipelines to transform this complex data into more manageable, insightful, and relational data formats. With the advancement of cloud-based technologies coupled with increases in big data systems and complex sources, a variety of methods and patterns have been introduced to manage this complex data including but not limited to Azure Databricks, Azure Synapse Analytics, Azure Data Factory Mapping Data Flows, Google BigQuery, and Snowflake. In this article, we will explore Snowflake’s out of box capability to flatten complex semi-structured data formats ranging from XML to nested-JSON that has been ingested into a variant data-type column in a Snowflake staging table.
Getting Started
The demonstrations presented assumes that at a minimum, a trial Snowflake account has been created and that the user has a basic understanding of working hands on with Snowflake Data warehouse. Explore Snowflake’s documentation on Getting Started for basic information and instructions for first-time Snowflake Users.
Within Snowflake, familiarize yourself with the various user roles, along with how to create databases, tables, views, and file formats. Also explore how to create and configure warehouses. As you get more familiar and advanced in your journey with Snowflake, also explore how to transform data with Snowflake and understand some of the more complex warehousing concepts such as auto-suspend, scaling policy and multi cluster options available with elastic warehousing.
Create Table
To begin, we will need a database and table. Let’s create the following FLATTEN_RAW_JSON_TABLE in the PUBLIC schema of the DEMO_DB database, containing one column of type VARIANT to hold the semi-structured JSON or XML data. For more detail on why we use a VARIANT data type column, read more about Semi-structured data considerations.
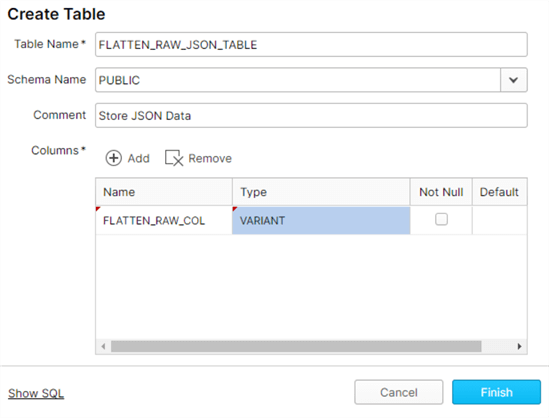
By clicking ‘Show SQL’, we can also view the SQL code generated to create this database and table.
CREATE TABLE "DEMO_DB"."PUBLIC"."FLATTEN_RAW_JSON_TABLE" ("FLATTEN_RAW_COL" VARIANT)
COMMENT = 'Store JSON Data';
Similarly, create two additional tables for XML and Nested JSON:

Create File Format
We will also need two file formats: one for XML and the other for JSON.
Note for the JSON file format, we checked ‘Strip Outer Array’ to allow the load process to remove the outer array structure and load the records into separate table rows.
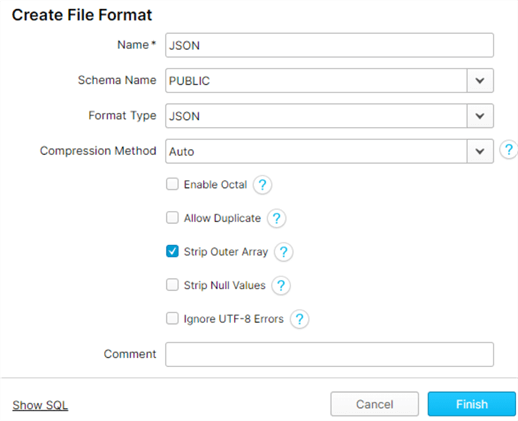
The corresponding SQL code to create a JSON file format is as follows:
CREATE FILE FORMAT "DEMO_DB"."PUBLIC".JSON
TYPE = 'JSON'
COMPRESSION = 'AUTO'
ENABLE_OCTAL = FALSE
ALLOW_DUPLICATE = FALSE
STRIP_OUTER_ARRAY = TRUE
STRIP_NULL_VALUES = FALSE
IGNORE_UTF8_ERRORS = FALSE;
Similarly lets also create an XML file format:
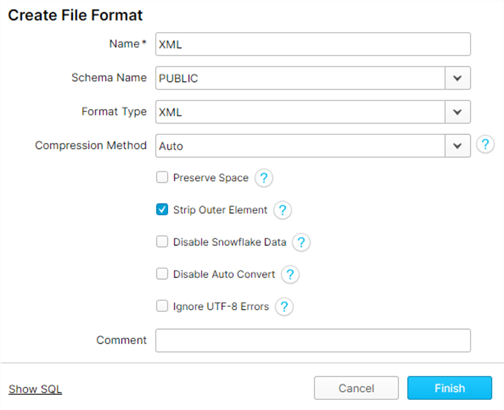
Here is the corresponding SQL code for the XML file format:
CREATE FILE FORMAT "DEMO_DB"."PUBLIC".XML
TYPE = 'XML'
COMPRESSION = 'AUTO'
PRESERVE_SPACE = FALSE
STRIP_OUTER_ELEMENT = TRUE
DISABLE_SNOWFLAKE_DATA = FALSE
DISABLE_AUTO_CONVERT = FALSE
IGNORE_UTF8_ERRORS = FALSE;
Load Data
There are a few options for loading data into Snowflake.
Within the Tables GUI tab, there is an option to manually Load Data by specifying the warehouse, source files, file format and load options.
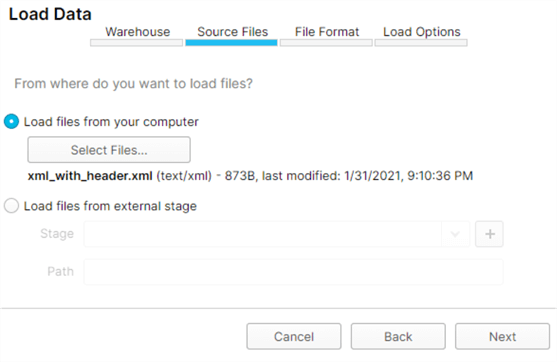
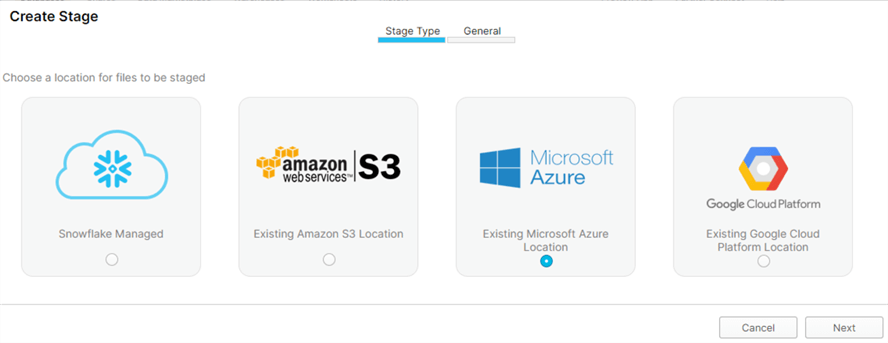
The source files can exist on a local drive or within an external stage residing in one of the multi-cloud environments: Azure, AWS, Google, Snowflake Managed.
When working with an external stage such as Azure Data Lake Storage Gen2, the COPY INTO script could be used in combination with a SELECT to transform and load ADLS2 files into Snowflake, similar to the script below:
COPY INTO AUTHOR (AUTHOR_CODE, DESCRIPTION)
FROM
(SELECT REPLACE($1,'~'),REPLACE($2, '~')
FROM @MY_ADLS2_ACCOUNT/raw/AUTHOR.txt)

FILE_FORMAT = AUTHOR_FILE_FORMAT;
Flatten XML Data to use with Snowflake
Load
For the XML flattening demo, we can use the following XML file by uploading it to the FLATTEN_RAW_XML_TABLE using one of the recommended load options along with the XML file format.
<?xml version='1.0' encoding='UTF-8'?>
<dataset>
 <AUTHOR AUTHOR_UID = 1>
    <FIRST_NAME>Ron</FIRST_NAME>
    <MIDDLE_NAME/>
    <LAST_NAME>LEsteve</LAST_NAME>
 </AUTHOR>
 <AUTHOR AUTHOR_UID = 2>
    <FIRST_NAME>Sam</FIRST_NAME>
    <MIDDLE_NAME>Smith</MIDDLE_NAME>
    <LAST_NAME>Broadwhick</LAST_NAME>
 </AUTHOR>
 <AUTHOR AUTHOR_UID = 3>
    <FIRST_NAME>Kathy</FIRST_NAME>
    <MIDDLE_NAME>L</MIDDLE_NAME>
    <LAST_NAME>Salisbery</LAST_NAME>
 </AUTHOR>
 <AUTHOR AUTHOR_UID = 4>
    <FIRST_NAME>Levi</FIRST_NAME>
    <MIDDLE_NAME/>
    <LAST_NAME>Bastille</LAST_NAME>
 </AUTHOR>
 <AUTHOR AUTHOR_UID = 5>
      <FIRST_NAME>John</FIRST_NAME>
    <MIDDLE_NAME/>
    <LAST_NAME>Doe</LAST_NAME>
 </AUTHOR>
 <AUTHOR AUTHOR_UID = 6>
    <FIRST_NAME>Kelly</FIRST_NAME>
    <MIDDLE_NAME/>
    <LAST_NAME>Jacobs</LAST_NAME>
 </AUTHOR>
</dataset>
Upon successfully loading the data, we can query the table to see the new rows inserted into the table.
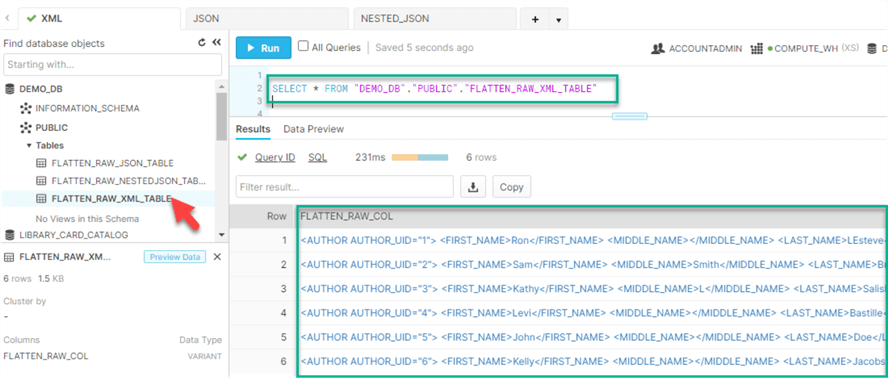
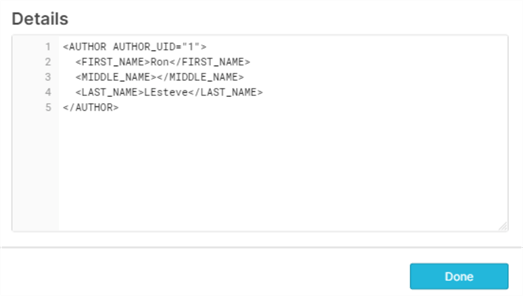
By clicking into one of the hyperlinks within a row, we can see more detail around the structure of the data:
Flatten
To flatten the XML data in Snowflake, we can run the following script, which will both flatten the data and cast the values into strings while getting rid of the quotes:
SELECT
FLATTEN_RAW_COL:"@AUTHOR_UID" as AUTHOR_ID
,XMLGET(FLATTEN_RAW_COL, 'FIRST_NAME'):"
quot;::STRING as FIRST_NAME ,XMLGET(FLATTEN_RAW_COL, 'MIDDLE_NAME'):"
quot;::STRING as MIDDLE_NAME ,XMLGET(FLATTEN_RAW_COL, 'LAST_NAME'):"
quot;::STRING as LAST_NAME FROM FLATTEN_RAW_XML_TABLE;
The resulting dataset is depicted in the following illustration:

Flatten JSON Data to use with Snowflake
Load
To test the flatten capability of JSON data, we can load the following JSON file into the FLATTEN_RAW_JSON_TABLE using one of the recommended load options along with the JSON file format.
{
        "id": 55388352846278,
        "inventory_quantity": 19,
        "sku": "sku6"
      },
      {
        "id": 98388391387998,
        "inventory_quantity": 37,
        "sku": "sku4"
      },
      {
        "id": 93394420142283,
        "inventory_quantity": 16,
        "sku": "sku2"
      },
      {
        "id": 95794426007123,
        "inventory_quantity": 28,
        "sku": "sku7"
      },
      {
        "id": 89794429022894,
        "inventory_quantity": 32,
        "sku": "sku9"
      },
      {
        "id": 45694431414982,
        "inventory_quantity": 28,
        "sku": "sku6"
      },
      {
        "id": 23594455597765,
        "inventory_quantity": 76,
        "sku": "sku8"
      },
      {
        "id": 45694459856987,
        "inventory_quantity": 10,
        "sku": "sku1"
      }
Once the JSON data is loaded into the table, it can be queried using a simple SELECT * statement.

By clicking into one of the hyperlinks within a row, we can see more detail around the structure of the data:

Flatten
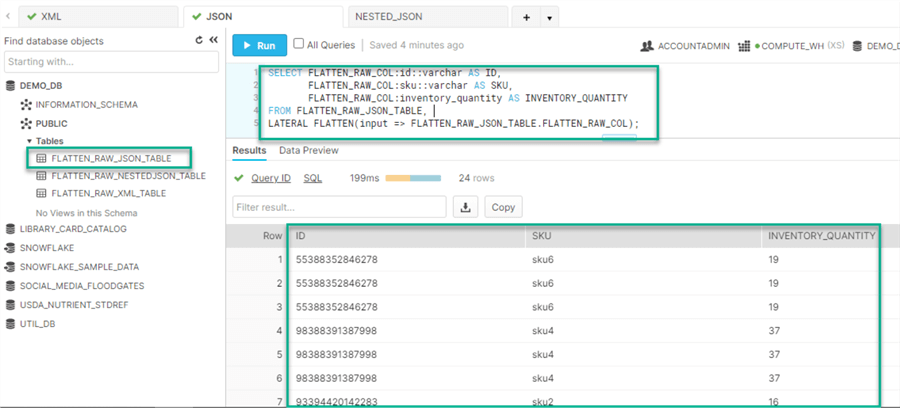
After the JSON data is loaded into the table within the VARIANT type column, the following query will flatten the JSON data so that each member of the array will become its own row to form a more structured dataset.
SELECT FLATTEN_RAW_COL:id::varchar AS ID,
       FLATTEN_RAW_COL:sku::varchar AS SKU,
       FLATTEN_RAW_COL:inventory_quantity AS INVENTORY_QUANTITY
FROM FLATTEN_RAW_JSON_TABLE,
LATERAL FLATTEN(input => FLATTEN_RAW_JSON_TABLE.FLATTEN_RAW_COL);
As expected, the SQL query results display a more structured view of the data.
Flatten Nested JSON Data to use with Snowflake
Load
To test the flatten capability of a NESTED JSON dataset, we can load the following NESTED JSON file into the FLATTEN_RAW_NESTEDJSON_TABLE using one of the recommended load options along with the JSON file format.
[{
  "book_title":"The Definitive Guide to Azure Data Engineering",
  "year_published":2021,
  "authors": [
       {
       "first_name":"Ron",
       "middle_name":null,
       "last_name":"LEsteve"
       },
       {
       "first_name":"Sam",
       "middle_name":"Smith",
       "last_name":"Broadwhick"
       }
       ]
 }
{
  "book_title":"Baby Talks",
  "year_published":2021,
  "authors":
       [{
       "first_name":"Kathy",
       "middle_name":"L",
       "last_name":"Salisbery"
       }
       ]
 }
{
  "book_title":"BBQ Recipes",
  "year_published":2021,
  "authors":
       [{
       "first_name":"Levi",
       "middle_name":null,
       "last_name":"Bastille"
       }
       ]
 }
{
  "book_title":"Game Of Tech",
  "year_published":2020,
  "authors":
       [{
       "first_name":"John",
       "middle_name":null,
       "last_name":"Doe"
       }
       ]
 }
{
  "book_title":"Corgi Dreams",
  "year_published":2021,
  "authors":
       [{
       "first_name":"Kelly",
       "middle_name":null,
       "last_name":"Jacobs"
       }
       ]
 }
Once the JSON data is loaded into the table, it can be queried using a simple SELECT * statement.
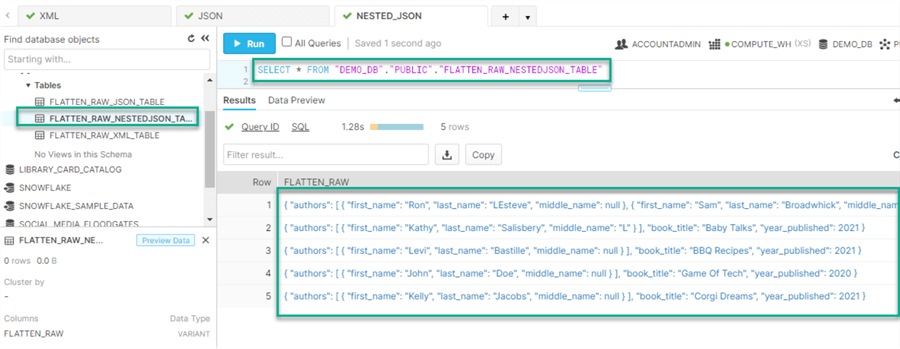
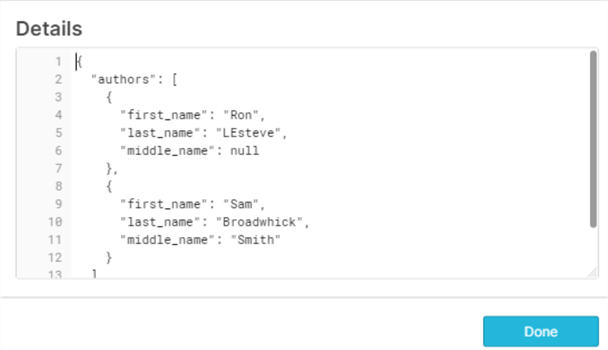
By clicking into one of the hyperlinks within a row, we can see more detail around the structure of the data:
Flatten
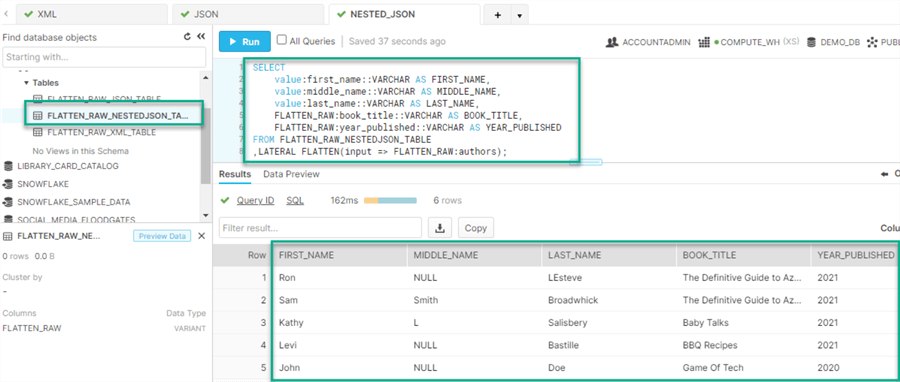
After the NESTED JSON dataset is loaded into the table within the VARIANT type column, the following query will flatten the NESTED JSON data so that each member of the array will become its own row to form a more structured dataset.
SELECT
    value:first_name::VARCHAR AS FIRST_NAME,
    value:middle_name::VARCHAR AS MIDDLE_NAME,
    value:last_name::VARCHAR AS LAST_NAME,
    FLATTEN_RAW:book_title::VARCHAR AS BOOK_TITLE,
    FLATTEN_RAW:year_published::VARCHAR AS YEAR_PUBLISHED
FROM FLATTEN_RAW_NESTEDJSON_TABLE
,LATERAL FLATTEN(input => FLATTEN_RAW:authors);
As expected, the SQL query results display a more structured view of the data.
Next Steps
- For more detail on getting started and working with Snowflake, read the following MSSQLTips in-depth tutorial on Snowflake.
- For more detail on flattening semi-structured data using Azure Data Factory’s Mapping Data Flows, read more about Flatten transformation in mapping data flows.
- For more detail on learning how to work with complex and nested data in Azure Databricks, explore the tutorials and sample notebooks and functions Databricks Complex and Nested Data.
- For more detail on working with semi-structured data in Azure Synapse Analytics, read more about Analyzing complex data types in Azure Synapse Analytics.
- For more detail on flattening data with Google Big Query, see Flattening the BigQuery variants table.

Ron C. L’Esteve is a Data and AI Leader and professional Author residing in Chicago, IL, USA. He is well-known for his impactful books and article publications on Azure Data & AI Architecture, Engineering, and Leadership. Ron holds a Master of Business Administration (M.B.A.) and Master of Science in Corporate Finance (M.S.F.) from Loyola University Chicago. Ron possesses deep technical skills and experience in designing, implementing, leading, and delivering modern Azure Data & AI projects for numerous clients around the world. He is a Motorola Certified Six Sigma Green Belt, a Microsoft Global Challenger, and also holds numerous additional Microsoft, Snowflake, and Databricks professional certifications in Big Data Engineering, Artificial Intelligence, Apache Spark and Data Platform Architecture.
- MSSQLTips Awards: Champion (100+ tips) – 2023 | Author of the Year – 2020-2021 | Rookie of the Year – 2019