By: Kenneth A. Omorodion | Updated: 2021-12-01 | Comments (8) | Related: > Power BI
Problem
Calculating time duration in Days, Hours, Minutes and Seconds in Microsoft Power BI using DAX is a common task most Analysts would undertake in their daily work with Power BI. Although the task is common, and there have been several articles written to demonstrate how to achieve this over the years, but I am putting together this detailed tutorial with an optional approach on how this can be easily done in a different business scenario by anyone using Power BI.
Solution
To demonstrate this, I will approach it from the two different business scenarios as follows.
- You have customer Order Dates and Ship Dates and want to know how long it took for the order to be delivered.
- You have a dataset which only has some fields along with a column of numbers representing total minutes staff worked in an hospital ward or something similar.
Scenario 1:
To approach the first scenario, let's say we have the dataset as seen in the diagram below.
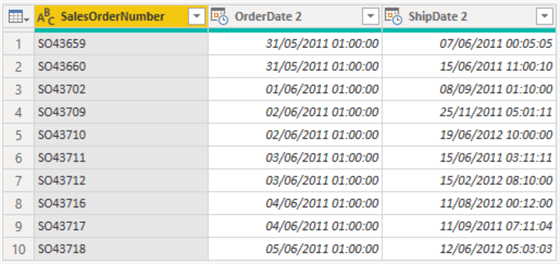
Then, the business requirement is for you to create a dynamic calculation in Power BI with a DAX formula that easily computes the Day, Hour, Minute and Seconds between Order Date and Ship Date of an order (i.e. date difference), and this date value should be output in a string format as seen below.

Or maybe it might be that this information needs to be seen on a table visual for business needs as seen below.
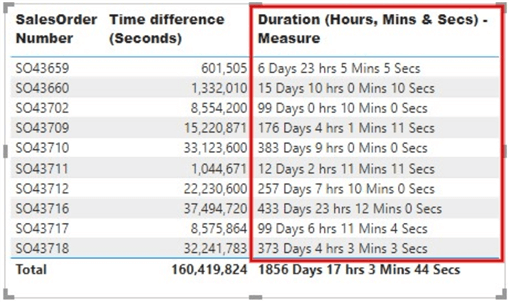
So, let's look at how we can achieve this using DAX. In this scenario, we are assuming we want to start with a situation where we have the duration in seconds. Note: You can start with Minutes or Hours too. However, I encourage you to start from the lowest time duration for ease of following this tutorial.
- Calculate the difference between the Order date and Ship date to know the number of days it took.
- Create a measure that holds the total duration in seconds.
- Create the measure that computes the string of the time duration.
STEP 1: Calculate the difference between the Order date and Ship date to know how long it took.
To do this, we need to create a calculated column using the DATEDIFF DAX function as seen in the diagram and DAX syntax below.
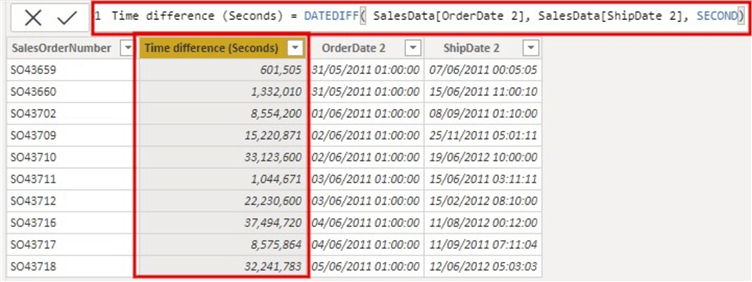
Time difference (Seconds) = DATEDIFF ( SalesData[OrderDate 2], SalesData[ShipDate 2], SECOND )
Note that I have used "SECOND" as my third argument in the DATEDIFF function. There are options to use other time durations like HOUR, MINUTES, etc.
STEP 2: Create a measure that holds the total duration in seconds.
This step is optional as it can be done within the third step. But I have decided to separate it for clarity's sake.
To do this, create a measure in DAX using a simple SUM function as seen in the diagram and code below.
Duration (Seconds) = SUM ( SalesData[Time difference (Seconds)] )
STEP 3: Create the measure that computes the string of the time duration.
I have created this measure using DAX variables as it makes it easier to understand and read. A combination of other DAX functions has been used in this measure; I will leave links to them in the next steps at the end of this article.
To do this, create a measure using DAX as seen in the diagram and code below.
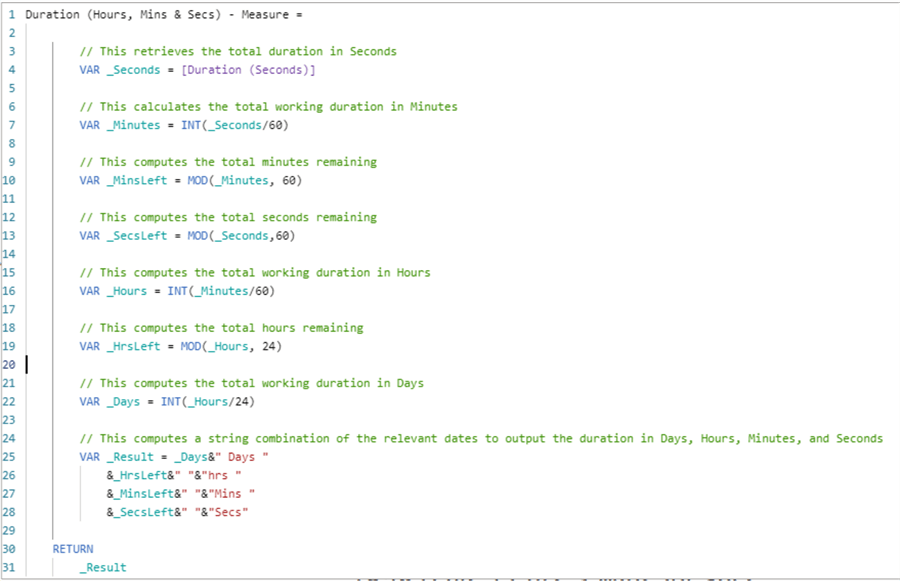
Duration (Days, Hours, Mins & Secs) - Measure =

        // This retrieves the total duration in Seconds
        VAR _Seconds = [Duration (Seconds)]

        // This calculates the total working duration in Minutes
        VAR _Minutes = INT(_Seconds/60)

        // This computes the total minutes remaining
        VAR _MinsLeft = MOD(_Minutes, 60)

        // This computes the total seconds remaining
        VAR _SecsLeft = MOD(_Seconds,60)

        // This computes the total working duration in Hours
        VAR _Hours = INT(_Minutes/60)

        // This computes the total hours remaining
        VAR _HrsLeft = MOD(_Hours, 24)

        // This computes the total working duration in Days
        VAR _Days = INT(_Hours/24)

        // This computes a string combination of the relevant dates to output the duration in Days, Hours, Minutes, and Seconds
        VAR _Result = _Days&" Days "
            &_HrsLeft&" "&"hrs "
            &_MinsLeft&" "&"Mins "
            &_SecsLeft&" "&"Secs"

    RETURN
        _Result
If you would like to copy the code directly into your own measure, all you need to do is change the "Duration (Seconds)" part at the top to your own calculated measure name, assuming it's also a second's time calculation.
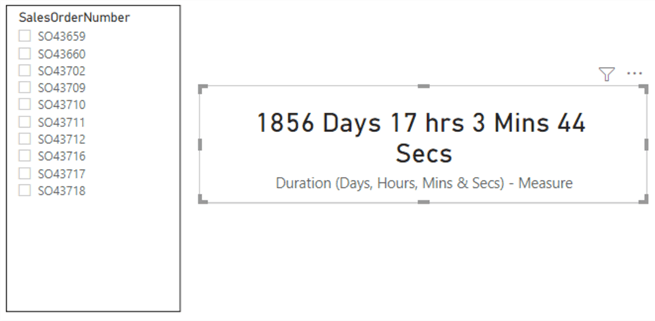
The output of the DAX code above is as seen below. The DAX code can also work as a calculated column instead of a measure.
Scenario 2:
In this scenario, you have a dataset which only has some fields along with a column of numbers representing total minutes staff worked in an hospital ward or something similar. Take the dataset below as a representation for the scenario.

In this case, the business requirement could be that you need to create a DAX solution that creates a string of duration which depends on the "Staff Working Duration/Day (Mins)" to create something like the below.

In this case, we must start from Minutes not Seconds as we did in the previous scenario. The steps are similar, nevertheless. To do this, we will follow the steps below.
- Create a measure that holds the total duration in minutes.
- Create the measure that computes the string of the time duration.
STEP 1: Create a measure that holds the total duration in Minutes.
Again, this step is optional as it can be done as part of the second step. This step is only separated from the second step to make it clearer to understand. So, to do this, all you need is to create a simple SUM function to create a measure that calculates the sum of the duration in Minutes as seen in the code and diagram below.
Total Minutes Duration = SUM ( 'Ad Data'[Staff Working Duration/ Day (Mins)] )

STEP 2: Create the measure that computes the string of the time duration.
Like what we did in the first scenario, we are using variables in the DAX measure for ease of readability. To do this, the DAX code should be as follows.
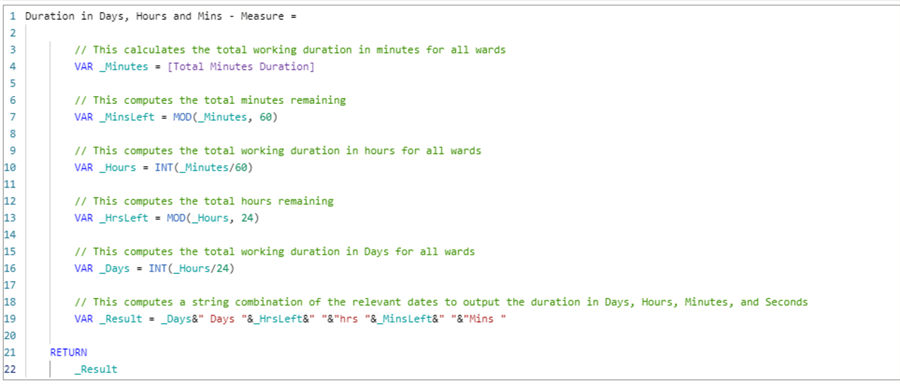
Duration in Days, Hours and Mins - Measure =

        // This calculates the total working duration in minutes for all wards
        VAR _Minutes = [Total Minutes Duration]

        // This computes the total minutes remaining
        VAR _MinsLeft = MOD(_Minutes, 60)

        // This computes the total working duration in hours for all wards
        VAR _Hours = INT(_Minutes/60)

        // This computes the total hours remaining
        VAR _HrsLeft = MOD(_Hours, 24)

        // This computes the total working duration in Days for all wards
        VAR _Days = INT(_Hours/24)

        // This computes a string combination of the relevant dates to output the duration in Days, Hours, Minutes, and Seconds
        VAR _Result = _Days&" Days "
            &_HrsLeft&" "&"hrs "
            &_MinsLeft&" "&"Mins "

    RETURN
        _Result
Again, if you would like to reuse this code in your own work, all you need do is to just change the [Total Minutes Duration] part of the code to the name of your aggregated minutes measure.
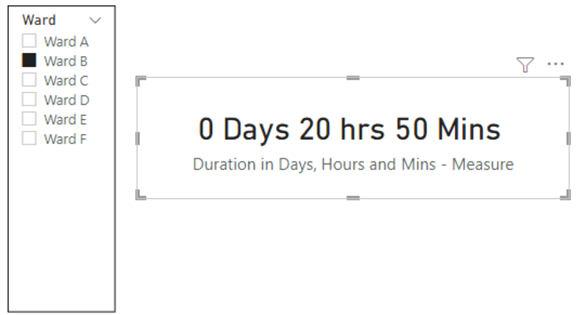
The output of the measure in a card visual and a slicer is as seen below.
In summary, as mentioned earlier in this article, this requirement in Power BI is not new, there have been many other articles that have demonstrated how to approach this. However, I have made this article very easy to follow using an approach which can be replicated by anyone.
Next Steps
- See this YouTube video from BI Elite on using GIF in Power BI here.
- Learn more about how to use the DAX INT function here.
- Learn more about the DAX MOD function here.
- Get some more information on how to use the DAX DATEDIFF function here.
- Check out all of the Power BI tips on MSSQLTips.com.
- Try this tip out with your data.
Learn more about Power BI in this 3 hour training course.
About the author
 Kenneth A. Omorodion is a Business Intelligence Developer with over eight years of experience. He holds both a bachelorís and masterís degree (Middlesex University in London). Kenneth has the MCSA, Microsoft Data Analyst - Power BI and Azure Fundamentals certifications. Kenneth is a Microsoft Certified Trainer and has delivered corporate training on Power BI, SQL Server, Excel and SSRS.
This author pledges the content of this article is based on professional experience and not AI generated.
View all my tips
Article Last Updated: 2021-12-01


