Problem
Should you manage one Python installation for all projects, or keep different installations on the same machine? Both approaches will inevitably lead to issues. In the former case, you must maintain lots of packages. In the latter, it is hard to keep the different installations from interfering with each other and breaking. Sometimes you may work on different projects that require different versions of the same package which will additionally complicate your setup.
Solution
Enter Anaconda, a useful collection of a Python interpreter and packages that also come along with conda, the tool for managing packages and environments. The Anaconda installer comes bundled with certain packages, but you can also use conda to install more of them. Conda can work alongside pip, which is another popular package manager. Anaconda is immensely popular in the general Python and advanced analytics community for one main reason – convenience. The platform has established itself as the definitive solution when you are up to scientific computing. With one installation you get all the core tools and packages. Read on to discover some additional benefits and caveats.
Anaconda Python Installation Process
In this article, we will focus on the free Anaconda distribution. There are two more distributions called Professional and Business which are subject to a paid subscription.
Installing on Windows Operating System
The installer is available at https://www.anaconda.com/. The minimum requirements are Windows 8 and newer, macOS 10.10 and newer, or any Linux distribution with a glibc version greater than 2.12 (CentOS 6). Anaconda also requires 3GB of free hard drive space, while Miniconda needs only 400 MB. First, install just for the current user:

Next, it is strongly recommended to install it in a target folder with no spaces, otherwise, you will get the following warning:

So instead of …\Program Files\… install Anaconda in a path like C:\Users\programs\anaconda.
Last but not least, do not add Anaconda to the PATH variable. Such a configuration may lead to clashes with other software. Instead, you will have to use the dedicated Anaconda prompt:

Keeping the defaults will give you peace of mind later. After the installation has finished, you will get a prompt to install Anaconda DataSpell, which is a rival for VS Code. I find VS code to be quite convenient and efficient, so it is up to you to try DataSpell.
Installing on MacOs and Linux
For MacOs the installer is available here. Download, open it and follow the prompts. Leave the defaults as they are.
Installing on Linux Operating System
This Linux installer is here. It is recommended to cryptographically validate the data integrity by running:
shasum -a 256 /PATH/FILENAME
# Replace /PATH/FILENAME with your installation's path and filename.
Next, enter the following in the bash terminal:
bash ~/Downloads/Anaconda3-2020.05-Linux-x86_64.sh
Replace it with the correct download location and file name. Finally, hit enter and follow the prompts to complete the installation with the default configuration.
Miniconda
If you are looking for a more compact and lightweight version of Anaconda that can still be up for scientific computing, then I suggest you also try Miniconda. It includes only Conda, Python and the core package dependencies. It is another helpful tool to get started quickly with advanced analytics and data science. The installers for Windows, MacOs and Linux are located here.
Overview
Most of the time, you will interface with the Anaconda navigator which is a convenient GUI providing access to the additional apps that come with Anaconda, as well as environment manager. The main purpose of the navigator is to simplify access to your environments and their packages. This way, a data scientist can easily manage their environments. This is what the home page of the navigator looks like:

On the left-hand side, you see the navigation, from where you can go to your environments, documentation (learning) or community links. Most notably, the home page gives you access to:
- JupyterLab: web-based interface for project Jupyter which allows you to manage and work easily with Jupyter notebooks.
- Jupyter notebooks: the most popular product of the Jupyter project, allowing you to quickly create, run, visualize, and present scientific experiments.
- Spyder: open-source scientific environment specifically designed for Python computing.
- VS Code: the popular, open-source source code editor. After enabling the shortcut from the settings, the icon in the navigator will point to an existing installation.
- PyCharm: IDE that is designed for general Python, web, or data science development.
- Orange: a visual data mining tool allowing you to author analytics and machine learning workflows.
Environment management
Creating a new conda environment is easy. You can do it either from the GUI or from the Anaconda prompt.
Using GUI
Go to Environments and click Create in the bottom menu. Give your environment a name and select Python or R:

In a few minutes, you will have a fresh environment. Notice the other options next to Create:
- Clone: duplicates an existing environment.
- Import: a quick way to import an existing environment
- Remove: deletes an existing environment.
Using Command Prompt
Use the command conda create -n followed by your environment’s name and specific package names that will be installed directly as well:

Additionally, you can specify a version of the interpreter and/or specific package versions. I suggest checking the full conda documentation located here. The conda prompt is a very efficient way for managing your environments and their packages.
Now when you have at least one target environment, you can use it with Visual Studio Code. My complete Visual Studio Code tutorial for that is here. For example, you can have one environment for statistical analysis and one for deep learning. Alternatively, you can segregate your environments by project.
Package management
One of the most important and helpful aspects of using the Anaconda platform is the package management capability. If you go to the Environments tab and select an environment, you will get a list of the installed packages. You can filter on installed, not installed, updatable, selected or all:

Installing a new package
If I wanted to add a package to this environment, I can filter on not installed and search in the search packages box:

When you select a package, the apply button will become active. Clicking it will trigger a pop-up displaying an overview of all package dependencies and their status (installed or not). Clicking Apply will start the installation. After the installation has been completed you may have to refresh the environment to see the package in the packages list.
Updating a package
If you filter on updatable packages, you will get a list of all those packages for which conda has detected a new version. You can click on a package and mark it for update. You will have to apply the changes so that the update will be triggered.

Installing a different package version
You can select a specific package version if needed for your project. First, look up the package, then use the menu Mark for specific version installation and select the version you need. You will have to apply the changes again.

Removing a package
You can remove a package much the same way as already described for updating or installing a specific package version. Select the package and click Mark for removal. There will be a popup letting you know the impact on related packages:

Command prompt
All package management tasks can be performed via the Anaconda prompt as well. I prefer the prompt – it is faster, especially when you know what package you need. If you start the Anaconda prompt from the start menu, you will see a terminal window pointing to the default (base) environment:

You can change the context to an existing environment with the activate command:

For example, you can use conda update –all to trigger an update for all packages in the environment:

This and many other commands will require confirmation by typing in y.
Channels and channel management
Channels are online or local repositories where the Navigator will look for packages. Anaconda comes with a default configuration which the user may change. A complete list of packages and channels is available here. When in an environment, you can use the Channels menu to add or manage existing channels:
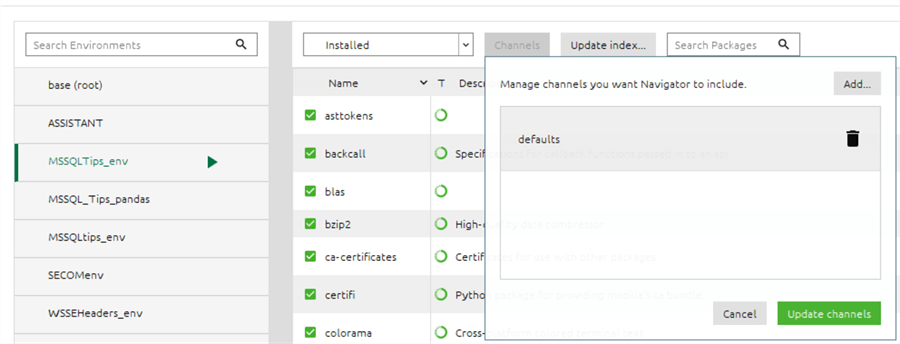
This option is handy – some packages are available only on certain channels. With Anaconda you have the flexibility to switch between channels.
Included packages
In the Anaconda documentation, we can also find a complete list of the packages available for installation. For a reference for the 64bit Windows installer for Python 3.9 go here.
Some considerations
Here are a couple of points that I think are also important when working with Anaconda. First, if you already have another Python distribution (e.g., had already installed Python from python.org), then you do not have to uninstall it. This is handy as you may use this default installation for another project and have it added to PATH as well.
Second, remember the directory where you installed Anaconda. It contains a subfolder named envs:

This subfolder contains all the data for your current environments. If it is a proper environment (e.g., not just a shell) then each folder contains a python.exe interpreter. In case you want to refer to a specific environment (e.g., from Power BI) then you need to point to the correct folder and environment.
Conclusion
In this article, we examined Anaconda – a platform and ecosystem that gets you started with scientific computing with Python. While not the only such software out there, Anaconda provides a great level of convenience in creating and managing virtual Python environments and their packages.
Next Steps
Additional reading:
- How to Get Started Using Python using Anaconda, VS Code, Power BI, and SQL Server
- Anaconda documentation

Hristo Hristov is a seasoned data professional with 10+ years of experience spanning the intersection of data engineering and smart manufacturing solutions. Since 2017, he has specialized in implementing advanced analytics solutions for bridging the IT/OT gap.
A technical writer with over 80 published articles on data and AI technologies, Python development, and cloud solutions. Passionate about transforming complex data into business value through innovative applications of Azure Data Platform, Python, IoT solutions, databases, and other cloud technologies.
Currently applying Industry 4.0 best practices, focusing on IoT connectivity, and implementing data and AI systems in manufacturing. Hristo holds a degree in Data Science and several Microsoft certifications covering SQL Server, Power BI, and related technologies.
- MSSQLTips Awards
- Achiever Award (75+ tips) – 2026
- Rookie of the Year – 2021
- Author Contender – 2022/2023/2024/2025


