Problem
In today’s data-driven world, businesses constantly seek ways to optimize their data infrastructure and reduce costs. Solution architects are looking for ways to replace software platforms with scripts and notebooks that can perform the same process at a lesser cost. In this article, we will look at how to perform an entire ETL process using PySpark and load it to SQL Server on a Windows virtual machine and automate using Windows Task Scheduler.
Solution
The rise of terms such as “Infrastructure as Code” or “Notebook base pipeline” are more popular than ever before. Companies seek ways to replace an entirely based Platform as a Service solution with only scripts that consume fewer resources and are easy to set up. This is the reason for this article: I will walk you through how to perform an entire ETL process using PySpark and load it to SQL Server on a Windows virtual machine (VM), and this process will be automated using Windows Task Scheduler.
Project Architecture
This project will be broken into separate phases, each aiming to achieve a significant goal.
- Phase 1 will be focused on configuring PySpark in the Windows server with the necessary information.
- Phase 2 will consist of writing an incremental script in Python to pick data from a particular location and perform the ETL process.
- Phase 3 will be about configuring SQL Server in the Windows server with the necessary drivers to load data into the database.
- Phase 4 for the final steps, we will set up an automated scheduler on the server using Windows Task Scheduler, which will help run the script daily in our VM.

Prerequisites
- Anaconda installed on Windows Server.
- SQL Server installed on Windows Server.
- Basic Python programming skills.
- Basic SQL skills.
- Be open-minded, and let’s build together.
Phase 1: Configure PySpark in Windows Server
What is PySpark?
PySpark is said to be the Python API for Apache Spark, an open-source platform for handling massive amounts of data. It is written in the Scala programming language, which makes it a powerful tool for handling big data. It works across networks of computers used to analyze massive amounts of data in parallel.

1.1 Setting Up Java on Windows Server
Before setting up PySpark on the Windows Server, install the Java Development Kit (JDK) on your server. The JDK is a set of libraries required to create Java software applications.
The following are steps in setting up Java on your Windows Server:
Step 1: Download and Install Necessary Libraries
First, we need to install the necessary version of JDK on our Windows Server. To install the appropriate version, click on the following URL: https://www.oracle.com/ng/java/technologies/downloads/.
After downloading the jdk-21_windows-x64_bin.exe file, install it on your Windows Server. Ensure to note down the path where the EXE file is installed.

Step 2: Set Environment Variables
We need to set environment variables in Windows to influence how programs and the system behave. They function as little labeled boxes that hold data that applications can access when required. This feature comes in handy when calling an application from the Windows command prompt.
Ensure you get the exact file path where the JDK was installed. You can get that information from your Local Disk (C:) drive Program Files.

In your Windows Desktop Server, click the Window icon and search Edit the system environment variables. In the window that appears, click on Environment Variables.
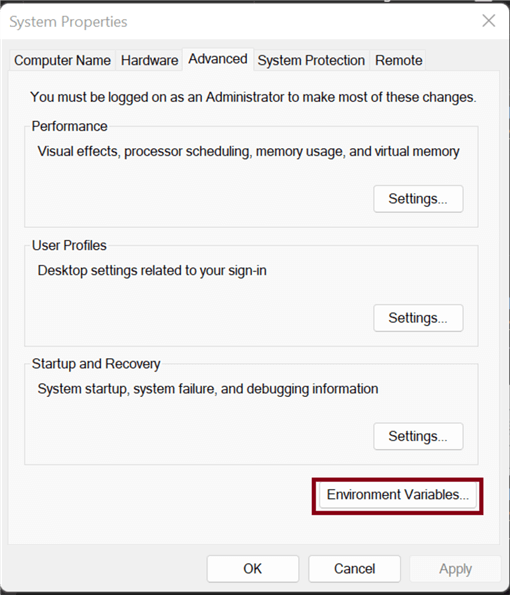
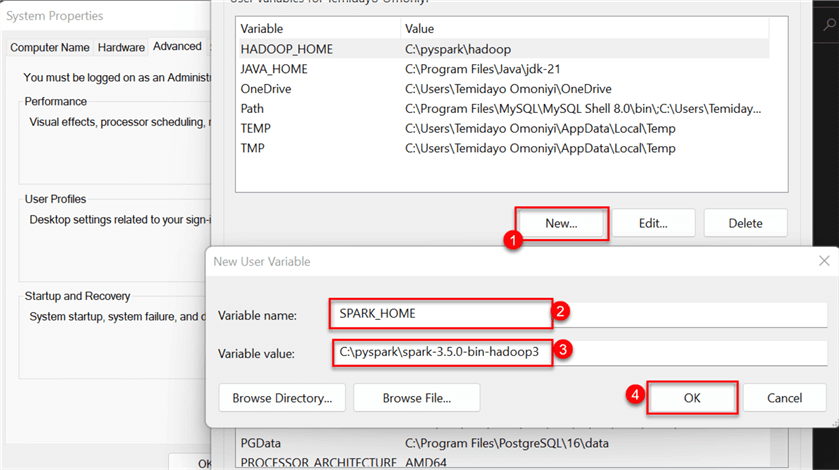
In Environment Variables, click New, then set the variable name as JAVA_HOME and the variable value as the file path where the JDK is installed on your server. Click OK.

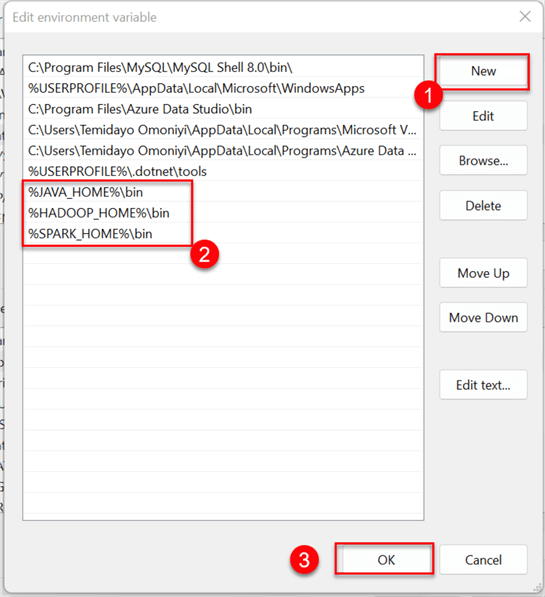
After creating the new variable, add it to the User variable path. Double-click Path; this will open another window. Then click New and reference the user variable in the path %JAVA_HOME%\bin. Click OK.

Step 3: Test Environment Variables
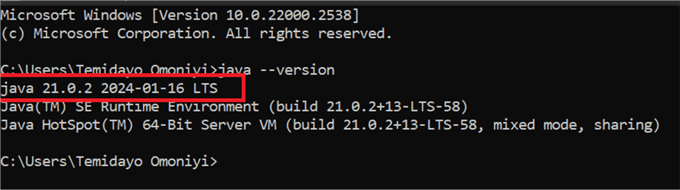
To assess if the Java configured in the system variable was successful, open your command prompt and type the word java --version. If this works as expected, you should see the version of Java installed on your server indicating that Java was successfully added to the Environment Variable.
1.2 Setting Up Spark and Winutils in Windows Server
Setting up Winutils at this point is important when dealing with Spark and Hadoop. Winutils for Apache Spark is a set of utilities designed for Windows environments when working with Spark and Hadoop.
Hadoop and Spark are primarily developed for Linux systems. This is where Winutils fills the gap for Windows users. It offers necessary Windows binaries that Spark needs to communicate with Hadoop’s file system on Windows, which are not available by default. Note: Winutils are not important in Linux and macOS.
The following steps are needed to set up Spark and Winutils in Windows Server:
Step 1: Download and Configure Winutils
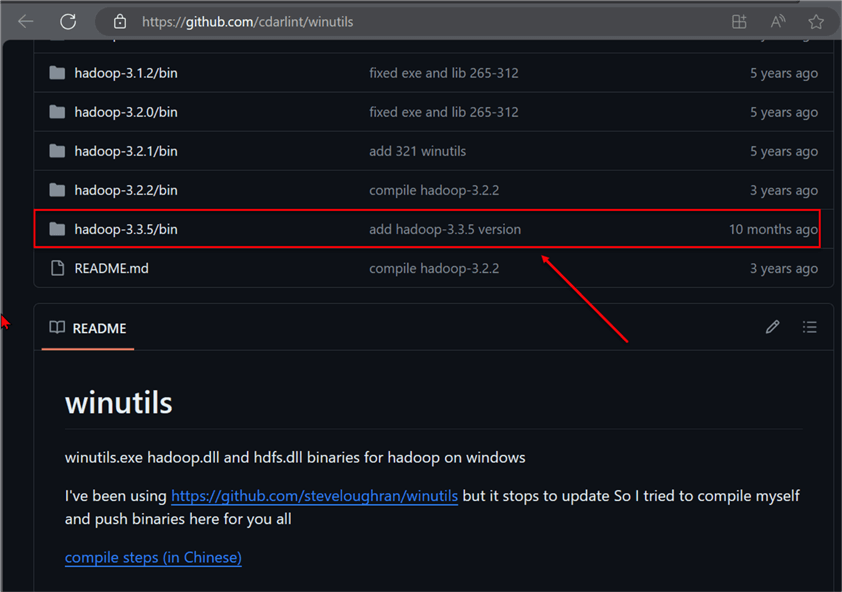
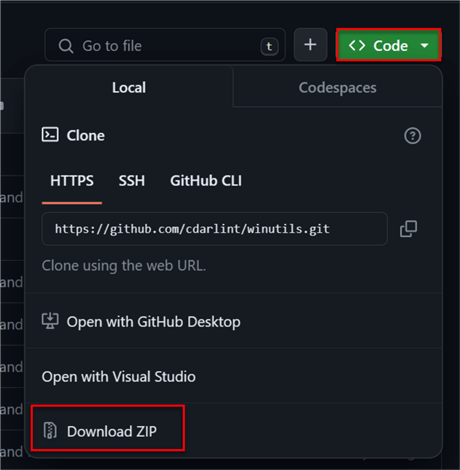
Open your browser and navigate to this URL: https://github.com/cdarlint/winutils. We will be using the hadoop-3.3.5/bin. To get started, you can clone the repo on your Windows server or download the repository manually.
On your Windows server, extract the zip file. Next, go to your Local Disk, create a folder directory called PySpark, and then create another subfolder in the same directory called Hadoop. The Hadoop folder will be used to house the Winutils Hadoop-3.3.5/bin file downloaded from the git repository.

Step 2: Download and Install Apache Spark
We need to download the correct Spark version with the supported bin Winutils version. In your browser, navigate to the following link: https://spark.apache.org/downloads.html.
Click on spark-3.5.1-bin-hadoop3.tgz to download the correct Spark version. Note: The Apache Hadoop version used is 3.3.

In the new window, download the zip file and extract it in your server environment. The extracted file should be saved in the pyspark directory created previously where the Hadoop folder also resides.

Step 3: Set Environment Variables
The approach conducted for the Java JDK will be the same for the Hadoop and spark variables. In your Windows server, navigate to Environment Variable in the Control Panel. Click on New, and provide a variable name and the value file path to Hadoop.

Repeat the process for spark, but give it a variable name called SPARK_HOME.
1.3 Setting Up PySpark and Python File Path
We need to add the path in the C: Drive of the Windows server to reference both Python and PySpark. We will be using Python for Anaconda.
The following steps below will help us achieve this:
Step 1: Add PySpark for Python in the Environment Variable
To achieve this, we first need to know where Python is installed on our Windows server. Start by getting the location of Python on your drive. Open the command prompt and type the word where python. This should provide you with the exact location where Python is installed on the server.

Now, copy the path and head to your System Variables. Create a new user variable with the following information:

Note: Since Spark was not originally made for Python, we need to redirect the Spark library to collaborate with Python. In your System Variables, create a new User Variable and add the following configuration:
%SPARK_HOME%\python;%SPARK_HOME%\python\lib\py4j-0.10.9.7-src.zip;%PYTHONPATH%
If you trace Spark from your Server drive, you will notice it is picking a file Python for Java. This is the only way Spark can collaborate properly with Python.

Step 2: Add All User Variable Created to Path
Click on New, add the directory for Hadoop and Spark home to the Path in your Environment Variable, and then click OK.
Step 3: Test Configuration
Before testing, ensure you have closed all windows on your server. Open the command prompt and type pyspark. If the configuration is done properly, you should see a Spark icon, like the image below.

Before starting with PySpark, ensure you pip install PySpark to double-check that all your configurations work as expected.

Type python in your command prompt to open Anaconda for Python. Then, type import pyspark. If there are no errors, then the configuration works as expected.

Open your Jupyter Notebook or any Python IDE and run the following lines of code to ensure the configuration is working as expected:
import pyspark
from pyspark.sql import SparkSession
spark = SparkSession.builder.appName("mssqltips_to_spark").getOrCreate()

read = spark.read.csv(r"C:\Users\Temidayo Omoniyi\Desktop\Customer.csv", header = True)
read.show()

Phase 2: Data Ingestion and Transformation
You are working with the marketing and sales department that utilizes Microsoft Dynamics 365 ERP software, a cloud-based suite of business applications created to assist corporations in managing several facets of their business operations.
The Marketing and Sales team exports its data daily in Excel format to a particular folder on the Windows Server. As the Data Engineer, I am expected to pick the data that is dropped in the folder as it enters. The concept we will be using is the last modified date. This approach will loop through the folder, pick the latest file in the folder, and perform all necessary transformations.
The following steps should be followed to achieve this:
Step 1: Import All Necessary Libraries
We need to get the latest data file as it is dropped in the folder. Python’s OS package offers an interface for interacting with the operating system. It provides a range of features to conduct operations, including manipulating files and directories, getting at environment variables, and running system commands.
import os
import pandas as pd
Step 2: Get the Latest File
def get_latest_file(folder_path):
    files = [os.path.join(folder_path, file) for file in os.listdir(folder_path)]
The get_latest_file function searches a folder for the most recent file using the folder path as input. Using os.listdir(folder_path), it first lists every file in the specified folder. Next, it uses list comprehension to link folder_path with each file name to get a list of file paths.
    if files:
        latest_file = max(files, key=os.path.getmtime)
        return latest_file
    else:
        return None
It uses the max() function with a custom key os.path if there are files in the folder (i.e., the list files are not empty) to locate the file with the longest modification time (mtime). This process helps find the latest file in the folder.
def read_latest_file_into_dataframe(folder_path):
    latest_file = get_latest_file(folder_path)
The read_latest_file_into_dataframe method is intended to read the most recent file within a folder and insert it into a Panda DataFrame.
   if latest_file:
        if latest_file.lower().endswith('.csv'):
            df = pd.read_csv(latest_file)
        elif latest_file.lower().endswith(('.xls', '.xlsx')):
            df = pd.read_excel(latest_file)
        else:
            print(f"Unsupported file format for {latest_file}")
            return None
It looks up the file extension to see what format it is in. It reads the file into a DataFrame using pd.read_csv() if the file has a ".csv" extension. It reads files with a ".xls" or ".xlsx" extension using pd.read_excel(). If the latest_file is None, which indicates that a file was not located.
       return df
    else:
        print(f"No files found in {folder_path}")
        return None
The DataFrame is returned if the DataFrame df was successfully constructed. Otherwise, it prints a notice saying that no files could be found in the folder and returns None.

Step 3: Read Folder Directory
Continuing the code above, you need to create a variable that directs to the folder path in your Windows server. Using folder_path as an input, the function read_latest_file_into_dataframe() for the folder path. As previously mentioned, this method uses Pandas to read the most recent file into a DataFrame by searching the designated directory.
folder_path = r"C:\Users\Temidayo\Documents\Databricks_Project\Excel_Folder\Staging Folder"
latest_df = read_latest_file_into_dataframe(folder_path)
To determine whether a DataFrame was successfully formed from the most recent file in the directory, this conditional statement looks to see if the variable latest_df is None.
if latest_df is not None:
    print("DataFrame created from the latest file: File Available")

Step 4: Fill Down Transformation
You will notice some NaN values under the Year column in the image above. This is usually due to the merging of cells or human error. We need to perform the Fill Down transformation, which automatically copies the value from a cell above to the next blank cells in the same column by using the fill down method.
latest_df['Year'] = latest_df['Year'].fillna(method='ffill')
latest_df.head(10)

Step 5: Unpivot Columns
You will notice the product columns are arranged in the wrong format. In a situation where new products are added, it needs to be column-wise; this is not proper as data are meant to be row-based entries. We need to perform the Unpivot transformation, which is the act of rearranging your data table from a wide format to a long format.
# Unpivot or melt the DataFrame
# For id_vars you select the list of fields you want to be unaffected!
latest_df = pd.melt(latest_df, id_vars=['id', 'Year', 'countries', 'Revenue', 'country_code'],
                    var_name='Products', value_name='Amount_Sold')

Step 6: Setting Datatype
Getting the right datatype for each column is important as it helps you load the transformed data easily into the SQL Server database.
#Check file DataTypes
latest_df.info()

# Change to the appropriate datatypes
latest_df['Year'] = latest_df['Year'].astype('int64')
latest_df['Revenue'] = latest_df['Revenue'].astype(float)
latest_df['Amount_Sold'] = latest_df['Amount_Sold'].astype(float)
latest_df.info()

Step 7: Convert Pandas DataFrame to Spark DataFrame
Now, we need to transform the Pandas DataFrame to Spark DataFrame. This is needed when writing the transformed data to SQL Server.
Let’s start by importing the necessary libraries for PySpark and then creating a Spark session.
import pyspark
from pyspark.sql import SparkSession
from pyspark import SparkContext, SparkConf

#Start spark session
spark = SparkSession.builder.appName("pandas_to_spark").getOrCreate()
Now that our Spark session is up and running, we need to set a data schema and datatype using PySpark.
from pyspark.sql.types import StructType, StructField, IntegerType, StringType, DateType, TimestampType, FloatType, DoubleType
schema = StructType([
   StructField("id", IntegerType(), False),
   StructField("Year", IntegerType(), True),
   StructField("countries", StringType(), True),
   StructField("Revenue", FloatType(), True),
   StructField("country_code", StringType(), True),
   StructField("Products", StringType(), True),
    StructField("Amount_Sold", FloatType(), True)# <-- corrected line
   ])
# Convert Pandas DataFrame to Spark DataFrame
spark_df = spark.createDataFrame(latest_df, schema=schema)
spark_df.show()

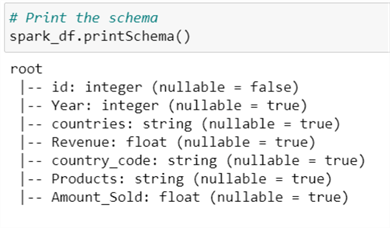
After converting to a Spark DataFrame, let’s confirm that the datatypes for each column are accurate.
# Print the schema
spark_df.printSchema()
Step 8: Set Ingestion Time
It is important to record the time at which data are loaded into the SQL Server database. This is for troubleshooting and referencing for future purposes.
from pyspark.sql.functions import current_timestamp
# Add a new column with the current time_stamp
spark_df = spark_df.withColumn("ingestion_date_time", current_timestamp())
spark_df.show()

Phase 3: SQL Server Configuration and Data Load
After the transformation process is complete, we need to load the transformed data into a table in the SQL Server database. We can achieve this by downloading and configuring the Apache Spark Connector.
3.1 Apache Spark Connector
The Apache Spark connector for SQL Server is a high-performance connector that can perform transactional data for big data analytics and store the results for use in ad hoc queries or reports.
The following steps should be followed in configuring Apache Spark Connector:
Step 1: Download and Configure Spark Connector
Microsoft already provides well-detailed documentation for this task: Apache Spark connector: SQL Server & Azure SQL. On the site, navigate to the release and download the apache-spark-sql-connector: https://github.com/microsoft/sql-spark-connector/releases.

Step 2: Place the Jar File in the Spark Directory
To get the exact file path where Spark was installed on the Windows server, head back to your Python script and write this line of code:
#Find Spark Library so you can install the necessary code
import findspark
findspark.init()
findspark.find()

Now that we have the file path, paste the downloaded connector into the spark jar folder.

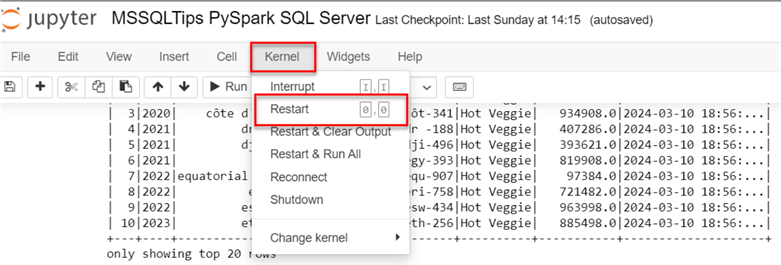
Note: Ensure to restart your Anaconda kernel before continuing the code.
3.2 Create a Table in the Database
We need to create a table in the SQL Server database to house the data that is being transformed and loaded by PySpark.
In SQL Server Management Studio (SSMS), right-click on the database we want to use and select New Query to run the code below.

Create table Sales_Report(
   id int,
   Year int,
   countries varchar(50),
   Revenue float,
   country_code varchar(50),
   Products varchar(50),
   Amount_Sold float,
   Ingestion_date_time datetime
);
3.3 Set SQL Server Credentials
We must get the needed credentials from SSMS to connect Python PySpark to the SQL Server database for reading and writing purposes.
The following steps explain how to get the needed SQL Server connection details:
Step 1: Get jdbc_url Setup
The jdbc_url contains the following credentials: Server name(your_hostname), port, and database name.
Usually, the jdbc_url is expressed in this format:
jdbc_url = "jdbc:sqlserver://<your_hostname>:<port>;databaseName=<your_database_name>"
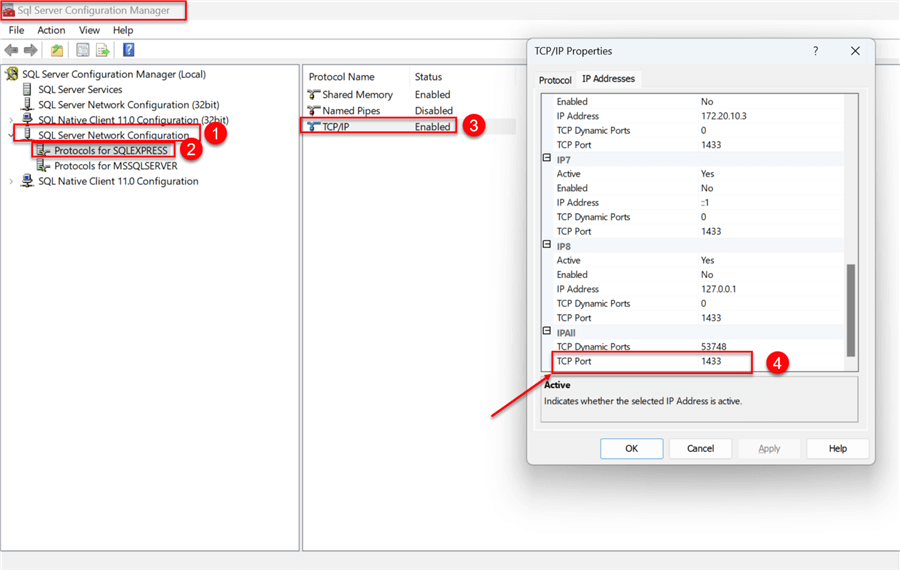
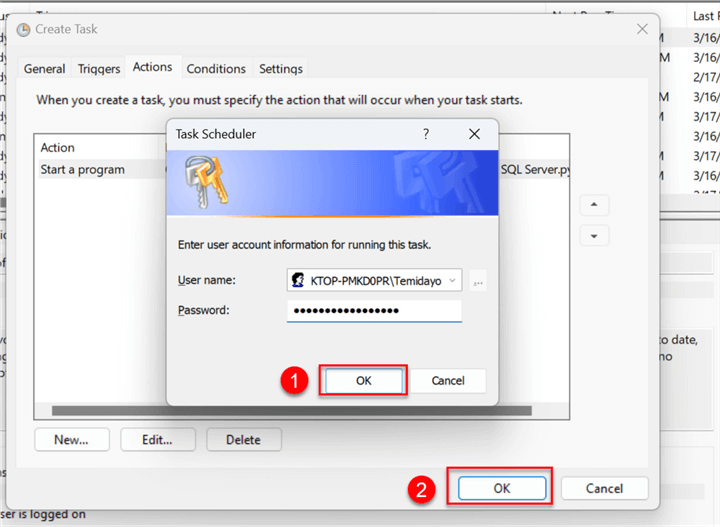
The required credential settings can be obtained from SSMS. Right-click on the database you want to use and select Properties In the new window, the database property for that database will be opened. To get more information, click View connection properties. The image below shows the Database name and Server Name. Step 2: Get User The default system username will not work for what we are trying to achieve. If the SQL Server does not already have users in the database, you can either contact the Database Administrator or create a new user, provided you have the necessary privileges. Step 2.1 Create a New User in SQL Server Follow these steps to create a new user. Step 2.1.1 Create New User. In SSMS, under your Server, expand the Security tab. Right-click on Login and select New Login. This should take you to another window. Step 2.1.2 Set New User Credentials. In the New User window, fill in the following: Step 2.1.3 Give Database Permission to New User. For new users to be created, we need to provide them with a database privilege and permission we will be using for this project. In the Login Properties, select User Mapping, where you can check the database you want assigned to the new user. We will assign the db_owner role to the new user, meaning the user MSSQLTips_user will have full control over the database. Click OK. Before testing, ensure you refresh the database and disconnect from the server. Step 2.1.4 Test New User. After disconnecting, try logging into SSMS with the new user credential. Use the SQL Server authentication, put the new username created with the password and click Connect. This should log you in if the user was created appropriately. Step 3: Get SQL Server Port Number To get the TCP/IP port number of your SQL Server, go to your Windows Server desktop and search for SQL Server Configuration Manager. Expand the SQL Server Network Configuration in the left pane, then select Protocols for your server. For me, I am using SQLEXPRESS. In the Protocol name, select TCP/IP. Right-click TCP/IP and select Properties from the dropdown menu. Search for TCP port number. Click OK. Now that we have all the necessary credentials, we need to follow standard practice by not writing the credentials plainly in the Python scripts. Load Environment Variables from .env Files The industry practice of loading sensitive information like API, passwords, or secret keys is usually done in an environment variable. Let’s see how we can achieve that using Python. Step 1: Install the Python Dotenv Library. Key-value pairs can be read from .env file and set as environment variables using the Python-dotenv tool. It facilitates the creation of apps that adhere to the 12-factor guidelines. To install the library in your Anaconda, write the following command in the command prompt: Step 2: Prepare Notebook. In your Windows Server, create a .env file that will house the credentials. Ensure the file is saved in the same directory as the Python notebook. Then, head back to your Python notebook where you will be calling the credentials in the file. In your Notebook, import the necessary library and prepare your environment: We need to load the environment variables from the .env file: Step 3: Read Table in SQL Server To evaluate the connection, let’s try reading the Sales_Report table we created earlier in SQL Server using the Spark read function: To visualize the table in the SQL Server database using Spark. This should be empty as no data has been loaded to the database table. From the image above, you will notice that no data is in the SQL database table. We will have to write data to the database using the Spark write function with the necessary credentials. The mode was set to append to support an incremental increase of new data as it enters the directory, since we plan to automate the entire process. The process of loading the data might take a couple of minutes depending on how large the data is. You can confirm the number of rows loaded to the Sales_Report table in the SQL Server database: Lastly, let’s visualize the data in the SQL Server using the Spark show() function. From the project architecture, we plan to automate the entire process in a Windows server. Data is obtained from an ERP system (Dynamic 365) and placed in a particular folder on the Windows server. We plan to use the concept of the last modified date to pick the latest file from the folder. We expect the Python code to run daily at a particular time. This is where Microsoft Task Scheduler plays a great role in running the script at a set period. The Windows Task Scheduler is a built-in application that lets you automate tasks in the Windows operating system, which for us is the Windows Server. Programs can be set up to run at times, intervals, or in response to occurrences. The Windows Task Scheduler does not support Notebook Python files in .ipynb format; it supports the .py format. There are various workarounds to solve this that are listed below. For this article, we will be using the third approach, which is the fastest now and does not require more configuration. Now that all the necessary files and script are working as expected, we need to automate the entire process on the Windows server. The following steps will help us achieve this: Step 1: Create a New Task On your Windows Server Desktop, click the Windows icon and search for “Task Scheduler.” In the Task Scheduler environment, click Create Task in the right pane. This will open a new window. Step 2: Task Settings Step 2.1 General. The General tab in the Task Scheduler has the following settings: Step 2.2 Trigger. Select the Trigger tab and click New at the bottom section. This should open a new window. Since we plan to run the script daily, check the Daily button and set a time for the script to run. Click OK. Step 2.3 Action. For this section, we will need to get the following information: Copy the Python script name and folder path, then paste them to the Actions settings. Before the Task Scheduler can work, you need to put in your Server Login password and click OK. Step 3: Wait and Observe Let’s try to simulate the same scenario. Remember the code was set to pick the latest file added to the folder. Now, add a new file to the folder path and wait for the Task Scheduler to trigger the notebook at the set time. Let’s wait and test if the task configuration will work as expected. For this article, I set the time for an earlier time due to testing purposes. If you recall the last number of rows in the SQL Server table was 30 rows. Let’s wait for a couple of minutes and check the SQL Server table. Errors. Before I show you the result, let’s talk about some errors that might occur when using Task Scheduler. Evaluate. This article covered multiple configurations to get PySpark working on your Windows server. We downloaded and installed multiple libraries and files, such as Java, Spark, Winutils, and SQL Connector. All libraries and connectors were placed in the right Environment Variable, which made it easy for the command prompt to read the files. We also created a new user in SQL Server Management Studio and assigned ownership roles to the database we used for this project. Transformation was completed on a particular folder on the server, using the concept of last modified date, aimed to pick files as new files enter the set location. Before running the script, we performed a best practice by storing all code in a .env file to house all credentials. Lastly, we configured and automated the entire process using Windows Task Scheduler. Please note that this project is not yet a fully automated solution as data still needs to be manually exported from the Dynamics 365 software. A subsequent article will show users how to connect to Dynamics 365 and pull the data. Next Steps Download the supporting code for this article: Read these related articles: Temidayo Omoniyi is a Microsoft Certified Data Analyst, Microsoft Certified Trainer, Power Platform Developer, Azure Data Engineer, Content Creator, and Technical writer with over three years of experience. Currently, he works as a data and business intelligence analyst for a training and consulting company in Lagos, Nigeria. Temidayo enjoys creating educative content on YouTube, LinkedIn, Twitter, and other online platforms. He loves sharing his knowledge and writing about systems, applications, tools, and processes. Apart from training, writing, and coding, you will find him watching and reading Anime. He is a big fan of DC Comics.


3.4 Making Credentials More Secure
pip install python-dotenv


#Importing the necessary libraries
from dotenv import load_dotenv, dotenv_values
import os
# Load environment variables from .env file
load_dotenv()

Define the necessary information for the SQL Server connection.
# Define SQL Server connection properties using environment variables
jdbc_url = f"jdbc:sqlserver://{os.getenv('Server_name')}:{os.getenv('TCP_port')};databaseName={os.getenv('Database_name')}"
properties = {
    "user": os.getenv("User_name"),
    "password": os.getenv("Password_value"),
    "driver": "com.microsoft.sqlserver.jdbc.SQLServerDriver"
}
# Read data from SQL Server into a DataFrame
table_name = "dbo.Sales_Report"
df = spark.read     .jdbc(url=jdbc_url, table=table_name, properties=properties)
df.show()

Load Transformed Spark DataFrame to SQL Server Table
# Write PySpark DataFrame to SQL Server table
spark_df.write     .jdbc(url=jdbc_url, table=table_name, mode="append", properties=properties)
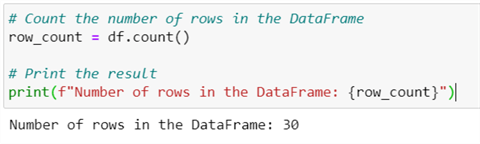
# Count the number of rows in the DataFrame
row_count = df.count()

# Print the result
print(f"Number of rows in the DataFrame: {row_count}")
df.show() #Data in SQL Server

Phase 4: Automate the ETL Process Using Windows Task Scheduler
What is Windows Task Scheduler?
Information
Solution


4.1 Configure Windows Task Scheduler to Run Script


Conclusion


Hello,
Yes, you can use pandas or any other data manipulation library you are comfortable with (sqlalchemy), etc The actual project was for the big data process and also I wanted the readers to be able to configure PySpark in their Windows/server environment.
Regards.
Why do you need Spark for this task? Pandas can also append rows to a sql table. Is it for performance to run parallel or?