Problem
I learned about AWS RDS general features (Provisioning, Patching, High Availability, Disaster Recovery, etc.) from this tip – Introduction to AWS RDS SQL Server Features. How do you deploy an AWS (Amazon Web Services) RDS (Relational Database Service) SQL Server instance?
Solution
Amazon Relational Database Service
Amazon offers a free tier account for hands-on experience with the AWS platform, products, and services. You can enjoy exploring AWS services for 12 months following the initial sign-up. In terms of RDS instance, the free tier offers the following benefits:
- It provides up to 750 Hours of Amazon RDS Single Availability Zone instance with db.t2.micro, db.t3.micro, and db.t4g.micro Instances. You can use MS SQL Server, MySQL, MariaDB, and PostgreSQL databases each month
- You can use 20 GB of General Purpose (SSD) database storage.
- It offers 20 GB of storage for database backups and DB Snapshots.
To create the AWS account, click on the "Create a Free Account" link on the AWS Free Tier webpage.

Note: I will use my subscription for this tip. The steps remain the same for the free tier or any subscription-based RDS.
Login to AWS Web Console and search for the RDS service.

The Amazon RDS dashboard creates a database option for configuring a relational database instance in the cloud. You can note that my DB instance will launch in the Asia Pacific (Mumbai) region.
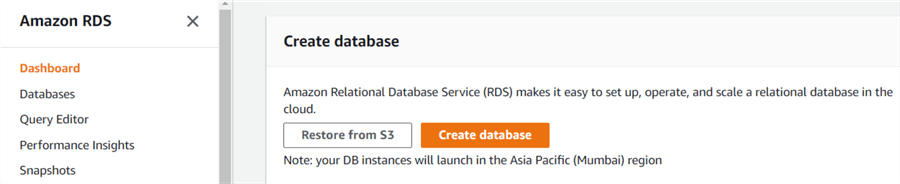
You can change the region to deploy the RDS instance in the region of your choice. Select the required region from the list below to change the region.

Let's go with my default region – Asia Pacific (Mumbai), and click on Create Database.
The create database page gives two database creation methods.

- Standard create: It allows users to set all configuration options for security, backup, and maintenance.
- Easy create: AWS uses the recommended best practice configurations with this option.
Let's go with the Standard Create and choose the Microsoft SQL Server engine type.

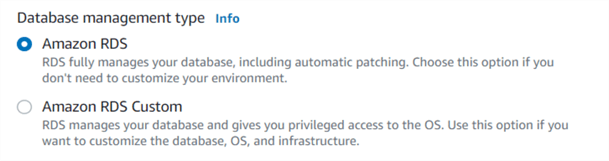
Next, you can choose database management type either Amazon RDS or Amazon RDS custom. For this part, let's go with Amazon RDS.
Choose SQL Server edition from Express, Web, Standard, and Enterprise editions. The RDS cost involves licensing costs as well.
Select the SQL Server version from the drop-down list. For this tutorial, I will go with the latest SQL Server 2019 15.00.4198.2.v1.

If you are working in the free-tier account, select the template as Free tier.

- DB instance identifier: Specify a database name. This name should be unique in your AWS instance for the RDS region.
- Master username: Specify a username to connect to SQL Database.
- Master password: Enter a password excluding special characters ( /,", and @) of a minimum of 8 characters.

Choose the DB instance class that combines the vCPU, RAM, and network speed. For this tip, I will go with db.t3.small.

For the free-tier, use db.t2.micro, db.t3.micro, and db.t4g.micro DB instance classes.
Let's use the default storage type as General Purpose SSD(gg2) with 20 GiB. The storage autoscaling allows increasing the space after the specified threshold is exceeded. If you do not want auto-scaling, uncheck the option – Enable storage autoscaling.

For connectivity, AWS creates a default Virtual Private Cloud (VPC) and subnet using IPv4 protocol. For the lab environment, we can go with the default VPC. However, your organization might already have a specific VPC to use. If so, select the VPC from the drop-down list.

The AWS RDS instance default does not assign a public IP address. Only EC2 instances and devices inside the VPC can connect to the RDS database.
Let's enable public access to allow devices outside VPC (Internet access) to connect to the database.

The additional configuration is for the database port. AWS RDS instances use SQL Server default port 1433.

By default, the RDS instance uses SQL Server authentication. It supports Windows authentication as well. If you require Windows authentication, click on the option – Enable Microsoft SQL Server Windows Authentication and choose a directory in which you want to allow authorized domain users for authentication with the RDS instance.

We will use the default options for DB parameter group, option group, time zone, and instance collation. As shown below, AWS enables automated backups for a point-in-time snapshot of your database.
For backup retention period, the default backup retention is seven days. You can choose a number between 1 to 35 for backup retention.

AWS provides feasibility for delete protection. Suppose you want to prevent an accidental drop of RDS. In that case, you can enable the option, which will show an error if anyone tries to drop the database until you modify instance properties and uncheck this option.

The following section shows the estimated monthly cost for your RDS instance. If you use a free-tier account and services, it does not show any monthly charges.

Click on Create database and it starts the RDS database deployment.

It takes a few minutes for the RDS instance deployment. You can click on view credentials details t to get the password for connecting to the database.

The RDS database status changes to available once it is deployed successfully.

For the database connections, we require the RDS endpoint. Click on the DB identifier and copy the endpoint from the connectivity & security. You also need the port number if the RDS instance uses a non-default SQL Server port.

For a database connection, we need a tool such as SSMS, Azure Data Studio, or SQLCMD. We cannot RDP to the RDS server. Therefore, install SSMS on a client computer from this link. You need to make sure your firewall allows connecting to the RDS instance.
Before connecting to the RDS instance, always ensure its status is Available. If the RDS instance status shows Creating or Backing up, wait for the status change for it to be available.
Launch SSMS and specify the following details:
1. Server type: Database Engine
2. Server name: Specify the endpoint copied from the AWS portal. Sample endpoint:
Default port:
sample-instance.abc2defghije.us-west-2.rds.amazonaws.com,1433
or
sample-instance.abc2defghije.us-west-2.rds.amazonaws.com

Custom SQL Server Port:
Sample-instance.abc2defghije.us-west-2.rds.amazonaws.com,<custom port>
3. Authentication: SQL Server Authentication
4. Login: admin
5. Password: S Specify the password we set for the admin account during the RDS instance configuration.

The RDS instance comes with default SQL Server system databases – Master, MSDB, Model, TempDB, and a new database, rdsadmin.
RDSAdmin database: AWS uses the rdsadmin database to store procedures and objects that will help manage the RDS database and perform advanced tasks.

Run the query, SELECT @@version, to check the SQL Server version of the AWS RDS DB instance. As shown below, the instance runs with the Express Edition of SQL Server 2019 CU15 – 15.0.4198.2.

Next Steps
- Start deploying database objects in your new RDS SQL Database.
- Explore existing SQL Server Amazon AWS Tips.

Hi! I am Rajendra Gupta, Database Specialist and Architect, helping organizations implement Microsoft SQL Server, Azure, Couchbase, AWS solutions fast and efficiently, fix related issues, and Performance Tuning with over 14 years of experience.
I am the author of the book “DP-300 Administering Relational Database on Microsoft Azure.” I can be reached at: Rajendra.gupta16@gmail.com for any consulting help.
- MSSQLTips Awards:
- Author of the Year – 2022 | Author Contender – 2021/2023/2024 | Champion Award (100+ tips) – 2020


