Problem
You want to know how to migrate a SQL Server database from on-premises to Google Cloud. In this tip, we will see how to do this using a backup file from an on-premises database.
Solution
Cloud SQL is a fully managed relational database service for Google Cloud that can reduce your maintenance activity and costs, can be provisioned really quickly, automates backups, replication, patches, capacity, and scales easily. Before choosing Cloud SQL as a managed service for our databases, we need to know if this solution is good for our needs. Below is a list of features, supported versions, and also some unavailable features.
Cloud SQL supported database versions
- SQL Server 2019 Standard (default)
- SQL Server 2019 Enterprise
- SQL Server 2019 Express
- SQL Server 2019 Web
- SQL Server 2017 Standard
- SQL Server 2017 Enterprise
- SQL Server 2017 Express
- SQL Server 2017
Cloud SQL supports new major versions within five months of general availability and new minor versions (CU’s) within three months of general availability release. Once Cloud SQL starts supporting a new minor version, new instances are automatically provisioned on the new version and are upgraded to the new version during the next scheduled maintenance.
For a list of supported and unsupported features, see the link Cloud SQL supported and unsupported features.
Cloud SQL users and roles
Because Cloud SQL is a managed service, it restricts access to certain system stored procedures and tables that require advanced privileges so you cannot create or have access to users with superuser permissions.
The sysadminrole is not supported and the default user after creating a new Cloud SQL is sqlserver.
See this link for more info regarding users, roles, and permissions.
Permissions needed
To import the backup file in Cloud SQL, first, we need to add the file to a bucket in Cloud Storage. The Cloud SQL instance service account or user must have one of the following roles:
- Cloud SQL Admin role and the roles/storage.legacyObjectReader IAM role
- A custom role including the following permissions:
- cloudsql.instances.get
- cloudsql.instances.import
- storage.buckets.get
- Storage.objects.get
Create a cloud storage bucket
Let’s login to Google Cloud Console and start creating a bucket in Cloud Storage.
Go to Cloud Storage in the left pane and chose Buckets.
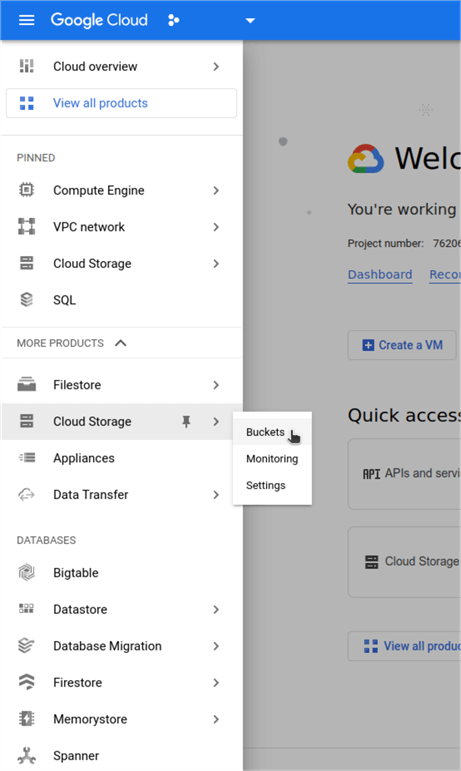
Next click on Create.

Give a name to the bucket, choose Region and select the region accordingly to your project needs.

Choose Standard storage, under Prevent public access make sure to uncheck Enforce public access prevention on this bucket and leave Access Control to Uniform. You can see a small description for most of these selectable options.

Next, leave Protection tools and Data encryption settings as shown below and click on the Create button.

Import database backup file to the bucket
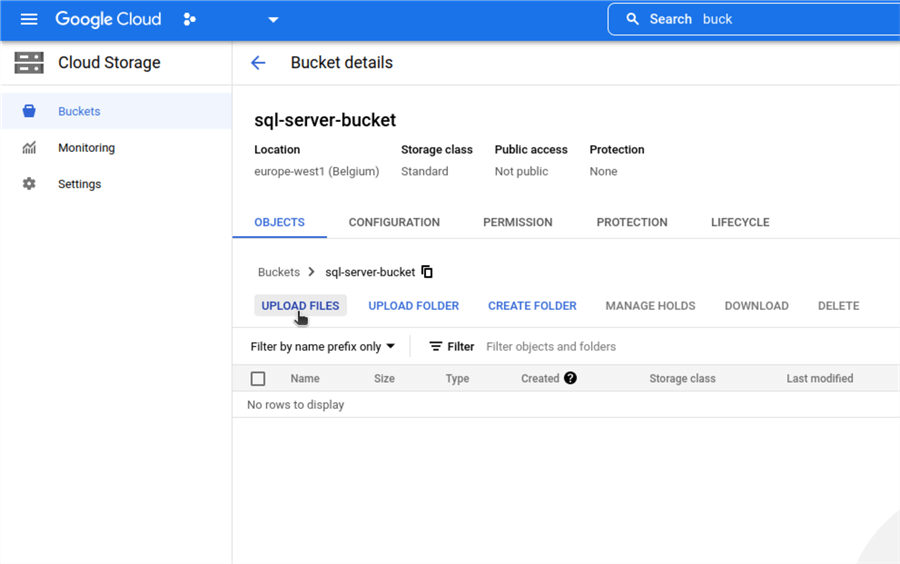
Once the bucket is created, we can move forward to import the backup file to the bucket.
Go to the newly created bucket, choose UPLOAD FILES and select the backup file you want to restore.
Create a Cloud SQL instance
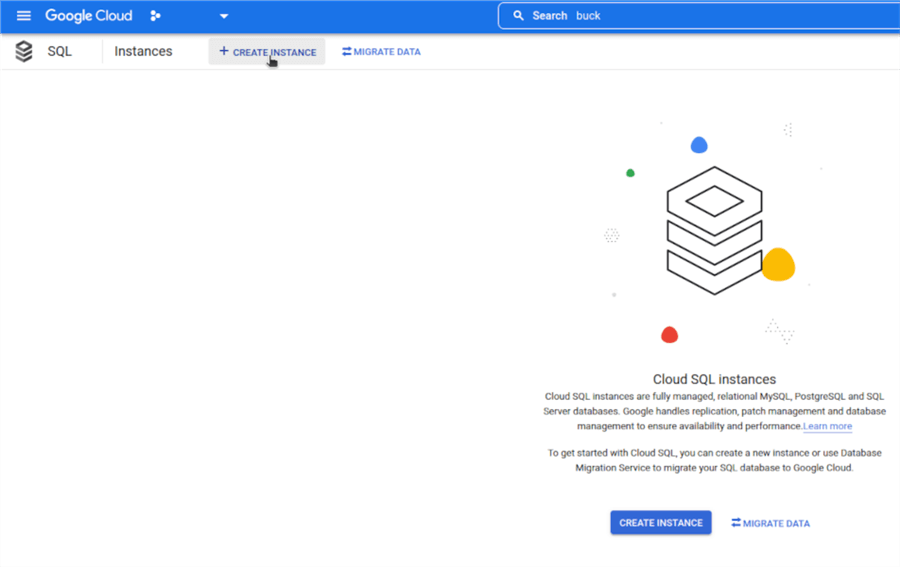
Next, we will create a Cloud SQL instance and import the backup file from the bucket. In the left side pane choose SQL.

Next, click on CREATE INSTANCE. If prompted to enable Compute Engine API, click ENABLE API.

In the following window, we need to choose an instance name, a password for the default username, database version and a preset configuration for resource allocation (Production or Development). After the instance is created you can change the configuration setup if needed. On the right-hand side, we have a summary describing our current setup.
By the way, there is a limit of up to 100 instances per project. For more, you can create a support case.

In the section Choose region and zonal availability we choose the region where to create the instance. It’s a best practice to place the instance in the same region as other resources that access the instance. The region cannot be changed later on, but zone can.
Under Zone availability you choose desired availability. This can be either Single or Multiple zones. Single zone does not protect in case of zone or instance failure, Multiple zones offer automatic failover to another zone from the selected region.
When a failover occurs, you can expect the instance to be unavailable for about three minutes. The duration might be different based on the environment.
For a failover to be performed, some requirements must be met:
- The primary instance must be in a normal operating state (not stopped, in maintenance, or performing a long-running Cloud SQL instance operation).
- The secondary zone and standby instance must both be in a healthy state. If the standby instance is unresponsive, failover operations are not allowed. After Cloud SQL repairs the standby instance and the secondary zone is available, failover can be made.
When failover occurs, any existing connections to the primary instance and read replicas are closed, and it will take about 2-3 minutes for connections to the primary instance to be re-established. The application reconnects using the same connection string or IP, there are no changes needed on the application side.

In the section, Customize your instance, we can set up lots of parameters like memory, storage, backups, trace flags, and so on. Let’s see the available options.
- Machine type option lets us select a preset configuration with CPU and RAM or select a custom one.
- Storage selects storage type and capacity and also has a nice option Automatic storage increase which provides more storage space if running low. The increase is permanent, meaning that once increased you cannot decrease it. The storage increase also applies to any existing read replicas that the primary instance has, so keep in mind that costs will be added. Here is a link with more details about increased limits and thresholds.
- Connections let us choose how the connection to the instance is made. Public IP assigns an internet-facing IP and needs an authorized network or Cloud SQL Auth proxy to connect to the instance, see details here. Private IP assigns an internal VPC IP and resources with access to that VPC can connect to this Cloud SQL. Using a Private IP is faster and more secure because traffic does not traverse the internet. More on that here.
- Authentication section can add the instance to an Active Directory domain.
- Data Protection lets us choose the backup windows time and point in time recovery, where to store the backups (single or multi-region) and retention policy. The Instance deletion protection settings prevent the instance from being deleted, so if you plan to delete the instance in the future, you’ll need to modify this setting at that time or leave it disabled.
- Maintenance lets us set a maintenance window when maintenance events can occur. There will be a small downtime during this period. If this timeframe is not specified, downtime can occur at any time.
- Flags and parameters section provides trace flags and other instance level settings like collation and audit that we can set. A complete list can be found here.
- Labels are key-value pairs that help filter resources. For example, you can set a label for a specific environment like prod or dev, or specific teams like finance or HR.
Finally, click on CREATE INSTANCE and the instance will be created in a couple of minutes.

Once the instance is created, we can view some useful details like below.
- Overview shows metrics, connection info and other information about instance configuration.
- Connections we can change network settings, enable TLS and manage certificates.
- Users let us create or delete users.
- Database lets us create or delete databases.
- Backups we can manage backups.
- Operations contains a log with instance operations.

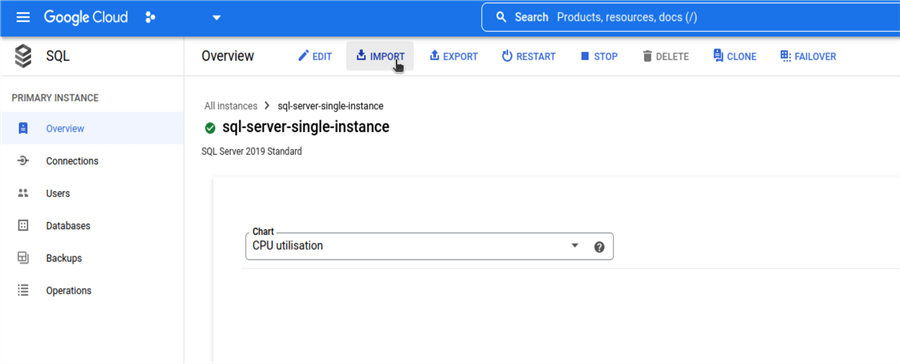
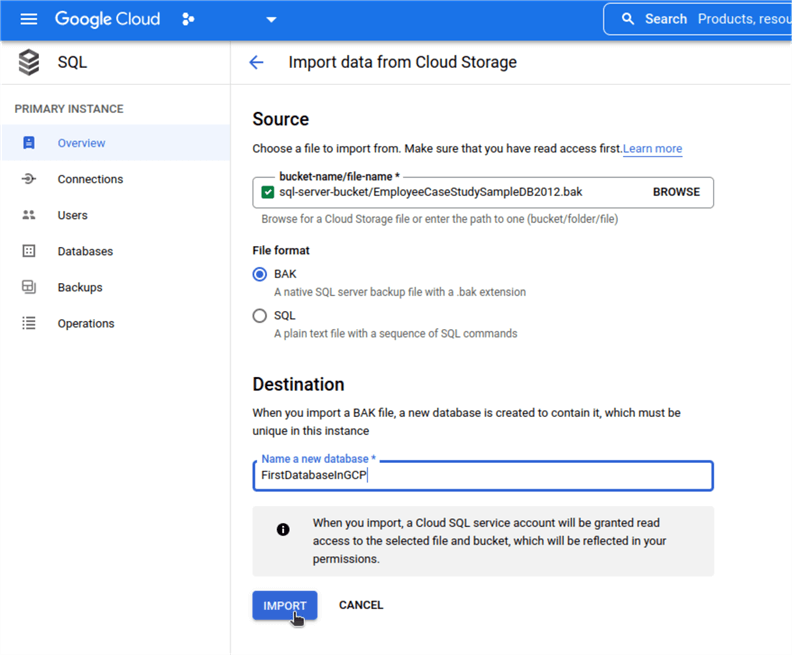
Import the backup file in Cloud SQL
Now we can import the backup file from the bucket into our new Cloud SQL instance.
First, go to IMPORT.
Under File Import choose BAKand click Browse.In the right-hand side you should see the bucket we created, click on the arrow, select the backup file and click on SELECTbutton on the bottom of the page.

Finally, give a name for the database and click IMPORT. Once the process is finished, the new database will be visible on the left-hand side in the Databasessection.
Here is the list of the databases.

Next Steps
- There you have it, we migrated a SQL Server database from on-premises to Cloud SQL using a backup file.
- Double-check the Cloud SQL supported and unsupported features to have a better view if this is a suitable solution for your needs.
- Carefully choose the available resources and their placement, and keep an eye on the costs overview to have a better idea of expected expenses.

Sergiu Onet is a SQL Server Database Administrator for the past 10 years and counting, focusing on automation and making SQL Server run faster. He also has a SQL Server developer background, .NET and PowerShell skills which he likes to play around with and learn new things. He is also a certified Google Professional Cloud Architect and AWS Certified Solutions Architect-Associate. His routine tasks include performance tuning, setting up HADR environments, enforcing best practice settings on SQL Server, and automating tedious manual tasks.


The problem is not how to place the DB in Google Cloud. It’s actually simpler and more intuitive than the other 2 clouds.
The problem is you don’t have yet Extended Events, Query Store or Query Insights (that is available for Postgres and in beta for MySQL) to know what’s going on in your system and analyze the executions.