Problem
How do you deploy SQL Server instances on a virtual machine (VM) inside the Google Cloud Platform (GCP)?
Solution
In a previous tip, we learned how to use Cloud SQL with SQL Server. In this article, we will cover how to use SQL Server inside a VM on Google Cloud.
Create SQL Server VM Instances on Google Cloud Platform
Compute Engine is an IaaS model that allows us to create and run VMs on Google infrastructure. We can create and configure VMs in a flexible manner that run Linux or Windows server images.
To create a VM for SQL Server use, we have multiple options:
- Create a VM using a pre-built image of Windows Server and SQL Server.
- We can choose from multiple SQL Server editions
- We don’t need an existing Microsoft license because Google manages it
- The license cost is included in the running cost of the VM in a “pay-as-you-go” model.
- Bring an existing license to sole-tenant nodes (BYOL).
- Sole-tenant nodes are physical servers dedicated to hosting VM instances only for our project.
- Here, we need to manage the license ourselves.
- Install SQL Server on a Linux VM.
We will focus on the first option: creating a VM using a pre-built image of Windows Server and SQL Server.
Let’s go to the Google Cloud console and start creating the VM.
Go to Compute Engine and choose VM instances.

If required, enable the Compute Engine API.

Click on Create Instance.

Give the instance a name, choose the Region and Zone, and the Machine Configuration based on your needs.

We should stay away from shared-core machine family types, and for Enterprise Edition, choose at least 4 vCPUs.
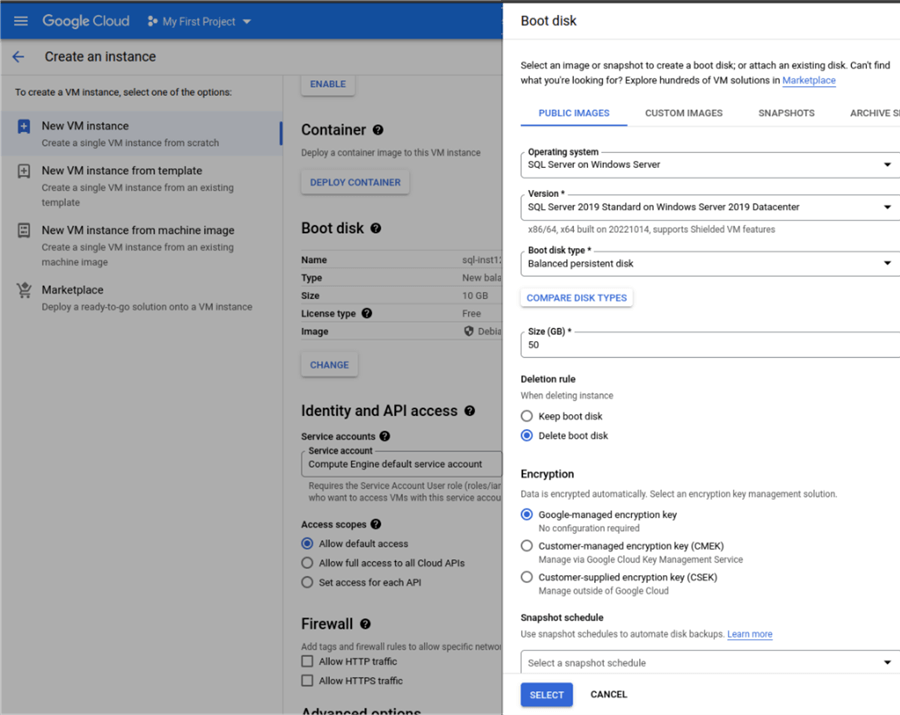
In the Boot disk section, click the Change button, and go to the Public images tab.
Operating system lets us choose the operating system we want to install. Search for SQL Server on Windows Server and select the Version you need. These preconfigured images contain preinstalled SQL Server with some components installed by default, depending on the selected edition.
For Boot disk type, choose Balanced persistent disk, and choose whether to keep or delete the boot disk when the instance is deleted.
Data on disk is encrypted automatically, and Encryption lets us choose if we want to manage encryption keys ourselves, with a Key Management Service (KMS) or let Google manage them. Click SELECT to go to the next step.
As a best practice, database data and log files should reside on separate disks. Google recommends adding a new SSD persistent disk for these files.
Go to Advanced options, and expand the Disks section.

Disk Options for Compute Engine
Before we add new disks, let’s talk about the disk options we have in Google Cloud related to using SQL Server in Compute Engine.
Persistent disks are network storage devices. The data on them is distributed across multiple physical disks that Compute Engine manages to ensure redundancy and best performance. The disks can be detached or moved around because they are located separately from the VM, and their performance scales with size.
Persistent disk comes in many flavors:
- Standard persistent disks – backed by HDD, block storage used mainly for workloads that primarily use sequential I/O, big data, and big compute workloads.
- Balanced persistent disks – backed by HDD, block storage suitable for general workloads, a balance between price and performance. Most VMs offer maximum IOPS as SSD persistent disks and lower IOPS per GB.
- Performance (SSD) persistent disks – backed by SSD, block storage used for database workloads, enterprise applications with low latency requirements, and more IOPS than standard persistent disk.
- Extreme persistent disks – backed by SSD, block storage used for high-performance databases like SAP HANA, offers consistent high random access and throughput, and we can provision desired IOPS.
Considering durability, we can have the following options:
- Zonal persistent disk
- Regional persistent disk – replicated in two zones in the same region, which protects from a zone failure.
Local SSDs are physically attached to the VM server and have lower latency and higher throughput than standard or SSD persistent disks. This disk type can be created only during the VM creation process; the data persists only until the instance is deleted or the guest operating system is shut down. Remember that we cannot stop a VM using a local SSD, but we can shut down the guest OS.
The disk size is fixed, 375 GB. We can attach up to 24 disks with certain restrictions based on the machine type. Data on this disk is automatically encrypted, but we can’t use customer-supplied encryption keys. If we add multiple local SSDs, we can mount them into a single logical volume. Check this link for instructions.
The local SSD performance depends on the interface we use. We can choose between SCSI and NVMe. On most images, NVMe offers the best performance, but the image needs to have optimized NVMe drivers. See this link for image support for NVMe drivers.
Local SSD has performance gains but also some trade-offs and can be candidates for scratch disk and temporary files like Windows paging files or tempdb database.
With this information in hand, let’s move forward in our setup.
Let’s add a new disk for data and log files. Click on Add New Disk. Give it a name, choose Blank disk for the Data source type, and select SSD persistent disk for the Data type to have more IOPS and better throughput. Give the disk a size and choose the desired Encryption key management.
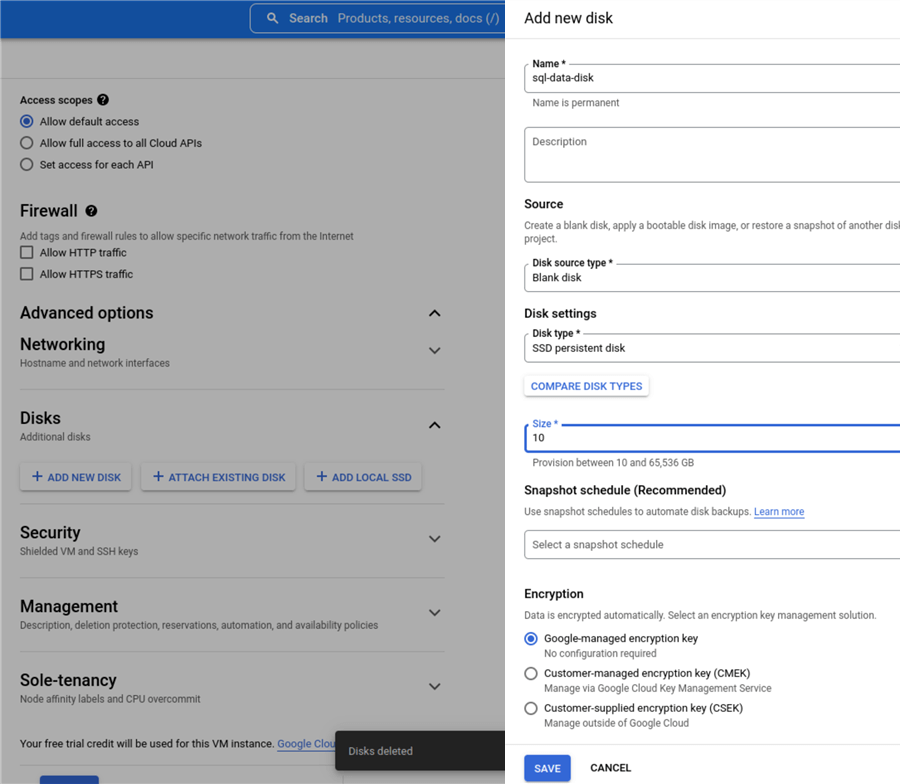
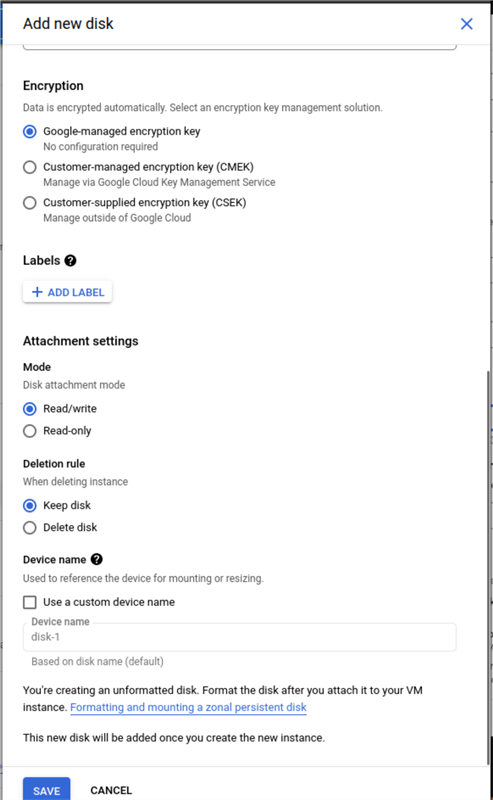
Disk attachment mode should be set to Read/write and choose what happens to the disk when the instance is deleted. Click SAVE.
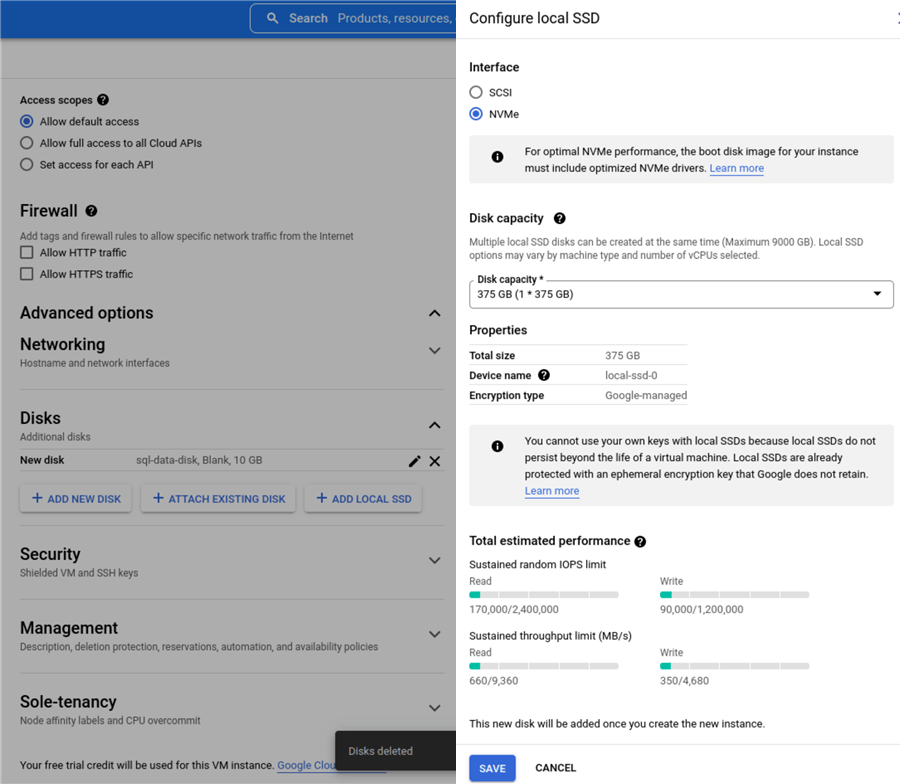
Next, we will add a local SSD for the tempdb database.
Click ADD LOCAL SSD, choose NVMe for Interface, a disk capacity based on your needs, and click SAVE.
Leave the rest of the options with their defaults and click CREATE.
Connect to the VM
As a security best practice, VMs should:
- Not be assigned an external IP address (public IP)
- Be placed in a custom network
- Communicate using internal IP and routes, and
- Firewall to be set up accordingly.
A bastion host could also be configured for extra security, but this is not in the scope of this article.
Once the VM is created, we can connect using Remote Desktop Protocol (RDP). Click on Set Windows password to set a password and username to connect with.
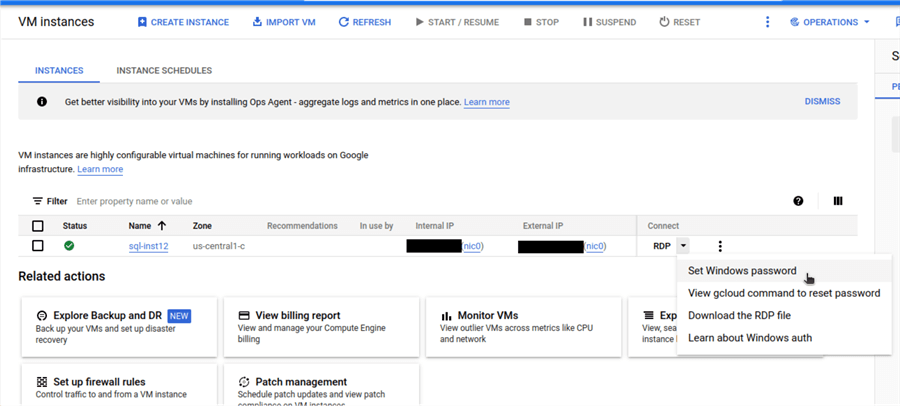
Download the RDP file and use the created credentials to log in from your local workstation.

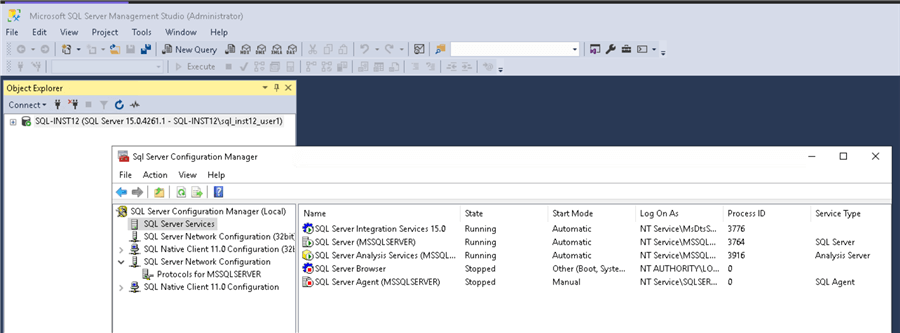
Below you can see the installed instance and other installed components by default. The SQL Server images have the installer files located at c:\sql_server_install\setup.exe, so you can add/remove other components (if needed) or install other instances.
Format the Disks
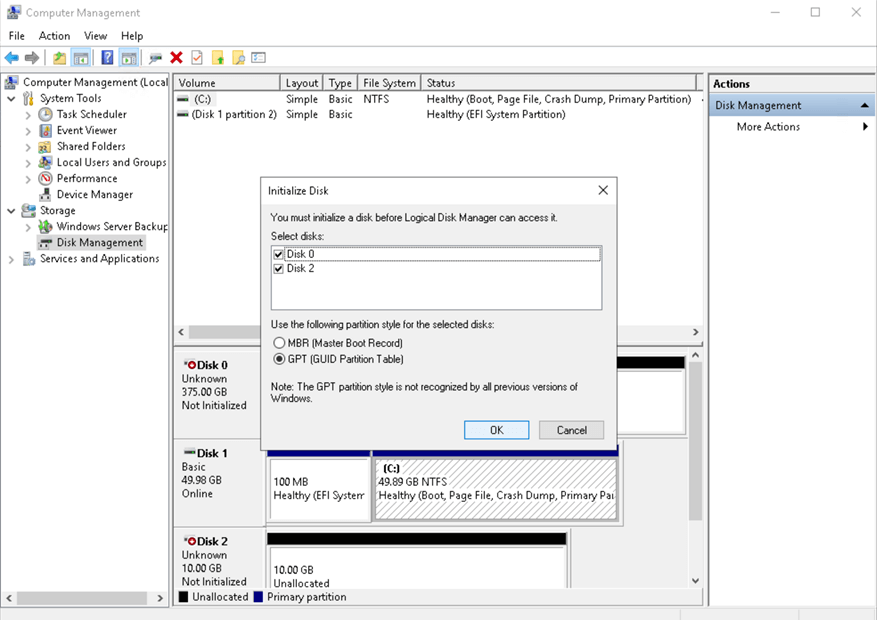
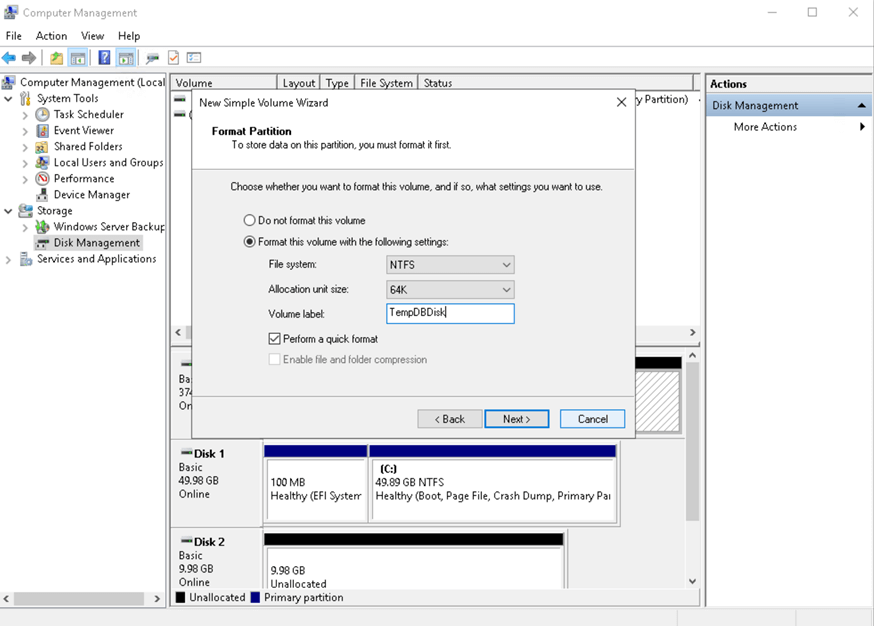
Let’s initialize and format the added disks for tempdb and data/log files.
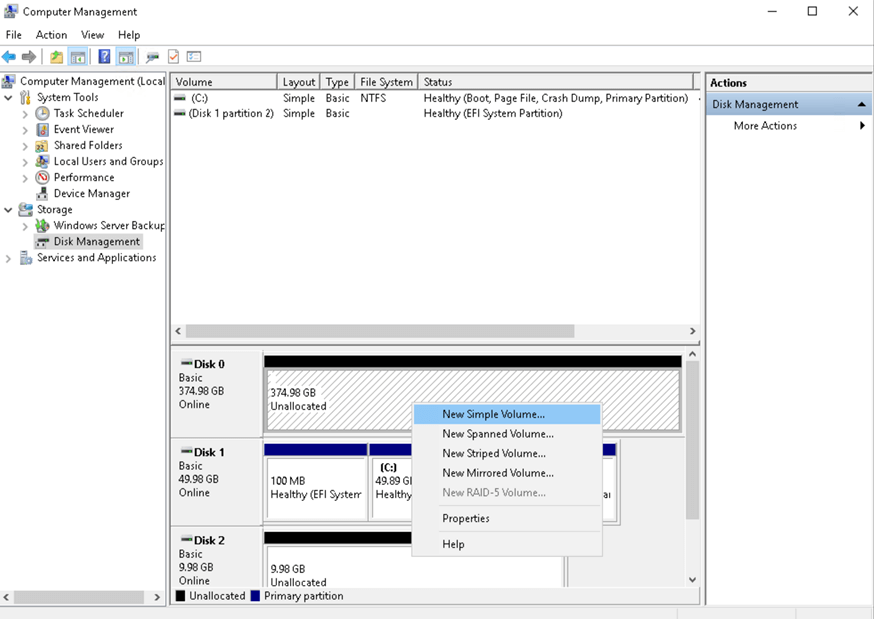
Open Computer Management, select GPT, and for each disk, create a new volume, give it a name and choose 64K Allocation unit size. After this, tempdb needs to be configured to use the new disk. See this link for details.
Now we have a familiar playground to work with and we have the SQL Server setup files already on the VM.
Next Steps
Now that the VM is setup, don’t forget to check and apply your SQL Server best practices.
- Check out these other virtualization tips

Sergiu Onet is a SQL Server Database Administrator for the past 10 years and counting, focusing on automation and making SQL Server run faster. He also has a SQL Server developer background, .NET and PowerShell skills which he likes to play around with and learn new things. He is also a certified Google Professional Cloud Architect and AWS Certified Solutions Architect-Associate. His routine tasks include performance tuning, setting up HADR environments, enforcing best practice settings on SQL Server, and automating tedious manual tasks.


I’ve set up similar SQL server VMs in the past, and the part about separating disks for data and logs matches what I’ve seen too. I usually test these setups on a small vps first before moving anything to production. Using services like UNIVIRTUAL has made it easier for me to compare performance across environments. Thanks for sharing your steps.
Hi Sergiu,
Would like to setup VM with sql server and web server installation using our own Microsoft BYOL licence? / Please email me and recommend some expert to setup.
Balanced Disk is built on SSD
Are you getting an error running the sql server setup? What do you want to achieve?
how to repair the instance in GCP VM instance or fix MSI and MSP missing?