Problem
Today, Apache Spark has become a dominant player in the big data processing area. A common design pattern is to copy raw data to the bronze quality zone. Then various notebooks enrich and/or transform the data between the silver and gold quality zones. At the end of processing, data is consumed from the lake for reporting and/or analytics. Due to the large number of database management systems, reading from (pull to bronze) and writing to (push from gold) a database is common. Since many libraries work at a dataframe (table) level, the developer might have to write a stored procedure to MERGE a staging table with an active table. Because SQL Server is ranked a top five database platform, it is common to be asked to work with this relational database management system (RDBMS).
How can we perform data processing using Apache Spark for SQL Server?
Solution
Microsoft and Databricks have created a high-speed Apache Spark connector that can be used to read or write dataframes to SQL Server. Additionally, the open-source community has created a library called pymssql that can control database interactions at a lower level using cursors. Today, we will review both ways to interact with a SQL Server database.
Note: The database must have a public end point if you want to avoid configuring virtual networks. This database can be any flavor of Azure SQL or a virtual machine with a local database install. If you are worried about security, the virtual network for Azure Databricks can be peered with a gateway for on-premise sources or a virtual network for in-cloud sources. This will allow network connectivity without going over the public internet.
Business Problem
Our company has just started using Azure Databricks. Our manager wants us to learn how to read from tables, write to tables, and execute stored procedures using the Apache Spark connectors and/or libraries. Here is a list of tasks that we need to investigate and solve:
| Task Id | Description |
|---|---|
| 1 | Setup environment |
| 2 | MS Connector – read table |
| 3 | Modify dataframe |
| 4 | MS Connector – write table |
| 5 | MS Connector – execute code |
| 6 | pymsql library – read data |
| 7 | Modify array |
| 8 | pymsql library – write data |
| 9 | pymsql library – execute code |
At the end of the research, we will have a good understanding of how to interact with the Microsoft SQL Server database.
Setup Environment
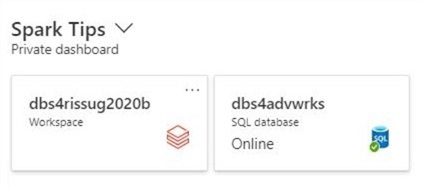
There are two Azure services we are going to use in this tip. The Azure Databricks service will be used to create and test our Spark notebooks written in Python. The Azure SQL database has a copy of the Adventure Works database. This is the database that we want to interact with. The image below shows an Azure Private Dashboard with these two services pinned as tiles.
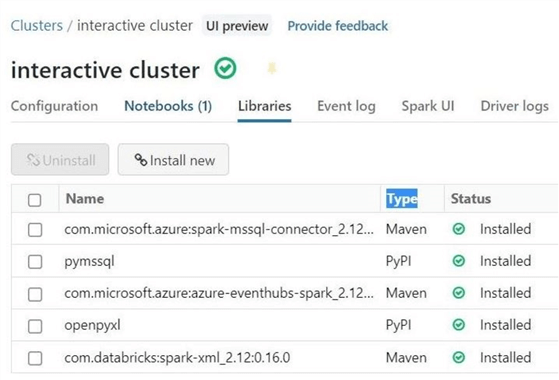
The next step is to install the two connectors on the cluster: Microsoft connector and Python library called pymssql. The image below shows that the two connectors have been successfully installed. They are listed as the first and second items on the list.
Now that the environment is set up, let’s start working with the Microsoft connector.
Read Table (MS Connector)
The first step for using the connector is to set up the database connection properties. Information such as server name, database name, username, and user password are required to make the connection. Different security protocols exist, such as Active Directory Authentication or Standard Password. I will use the latter since it is easier to set up. However, always use a strong password and store it in your secret scope.
#
#  1 – Set connection properties
#

server_name = "jdbc:sqlserver://svr4tips2030.database.windows.net"
database_name = "dbs4advwrks"
url = server_name + ";" + "databaseName=" + database_name + ";"
user_name = "jminer"
password = "<your password here>"
Later in this article, I will revisit how we can bundle up connection information to be used within our Python notebook. The above code is an example using just global variables. It requires a lot of parameters to be passed to a user-defined function if we want to write a reusable component. The below code loads the FactInternetSales table from the Azure SQL database into a new Spark dataframe.
#
#  2 – Read from table
#


# set table name (existing)
table_name = "dbo.FactInternetSales"

# create df
df = spark.read \
        .format("com.microsoft.sqlserver.jdbc.spark") \
        .option("url", url) \
        .option("dbtable", table_name) \
        .option("user", user_name) \
        .option("password", password).load()

# show the data
display(df)
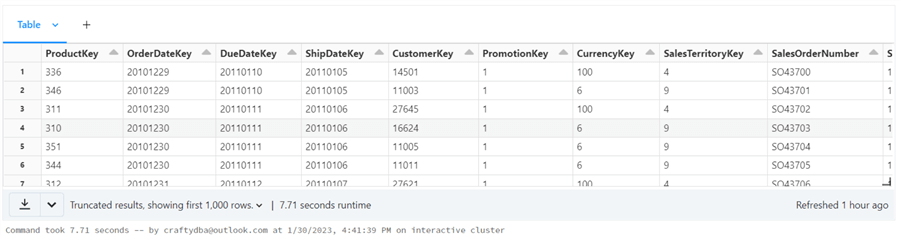
The connection properties are passed as options. The format command specifies the Microsoft driver to use when loading the data. We can use the display statement to dump the dataframe to a tabular grid for review. Run the above code now to get the desired output.
The output below shows the dataframe for the FactInternetSales table.
Note: There are two methods commonly used on a Spark Dataframe. The count method returns the number of rows, and the printSchema method shows a textual visualization of the schema.
# show record count
df.count()

# show the schema
df.printSchema()
The output below is the number of rows in the FactInternetSales dataframe.

The output below is the text visualization of the schema for the FactInternetSales dataframe.

To recap, the read method of the Spark session can be used to pull data from SQL Server to a Spark Dataframe. It is very easy to use.
Modify Dataframe (Spark)
So far, we have been working with complete dataframes that reflect the data in a SQL Server table. However, the pyspark library is capable of much more. The where method of the dataframe can be used to return a subset of the records. This method is actually an alias to the filter method and can be considered a horizontal slicer. The select method returns columns you want to review and can be considered a vertical slicer. When working with pyspark, we can use the col function to return a particular column by name.
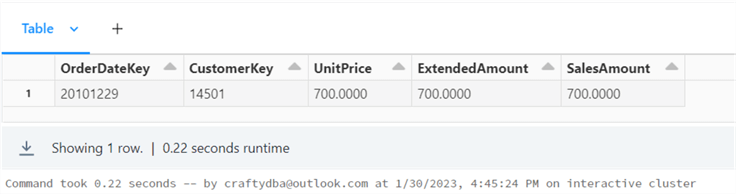
The code below creates a new dataframe called row, which has the single sales order for a particular customer. It displays only five fields of importance. The first two fields are the composite key, and the next three fields are the columns or data we want to modify.
#
# M1 – Show one customer sales orders record
#

# import library
from pyspark.sql.functions import col

# find one record
row = df.where("OrderDateKey = 20101229 and CustomerKey = 14501")

# show specific cols
display(row.select(col("OrderDateKey"), col("CustomerKey"), col("UnitPrice"), col("ExtendedAmount"), col("SalesAmount")))
The output below shows the unit price, extended amount, and sales amount to be $699 and some change. The sales department has told us that these values should be $700. How can we modify the existing dataframe to update these values?

Updating a single row with dataframe methods does take some coding. The withColumn method allows the developer to create a new column or update an existing column. The when function allows the coder to change the value of the column if a condition is met or keep the current value when the otherwise function is used. Thus, the code has to search all rows in the dataframe for a match. If a match is found, set the value to 700 or keep the existing value.
#
#  3 – Update one row
#

from pyspark.sql.functions import col, when

# update – unit price
df = df.withColumn("UnitPrice",
  when(
        (col("OrderDateKey") == 20101229) & (col("CustomerKey") == 14501),
        700
      ).otherwise(col("UnitPrice"))
)

# update – extended amount
df = df.withColumn(
  "ExtendedAmount",
  when(
        (col("OrderDateKey") == 20101229) & (col("CustomerKey") == 14501),
        700
      ).otherwise(col("ExtendedAmount"))
)


# update – sales amount
df = df.withColumn(
  "SalesAmount",
  when(
        (col("OrderDateKey" ") == 20101229) & (col("CustomerKey") == 14501),
        700
      ).otherwise(col("SalesAmount"))
)
Run the above code labeled M1 to show this single sales order record. We can see that the in memory dataframe has been updated with the new values.
Unfortunately, the write command of the Spark session will try to overwrite the existing table. This will cause an exception if there are foreign key constraints. A better pattern is to write the updated dataframe to a staging table. Then use a stored procedure to UPSERT the data from the staging to the active table.
Write Table (MS Connector)
The code to write the dataframe to the SQL Server table is quite similar to the read method. Instead, we have a mode that determines if we are going to overwrite the table. Also, the action is a save instead of a load. See the code below for details. Do not execute this write command yet!
#
#  4 – Write to table
#

# set table name
table_name = "stage.FactInternetSales"

# create df
df.write \
  .format("com.microsoft.sqlserver.jdbc.spark") \
  .option("url", url) \
  .option("dbtable", table_name) \
  .option("user", user_name) \
  .option("password", password) \
  .mode("overwrite") \
  .save()
Open SQL Server Management Studio (SSMS) and connect to the Azure SQL Database. If we execute the T-SQL statement shown below, we will see the current values of the record we want to change in the [dbo] schema.
--
-- S1 – Show one record (active)
--

SELECT
    OrderDateKey,
    CustomerKey,
    UnitPrice,
    ExtendedAmount,
    SalesAmount
FROM
    [dbo].[FactInternetSales]
WHERE
    OrderDateKey = 20101229 and
    CustomerKey = 14501
GO
The image below shows the table named dbo.FactInternetSales currently has the old data.

The T-SQL statement returns the number of records in the table named dbo.FactInternetSales.
--
-- S2 – Get table count (active)
--

SELECT COUNT(*) as ActiveRecs
FROM [dbo].[FactInternetSales];
GO
The output from executing the statement is shown below.

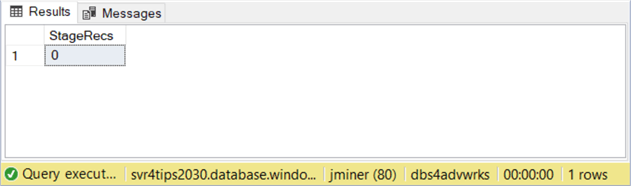
The T-SQL statement returns the number of records in the table named stage.FactInternetSales.
--
-- S3 – Get table count (stage)
--

SELECT COUNT(*) as StageRecs
FROM [stage].[FactInternetSales];
GO
The output from executing the statement is shown below.
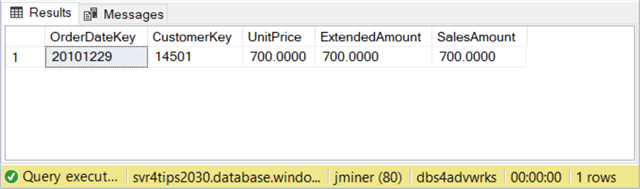
Please execute the WRITE command at this time. If we run the above code labeled S3, there will now be 60,389 records in the staging table. If we execute the T-SQL code below, we will see the one customer sales order record that has been updated.
--
-- S4 - Show one record (stage)
--

SELECT
    OrderDateKey,
    CustomerKey,
    UnitPrice,
    ExtendedAmount,
    SalesAmount

FROM
    [stage].[FactInternetSales]
WHERE
    OrderDateKey = 20101229 and
    CustomerKey = 14501
GO
Output from T-SQL statement showing the one sales order record.
Are we done yet? The answer is no. The staging table has been updated but not the active (dbo) table. In the next section, we will discuss how to execute code with the Spark session driver.
Execute Code (MS Connector)
The next step is to create a stored procedure that will MERGE the staging table into the active (dbo) table. The T-SQL code below creates a stored procedure that uses the MERGE statement to UPSERT data from one table to another.
--
--
-- S5 - Merge [stage] with active [dbo] table
--

-- Create stage table
CREATE OR ALTER PROCEDURE [stage].[UpsertFactInternetSales]
AS
BEGIN

   -- Set no count
   SET NOCOUNT ON

   -- Merge the clean stage data with active table
   MERGE
      [dbo].[FactInternetSales] AS trg
   USING
      ( SELECT * FROM [stage].[FactInternetSales] ) AS src
   ON
      src.[SalesOrderNumber] = trg.[SalesOrderNumber] and
      src.[SalesOrderLineNumber] = trg.[SalesOrderLineNumber]

     -- Update condition
     WHEN MATCHED THEN
         UPDATE SET
      [ProductKey] = src.[ProductKey],
      [OrderDateKey] = src.[OrderDateKey],
      [DueDateKey] = src.[DueDateKey],
      [ShipDateKey] = src.[ShipDateKey],
      [CustomerKey] = src.[CustomerKey],
      [PromotionKey] = src.[PromotionKey],
      [CurrencyKey] = src.[CurrencyKey],
      [SalesTerritoryKey] = src.[SalesTerritoryKey],
      [RevisionNumber] = src.[RevisionNumber],
      [OrderQuantity] = src.[OrderQuantity],
      [UnitPrice] = src.[UnitPrice],
      [ExtendedAmount] = src.[ExtendedAmount],
      [UnitPriceDiscountPct] = src.[UnitPriceDiscountPct],
      [DiscountAmount] = src.[DiscountAmount],
      [ProductStandardCost] = src.[ProductStandardCost],
      [TotalProductCost] = src.[TotalProductCost],
      [SalesAmount] = src.[SalesAmount],
      [TaxAmt] = src.[TaxAmt],
      [Freight] = src.[Freight],
      [CarrierTrackingNumber] = src.[CarrierTrackingNumber],
      [CustomerPONumber] = src.[CustomerPONumber],
      [OrderDate] = src.[OrderDate],
      [DueDate] = src.[DueDate],
      [ShipDate] = src.[ShipDate]

     -- Insert condition
     WHEN NOT MATCHED BY TARGET THEN
         INSERT
         (
            [ProductKey]
           ,[OrderDateKey]
           ,[DueDateKey]
           ,[ShipDateKey]
           ,[CustomerKey]
           ,[PromotionKey]
           ,[CurrencyKey]
           ,[SalesTerritoryKey]
           ,[SalesOrderNumber]
           ,[SalesOrderLineNumber]
           ,[RevisionNumber]
           ,[OrderQuantity]
           ,[UnitPrice]
           ,[ExtendedAmount]
           ,[UnitPriceDiscountPct]
           ,[DiscountAmount]
           ,[ProductStandardCost]
           ,[TotalProductCost]
           ,[SalesAmount]
           ,[TaxAmt]
           ,[Freight]
           ,[CarrierTrackingNumber]
           ,[CustomerPONumber]
           ,[OrderDate]
           ,[DueDate]
           ,[ShipDate]
         )
         VALUES
         (
            src.[ProductKey],
            src.[OrderDateKey],
            src.[DueDateKey],
            src.[ShipDateKey],
            src.[CustomerKey],
            src.[PromotionKey],
            src.[CurrencyKey],
            src.[SalesTerritoryKey],
            src.[SalesOrderNumber],
            src.[SalesOrderLineNumber],
            src.[RevisionNumber],
            src.[OrderQuantity],
            src.[UnitPrice],
            src.[ExtendedAmount],
            src.[UnitPriceDiscountPct],
            src.[DiscountAmount],
            src.[ProductStandardCost],
            src.[TotalProductCost],
            src.[SalesAmount],
            src.[TaxAmt],
            src.[Freight],
            src.[CarrierTrackingNumber],
            src.[CustomerPONumber],
            src.[OrderDate],
            src.[DueDate],
            src.[ShipDate]
         );
END
GO
Now that we have the code to perform the desired action using T-SQL, we need to call the stored procedure from our Spark Session. The Python code below uses the current driver manager, makes a connection, prepares a T-SQL call, executes the T-SQL call, and closes the connection.
#
#  5 - Upsert from stage to active table.
#      Grab driver manager conn, exec sp
#

driver_manager = spark._sc._gateway.jvm.java.sql.DriverManager
connection = driver_manager.getConnection(url, user_name, password)
connection.prepareCall("exec [stage].[UpsertFactInternetSales]").execute()
connection.close()
The above code calls the java objects in a Python script. It does not pass parameters to the stored procedure or retrieve output values. However, both of these actions can be coded if needed. Please see this link on how to call stored procedures with Java. I will leave it up to you, the reader, to verify that the active table has been updated after calling the Python code.
Read Table (pymssql library)
The pymssql library primarily works with cursors. The following algorithm is usually used with designing cursor code to retrieve data from a relational database management system.
| Task Id | Description |
|---|---|
| 1 | Open Connection |
| 2 | Open Cursor |
| 3 | Execute Statement |
| 4 | Process Result Set |
| 5 | Close Cursor |
| 6 | Close Connection |
The Python code below creates a function called qry_mssql_ret_dict that implements these steps. Please remember that our Spark code used global variables. In this code, we made an improvement by reducing the number of variables to pass to the function. A dictionary will contain all the information we need. Any non-string variables can be cast to their appropriate data types before calling the pymssql methods. The data returned from the pymssql cursor is an array of tuples without headers. We can grab the column header by accessing the description method of the cursor. Finally, the zip function mashes up the two tuples into one. One must cast the data to string; otherwise will end up with Java types in the output. Please see the internal function called return_dict_pair, which converts the header and value information into a dictionary object.
#
#
#  6 - Use pymssql to grab data
#

# required library
import pymssql

def qry_mssql_ret_dict(info):
  try:

    # open conn + exec sql
    con = pymssql.connect(info["server"], info["username"], info["password"], info["database"])
    cur = con.cursor()
    cur.execute(info["sql"])

    # covert row into dictionary
    def return_dict_pair(row_item):
      return_dict = {}
      for column_name, row in zip(cur.description, row_item):
        return_dict[column_name[0]] = str(row)
      return return_dict

    # for each row, append to list
    return_list = []
    for row in cur:
      row_item = return_dict_pair(row)
      return_list.append(row_item)

    # close connection
    con.close()

    # return list
    return return_list

  except Exception as e:
    print ('%s' % e)
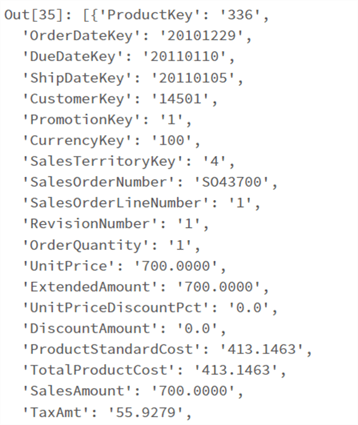
The next step is to call this new function to return data from the table named dbo.FactInternetSales.
#
# Make call to function
#

# create dict
info = {
"server": "svr4tips2030.database.windows.net",
"database": "dbs4advwrks",
"sql": "select * from dbo.FactInternetSales",
"username": "jminer",
"password": "<your password here>"
}

# get table data as array of dictionaries
slist = qry_mssql_ret_dict(info)

# show 2 rows
slist[0:2]
The above code returns an array of dictionaries. The last line of the code block uses slicing to bring back the first two dictionaries. We can see in the image below that the Unit Price, Extended Amount, and Sales Amount have a new value of $700.
Now that we have our table data let’s change the row for customer key 14501 back to the original values.
Modify Array (Spark)
Like before, we want to find the matching row and revert the data back to the original values. This time, we are working with an array of dictionaries. How can we find the first matching record given a value? The code below uses an enumerator to search the array of dictionaries for the first matching record. The find function returns the index so we can update the values before writing to the staging table.
#
#  Find first index of matching dictionary
#

def find(1st, key, value):
  for i, dic in enumerate(1st):
    if dic[key] == value:
      return i
  return -1


# call function
idx = find(slist, 'CustomerKey', '14501')

# show value
print("the row is at position {}.".format(idx))
We can see that the first row happens to be the matching record.
The code to change the customer order back to the original values is extremely simple compared to the dataframe code. Remember, dataframes are built to do actions at the set level, not the row level. Arrays and cursors are built to work at the row level.
# find pos
idx = find(slist, 'CustomerKey', '14501')

# change data back
slist[idx]['UnitPrice'] = 699.0982
slist[idx]['ExtendedAmount'] = 699.0982
slist[idx]['SalesAmount'] = 699.0982

# show the one record
slist[0:1]
The output below shows the sliced array at position zero. Our array of data is ready to be written to the staging table.

There are questions that you might be asking at this point. First, can we convert the array of dictionaries to a dataframe? Second, is this code better than the first example? Unlike the read command of the Spark session, this library allows us to provide any SELECT statement for the cursor to execute. Thus, we can now return filtered or aggregated data to Spark. Third, can we write the updated row to the staging table to increase the speed of the action?
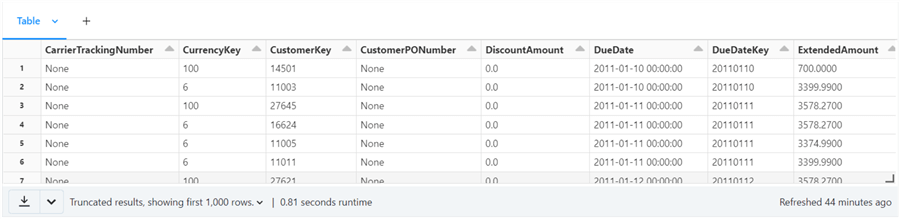
To answer the first question, we can definitely convert the array of dictionaries to a Spark Dataframe. The code below serializes the data into a resilient distributed dataset (RDD). This data is read up as JSON data.
# convert to an rdd
sjson = sc.parallelize(slist)

# convert to df
df = sqlContext.read.json(sjson)

# display df
display(df)
The image below shows the new dataframe. Note: The fields are strings by default. Please use a schema definition to change the data types during reading from the RDD to increase speed.
The second question can be answered by changing the dictionary content for the SQL statement that is passed during our function call. We are now returning five key fields for the one customer or two sales records instead of 60,000 plus sales records. Before, our variable was called slist since it represented a list of sales. We are using a variable called clist since the data is related to a particular customer.
# update SQL statement
info['sql'] = "select OrderDateKey, CustomerKey, UnitPrice, ExtendedAmount, SalesAmount from dbo.FactInternetSales where CustomerKey = 14501"

# get array of dictionaries
clist = qry_mssql_ret_dict(info)

# show data
clist
The image below shows that the customer has placed two orders in the past with the Adventure Works company. This is the current state of the data from the active table.

The Python filter function can be called with a lambda function to return only dictionaries that match the Customer Key. Since the result is a filter object, we can cast the result back to a list.
# apply filter
flist = list(filter(lambda sale: sale['CustomerKey'] == '14501', slist))
# show results
print(flist)
The image below shows the two complete orders from this particular customer. If we wrote two records to the staging table using the flist array, we would reduce the I/O since the original table has over 60,000 rows.

Now that we have an updated slist array, we need to create a function to write this data to the staging table.
Write Table (pymssql library)
If you look at the pymssql sample code, the cursor likes to work with tuples. Our data is an array of dictionaries. We need to write a few lines of code to reformat the data.
# empty array
ltuple = []

# convert from dict to tuple
for i in slist:
  ltuple.append(tuple(i.values()))

# show our interesting order
print(ltuple[0])
The above code converts our variable slist – an array of dictionaries to a variable called ltuple – an array of tuples. The image below shows the one record we are interested in. We need to incorporate this code in our write function. That way, the read and write functions both work with an array of dictionaries.
The code below writes our slist variable (modified table data) to the staging table.
#
#  write dictionary to table
#

# use module
import pymssql

# create function
def mssql_write_dict(info, slist):

  try:

    # empty array
    ltuple = []

    # convert from dict to tuple
    for i in slist:
      ltuple.append(tuple(i.values()))

    # make con
    con = pymssql.connect(info["server"], info["username"], info["password"], info["database"])
    cur = con.cursor()

    # exec statement for each row
    cur.executemany(info["sql"], ltuple)
    cnt = cur.rowcount

    # close connection
    con.commit()
    con.close()

    # return row cnt
    return cnt

  except Exception as e:
    print ('%s' % e)
To execute the new code, we need to pass the correct INSERT statement. The cool thing about a dictionary variable is that we can update the “sql” field with our new statement. Everything else in the dictionary remains the same.
#
#  E2 – execute write function
#
# update SQL statement
info['sql'] = """
INSERT INTO [stage].[FactInternetSales]
(
 [ProductKey],
 [OrderDateKey],
 [DueDateKey],
 [ShipDateKey],
 [CustomerKey],
 [PromotionKey],
 [CurrencyKey],
 [SalesTerritoryKey],
 [SalesOrderNumber],
 [SalesOrderLineNumber],
 [RevisionNumber],
 [OrderQuantity],
 [UnitPrice],
 [ExtendedAmount],
 [UnitPriceDiscountPct],
 [DiscountAmount],
 [ProductStandardCost],
 [TotalProductCost],
 [SalesAmount],
 [TaxAmt],
 [Freight],
 [CarrierTrackingNumber],
 [CustomerPONumber],
 [OrderDate],
 [DueDate],
 [ShipDate]
)
VALUES
(
 %s,
 %s,
 %s,
 %s,
 %s,
 %s,
 %s,
 %s,
 %s,
 %s,
 %s,
 %s,
 %s,
 %s,
 %s,
 %s,
 %s,
 %s,
 %s,
 %s,
 %s,
 %s,
 %s,
 %s,
 %s,
 %s
)
"""
# call write function
rcnt = mssql_write_dict(info, slist)
# show affected rows
print("total number of affected rows = {}".format(rcnt))
Note: I labeled this code as E2. Why is that? Looking at the staging table via SSMS, we have double the number of records. If you remember, the Spark write method has an option to overwrite the table. At a lower level of coding, the Spark library truncates the table before inserting records. The image below shows the correct number of records.

I left the execution timing in this image for a purpose. This code took almost 4 minutes to execute. The prior Spark code took nearly 36 seconds. This is a big difference. The reason behind this reduction in performance is the fact that the executemany method sends over single insert statements instead of a batch of insert statements. In the next section, we will learn how to execute code using the pymssql library.
Execute Code (pymssql library)
The next step is to create a Python function to execute T-SQL statements that do not return data. The function called mssql_exec_nonqry defined below does just that. It is very similar to prior functions we created.
#
#  Call statements that do not return data
#

# use module
import pymssql

# create func
def mssql_exec_nonqry(info):

  try:

    # make con
    con = pymssql.connect(info["server"], info["username"], info["password"], info["database"])
    cur = con.cursor()

    # exec stmt, get row affected
    cur.execute(info["sql"])
    cnt = cur.rowcount

    # close connection
    con.commit()
    con.close()

    # return row cnt
    return cnt

  except Exception as e:
    print ('%s' % e)
The notebook cell below truncates the stage table. Then run cell E2 in the previous section to write the data to the staging table.
#
# E1 - truncate staging table
#

# update SQL statement
info['sql'] = "truncate table [stage].[FactInternetSales]"

# execute statement
rcnt = mssql_exec_nonqry(info)

# how many rows effected
print("total number of affected rows = {}".format(rcnt))
The last cell seen below calls the stored procedure to merge the staging table with the active (dbo) table.
#
# E3 - merge staging table with dbo table
#

# update SQL statement
info['sql'] = "exec [stage].[UpsertFactInternetSales]"

# execute statement
rcnt = mssql_exec_nonqry(info)

# how many rows effected
print("total number of affected rows = {}".format(rcnt))
In short, we can replicate anything the MS connector can do with the pymssql library.
Next Steps
Today’s investigation resulted in two different ways to process SQL Server tables with Spark.
The first way is to use Spark Dataframes. The amount of code to read and write dataframes is quite small. However, the code to update three columns of a single row in a dataframe is very large. Since dataframes work with sets of data, it is necessary to use staging tables when we want to write changes back to a table with referential integrity. The SQL driver of the existing spark session can be used to execute a stored procedure to finish off this MERGE design pattern.
The second way to work with tables is the pymssql library. Reading, writing, and executing code all depend on using a cursor. The amount of code to perform these actions has increased, but these functions are written once and can be saved as a code module. The pymssql library likes working with tuples. However, we want dictionaries to avoid losing the column information. An array of dictionaries can be easily updated. The amount of code for this action is quite small in comparison. With cursors, we have finer control over what can be returned from the function call. While the Spark driver works with a table, the pymssql library works with statements. That means we can read aggregated data from SQL Server and/or execute an UPDATE statement to modify changed rows.
When writing code or functions in Python, it is better to work with dictionaries instead of variables. A dictionary is capable of holding many key/value pairs. Global variables get messy when the number of parameters becomes large.
In closing, there is a significant performance difference between the Spark driver and the pymssql library. Performance can be increased with both design patterns by using partitions and/or bulk copy. I have purposely left off performance tuning for another article. Best of luck with your newfound skill – data processing using Spark and MS SQL.
Enclosed are the files containing the following information: the T-SQL code and the spark code.

John Miner is a Senior Data Architect at Insight Digital Innovation helping corporations solve their business needs with various data platform solutions.
He has over thirty years of data processing experience, and his architecture expertise encompasses all phases of the software project life cycle, including design, development, implementation, and maintenance of systems.
His credentials include undergraduate and graduate degrees in Computer Science from the University of Rhode Island. Also, he has earned certificates from Microsoft for Database Administration (MCDBA), System Administration (MCSA), Data Management & Analytics (MCSE), Data Science (MPP), Databricks Certified, and Fabric Certified.
John has been recognized with the Microsoft MVP award nine times for his outstanding contributions to the Data Platform community.
When he is not busy talking to local user groups or writing blog entries on new technology, he spends time with his wife and daughter enjoying outdoor activities. Some of John’s hobbies include wood working projects, crafting a good beer and playing a game of chess.
- MSSQLTips Awards: Author of the Year – 2019, 2022, 2023 | Champion (100+tips) – 2023