Problem
The Jupyter Notebook is a powerful and handy format for running and sharing computational documents. It offers a simple, but streamlined interface and combines the results of code blocks with text and visualizations. How do you start using Jupyter Notebooks with VS Code?
Solution
In this tutorial, we will present a step-by-step guide on how to get started with Jupyter Notebooks in VS Code with a Python virtual environment.
Step 1: Install Python
Head over to https://www.Python.org/downloads/ and download the latest release. Run the executable and make sure to keep “Add Python.exe to PATH” selected:

After a short while, the installation will be complete.

Step 2: Install VS Code
With installing Python done, we are ready for Step 2. Head over to https://code.visualstudio.com/ and download the latest release. Run the installer and follow the prompts:


Click Next and wait for the installation to finish.
Step 2.1: And the Python extension to VS Code
After installing VS Code, we must customize it to support the necessary functionality. To that end, the Python VS Code extension supports all Python versions greater than 3.7. It includes features such as IntelliSense (Pylance), linting, debugging, code navigation, code formatting, refactoring, variable explorer, and testing. Go to the extension section of your newly installed VS Code. Search for Python:

The extension should be at the top of the list. Click Install. Once installed, you are ready for Step 3.
Step 3: Create a Project Folder
At this point, we are almost ready to start coding. Create a project folder somewhere on your hard drive. From VS Code, click File > Open folder. You will get a pop-up asking if you trust the contents of the folder; click Yes.

Step 4: Create a Virtual Environment
Next, we need to create an environment for our project to run Python files or as a kernel for Jupyter notebooks. Hit Ctrl + Shift + P to open the VS Code command palette, then search for Python:

Click Python: Create Environment. Next, choose the environment type:

There are two types: venv and conda. Venv is the default Python environment manager, while conda is both an environment and a package manager. Note: This tip focuses on using venv. After clicking venv, you must choose the default interpreter path. There should only be one preselected since we installed Python 3.11. in Step 1:

After VS Code finishes creating the environment, you will notice the .venv subfolder in your project folder. Additionally, the Python environment should get activated automatically. It is possible, however, to get the following error in the VS Code terminal:

The error is caused by the Power Shell script that is supposed to activate the virtual environment. The script cannot be executed due to a default security restriction on the local system related to running similar scripts. To relax the security configuration, from the start menu, open your Power Shell terminal by right-clicking on the icon, clicking “Run as administrator,” and then typing in Set-ExecutionPolicy RemoteSigned:

Type Y for yes, hit Enter, and close Power Shell. Here is more information on this configuration: about Execution Policies – PowerShell | Microsoft Learn.
Step 5: Activate your Environment
Go back to VS Code and open its terminal (in case you closed it) using Ctrl + ` or View > Terminal. Copy the command that the environment setup attempted to run and failed. Now run it. This time it should run successfully. You should see a (.venv) prefix to your working directory:

As a result, your terminal in VS Code accepts commands in the context of your Python environment.
Let’s install some packages:
The above command uses the pip package manager. It comes as standard with your virtual environment. We use it to install the pandas and seaborn packages.
To quickly test what we have done, create a Python script file in our project directory. Click the new file icon, name your file, and add the .py extension. VS Code will automatically recognize this file as a Python script file:

Type the code below in your script. You should get Intellisense so VS Code will suggest package and built-in function names as you type:

The script imports the seaborn library into the current namespace and prints a list of all built-in datasets.
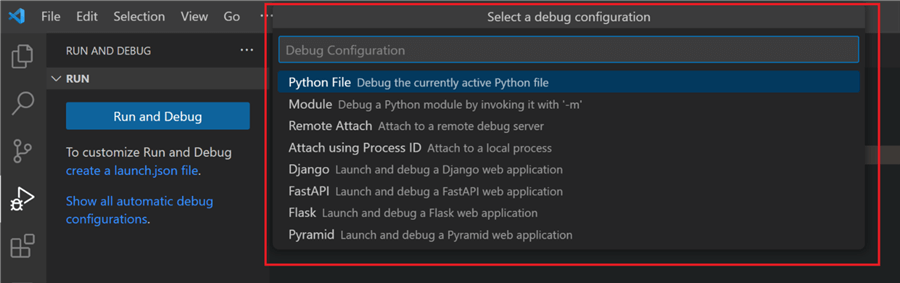
Hit F5, then from the debug configuration dropdown, select Python file:
Hit F5 again, and your terminal should display the output of your script, containing a list of all built-in seaborn datasets:

With this test, we successfully created a Python virtual environment, imported some packages, and ran a script file.
Step 6: Create a Jupyter Notebook
The last step is to create and run a Jupyter Notebook. First, create a new file with the Jupyter Notebook extension .ipynb:

To run the Jupyter Notebook, we must perform an additional configuration. Click Select Kernel on the top right-hand side of the notebook:

A submenu will appear. Click Install suggested extensions:

Since we already have the Python extension, this command will install the Jupyter Notebook extension. It will enable full support for the Jupyter notebooks in VS Code.
Now if you click Select Kernel again, there will be a choice for Python Environments:

Click the option, and select the virtual environment sitting in the project directory, as shown below:

This may trigger an alert from the Windows firewall. Click Allow access.

At this point, the .venv we previously created is selected as the Kernel source. Now, you can click Run next to the code cell in your Jupyter Notebook. This action will trigger a pop-up saying you need the ipykernel package in your virtual environment:
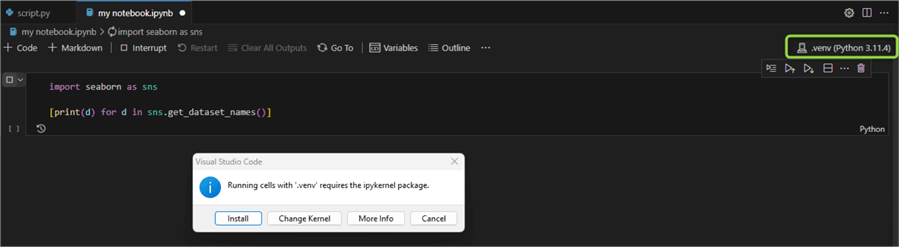
Click Install and wait until the library installs in your virtual environment. Once the installation completes, your cell will run, displaying the output in the Jupyter Notebook cell output:

And that is it! Now you can run Jupyter Notebooks on your local machine using a Python virtual environment in VS Code.
Conclusion
In this tip, we completed a step-by-step tutorial on installing Python and VS Code, configuring a virtual environment, and running a Jupyter Notebook. Use this tutorial to prepare for data analytics and data science work quickly.
Next Steps
- Working with Jupyter Notebooks in VS Code
- Data science in VS code
- Anaconda Python Installation and Management for Various Projects
- How to Get Started Using Python using Anaconda, VS Code, Power BI and SQL Server

Hristo Hristov is a seasoned data professional with 10+ years of experience spanning the intersection of data engineering and smart manufacturing solutions. Since 2017, he has specialized in implementing advanced analytics solutions for bridging the IT/OT gap.
A technical writer with over 80 published articles on data and AI technologies, Python development, and cloud solutions. Passionate about transforming complex data into business value through innovative applications of Azure Data Platform, Python, IoT solutions, databases, and other cloud technologies.
Currently applying Industry 4.0 best practices, focusing on IoT connectivity, and implementing data and AI systems in manufacturing. Hristo holds a degree in Data Science and several Microsoft certifications covering SQL Server, Power BI, and related technologies.
- MSSQLTips Awards
- Achiever Award (75+ tips) – 2026
- Rookie of the Year – 2021
- Author Contender – 2022/2023/2024/2025


