Problem
Throughout my career, there have been several occasions where I was asked how certain common things can be done in Power BI reports on the service to enable the stakeholders, or business end users, to use the reports more efficiently, easily, productively, and readily. Generally, these stakeholders only consume the reports and have no technical understanding of how the reports are created in the Power BI Desktop backend.
This tip will demonstrate how to do several of these common actions in the Power BI service to help the business end user.
Solution
To demonstrate, I have listed below a few common tips based on my experience with what report end users want to be able to do with their reports without requiring IT support:
- Bookmark a report page
- Analyse the report data in Excel
- Export the report to PowerPoint
- Embed the report on a Microsoft Teams page
- Subscribe to a report
Bookmark a Report Page in Power BI
The bookmark feature in the Power BI service allows end users to bookmark (create a default view) a report page based on their preferences without altering the report view for others. For example, in the report page image below, the display slicer selection on the date slicer is “Last 7 years.” However, a user might want to set this to “Last 5 years” by default so that whenever they open the report page, they always see the date filtered to “Last 5 years” unless they change it.

To achieve this, while viewing the report in an app or within a workspace in Power BI service, you need to change the slicer you are applying to the bookmark to capture the state of the report you desire. In this demo, I have changed the “Last 7 Years” slicer selection to “Last 5 Years,” as seen in the image below.

Click the Bookmark icon in the upper right corner. Next, select “Add a personal bookmark” from the dropdown list to create a bookmark for your desired default slicer selection, as seen in the image below.
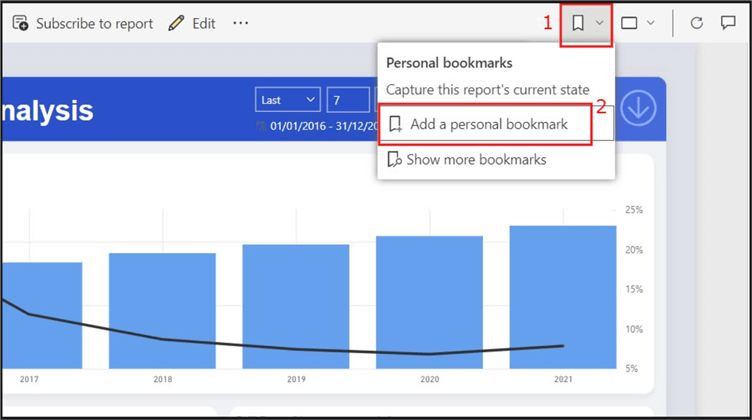
Assign a name to the bookmark. For this purpose, I have named it “Demo Bookmark.” Check the box that says “Make default view” if you desire to make this view selection the default view whenever the report is opened. Click “Save.” See the image below.

Analyze Power BI Report Data in Excel
Two ways to export data in reports from Power BI into Excel for further or other analysis include the “Analyze in Excel” or “Export data” features. However, these options export the data to Excel differently.
Analyze Power BI Data in Excel Option
This option downloads your Power BI model dataset to a OneDrive for Business folder (if available). Note: If you are unsure, this download might go into your documents folder in your OneDrive personal mode. However, it would just download as usual, and you can open the Excel workbook in the cloud (Excel Online) as a Pivot Table, which you can then use to analyze your data further if you are used to working in Pivot Tables.
The following steps can be used to export your data to an Excel Pivot Table:
First, at the top left corner of your report page, click the dropdown on the “Export” feature, as seen in the image below. Next, choose “Analyze in Excel” from the options provided. This will download the Excel workbook.

Once downloaded, you will see a prompt with a link to click and open the file, as seen in the image below.

Once opened, you will see a Pivot Table, as in the image below.

To trace where your file was saved in OneDrive, click the file name at the top left corner of the file. Click on the defined path to see the file download location if you need to reuse the file again. See the image below.

Export Power BI Data to Excel Option
If you need to export data from a single visual to be further analyzed outside Power BI, then this option is your best choice. You can export the data behind any Power BI visual. However, this feature is best used with Table or Matrix visuals since all the functionalities are actionable on these two visuals.
I will use the matrix visual in the report below to demonstrate how to export data from a matrix visual.

The first step is to hover your mouse over the visual you want to export the data.
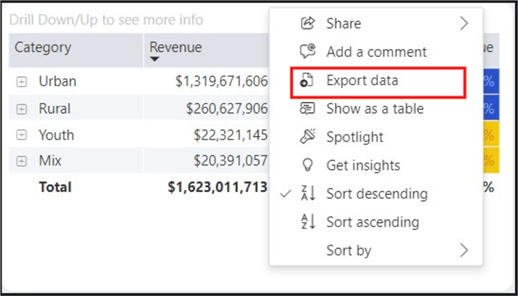
While hovering, find and click on the highlighted ellipses (…) at the top right of the visual, as seen in the image below.

Select “Export data,” as shown in the image below.
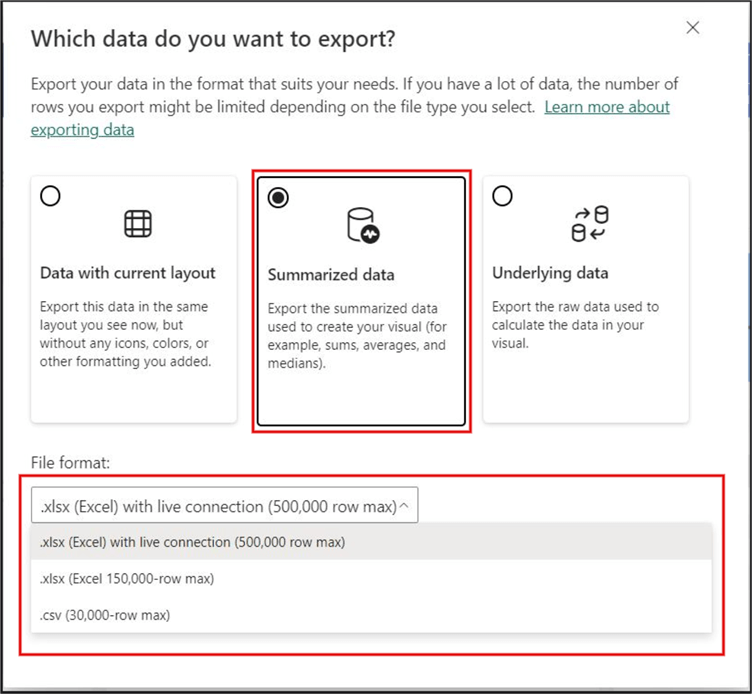
Next, you will be presented with three options for exporting the data. If exporting from a table or matrix visual, you would only see the first option (Data with current layout).

The dataset layout you export depends on the option you select at this stage.
If you select the “Data with current layout” option, by default, your data will be exported in Excel (.xlsx) format, with the same layout as the matrix visual on the report page, but without any conditional formatting, icons, or other formatting. Note: If you export from a matrix visual like in this demo, you will not see any drill-down value details. You will only see the topmost hierarchy of the data, as seen in the image below. Note: The percentage formatting is also undone.

If you selected the “Summarized data” option, you should have the option to export in CSV format in addition to Excel, as seen in the image below. However, this option allows you to export the summarized data originally used to create the visual only (not the raw dataset).
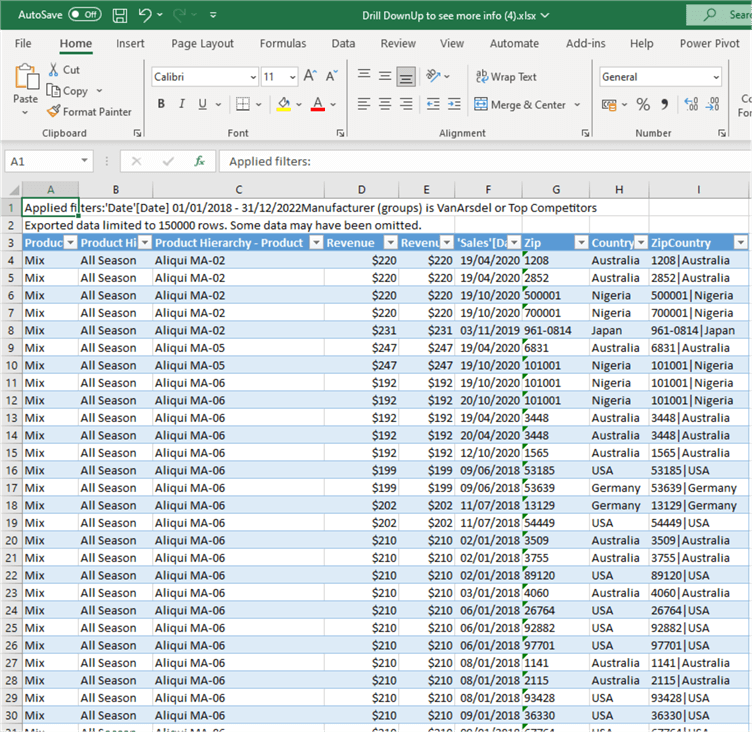
Note: With this option, you can export the full drill-down hierarchy with all columns showing, as seen in the image below.

If you select the “Underlying data” option, the export format will default to Excel (.xlsx) only, and the export will be based on the raw dataset, as seen in the image below.

Depending on the size of the raw dataset, this would usually take longer to export. Once exported, the Excel file will show all columns from the raw dataset used to create the report, not just the visual.
Export Power BI Report to PowerPoint
There are currently two ways to export Power BI data to PowerPoint: embed as an image or embed as live data. If you have not exported data from Power BI to PowerPoint before, you might need to put some settings in place before you can do so.
Embed a Power BI Report as an Image in PowerPoint
Click on the “Export” dropdown at the top right of the report page. Click “PowerPoint” and select “Embed an image,” as seen in the image below.

On the next window, click “Export,” as seen in the image below.

A download of the PowerPoint file with the pages in the report (depending on if you selected the checkbox that says “Only export current page” or not) as an image should be displayed, as seen in the image below.

Embed a Power BI Report as Live Data in PowerPoint
The following steps can be used to export a live Power BI report page to PowerPoint. Microsoft documentation is available for more information.
First, follow the steps provided above to export data to PowerPoint. Then select the “Embed live data” option, as seen in the image below.

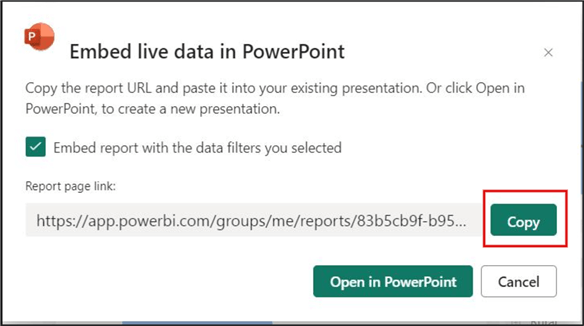
After making the selection, the image below will appear. You can then choose to copy the “Report page link” or click the “Open in PowerPoint” button.

If it’s your first time using this option, you may find that once you click the “Open in PowerPoint” button, the download completes, but requires a log-in to PowerPoint first, as seen in the image below.

Similarly, you might need to activate an “Add-in” in PowerPoint to ensure Power BI exports can be viewed live. You will see this message (below) on the second page of the PowerPoint file.

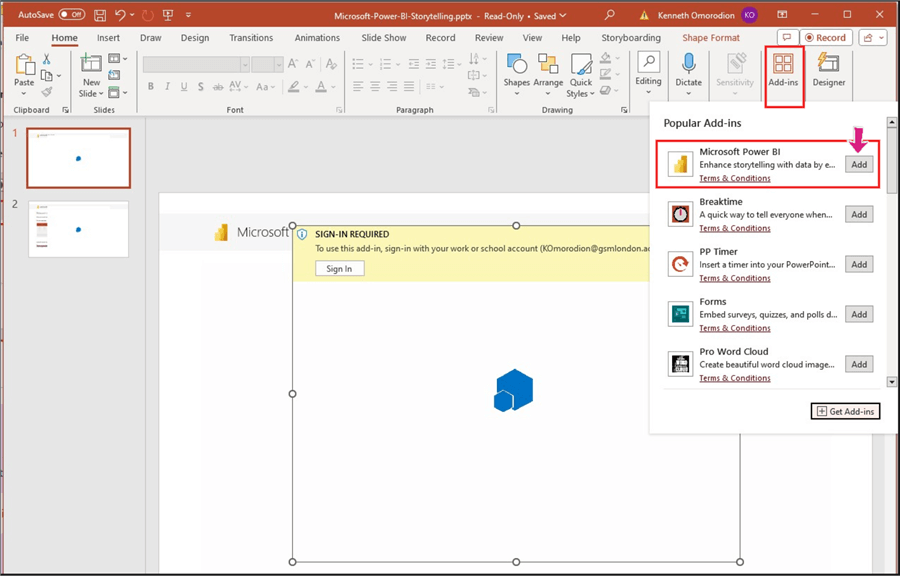
To access and activate the Add-in to PowerPoint, check for “Add-ins” in the home tab on the top right of the PowerPoint page, as seen in the image below. Click the “Add-ins” section and select the “Microsoft Power BI” option by clicking “Add,” as seen below.
You can see it in your Add-ins list when clicking the Add-in section again (see image below).

With the Add-in activated, use the “Open in PowerPoint” button option mentioned earlier to get your Power BI report embedded live in PowerPoint, as seen in the image below.

You can also use the second option: copying the “Report page link” as seen below.
To do this, copy the link seen in the above image, open a new PowerPoint file, and on the “Home” tab on the top right of the PowerPoint page, select the “Add-ins” section. You will see all available Add-ins under “My Add-ins.” Select the “Microsoft Power BI” Add-in. The following will appear.

You must paste the link you previously copied into the “Paste a URL from Power BI here” space. An example is shown below.

Click “Insert,” which will render the embedded report live in PowerPoint.
Embed Power BI Report on a Microsoft Teams Page
This is a very popular option with Power BI end users who want to view their reports in Teams without logging into the Power BI service or moving to a different web page each time.
To embed a Power BI report or app on a Teams page, you first must consider if you currently have a Teams page or if one needs to be created. Let’s assume a Teams page already exists for this demo; otherwise, see this article for directions to create one.
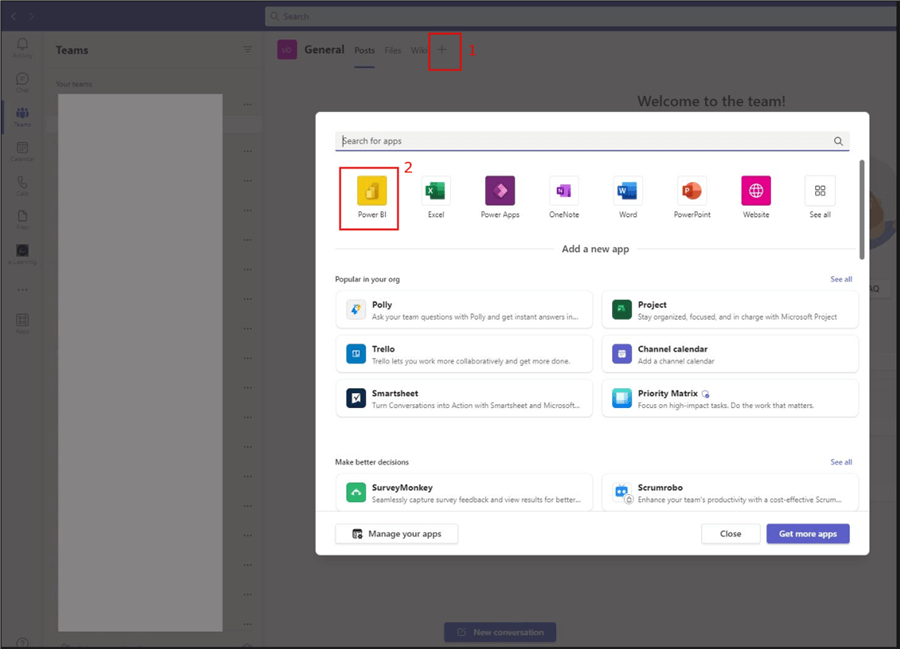
After accessing the Teams page, click “+” at the top and select “Power BI” from the list of apps, as seen in the image below.
A new window will appear where you can click “Save.”

Next, the image below appears where you choose how to embed the report or app: “Paste a Power BI link” section or “Browse workspaces” options.

Paste a Power BI Link Option
Paste a link from your app or report in the Power BI service to use this option.
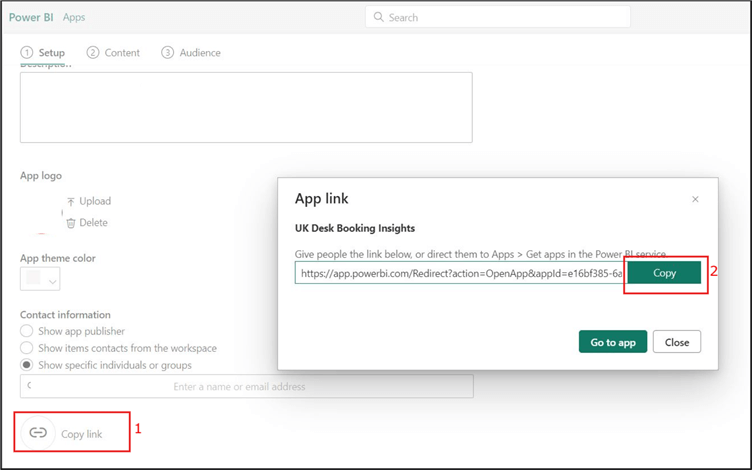
To get the link from an app, you should try to update an existing app and then copy the link. Click “Update app.“

Then, copy the link by following the steps in the image below.
After copying the link, go back to the Teams page and paste it in the space provided, as seen in the image below.

You can also follow the same approach to paste the link relating to a report. To copy the link to a report, you need to open the report from within a workspace. Then copy the URL link, as seen in the image below, and paste it on the Teams page.

Browse Power BI Workspaces Option
To use this option, you must first click on the hyperlink, as seen in the image below.

A new window will display (see below), and are given the following options:
- Select a report from a workspace.
- Select an app from your list of available apps; or
- Select a report shared with you.

Whichever option you select, you will see your Power BI report or app embedded on your Teams page, like in the following image. A tab is created at the top of the page for the team to click each time you need to view the report.

Subscribe to a Report in Power BI Service
Many Power BI end users leverage this feature to subscribe to a Power BI report in a workspace or app and a dashboard on a schedule. It is one of the most common features Power BI end users utilize.
The feature enables Power BI users to schedule when and how reports or report pages are sent in an automated way. Users do not need to log in to the Power BI service to view reports; instead, the reports are scheduled to be sent to them periodically.
This feature is configured by clicking “Subscribe to report” at the top of the page, as seen in the image below.

The process is also the same for dashboards, except the button reads “Subscribe to dashboard,” as seen in the image below.

It is easy and self-explanatory to configure the subscription. The sections to be completed are relatively the same for both reports, apps, and dashboards. The one main difference is the ability to select a chosen report page on the app and reports subscription but not in dashboards, as one would expect (since dashboards only have a single page by default).
The image below shows the sections that must be completed to configure a report subscription. You can also expand “More options” to add additional settings. Read more about how to configure the subscription settings in this article.

In summary, this article showcases some common tips to assist Power BI end users gain more from using Power BI to enable them to use already-created reports to the fullest extent in the most efficient way possible.
It is also worth noting that other Power BI features are available that do not require technical know-how; however, I have narrowed these features to five for this article. Additional use cases might include embedding Power BI reports in SharePoint, viewing and understanding usage metrics in Power BI service, creating quick self-service reports in Power BI service, and so on. To learn more about these use cases, see the articles provided in Next Steps.
Next Steps
- Analyze in Excel Workbooks are now saved to OneDrive for Business
- About storytelling with Power BI in PowerPoint
- Add live Power BI data to PowerPoint.
- Embed Power BI content in Microsoft Teams
- Email subscriptions for reports and dashboards in the Power BI service
- Monitor report usage metrics
- Embed a report web part in SharePoint Online
- Create quick reports in the Power BI service
- Email subscriptions for reports and dashboards in the Power BI service

Kenneth A. Omorodion is a Microsoft Certified Solutions Associate (MCSA) with 12+ years of enterprise application experience in Power BI, DAX, Microsoft Fabric, Business Intelligence, data warehousing, SSRS, T-SQL, and Azure. Beyond his technical skills, Kenneth has expertise working with stakeholders’ and business leaders to help them better understand key insights. He has a great track record of successfully delivering full life cycle Business Intelligence and data solutions to organizations with measurable business impact.
- MSSQLTips Awards
- Achiever Award (75+ Tips) – 2025
- Author of the Year-2021
- Author Contender-2022/2023/2024


