Problem
Our organization is looking to deploy virtual machines on AWS for both testing and disaster recovery (DR) environments. I want to create and administer AWS virtual machines running SQL Server using Windows PowerShell. How do I get started?
Solution
In a previous tip, Introduction to AWS Tools for PowerShell to Administer Virtual Machines, we looked at how to use the AWS PowerShell modules to start working with AWS. In this tip, we’ll begin exploring how to create AWS EC2 instances that run SQL Server instances.
There are different ways to create virtual machines in AWS. One way is to create a Windows Server virtual machine and install your licensed copy of SQL Server. You can even take advantage of the Pay-As-You-Go (PAYG) model in SQL Server 2022 that provides per-hour consumption-type billing for on-premises or hosted SQL Server instances – even when you’re on AWS. Another way is to use an Amazon Machine Image (AMI) that already has SQL Server installed. We will use the latter in this tip.
We can start by exploring the different AMIs that run the Windows Server operating system. Let’s use the Get-EC2Image cmdlet, filtering the results that we want by using the Where-Object cmdlet:
#MSSQLTips
Get-EC2Image | Where-Object {$_.ImageLocation -like "*Windows*English*"}

NOTE: If your organization uses AWS Systems Manager, you can use the Get-SSMLatestEC2Image PowerShell cmdlet to display all the latest EC2 AMIs. This tip assumes that you do not have access to AWS System Manager and will use PowerShell cmdlets that do not reference this resource.
You might be wondering, “Where did that ImageLocation property come from?” Refer back to the previous tip about how to retrieve the different properties, methods, and events of an object using Windows PowerShell. Because I do not – and cannot – memorize all of the different object properties when I use Windows PowerShell, I use the Get-Member cmdlet to discover and explore them as I go.
The results of the PowerShell command can be a bit overwhelming with all the available versions of supported Windows Server operating systems, including those that have other apps installed. We’re only concerned with those running the specific Windows Server operating system version we will be using, together with the specific SQL Server version. We can tighten up the parameter values in the ImageLocation property to be more specific. Let’s say you want to run a SQL Server 2019 Standard Edition instance on Windows Server 2019. Run the Get-EC2Image cmdlet below with a more specific ImageLocation property value:
Get-EC2Image | Where-Object {$_.ImageLocation -like "*Windows*2019*English*SQL*2019*Standard*"}

This is the same result you’ll get when you navigate through the AWS EC2 management console while filtering the results to only display SQL Server 2019 AMIs.

For this tip, we will use the latest Windows Server 2019 with SQL Server 2019 Standard Edition AMI that supports TPM. Use the PowerShell command below to retrieve that specific AMI. Take note of the ImageId property. You will need it to create the AMI later.
Get-EC2Image | Where-Object {$_.ImageLocation -like "*TPM*Windows*2019*English*SQL*2019*Standard*"} | Sort-Object -Property CreationDate -Descending | Select-Object -First 1
What You Need to Create a SQL Server on Windows Instance Using the Available AMI
Review this tip on Launch SQL Server instances on AMAZON EC2 to understand what you need to create a SQL Server instance on AWS. Refer to the AWS EC2 Dashboard for a more accurate picture, as the user interface for public cloud providers keeps changing.
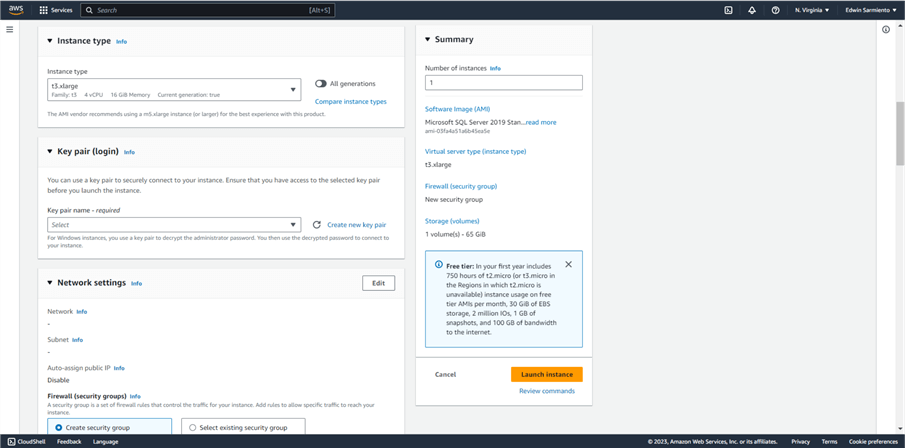
Instance Type
This is the VM size. It’s the combination of CPU, memory, networking, and storage capacity for your EC2 instance. Choosing an instance type for SQL Server workloads is in itself a challenge. You want to properly size the EC2 instance for your workload without spending too much. The t3.xlarge instance with 4vCPUs and 16GB of RAM will be used for this tip.
Key Pair
AWS uses public-key cryptography to secure the login information for your instance. This is the credential that you will use to log in to the Windows Server. You need to specify the name of the key pair when you launch your instance. You also need to provide the private key to obtain the administrator password for your Windows instance so you can log in using Remote Desktop. This is demonstrated later in this tip.
Networking Components
You need to configure networking to access resources on AWS. For SQL Server DBAs, this is one of the most challenging parts of working with public cloud providers. They rarely work with networking components in their day-to-day tasks. Understanding networking components is necessary with the public cloud. The goal is not to become a network engineer but rather to be familiar with the basic concepts that allow you to configure communication between resources, for example, an app and a SQL Server database. The following network components are needed:
- Virtual private cloud (VPC). A VPC is a logically isolated virtual network that you can use to create and launch your AWS resources. Imagine how your resources – servers, devices, applications, etc. – are connected within your organization. A VPC is AWS’ equivalent of your corporate network.
- Subnets. A subnet is a range of IP addresses in a VPC. It’s how a network is divided into smaller sections for ease of management and efficiency.
- IP Addresses. An IP address is the unique network address of a resource. It is how you locate a resource in the network.
- Gateway. A gateway connects the VPC to another network, such as another VPC. An internet gateway connects the VPC to the internet.
- Security group. A security group acts as a virtual firewall for controlling inbound and outbound traffic for the EC2 instance. It defines what traffic is allowed and/or denied from specific sources to the EC2 instance.
While it’s not necessary to perform your tasks as a SQL Server DBA, you can dive deeper into each of these components to further understand how they work together in the context of launching an EC2 instance.
Put Them All Together
Now that you know the components you need to launch a SQL Server on Windows EC2 instance, let’s put them all together.
Create a Security Key Pair
You will use the New-EC2KeyPair PowerShell cmdlet to create the security key pair. The sample PowerShell code below uses the variable $keypair to easily access the properties:
$keypair = New-EC2KeyPair -KeyName SQLEC2AWSKeyPair
Next, you will use the Out-File PowerShell cmdlet to export the security key pair into a Privacy Enhanced Mail (PEM) file. You will use this file later to generate the password for the local Administrator account.
$keypair.KeyMaterial | Out-File -Encoding ascii C:\AWS\SQLEC2AWSKeyPair.pem
Run the PowerShell command below to display the properties of the security key pair. It’s a standard PEM file containing a private key that you can use to log in to the EC2 instance.
$keypair

Create an AWS Security Group and Rules for Inbound Network Traffic
Use the New-EC2SecurityGroup PowerShell cmdlet to create an AWS security group.
New-EC2SecurityGroup -GroupName SQLEC2AWSSecGrp -GroupDescription 'SQLEC2AWS Security Group'

Take note of the output from running the command. This is the ID of the newly created security group.
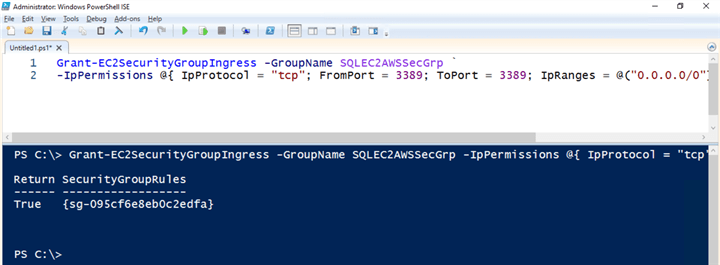
After creating the security group, use the Grant-EC2SecurityGroupIngress PowerShell cmdlet to add a specified inbound (ingress) rule to the security group. Since this is an inbound rule, you must define the source traffic, the network protocol, and the port number. Note the following property values:
- IpProtocol = “tcp” – This is the network protocol that will be allowed for inbound traffic
- FromPort = 3389 – This is the port number allowed from the source. Port 3389 is used for Remote Desktop connection. You will be using the Remote Desktop Connection app from your machine to connect to this EC2 instance
- ToPort = 3389 – This is the port number allowed to reach the destination. Port 3389 is used for Remote Desktop connection. The EC2 instance will be accepting Remote Desktop Connection sessions.
- IpRanges = @(“0.0.0.0/0”) – This is the range of IP addresses you are allowing to connect to the EC2 instance. Note that the range provided means you are allowing inbound access from any IPv4 address from any source. This is for demonstration purposes only and not a security best practice. You don’t want your SQL Server EC2 instance to be accessible to the public internet. You can, however, restrict the IpRanges value to only the public IP addresses from your internal network, assuming you’re working from your corporate office and not from home.
Grant-EC2SecurityGroupIngress -GroupName SQLEC2AWSSecGrp -IpPermissions @{IpProtocol = "tcp"; FromPort = 3389; ToPort = 3389; IpRanges = @("0.0.0.0/0")}
Create the SQL Server on Windows EC2 Instance
After retrieving the properties of the AMI, creating the key pair, the security group, and the network inbound rules, you can create the SQL Server on Windows EC2 instance. Use the New-EC2Instance PowerShell cmdlet to create the SQL Server on Windows EC2 instances. Note the following parameters:
- ImageId. This is the ImageID value of the AMI when you ran the Get-EC2Image PowerShell cmdlet
- MinCount. This is the minimum number of EC2 instances to launch. This applies to workloads that require more than one EC2 instance, such as a SQL Server Always On Availability Group, and is dictated by your AWS account’s limit
- MaxCount. Similar to the MinCount parameter, this is the maximum number of EC2 instances to launch
- KeyName. This is the name of the security key pair you created using the New-EC2KeyPair PowerShell cmdlet
- InstanceType. This is the size of the EC2 instances. This example uses the t3.xlarge size
- SecurityGroup. This is the name of the security group you created using the New-EC2SecurityGroup PowerShell cmdlet
New-EC2Instance -ImageId ami-0cf1df71dc2f19888 -MinCount 1 -MaxCount 1 -KeyName SQLEC2AWSKeyPair -InstanceType t3.xlarge -SecurityGroup SQLEC2AWSSecGrp

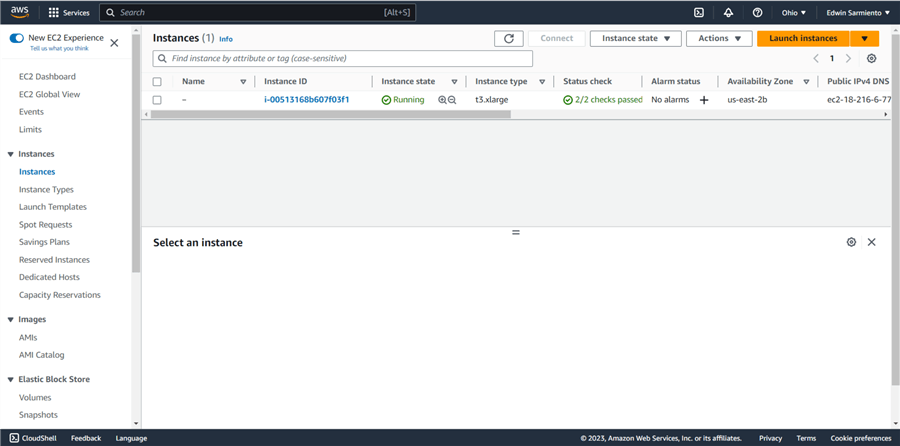
You can use the AWS EC2 Dashboard to confirm the creation of the resources. The screenshot below displays the newly created EC2 instances. Note the Instance Type (t3.xlarge) and Availability Zone (us-east-2b) properties, assigned with the New-EC2Instance and Set-DefaultAWSRegion PowerShell cmdlets, respectively.
The screenshot below displays the associated security group (SQLEC2AWSSecGrp) and security group inbound rules created with the New-EC2SecurityGroup and Grant-EC2SecurityGroupIngress PowerShell cmdlet, respectively.

Where are the Networking Components?
You might be wondering where the networking components are since only the security group and its corresponding rules were created. If you did not explicitly create the VPC, the subnets, the IP addresses, and the gateways, AWS will automatically create one for you. Refer to the value of the VPC ID column for the created security group. Clicking on this link will open a new browser window, redirecting you to the AWS VPC Dashboard.
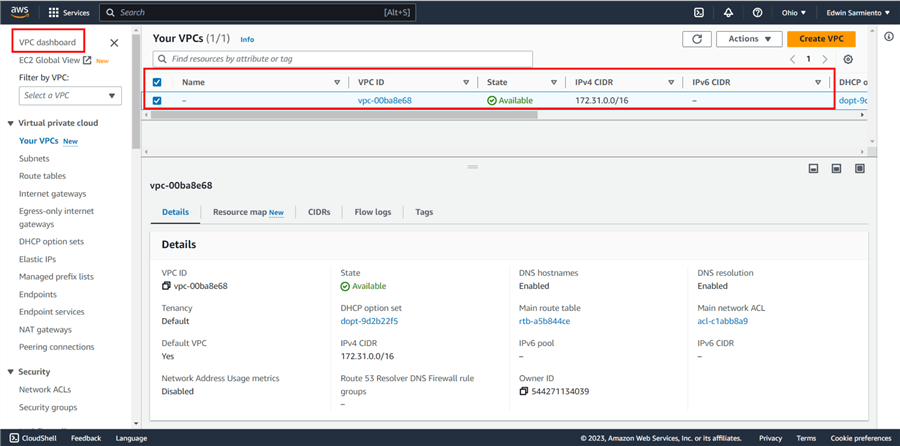
Click on the Subnets link to show the created subnet the EC2 instances will use. Note the assigned IPv4 addresses (172.31.16.0/20) and the Availability Zone (us-east-2b).

Click on the Internet gateways link to show the created internet gateway the EC2 instances will use.
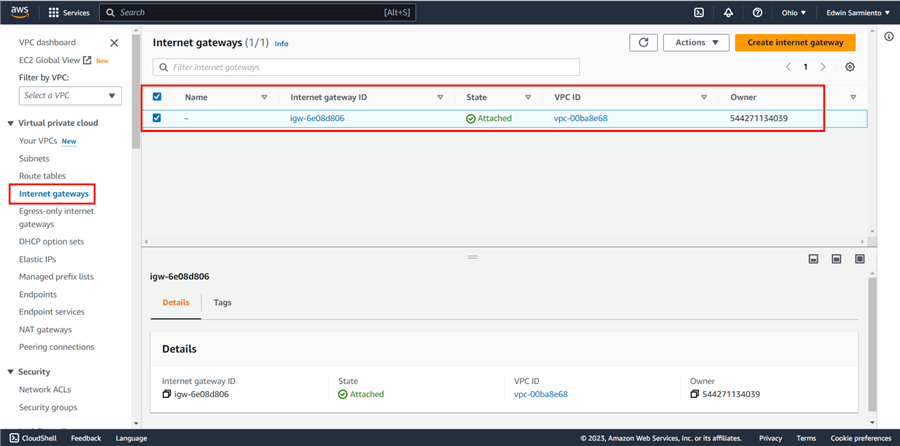
Ideally, you would create the VPC first, then the subnets. Assigning resources on the subnets will automatically give them IP addresses via dynamic host configuration protocol (DHCP). If the resources need to access the internet, an internet gateway is created. Since these tasks are the responsibility of network engineers, this tip only covers what you need to know to create and launch a SQL Server on Windows EC2 instances.
Displaying Properties of the SQL Server on Windows EC2 Instances using Windows PowerShell
You can use the Get-EC2Instance PowerShell cmdlet to return a list of all the instances in your account. It’s confusing since the Get-EC2Instance PowerShell cmdlet returns a reservation object, not the instances themselves.
NOTE: Using the New-EC2instance PowerShell cmdlet always creates instances in batches called reservations. A reservation is a batch of instances launched at the same time. In the example above, a batch of size one is created using the MinCount and MaxCount parameters of the New-EC2Instance.
To display the list of instances in your AWS account, run the PowerShell command below. Note the InstanceId property value. You will use this to explore the different properties of the EC2 instances.
(Get-EC2Instance).Instances

It takes time to create an EC2 instance, together with the required resources. Before you can log in to the Windows Server via Remote Desktop, the EC2 instance needs to be in a Running state. Run the PowerShell commands below to display the Status and Instance State of the EC2 instance.
(Get-EC2InstanceStatus).Status
(Get-EC2InstanceStatus).InstanceState

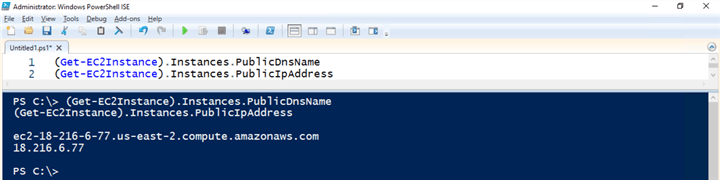
You need the public DNA name or the public IP address to connect to the EC2 instance via the internet. Run the PowerShell commands below to display the public DNS name and public IP address of the EC2 instance. Use any of the results in your Remote Desktop connection.
(Get-EC2Instance).Instances.PublicDnsName
(Get-EC2Instance).Instances.PublicIpAddress
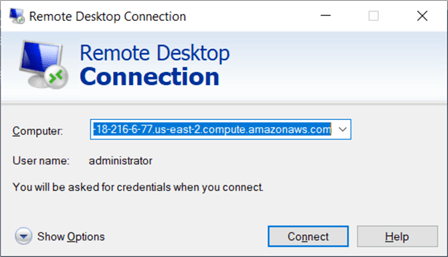

You still need the local Administrator account’s password. Remember the generated PEM file using the New-EC2KeyPair PowerShell cmdlet? To retrieve the local Administrator account’s password, decrypt the PEM file using the Get-EC2PasswordData PowerShell cmdlet. The InstanceId parameter value is from running the Get-EC2Instance PowerShell cmdlet.
Be warned. This isn’t your typical complex password. Make sure you type it correctly when logging in to the EC2 instance using Remote Desktop.
Get-EC2PasswordData -InstanceId i-00513168b607f03f1 -PemFile C:\AWS\SQLEC2AWSKeyPair.pem -Decrypt

Once logged in, check the desktop wallpaper. This shows the property of the EC2 instance you created. To validate the SQL Server version and edition, open SQL Server Management Studio.

Next Steps
- Refer to the following AWS documentation:
- Review this tip: Introduction to Windows PowerShell for the SQL Server DBA Part 1
- Check out the Windows PowerShell Tips

Edwin M. Sarmiento is the Managing Director of 15C, a consulting and training company that specializes on designing, implementing and supporting SQL Server infrastructures. He is a Microsoft SQL Server MVP and Microsoft Certified Master from Ottawa, Canada specializing in high availability, disaster recovery and system infrastructures running on the Microsoft server technology stack ranging from Active Directory to SharePoint and anything in between. He is very passionate about technology but has interests in music, professional and organizational development, and leadership and management matters when not working with databases. Edwin lives up to his primary mission statement: “To help people and organizations grow and develop their full potential.”
- MSSQLTips Awards: Champion Award (100+ tips) – 2017 | Author of the Year Contender – 2020, 2017


Sarah moe,
Define clear processes.
Any automation task should start with having a clear, well-defined process that takes into account security and compliance requirements while minimizing human intervention.
It’s one of the reasons why I don’t just tell people to automate. I have them go through the entire manual process first so they can identify parts that need to be audited to meet strict compliance requirements. The auditing can also be automated following the same process.
How do SQL Server DBAs strike the right balance between leveraging PowerShell for automation and maintaining necessary manual controls, especially in complex environments with multiple dependencies and stringent compliance requirements?