Problem
Databricks applications need a secure and manageable way to connect PySpark applications to Azure SQL databases without embedding sensitive credentials directly in their code. This practice risks exposure and leaves access control un-centralized. An ideal solution would leverage service principal authentication, granting granular access permissions while keeping credentials safely stored in Azure Key Vault. But existing methods can be complex and lack comprehensive documentation. This article aims to address this gap by providing a clear and efficient PySpark code example for establishing secure connections to Azure SQL using service principal authentication.
Solution
The solution leverages Microsoft Azure Active Directory (AD) authentication for PySpark applications in Databricks. We create a service principal in Azure AD and grant it access to the desired Azure SQL database. Secrets for the service principal’s client ID, secret, and tenant ID are securely stored in Azure Key Vault. PySpark code retrieves a token using the Microsoft Azure Active Directory Authentication Library (ADAL) and the stored secrets, allowing seamless connection to Azure SQL without hardcoded credentials. This approach ensures centralized access control, enhances security, and simplifies code management, enabling secure and efficient interactions between Databricks PySpark and Azure SQL.
Requirements
The following are requirements that need to be set up and configured:
- An Azure Subscription
- An Azure SQL Database
- An Azure Databricks workspace
- An Azure Databricks Cluster (Runtime 7.0 or above)
Create Azure Key Vault
Azure Key Vault is a cloud-based security service offered by Microsoft Azure. It provides a secure and centralized storage solution for cryptographic keys and secrets, such as passwords, certificates, and keys used for encryption. Think of it as a digital vault for your most sensitive information, but instead of a physical lock and key, it uses advanced security features to keep your data safe.
To create an Azure Key Vault, follow the steps below:
Step 1
Open a web browser (I prefer Chrome).
Step 2
Enter the URL https://portal.azure.com and sign in to your Azure Account.
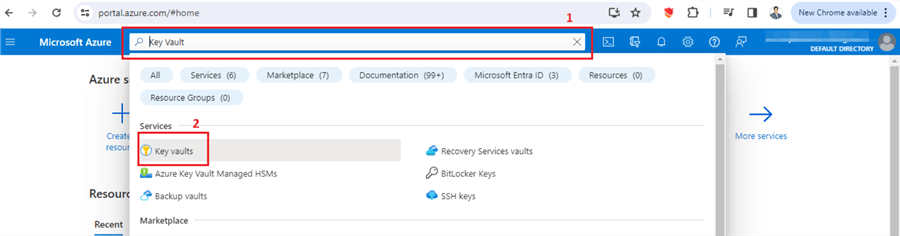
Step 3
Search for “Key Vault” in the search bar and create a new key vault.
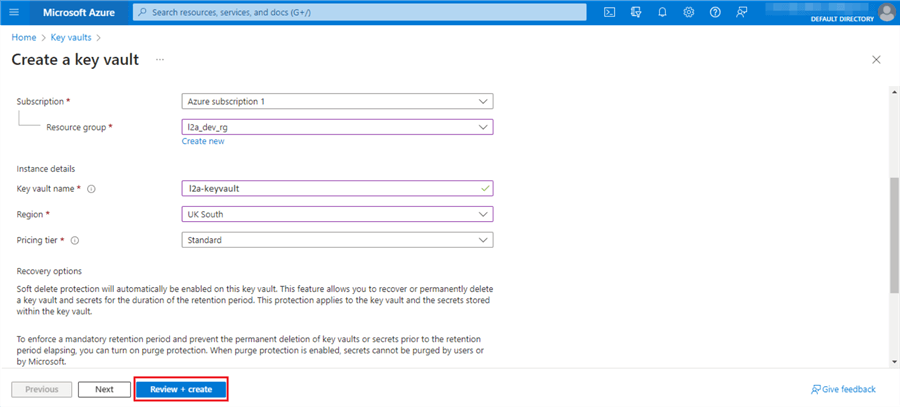
Step 4
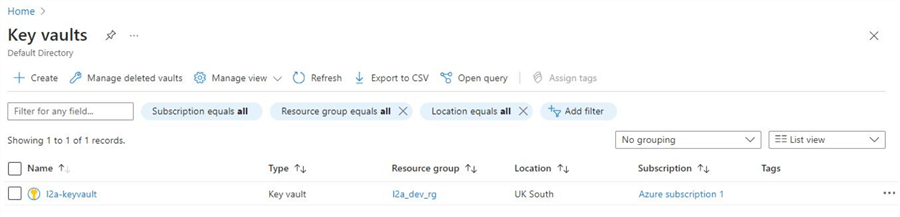
Enter all the relevant information and click Review + create.
Once the resource is created, refresh the screen to show the new “key vault” we created.
Step 5
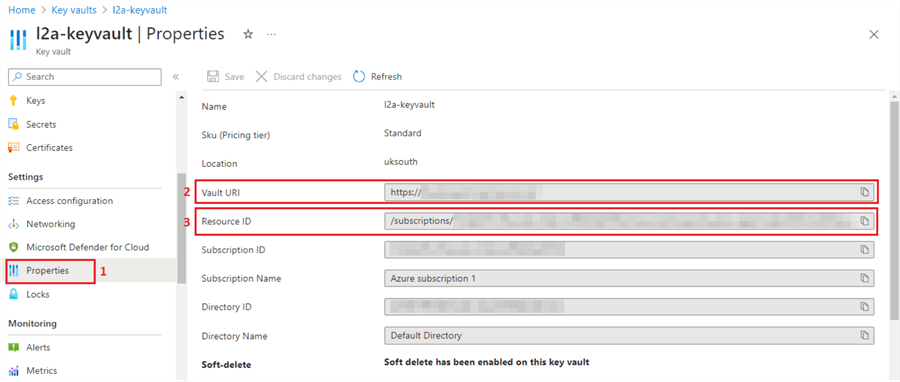
Now, click on the key vault we just created, and on the left-hand side menu, scroll down to find the Properties.
Take note of the Vault URL and the Resource ID. We will use this information to set up a “secret scope” in your Azure Databricks workspace.
Create an Azure Service Principal
An Azure service principal is a managed identity used by applications, services, and automated tools to access Azure resources. Think of it as a special “user account” for non-human entities in Azure. It allows services to perform tasks like managing and accessing resources, deploying applications, and accessing data.
To create Azure Service Principal, follow the steps below:
Step 1
In the Azure portal, search for “Entra ID.”

Step 2
In the left-hand side menu, scroll down to find App registrations.
Click + New registration.

Step 3
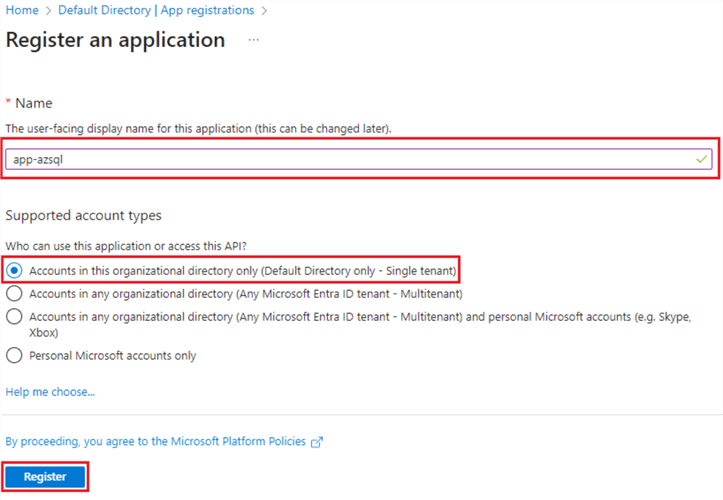
Provide a suitable name for an application and click the “Accounts in this organizational directory only (Default Directory only – Single tenant)” radio button. Click Register.
Step 4
Once the application is registered, note the Application (client) ID and the Directory (tenant) ID. We will add this sensitive information to the Azure Key Vault secrets so that it can be securely accessed by other resources.
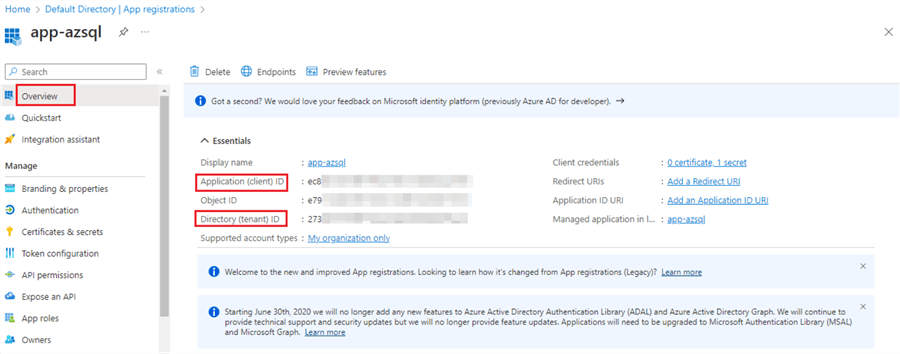
We have created a Service Principal, which you can think of as a user ID. In the next step, we will create a “client secret,” similar to creating a password for the user ID (i.e., service principal).
Create a Client Secret for Your Service Principal
The client secret is a cryptographic token that acts like a password for the Service Principal. It’s used to authenticate the application (represented by the Service Principal) when requesting access to Azure resources.
So creating a client secret for your Service Principal is essentially generating a secure password that allows your application to authenticate with Azure and perform authorized actions.
To create a Client Secret, follow the steps below:
Step 1
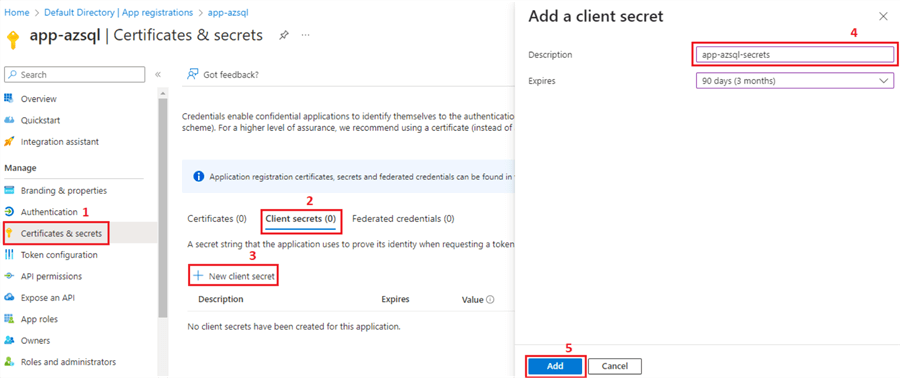
Click Certificates & secrets.
Step 2
Click the Client secrets tab.
Step 3
Click + New client secret.
Step 4
Add a client secret name and choose when it will expire. Here, I have chosen 90 days, or this client secret will be invalidated after 90 days from its creation. A new client secret needs to be created after that.
Step 5
Click Add.
Step 6
Once the client secret is created, you will be displayed a Value. Jot down this value. We will be adding this in our Key Vault in later steps. It is important to note that this value will only be displayed once and will not be visible once you refresh or exit the page. So, make sure to write it down separately for later use.

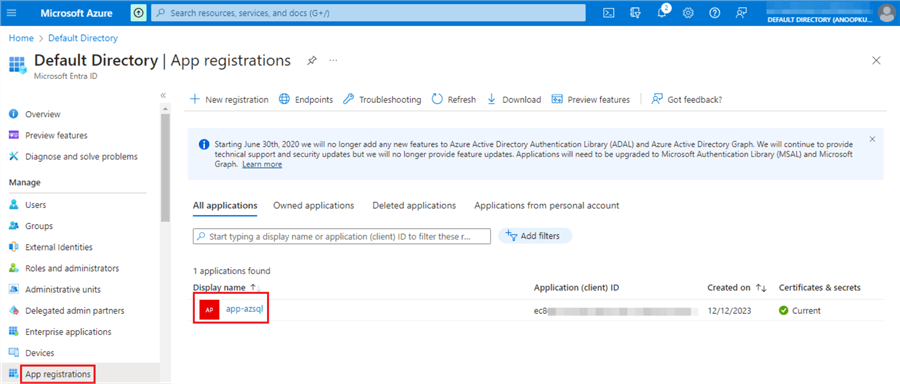
After registering the application and creating the client secret, you should see the application we registered now if you return to the App Registration page.
Store All the Sensitive Information in the Azure Key Vault Secrets
Storing all the sensitive information in Azure Key Vault Secrets essentially means placing your most critical data, like passwords, encryption keys, client and tenant IDs, and API tokens, under a virtual lock and key in the cloud. Imagine it as a digital safe, but far more sophisticated and secure than any physical counterpart.
By storing all your secrets in Azure Key Vault, you achieve several benefits:
- Enhanced Security: Encryption and strict access control significantly reduce the risk of data breaches.
- Centralized Management: You have one central location to manage and audit all your secrets, simplifying administration.
- Improved Compliance: Azure Key Vault helps meet compliance requirements with features like audit trails and secure storage.
- Reduced Risk: It eliminates the need for hardcoding credentials in applications, a major vulnerability.
- Scalability: Easily accommodates growth in the number of secrets and applications requiring access.
In this step, we will store the Application (client) ID, Directory (tenant) ID, and Secret Value noted in our previous steps.
This involves the following steps:
Step 1
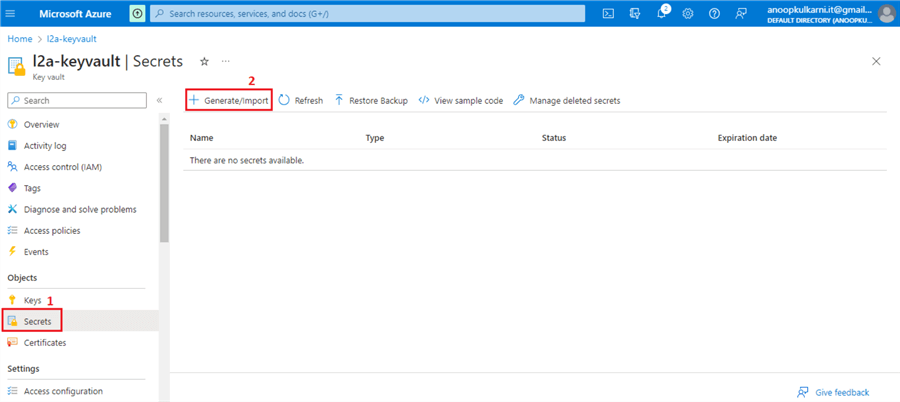
Go to the Key Vault and navigate to Secrets on the left-side menu.
Click + Generate/Import to create a new secret.
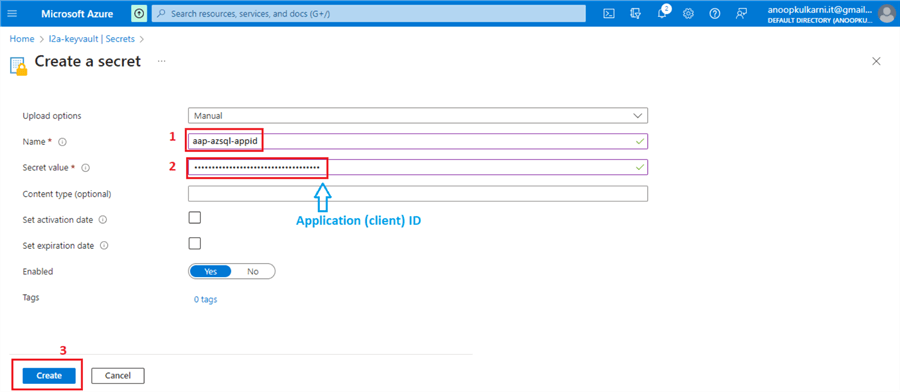
Step 2
Provide the name for the secret, copy and paste the Application (client) ID, and click Create.
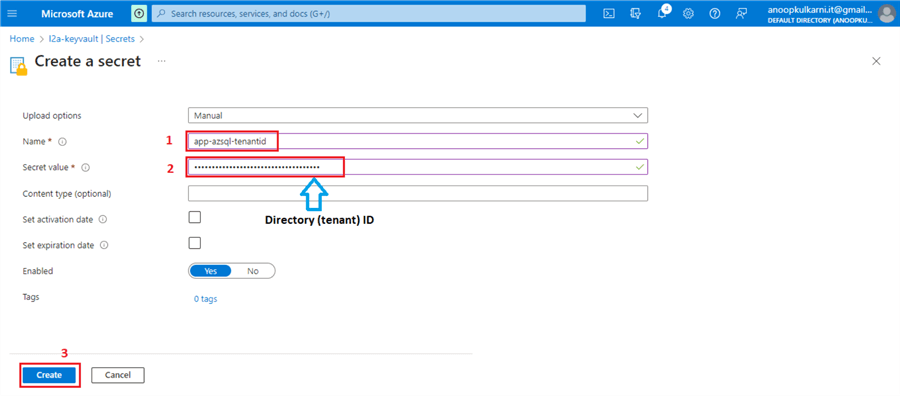
Repeat these steps for the Directory (tenant) ID.
Repeat these steps for the Secret Value.

Finally, we should see these three secrets created and enabled under the Key Vault.

Later, we will access these secrets in the Azure Databricks Notebook using the dbutils command.
Create Azure Key Vault-backed Secret Scope in your Azure Databricks Workspace
In this step, we will be establishing a secure bridge between your Databricks workspace and an Azure Key Vault instance. This integration enables you to leverage the Key Vault’s robust security features to safeguard sensitive information like passwords, API keys, and other credentials utilized within your Databricks notebooks and jobs.
This step simply provides Azure Databricks workspace access to the Azure Key Vault we just created.
Follow these steps to set up a secret scope.
Step 1
Go to your Azure Databricks Services and copy the URL.
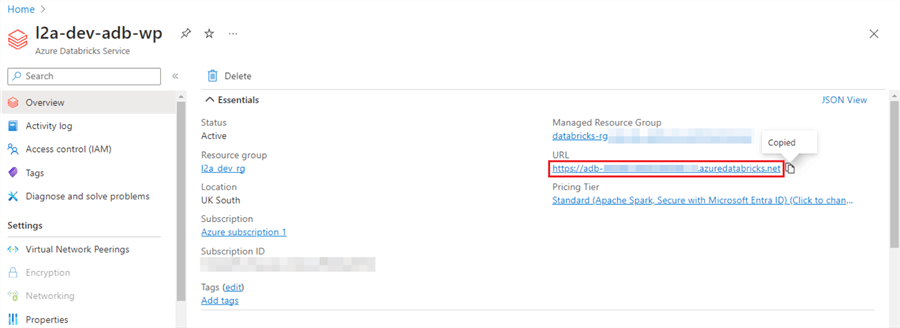
Step 2
At the end of the URL, add /#secrets/createScope in the web browser and hit Enter.
Example: https://adb-<account id>.azuredatabricks.net/#secrets/createScope
Step 3
This will open a secret scope web page. We will use the Vault URL and Resource ID previously noted while creating the Key Vault to configure the secret scope.
Provide a suitable Scope Name. Select “All Users” for Manage Principal. Add the Vault URL for the DNS Name and Resource ID values for the Resource ID.
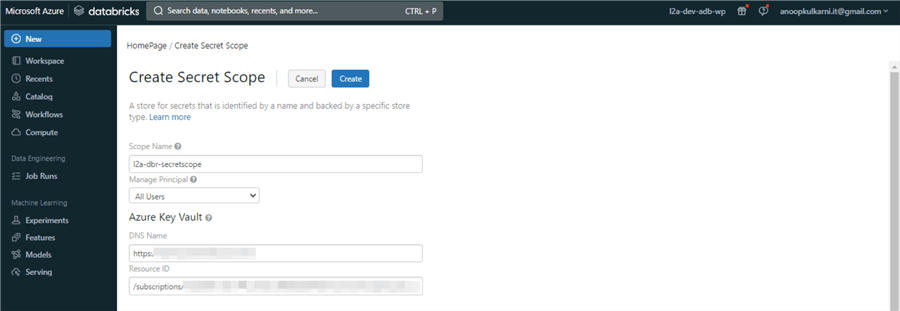
We have successfully established a connection between the Azure Databricks and the Azure Key Vault.
In the next step, we will create a Databricks Notebook and run a few Python commands to access this secret scope to validate the connection.
Create External Provider Users and Grant Appropriate Permissions
Even with authentication in place, your app requires explicit permissions to interact with Azure SQL and its contents. To establish these permissions, you’ll first create a corresponding user account for the Service Principal within the database itself. Once created, you’ll then grant this user account the necessary permissions to access and perform actions on specific objects within the database.
As an illustrative example, I’ve detailed below the steps to grant the Service Principal read-only permissions (SELECT) on the dbo schema.
Step 1
Log in to your Azure SQL database in the Azure portal or use SQL Server Management Studio.
Step 2
We will create a user for the Service Principal we created earlier and grant (SELECT) permission to that user.

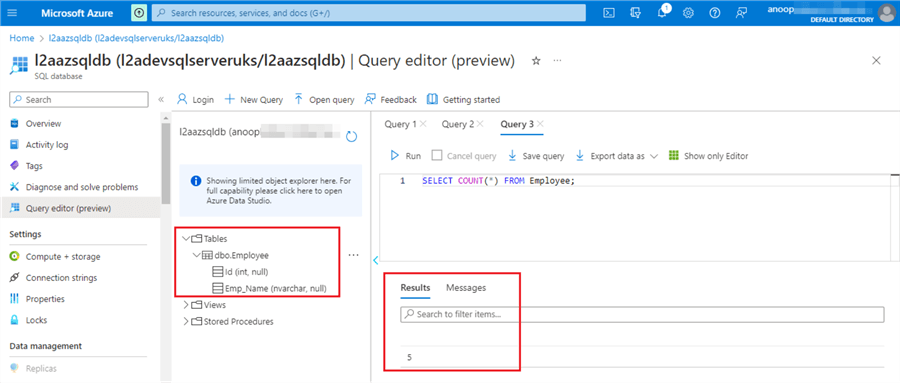
Step 3
If we query the table, we should see the five records we inserted.
Azure SQL Snippet:
CREATE USER [app-azsql] FROM  EXTERNAL PROVIDER  WITH DEFAULT_SCHEMA=[dbo]
GO

GRANT SELECT ON SCHEMA :: dbo TO [app-azsql];

CREATE TABLE Employee (
  Id INT,
  Emp_name NVARCHAR(150)
)


INSERT INTO dbo.Employee (Id, Emp_name)
VALUES (1, 'Joe'),
       (2, 'Bob'),
       (3, 'Ali'),
       (4, 'Tim'),
       (4, 'Lia');
We have done everything we need to enable the secure connection between Azure SQL and Azure Databricks using the Service Principal and Azure Key Vault.
In the next and final step, we will create a Databricks Notebook and write a few lines of Python code to access the Azure SQL table.
Create PySpark Code Databricks Notebook to Connect to Azure SQL Database
We will write a Databricks notebook that will enable us to securely connect PySpark code to the Azure SQL database, eliminating the need for hardcoded credentials and elevating data analysis efficiency. Leveraging the robust capabilities of the Microsoft Azure Active Directory Authentication Library (ADAL) and the secure storage of secrets in Azure Key Vault, we can establish a seamless, secure connection with minimal effort.
This approach not only enhances security but also simplifies code management and streamlines the flow of data between our Databricks environment and Azure SQL, paving the way for powerful and insightful data-driven workflows.
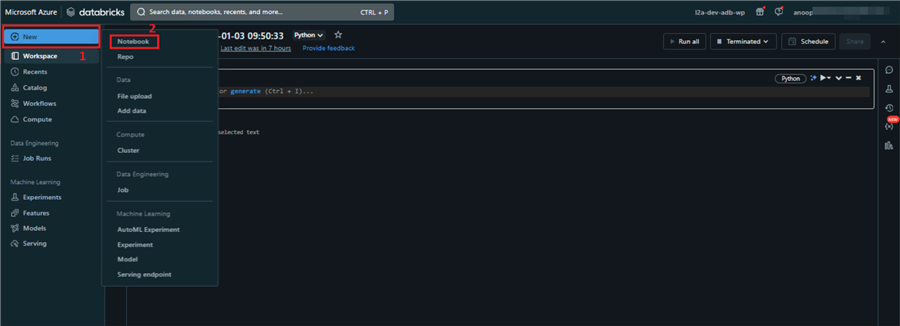
Launch your Azure Databricks Workspace from the Azure portal and create a new Notebook.
Run the command below to list the secret scope.
dbutils.secrets.listScopes()
This dbutils command will list all the secret scopes available in the Databricks workspace.
Run the following code by replacing it with your appropriate scope, keys, and SQL database details.
Note: We are using the variables that we created in the previous step in the configuration options.
#Key Steps for Secure Azure SQL Connection:
import adal

resource_app_id_url = "https://database.windows.net/"

#Retrieve appid, secrets and tenanted.
service_principal_id = dbutils.secrets.get(scope = "l2a-dbr-secretscope", key = "app-azsql-appid")
service_principal_secret = dbutils.secrets.get(scope = "l2a-dbr-secretscope", key = "app-azsql-secrets")
tenant_id = dbutils.secrets.get(scope = "l2a-dbr-secretscope", key = "app-azsql-tenantid")

authority = "https://login.windows.net/" + tenant_id

#Define the hostname, port and database name and table to be referred.
hostname = "l2adevsqlserveruks"
port = 1433
database_name = "l2aazsqldb"
table_name = "dbo.Employee"
encrypt = "true"
host_name_in_certificate = "*.database.windows.net"
azure_sql_url = "jdbc:sqlserver://{0}.database.windows.net:{1};database={2}".format(hostname,port,database_name)

#Validate if the connection was establish successfully
context = adal.AuthenticationContext(authority)
token = context.acquire_token_with_client_credentials(resource_app_id_url, service_principal_id, service_principal_secret)
if token:
    access_token = token["accessToken"]
    print("Succeeded to acquire access token")
else:
    print("Failed to acquire access token")
Here is the key information for a secure Azure SQL connection:
Import Necessary Library
- import adal: This line imports the Azure Active Directory Authentication Library (adal), providing functions for acquiring authentication tokens.
Define Connection Information
- resource_app_id_url: Sets the URL of the Azure SQL resource for authentication.
- service_principal_id, service_principal_secret, tenant_id: Retrieve these credentials securely from Azure Key Vault using dbutils. secrets. get, enhancing security by avoiding hardcoded values.
- authority: Specifies the Azure Active Directory endpoint for authentication.
- hostname, port, database_name, table_name: Define the Azure SQL server details and target table.
- azure_sql_url: Constructs the JDBC connection string for Azure SQL.
Acquire Authentication Token
- context = adal. AuthenticationContext(authority): Creates an authentication context object.
- token = context. acquire_token_with_client_credentials(. . .): Uses the service principal credentials to obtain an access token from Azure AD, enabling secure access to Azure SQL.
Validate Connection
- if token: Checks if the token was successfully acquired.
- print(“Succeeded to acquire access token”): Indicates successful authentication.
- else: Handles token acquisition failure.
Output:
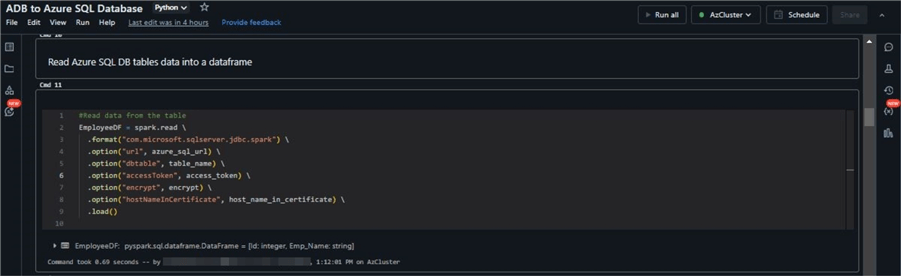
Now, let’s create a data frame by reading the Employee table from the Azure SQL Database. Run the code below in your notebook.
#Read data from the table
EmployeeDF = spark.read   .format("com.microsoft.sqlserver.jdbc.spark")   .option("url", azure_sql_url)   .option("dbtable", table_name)   .option("accessToken", access_token)   .option("encrypt", encrypt)   .option("hostNameInCertificate", host_name_in_certificate)   .load()
Run the show command to view the Data Frame we created.
EmployeeDF.show()

Conclusion
By establishing secure connections to Azure SQL using Service Principal authentication, we not only eliminate the vulnerability of hardcoded credentials but also simplify code management, strengthen centralized access control, and enable seamless, secure interactions between Databricks PySpark and Azure SQL. By embracing this method, Databricks users can unlock the full potential of their data pipelines while maintaining optimal security and manageability.
Next Steps
- Understand the best practices for using Azure Key Vault.
- Learn to build Extract, transform, and load (ETL) pipeline.
- Mount an Azure Data Lake Storage Gen2 Account in Databricks.

Anoop Kulkarni is a Microsoft Certified Data Engineer with 13+ years of experience in Data Engineering specializing in Azure ecosystem, big data technologies, and building modern-day data solutions from London.


It was really helpful the way you explain step by step