Problem
When using AWS Relational Database Service (RDS), we may need to migrate data from a third-party database such as MySQL to SQL Server. Let’s see how this can be done.
Solution
AWS provides the Database Migration Service (DMS) for migrating from one database to another. In this article I explain how to migrate MySQL running on AWS RDS to SQL Server, also running on RDS. The procedure to migrate some other third-party database to SQL Server on RDS is like this only with a few differences. At the outset, when we migrate one database platform to another type of database, it’s called heterogeneous migration, which sets the scope of this article. The only caveat is that the migration path should be supported by the AWS Database Migration Service.
Table of contents
- Setting the Environment
- Creating an IAM User
- Creating the Source MySQL Instance on RDS
- Creating the Target SQL Server Instance on RDS
- Configuring MySQL for Migration
- Configuring SQL Server for Migration
- Getting Started with Migration
- Creating an Endpoint for MySQL
- Creating an Endpoint for SQL Server
- Creating a Migration Task
- Running the Migration Task
- Exploring Migrated Data
- Summary
Setting the Environment
Create an AWS account if you don’t already have one. Download and install SQL Server Management Studio (SSMS) on your local machine, if not already installed.
Creating an IAM User
We need an IAM user to be able to access other AWS services that we need, services like AWS RDS, Cloud Shell for connecting to MySQL, KMS for data encryption, and optionally CloudWatch for logging. Let’s first create an IAM Policy with all the required permissions and policy statements. Then, we can create an IAM user based on the IAM Policy. We use this IAM user to login to the AWS Management Console and use the AWS DMS service to perform the migration. However, first login to the AWS Management Console as the Root user.
Creating an IAM Policy
To create an IAM policy click on Create policy in the IAM Dashboard.

Select the JSON tab to specify the policy permissions in JSON format.

It’s best to create a policy that even includes permissions for services that we use only occasionally because it’s not always convenient to update a policy for each new service we may need. Copy the following JSON listing to the Policy editor text area.
--MSSQLTips.com (JSON)

{
    "Version": "2012-10-17",
    "Statement": [
        {
            "Effect": "Allow",
            "Action": "dms:*",
            "Resource": "*"
        },
        {
            "Effect": "Allow",
            "Action": "s3:*",
            "Resource": "*"
        },
        {
            "Effect": "Allow",
            "Action": "ds:*",
            "Resource": "*"
        },
    {
       "Effect": "Allow",
       "Action": "cloudshell:*",
       "Resource": "*"
    },
        {
            "Effect": "Allow",
            "Action": "rds:*",
            "Resource": "*"
        },
        {
            "Effect": "Allow",
            "Action": "kms:*",
            "Resource": "*"
        },
        {
            "Effect": "Allow",
            "Action": "iam:*",
            "Resource": "*"
        },
        {
            "Effect": "Allow",
            "Action": "ec2:*",
            "Resource": "*"
        },
        {
            "Effect": "Allow",
            "Action": "cloudwatch:*",
            "Resource": "*"
        },
        {
            "Effect": "Allow",
            "Action": "aws-marketplace:*",
            "Resource": "*"
        },
        {
            "Effect": "Allow",
            "Action": "logs:*",
            "Resource": "*"
        }
    ]
}
Click Next.
In the Review and create screen, specify a policy name (for e.g. DMS).
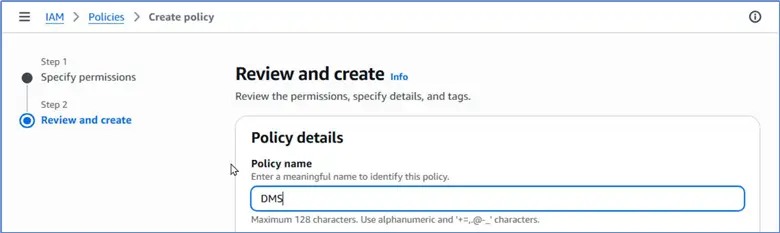
Scroll down and click Create policy.

A new IAM policy has been created.

Creating the User
Select Users in the IAM dashboard and click on Create user.

Specify a User name (e.g. sqlserver_user) and select the option Provide user access to the AWS Management Console. Scroll and specify a console password. Click Next.

In Set permissions select Attach policies directly.
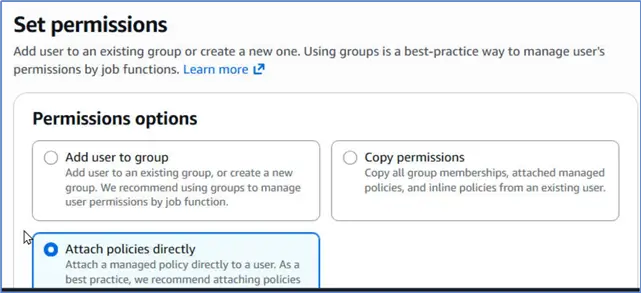
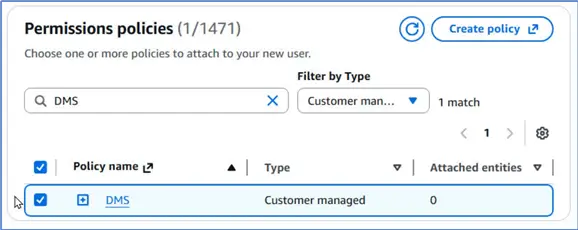
In the Permissions policy table, select the policy (DMS) that we created earlier. Scroll and click Next.
Review the user’s details.

Click Create user. A new IAM user has been created. Note the listed Console sign-in details. We use the Console sign-in URL to login with the User name and Console password. It is important to copy and keep the console password because this is the only time it can be copied.
Creating the Source MySQL Instance on RDS
To create the source database instance, login to the AWS Management Console as the Root user. Select the RDS service. Select Databases in the margin. Click Create database.

Choose database creation method as Full configuration. Choose database engine as MySQL.

Select the Engine version next. Select a template based on use case. As we are not deploying the database into production, select Dev/Test.

We don’t need a high availability deployment; therefore, select Single-AZ DB instance deployment (1 instance).

Specify a DB instance identifier (e.g., mysql-database). This is not the database name, which we set later. The master username is admin by default.

Choose the Self-managed credentials management option. Specify, and confirm, the master user password. Note the password as we’ll need it to access the MySQL database.

Select Password authentication as the database authentication method.

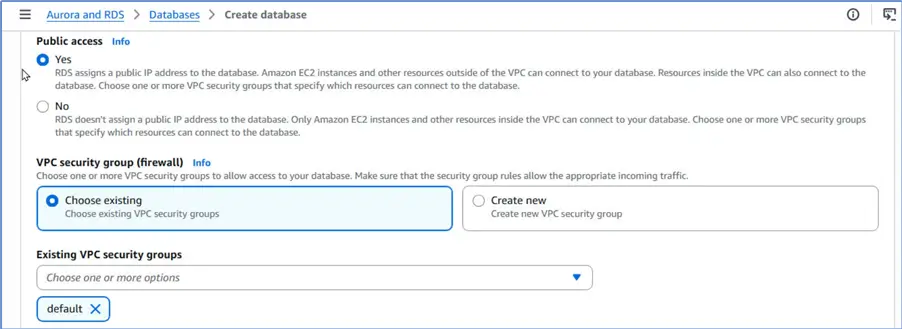
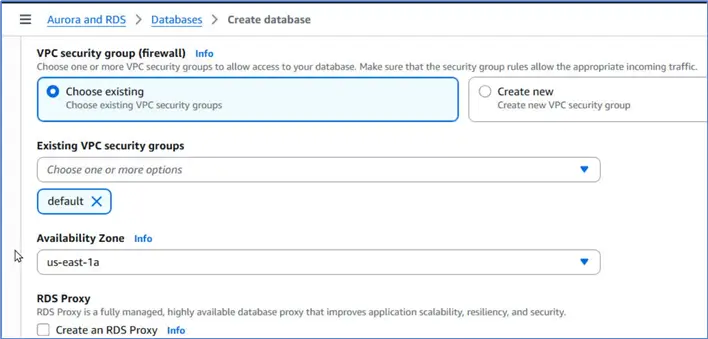
Keep the default settings for instance type, storage, and select Yes for Public access. Without public access, we can’t access the database from a local machine. However, as we will discover, we won’t need to use public access as we can use the integrated cloud shell. Choose the default VPC Security group.
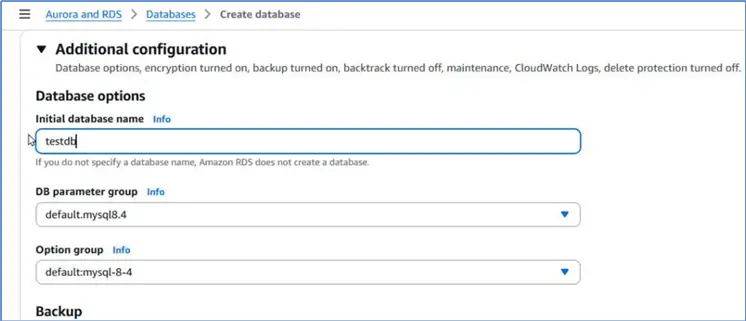
Specify a database name, testdb for example. We’ll use this database to demonstrate migration.
We can deselect the options to perform backups, monitoring, connecting to an EC2 instance, and other ancillary operations if we don’t need them. Choose the option to Create new VPC. We’ll use this VPC to create all our resources needed to perform a migration. Click Create database.

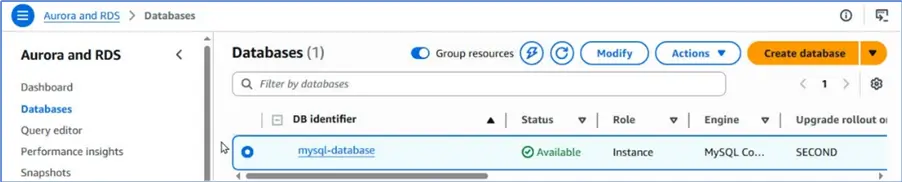
A new RDS based MySQL instance has been created.
Creating the Target SQL Server Instance on RDS
Using the same procedure as the MySQL instance, create a SQL Server instance by choosing a database engine as SQL Server.

Notably, choose from the Enterprise, Standard, Developer, and Workgroup editions only as the Web and Express are not supported for a SQL Server migration target.

Choose the engine version.

Specify database identifier (for e.g., sqlserve-rds). The default master username is admin. Select the Self-managed credentials management option and specify a master password.

Select the same VPC and the default DB subnet group as for the MySQL instance. Set Public access to Yes.

The Inbound/Outbound rules of the associated Security Group should allow access from a local machine. Select the Availability Zone as the same as for the MySQL instance. We keep all resources in the same VPC and AZ to avoid network issues.
Click Create database.

We have both the source and the target database instances running and available on RDS.

Configuring MySQL for Migration
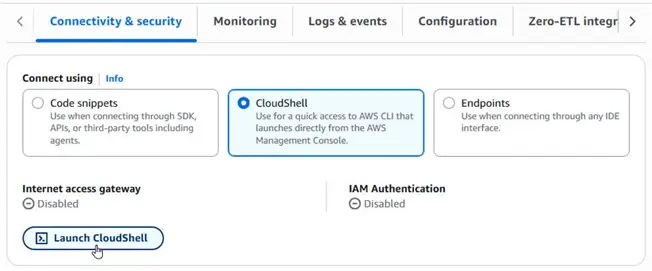
Next, we connect to the MySQL database and create a sample table in the testdb that we created. For the MySQL instance, select the Connectivity & security tab. Select the Connect using > CloudShell option. Click Launch CloudShell.
Specify a new environment name and click Create and run.

Specify password for the MySQL database and press Enter.

A connection to the MySQL database is established as shown in client shell.

List databases with show databases command.

Set the database to testdb with use testdb command. Create a sample database called Employee by running the following script:
--MSSQLTips.com (T-SQL)
CREATE TABLE Employee (
       empid INT NOT NULL AUTO_INCREMENT PRIMARY KEY,
       lname VARCHAR (35),
       fname VARCHAR (35),
       dept INT,
       age INT,
       since INT,
       INDEX idx1(dept,age,lname)
);
The table that we use to migrate data to SQL Server has been created.

Next, add sample data to the table with the following script.
--MSSQLTips.com (T-SQL)
INSERT INTO Employee (lname, fname, dept, age, since)
VALUES ('abbot','john',1,26,2020),
       ('smith','jon',30,45,2017),
       ('branch','bob',4,34,2019),
       ('smith','bob',15,55,2018),
       ('carlyle','joe',10,35,2021);
Then, verify that data is added by running a SELECT query.
--MSSQLTips.com (T-SQL)
Select * from Employee;
The table data listed is shown in CloudShell.

Next, create a MySQL user with same name as the IAM user (sqlserver_user) we created earlier. When we connect and perform migration using this IAM user, it needs the privileges to select etc. from the source database.
--MSSQLTips.com (T-SQL)
CREATE USER 'sqlserver_user'@'%' IDENTIFIED BY 'some password';
Run the following script to grant the necessary privileges to the user.
--MSSQLTips.com (T-SQL)
GRANT ALTER, CREATE, DROP, INDEX, INSERT, UPDATE, DELETE, SELECT ON *.* TO 'sqlserver_user'@'%';
The privileges are granted to the DMS user.

Configuring SQL Server for Migration
First, we obtain the connection endpoint to connect to the AWS RDS based SQL Server instance. For this, select the Connectivity and security tab for the AWS RDS instance in the Management Console. Choose Connect using > Endpoints. Note the Master username as we need it to connect. The port will be included in the endpoint itself; therefore, we don’t need to note it separately.

Copy the Endpoint.

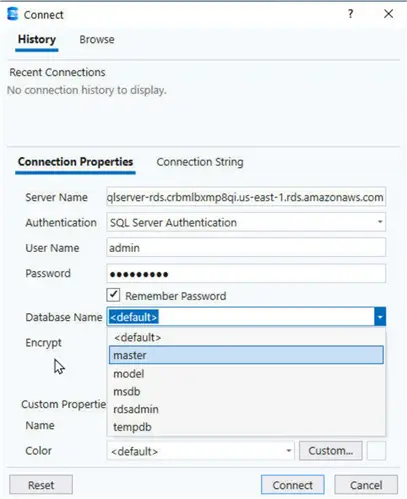
Open SQL Server Management Studio, and select File > Connect Object Explorer from the toolbar.

Add Server Name as the Endpoint we copied from the AWS Management Console. Select Authentication as SQL Server Authentication. Specify User Name as admin, and add the Password for admin. Click the down arrow adjacent the Database Name and the SSMS should get connected to SQL Server if all the connection information is correct. It will list the databases. Select the master database. Next, click Connect in the dialog.
The Object Explorer should list the new connection, and the databases.

Create Database and User
Run the following statement in a query editor.
--MSSQLTips.com (T-SQL)
CREATE DATABASE testdb;
A new database has been created. This is the target database for the migration.

Run the following script in a query editor.
--MSSQLTips.com (T-SQL)
USE [testdb];
CREATE LOGIN sqlserver_user WITH PASSWORD = 'some password';
CREATE USER sqlserver_user FOR LOGIN sqlserver_user;
ALTER ROLE db_owner ADD MEMBER sqlserver_user;
This script sets the database to testdb. It creates a “Login,” at the server level as the security principal used to connect to the SQL Server instance itself. Next, it maps the server login to a user identity sqlserver_user inside the database at the database level. Then, it adds the new user to the db_owner fixed database role.

Run the following script to verify that the DMS user is indeed made the db_owner.
--MSSQLTips.com (T-SQL)
USE [testdb];

SELECT IS_ROLEMEMBER('db_owner', 'sqlserver_user') AS IsDbOwner;
It should list 1 in the result, which confirms the sqlserver_user has the db_owner role.

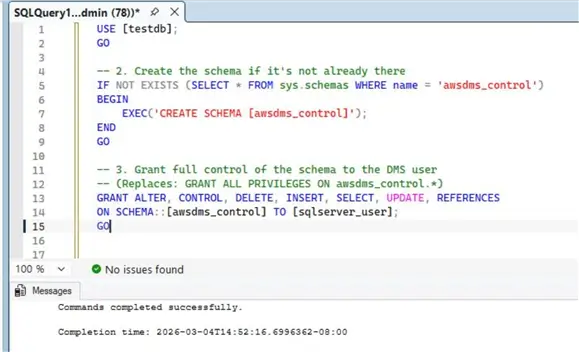
Next, run the following script to grant the necessary privileges to the sqlserver_user.
--MSSQLTips.com (T-SQL)
USE [testdb];
GO
-- 2. Create the schema if it's not already there.
IF NOT EXISTS (SELECT * FROM sys.schemas WHERE name = 'awsdms_control')
BEGIN
    EXEC('CREATE SCHEMA [awsdms_control]');
END
GO
-- 3. Grant full control of the schema to the DMS user
-- (Replaces: GRANT ALL PRIVILEGES ON awsdms_control.*)
GRANT ALTER, CONTROL, DELETE, INSERT, SELECT, UPDATE, REFERENCES
ON SCHEMA::[awsdms_control] TO [sqlserver_user];
GO
It checks the system catalog to see if a schema named awsdms_control already exists. Further, AWS DMS uses this schema to store control tables (like checkpoints and replication status) during a migration. It checks the system catalog to see if a schema named awsdms_control already exists. Then it gives sqlserver_user full administrative rights only over this schema. The user can create tables (ALTER), manage security (CONTROL), and perform all standard data operations (INSERT, SELECT, etc.).
Check User Permissions
Run the following script to verify that the DMS user has the necessary privileges.
--MSSQLTips.com (T-SQL)
USE [testdb];
SELECT
    name AS DatabaseUser,
    permission_name
FROM sys.database_permissions AS dp
JOIN sys.database_principals AS pr ON dp.grantee_principal_id = pr.principal_id
WHERE pr.name = 'sqlserver_user';
It lists all the privileges granted.

Getting Started with Migration
To get started with performing a migration from MySQL to SQL Server, we logout as the root user, and log back in as the DMS user sqlserver_user that we have created and configured in both the databases. The user listed at the top-right should be the DMS user.

Navigate to the DMS > Get started screen. Select the Migrate and replicate option.

Then, select the Serverless tab. The Serverless data movement automatically scales resources needed for a migration.
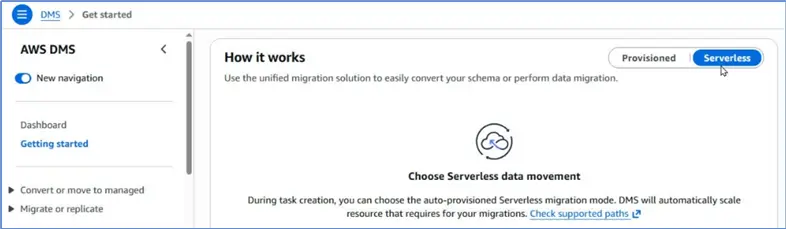
Select Migrate or replicate in the margin, if not already expanded.

The two important top-level choices we have made are to migrate or replicate data, and to use serverless data movement.
Creating an Endpoint for MySQL
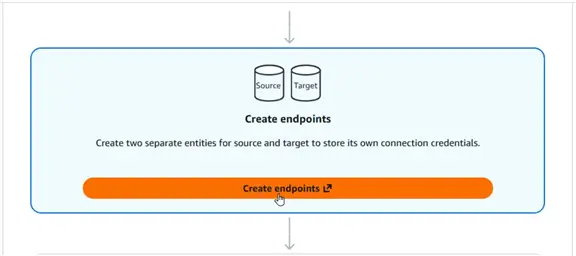
To create an endpoint for MySQL, click Create endpoints.
In the Create endpoint page, select Endpoint type as Source endpoint. Further, click the checkbox Select RDS DB instance.
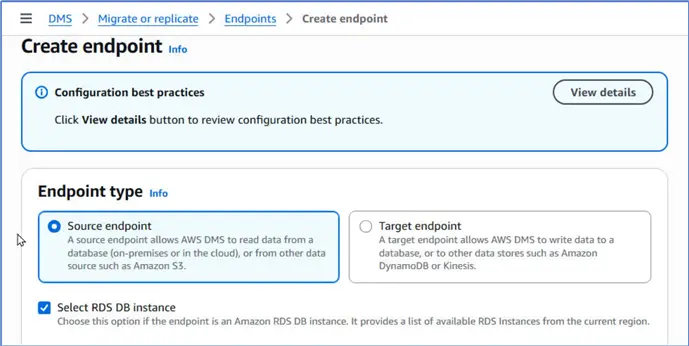
Select the RDS instance as the one we created earlier, mysql-database.

Next, configure the endpoint. An Endpoint identifier by the same name as the RDS instance is added by default. Select Source engine as MySQL. An ARN is not needed.

Select the option Provide access information manually under Access to endpoint database. The Server name and Port are added automatically.

Specify the Password for the admin user and select none in Secure Socket Layer mode.

Keep other settings as the default. Scroll down and click Create endpoint.

A new endpoint has been created for the source database.

Creating an Endpoint for SQL Server
Click on Create endpoint to create an endpoint for SQL Server.

This time, select Endpoint type as Target endpoint. Again, click the checkbox Select RDS DB instance.

Select the RDS instance that we created for SQL Server.

Again, the Endpoint identifier has been set to the same name as the RDS instance. The Target engine should be Microsoft SQL Server.

Select Provide access information manually under Access to endpoint database. Specify the Password for the admin user.

Select none for SSL mode. Specify the target Database name as the one we have created both in the source and the target instances, which is testdb.

Click Create endpoint.

The target endpoint has been created.

Creating a Migration Task
To create a migration task, click Create task in the top-level page.

In the Create task page, specify a Task identifier, mysql-to-sqlserver, for example.

Select the Source database endpoint that we just configured for MySQL. Next, select the Target database endpoint that we configured for SQL Server. Select Task mode as Serverless.

Select Task type as Migrate only. This option migrates data only once (Full Load). One other option is Migrate and replicate, which migrates data from source to target and replicates ongoing changes to migrate additional data that may have been added to the source database. The third option is Replicate only, which replicates data without performing a Full Load. Keep the Editing mode setting as the default. Choose the Drop tables on target option for Target table preparation mode.

Set Additional Settings
Set the Include LOB columns in replication to Do not include LOB columns. Click the checkbox Turn on validation under Data validation to validate the migrated data. We have the option to turn on CloudWatch logs.

For Table mappings we must add one selection rule with an include action. Click Add new selection rule.

Specify Schema name as testdb, and Schema table name as Employee.

Select Action as Include. Similarly, we can include/exclude other tables individually. Because we have specified a schema name and a table name, this is the only table that will be migrated. The table will be created in the SQL Server because we chose to drop existing tables and create new ones earlier. Alternatively, we can choose to migrate all tables with % for Schema table name and then exclude individual tables that we don’t want to migrate with selection rules that specify the Exclude action. We can even migrate all schemas by specifying % for Schema name.

Optionally, we can add transformation rules with Add new transformation rule to perform transformation, like adding a prefix/suffix to a table/column name. With the simple table we are migrating we won’t use any transformation rules.

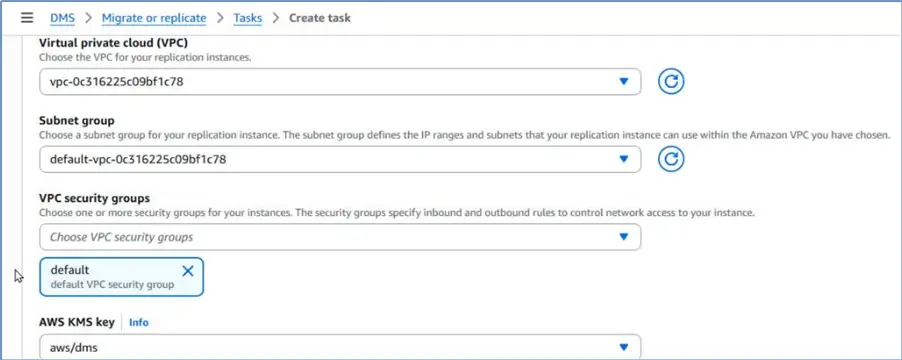
Under Compute settings, select the same VPC, Subnet group, and VPC Security group that we use for the RDS instances.
Under Availability, select a Single-AZ deployment and set the Availability Zone to be the same as for the RDS instances.

Specify minimum and maximum DMS capacity, which in turn determines the memory, compute, and networking resources to be provisioned.

Click Create task.

A new task has been created.

Running the Migration Task
To perform the data migration, select the migration task in the table and select Actions > Start from the dropdown.

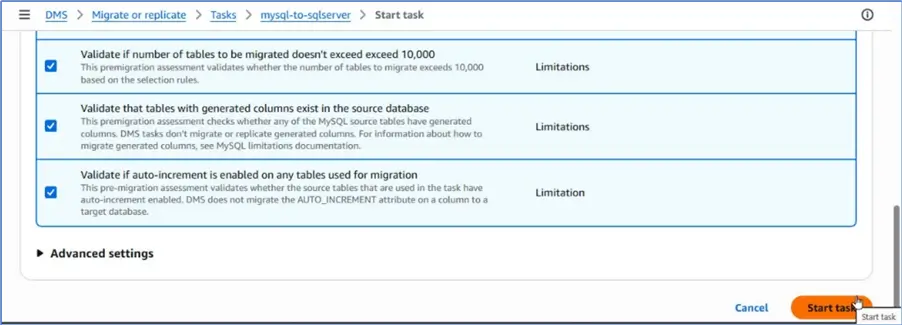
To perform premigration assessment to verify that we have configured the source and target databases properly, we have the option to Turn on Premigration assessment, and Stop Replication On Premigration Assessment Failure.

Further, we can select individual assessments that we want to perform. By default, all assessments are performed. These are useful for first-time migration users because these identify the precise cause why a migration may be failing. However, if you have performed a few similar migrations before, you can switch off the premigration assessments.

Click Start task to start the task.
First, it provisions capacity, and then it performs the premigration assessments.

Once the task has been started, it starts the data migration after the premigration assessments have completed successfully. If there are any issues, they are listed in the result of the premigration assessments.

Note; however, after fixing the indicated issue/s the premigration assessments should be skipped in the next run of the migration task because it will continue to list the same issues even though you may have fixed them. This is because it caches the metadata, and obtains the data for the assessments from the metadata. If you want to perform a new premigration assessments you should delete the existing RDS instances, endpoints and migration task, to create new artifacts with all issues fixed.
Once, the migration has been completed successfully, it indicates it has been Completed in the Serverless replications table.

Exploring Migrated Data
Let’s explore what got migrated and what didn’t. The Object Explorer lists the testdb.Employee table, which verifies that the table has been migrated from MySQL to SQL Server.
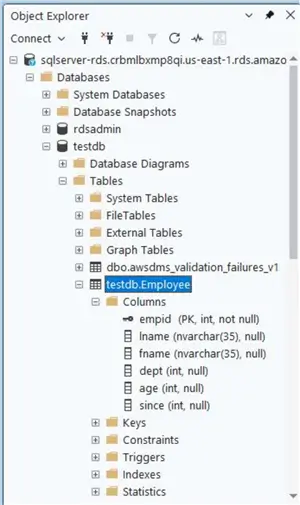
We can discover the migrated table in the SQL Server Management Studio.

The migration has migrated the data as well.

The migration does migrate the primary key. However, the migration did not migrate the index from the source database in MySQL. This is a limitation we need to aware of – that it doesn’t migrate secondary indexes. We can discover best practices for a DMS migration, and those specific to SQL Server as the target.

Summary
In this article, we explain the procedure to migrate table data from a MySQL instance running on AWS to a SQL Server instance also running on RDS using AWS DMS. First, we create an IAM user to perform a DMS migration. Then we create and configure the source and target databases, followed by performing a migration.
Next Steps
- Register an Account with AWS
- Download and install SQL Server Management Studio
- Get started with AWS RDS
- Get started with AWS DMS
- Read up on related articles:

Deepak Vohra is an Oracle Certified Data Science Professional, and an author of more than 20 books. Hobbies include philately, golf, and cricket.