By: Scott Murray | Comments (4) | Related: > Power BI
Problem
I heard Power BI Desktop now allows the use of parameters; how can I make use of this feature?
Solution
One of the most requested features in Power BI is the availability of parameters to be integrated with dashboards and reports. These parameters are more pronounced than the "on the fly" filter capacity that is embedded currently in Power BI. Fortunately, during several of the recent (and frequent) updates, the "beginning" components of parameter functionality has been added. Within Power BI Desktop, parameters are currently added during the query and modeling phase of your Power BI data model development. Furthermore, as of now, parameters can only be added to your data model queries in the Power BI Desktop (PBID) tool; this functionality is NOT available when using Power BI online (at least not yet). Two items to be aware of with parameters are:
- The method of implementing "criteria" in Power BI is different than in SSRS for instance. Power BI uses contextual filtering where as SSRS uses full-fledged selection parameters (see these tips: Querying SQL Server Data with Power BI Desktop and Power BI Desktop Report and Panel Design). Thus parameters are not prominently displayed for selection on the report preview screen.
- When deploying a report with parameters to Power BI online, the current selected value for the parameters are used and cannot be changed online.
Finally, parameters can be used and GUI screens are provided in the following 4 areas of Power BI Desktop:
- Data Sources
- Replace Value
- Remove Rows
- Filter Rows
In order to work with Power BI and Power BI Desktop, you need to do a few things to get everything setup for access. First, you need to go to the PPower BI web site and sign up to access Power BI. Note that you must use a work or school address to sign up for Power BI. Gmail, Yahoo, and similar accounts will not work. Next, you need to download the Power BI Desktop (PBID) tool. Once you have your account setup and your Power BI Desktop application installed, you are ready to start exploring the features available in Power BI including parameters.
Define a Parameter in Power BI Desktop
TThe first step in creating a parameter is to define it in the Query Editor panel.

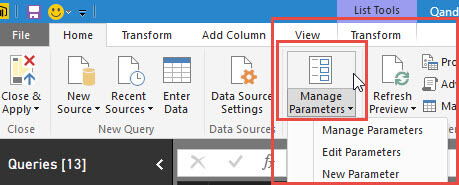
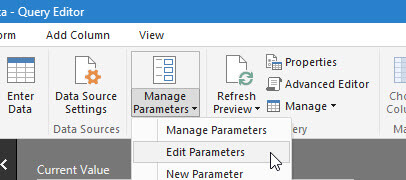
Once the Query Editor Screen is open, you will notice on the Home Ribbon, a button called Manage Parameters. From that point, you can Manage Parameters, Edit Parameters, and finally create a New Parameter. Option 1, Manage Parameters is where you would adjust the properties of a previously created parameter. The Edit Parameters option actually provides the method of adjusting the parameter data value used while the New Parameter options is where you would add a new parameter to your queries. We will discuss each of these items in detail next.
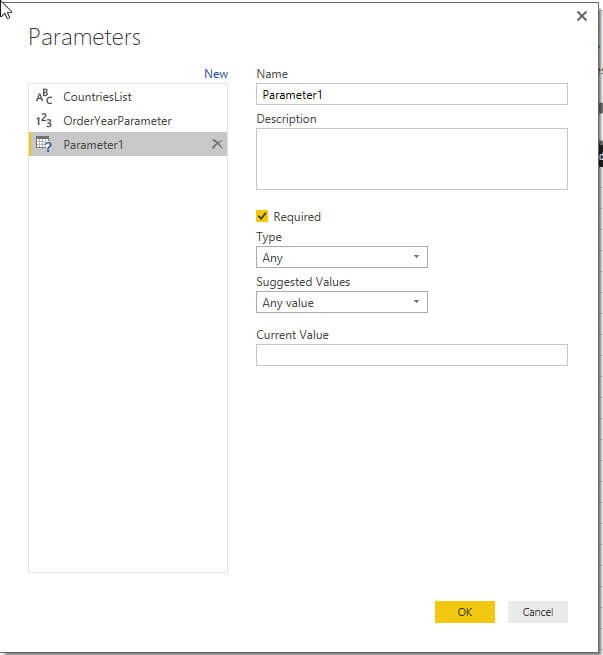
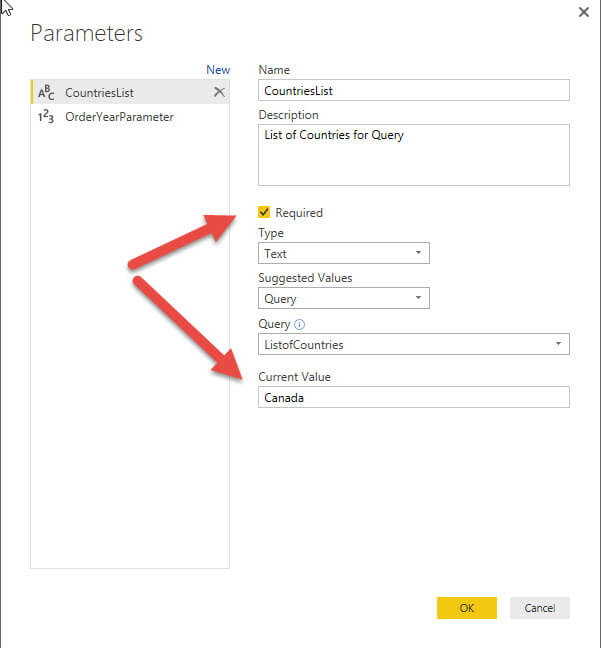
Let us start with setting up a new parameter. As you can see in the screen print below, you give the parameter a name and a description, and then mark it as required or not. The type field allows you to specify the data type.
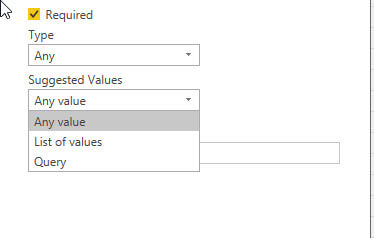
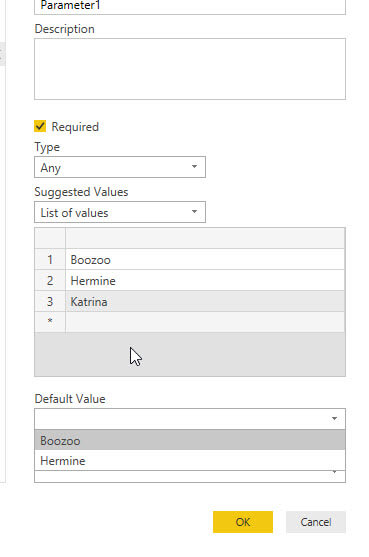
The suggested values option is probably the most important property to select. As shown below, three options exist for this property. The Any value option allows for free form entry of values. The List of values, the second option (and second screen print below), allows you to enter a predefined list of available values, similar to a list box. The final available, option is to populate the parameter list based on a query. The query can be populated from an existing field in a table in the data model. Alternately, you can write M code to retrieve the desired data (see this tip for details on the M Language)). In either case you need to define the query before being able to use it.
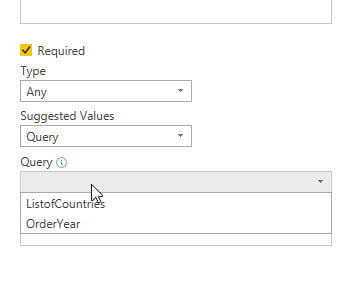
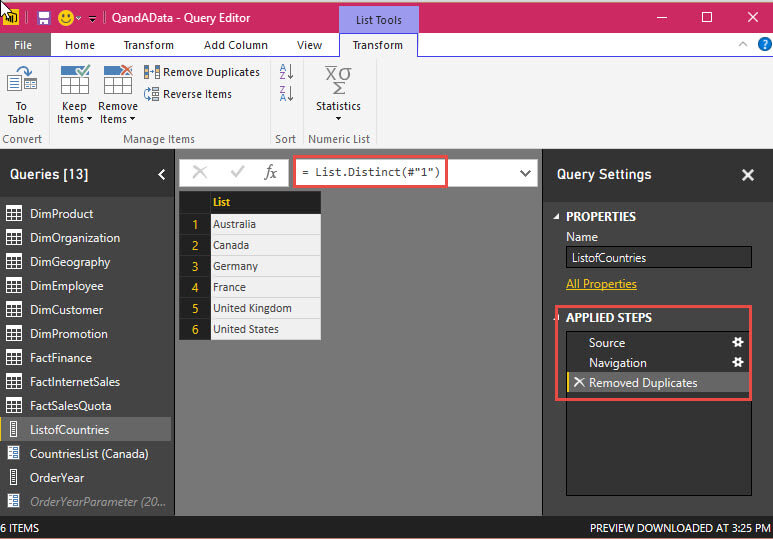
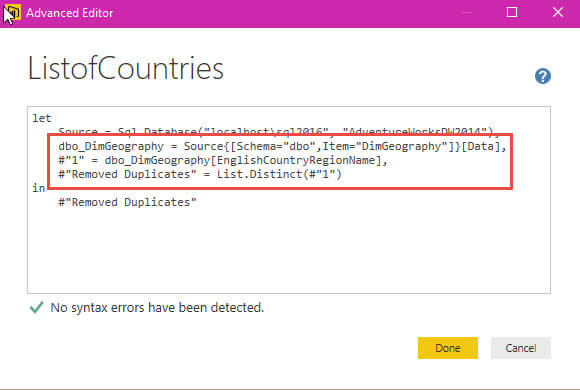
In the above screen print example, we are using the ListofCountries Query to populate the CountriesList parameter. This query is actually retrieving the EnglishCountryRegionName field from the DimGeography table (see second screen print below).
I created a second query based on the Order Year from the FactInternetSales table. As displayed next, this second query finds the distinct values for the order year, by using the Date.Year function to get the year of each order and then removing the duplicates from the list.
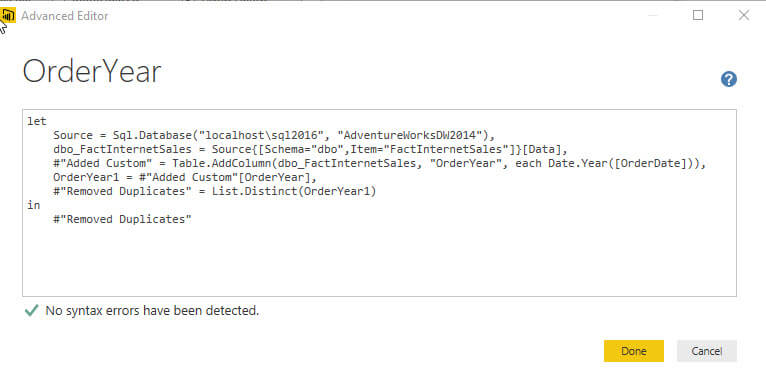
The step by step process is completed by creating a new column within Fact Internet Sales and then extracting the year from the Order Date field.
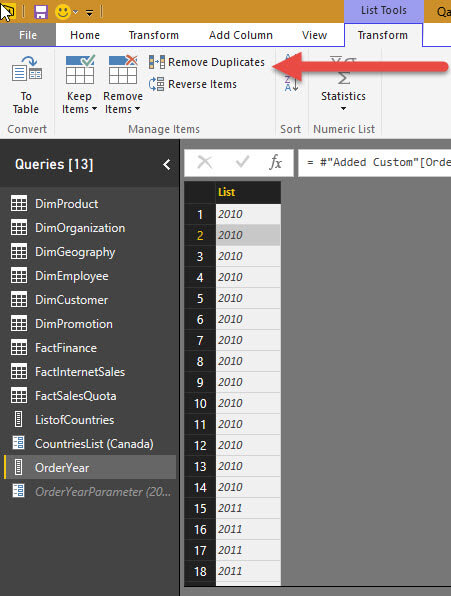
Next, use the remove duplicate function is applied to the dataset, as shown below.
The create query functionality also is actually very handy for many different areas outside of parameters, but we will save those details for another tip. However, the queries are now ready to be used in our parameters setup. Remember, these parameters can be used in areas such as filter rows, remove rows, and within data sources. For our tip, we will apply our parameter to a row filter. The application to other areas follows the same procedure.
JJumping back to our New Parameter screen, the final property that needs to be completed is the Current Value field. It should be noted that if the Required check box is enabled, this field must be filled in. Otherwise the Current Value is optional. This item is very much like the default value for a parameter in SSRS. You may also want to note that currently only a single value is allowed.
The Current Value field is also set by selecting the Edit Parameters option. The value entered here persists to all locations where the parameter is used.
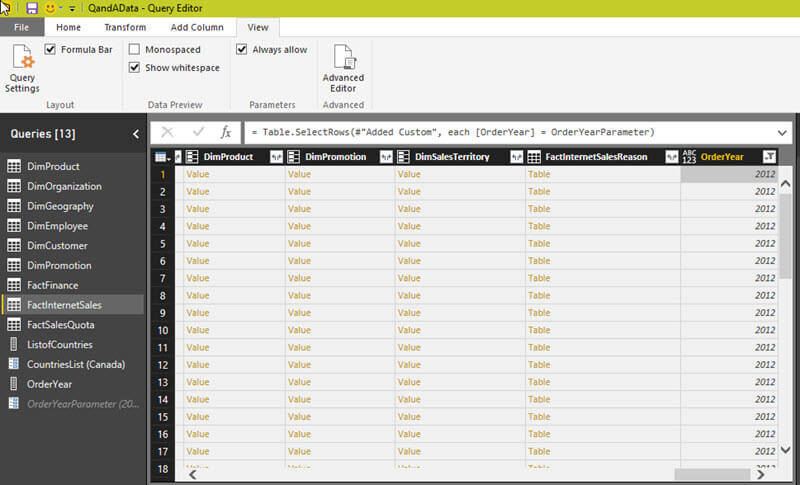
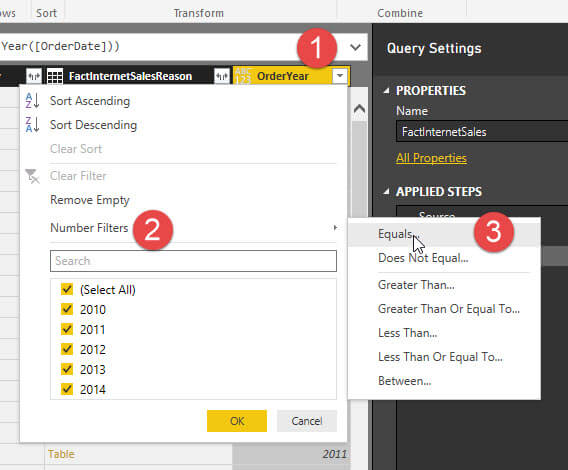
The final step in our parameter setup is to apply it to FactInternetSales table. We must first open FactInternetSales dataset and then click on the down arrow next to order year. Next, you will click on Number Filter and then Equals.
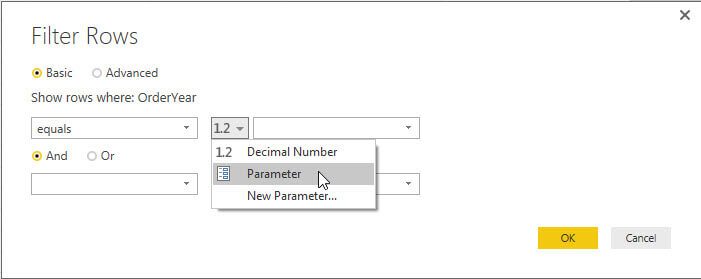
As shown below, you will subsequently select the parameter option from the potentials value sources. Of course you could also use other comparison operations such as is greater than, does not equal, etc.
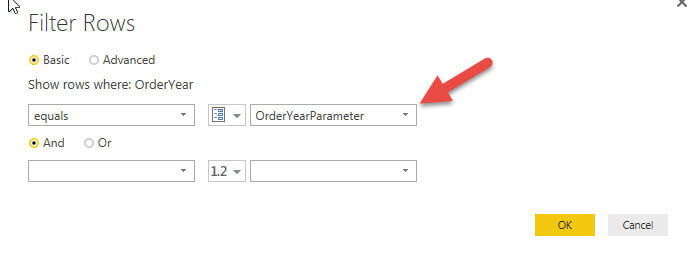
Finally, we select the OrderYearParameter parameter that we previously created. You could also use the New Parameter to create the parameter now (note if you want the parameter to be based off a query, that query will need to have been previously setup).
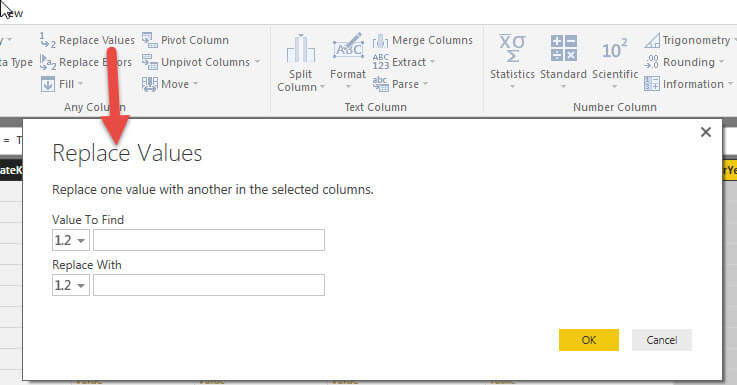
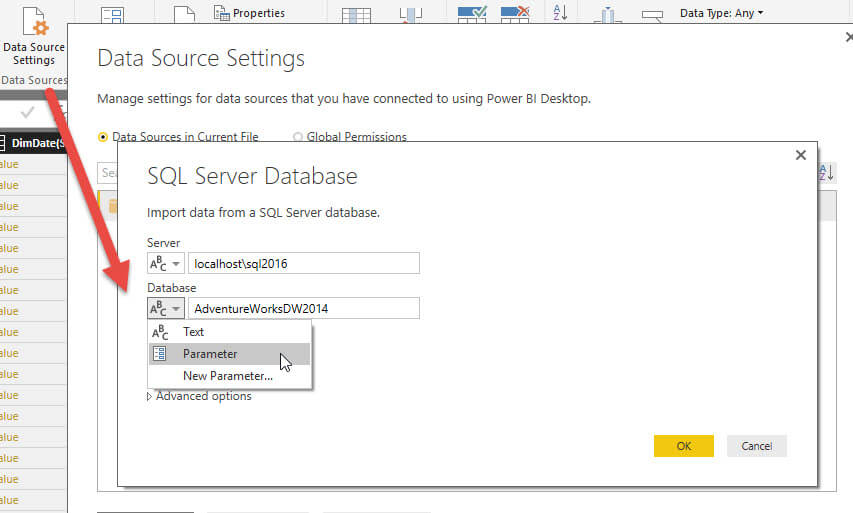
Similarly, we could apply a parameter to the Replace Values methods or to the Data Source settings, which are both shown below. Microsoft has indicated that these screen templates will be applied to other areas in the future.
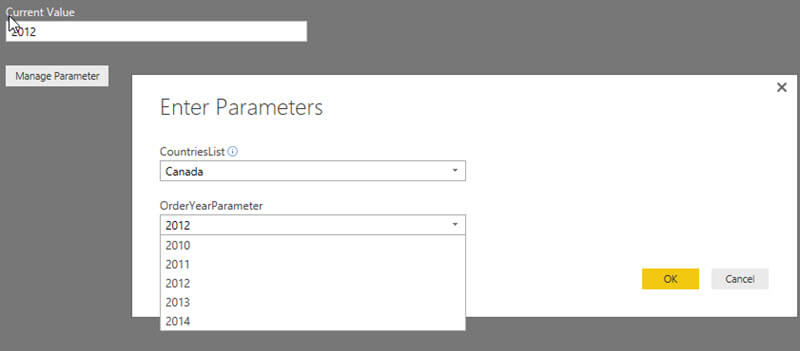
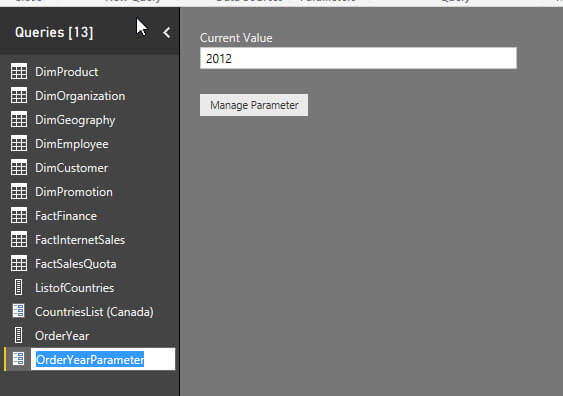
Finally, let us show the parameter in use. The current value is set for our OrderYearParameter parameter to 2012.
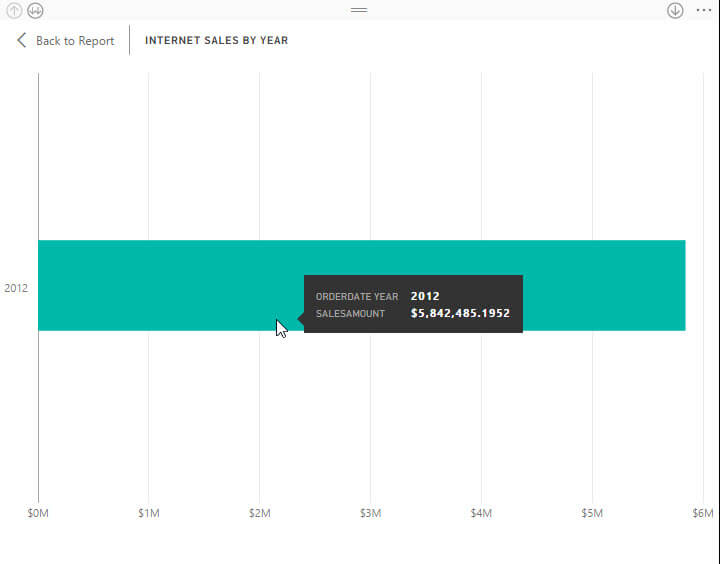
Closing the Edit Query window and heading back to the Report Dashboard, you will notice that my visualization of Internet Sales By Year only shows 2012.
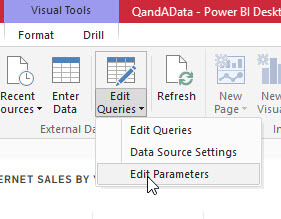
On the main Report Screen, we can use the Edit Queries > Edit Parameters option
to adjust our current value.
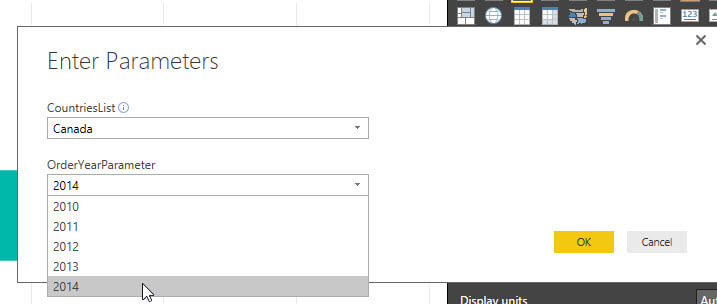
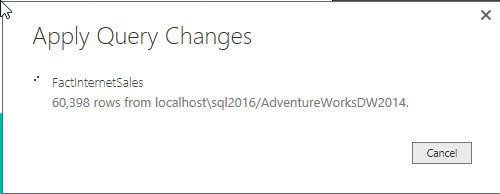
In the below example we change the current value to 2014, click OK, and then we must Apply the changes to the data model. Remember these adjustments are being made at the query level and not at the report level.

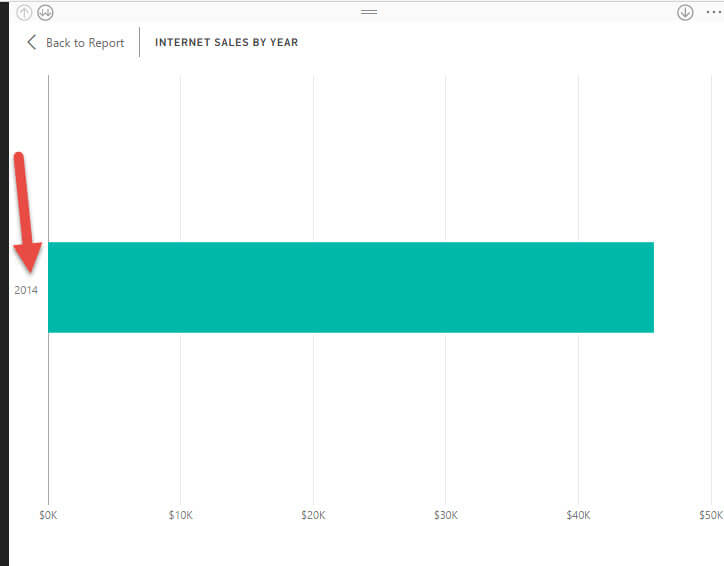
Now only 2014 shows on the dashboard.
Of course you can add as many additional parameters as necessary for your dashboards.
Conclusion
Much to the happiness of Power BI report developers, parameters have been added to Power BI Desktop. New parameters can be added and existing parameters maintained within the Query Editor. The values used within the parameters can be either free form, a set of input values, or based on a query. Once the parameters are created, they then can be used to filter a dataset, remove values, or to define datasets. In order to manage the values used in a parameter, you use the Edit Parameters option to change the current value used in the parameter. Additionally, once a parameter value changed, the change must be applied to the queries flow through to the related dashboards and reports.
Next Steps
- Review all the Power BI Tips on MSSQLTips
Learn more about Power BI in this 3 hour training course.
About the author
 Scott Murray has a passion for crafting BI Solutions with SharePoint, SSAS, OLAP and SSRS.
This author pledges the content of this article is based on professional experience and not AI generated.
View all my tips


