Implement SQL Server High Availability and Disaster Recovery on Amazon EC2 - Part 3

By:   |   Comments   |   Related: > Amazon AWS


Problem

In the previous tip on Implementing High availability and disaster recovery in Cloud – Part 2, we validated the Windows cluster configuration and built a Windows Failover Cluster on Elastic Compute Cloud (EC2) instances across multiple availability zones in the AWS cloud and configured the quorum for the cluster. In this tip, we look at how to install SQL Server 2016 in the Elastic Compute Cloud (EC2) instances.

Solution

In this tip, we will install SQL Server as stand-alone installs on all of the Elastic Compute Cloud (EC2) instances. In part 2, we configured the Windows Server Failover Cluster.

Prerequisites

SQL Server installation is pretty straight forward and the requirements are like on-premises. In the Elastic Compute Cloud (EC2) instances the servers by default will have a C:\ drive with 30 GB of storage, it can be increased as per your need. In AWS adding extra space to the volume is very easy and you have control to allocate the amount of space and assign the availability zones. You can create volumes from 1GB to 16TB as per your requirements with just a few clicks. In on-premises installations adding extra space will take some time and it might need downtime, but in Amazon Web Services there’s no downtime required.

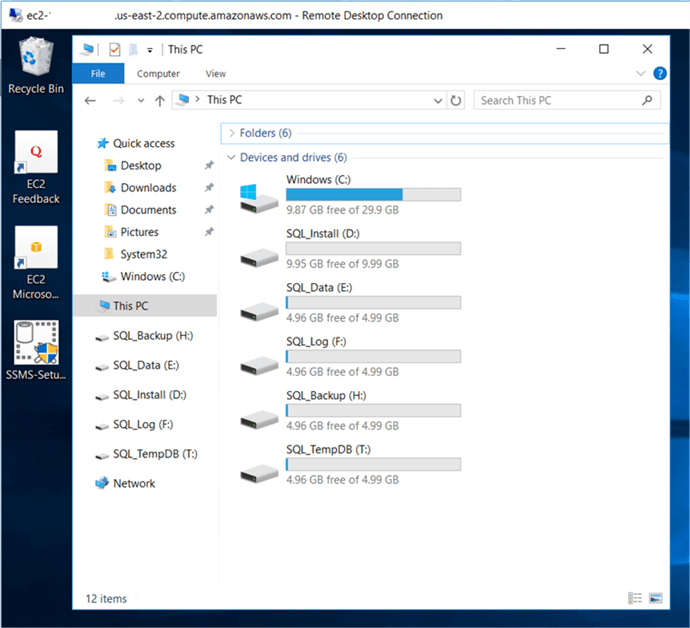
We also need to create SQL service accounts that we will use for the SQL Server install and also create extra storage volumes where we will place the SQL Server databases. I have created D:, E:, F:, H: and T: volumes on each of these servers and service accounts.

C$ - 30GB OS
D$ - 10GB SQL_Install
E$ - 5GB SQL_Data
F$ - 5GB SQL_Log
H$ - 5GB SQL_Backup
T$ - 5GB SQL_TempDB
disks

Installing SQL Server

Here I will install SQL Server 2016 on these three servers AGReplica01, AGReplica02 and AGReplica03. We need to do SQL Server stand-alone installs to use with AlwaysOn Availability Groups.  In the SQL Server 2016 stand-alone installation there are some new features which we will cover and we also need to install SQL Server Management Studio separately after installing SQL Server and restarting the instance.

Server Instance name
USOHWin16Node01 AGReplica01
USOHWin16Node02 AGReplica02
USOHWin16Node03 AGReplica03

 I copied the SQL Server installation media binaries to be used for each install, so let’s start the installation.

Run the SQL Server 20016 setup program setup.exe and use Run as administrator to launch the SQL Server Installation Center.

Run setup.exe from the SQL Server 2016 installation media to launch SQL Server Installation Center. - Description: Run setup.exe from the SQL Server 2016 installation media to launch SQL Server Installation Center.

On the SQL Server Installation Center click on New SQL Server stand-alone installation... this will run the SQL Server 2016 setup wizard. Since we are setting up an Availability Group, we want to use this setup option and not the New SQL Server failover cluster installation.

On the SQL Server 2016 installation media click on the installation link on the left hand side and click on New SQL Server stand-alone installation. This will run the SQL Server 2016 setup wizard. - Description: On the SQL Server 2016 installation media click on the installation link on the left hand side and click on New SQL Server stand-alone installation. This will run the SQL Server 2016 setup wizard.

On the Product Key dialog box, enter the product key that came with your installation media (or select Evaluation) and click Next.

On the Product Key dialog box, enter the product key (or select evaluation) that came with your installation media and click Next. - Description: On the Product Key dialog box, enter the product key (or select evaluation) that came with your installation media and click Next.

On the License Terms dialog box, click the I accept the license terms check box and click Next.

On the License Terms dialog box, click the I accept the license terms check box and click Next. - Description: On the License Terms dialog box, click the I accept the license terms check box and click Next.

On the Global Rules dialog box, validate all rules return successful results and click Next.

On the Global Rules dialog box, validate all the rules checks return successful results and click Next. - Description: On the Global Rules dialog box, validate all the rules checks return successful results and click Next.

On the Microsoft Update dialog box, you have the option to include SQL Server product updates like service packs and cumulative updates in the installation process or you can download the service pack and cumulative update and store them on a network share and run the installs later.

On the Microsoft Update dialog box, you have the option to include SQL server product updates like service packs and cumulative updates in the installation process or you can download the service pack and cumulative update and store on share network and run the Setup.exe. - Description: On the Microsoft Update dialog box, you have the option to include SQL server product updates like service packs and cumulative updates in the installation process or you can download the service pack and cumulative update and store on share network and run the Setup.exe.

On the Install Rules dialog box, validate all the rules return successful results. If any rules return warnings, make sure you fix them before proceeding with the installation and click Next.

On the Install Rules dialog box, validate all the rules return successful results. If any rules returned a few warnings, make sure you fix them before proceeding with the installation and Click Next. - Description: On the Install Rules dialog box, validate all the rules return successful results. If any rules returned a few warnings, make sure you fix them before proceeding with the installation and Click Next.

On the Feature Selection dialog box, select the following instance features Database Engine Services, SQL Server Replication and under Shared Features select the tools per your requirements and click Next.

Note: SQL Server Management Studio is no longer included in the SQL Server 2016 installation media and has to be downloaded separately and then installed.

On the Feature Selection dialog box, set the instance root directory and shared features to the D$ drive volume that was created before setup.

On the Feature Selection dialog box, select the following instance features Database Engine Services, SQL server replication and shared features client tools connectivity as per you requirement and click Next. - Description: On the Feature Selection dialog box, select the following instance features Database Engine Services, SQL server replication and shared features client tools connectivity as per you requirement and click Next.
The SQL Server Management Studio is no longer included in the SQL Server 2016 installation media and has to be downloaded separately and then install.

On the Feature Selection dialog box, the instance root directory and share feature on D$ drive volume.


On the Feature Rules dialog box, verify all the rules have passed. If any rules failed, or there are warnings make sure you fix them before proceeding with the installation and click Next.

On the Feature Rules dialog box, verify all the rules have passed. If there any rules failed, or warnings make sure you fix them before proceeding with the installation and click Next. - Description: On the Feature Rules dialog box, verify all the rules have passed. If there any rules failed, or warnings make sure you fix them before proceeding with the installation and click Next.

On the Instance Configuration dialog box, enter the instance name, for a default instance the instance name and instance ID would be MSSQLSERVER and click Next.

On the Instance configuration dialog box, enter the instance name , for a default instance, the instance name and instance ID would be MSSQLSERVER and click Next.  - Description: On the Instance configuration dialog box, enter the instance name , for a default instance, the instance name and instance ID would be MSSQLSERVER and click Next.

On the Server Configuration dialog box, provide the credentials for the SQL Server service accounts in the Service Accounts tab. Select the checkbox Grant Perform Volume Maintenance Task privilege to SQL Server Database Engine Service - this is new in SQL Server 2016. This enables Instant File Initialization for SQL Server and click Next.

On the Server Configuration dialog box, provide the credentials for the SQL server service accounts in the Service Accounts tab. select the checkbox grant perform volume maintenance task privilege, to SQL Server Database Engine Service - this is new in SQL Server 2016. This enables Instant File Initialization for SQL Server and click Next. - Description: On the Server Configuration dialog box, provide the credentials for the SQL server service accounts in the Service Accounts tab. select the checkbox grant perform volume maintenance task privilege, to SQL Server Database Engine Service - this is new in SQL Server 2016. This enables Instant File Initialization for SQL Server and click Next.

On the Server Configuration dialog box, change the database collation if you do need to.

On the Server Configuration dialog box, Change the database collation if you do not want to default collation on Collation Tab. - Description: On the Server Configuration dialog box, Change the database collation if you do not want to default collation on Collation Tab.

On the Database Engine Configuration dialog box, under the Server Configuration tab, select Windows authentication mode or Mixed Mode (SQL Server authentication and Windows authentication) in the Authentication Mode section. If needed you can change it after the installation.

Add the current login ID as part of the SQL Server administrators by clicking on Add Current User or click Add to add a different login or Windows group as the SQL Server administrator.

On the Database Engine Configuration dialog box, under the Server Configuration tab, select Windows authentication mode or Mixed Mode (SQL server authentication and Windows authentication) in the Authentication Mode section. If need to change it you can change it later after the installation is complete.  - Description: On the Database Engine Configuration dialog box, under the Server Configuration tab, select Windows authentication mode or Mixed Mode (SQL server authentication and Windows authentication) in the Authentication Mode section. If need to change it you can change it later after the installation is complete. 

Add the current login ID part of SQL Server administrator clicking on Add Current User or click on Add to add DBA group as SQL Server administrator.


On the Data Directories tab, specify the location of the root directory where the system data files, the default user database data, log and backup files will be located.

On the Data Directories tab, specify the location of the root directory (Where system data files stay), default user database data, log and backup files. - Description: On the Data Directories tab, specify the location of the root directory (Where system data files stay), default user database data, log and backup files.

On the TempDB tab, this is a new feature in SQL Server 2016, you can set the number of tempdb data files, initial size and auto growth settings of both data and log files and data and log file locations.

On the TempDB Tab this is new feature in SQL Server 2016 configuration TempDB. You can set the number of tempdb data files, initial size and auto growth settings of both data and log files and data and log file locations. - Description: On the TempDB Tab this is new feature in SQL Server 2016 configuration TempDB. You can set the number of tempdb data files, initial size and auto growth settings of both data and log files and data and log file locations.

On the FILESTREAM tab, enable the file stream option if you need to and click Next.

On the File Stream Tab, select the File Stream option if you need to enable it and click Next. - Description: On the File Stream Tab, select the File Stream option if you need to enable it and click Next.

On the Ready to Install dialog box, verify all configurations are correct then click Install.

 On the Ready to Install dialog box, verify all the configuration are correct then click on Install. - Description: On the Ready to Install dialog box, verify all the configuration are correct then click on Install.
On the Ready to Install dialog box, verify all the configuration are correct then click on Install. - Description: On the Ready to Install dialog box, verify all the configuration are correct then click on Install.

On the Complete dialog box, verify that SQL Server was installed successfully and then click Close.

On the Complete dialog box, Verify all the SQL server Installation successfully completed and click Close. - Description: On the Complete dialog box, Verify all the SQL server Installation successfully completed and click Close.

The SQL Server install needs to be done on all other nodes.

Install SQL Server Management Studio

To install SQL Server Management Studio it has to be downloaded separately and installed. To install run SSMS-Setup.exe with the Run as administrator option.

This is new feature in SQL server 2016, to install SQL server 2016 management studio, Run SSMS-Setup.exe as Administrator. - Description: This is new feature in SQL server 2016, to install SQL server 2016 management studio, Run SSMS-Setup.exe as Administrator.

On the Microsoft SQL Server Management Studio dialog box, click on Install to start the SSMS installation.

On the Microsoft SQL server Management Studio dialog box, Click on Install to start SSMS installation. - Description: On the Microsoft SQL server Management Studio dialog box, Click on Install to start SSMS installation.

On the Microsoft SQL Server Management Studio dialog box, installation is in progress.

On the Microsoft SQL server Management Studio dialog box, installation is in progress. - Description: On the Microsoft SQL server Management Studio dialog box, installation is in progress.

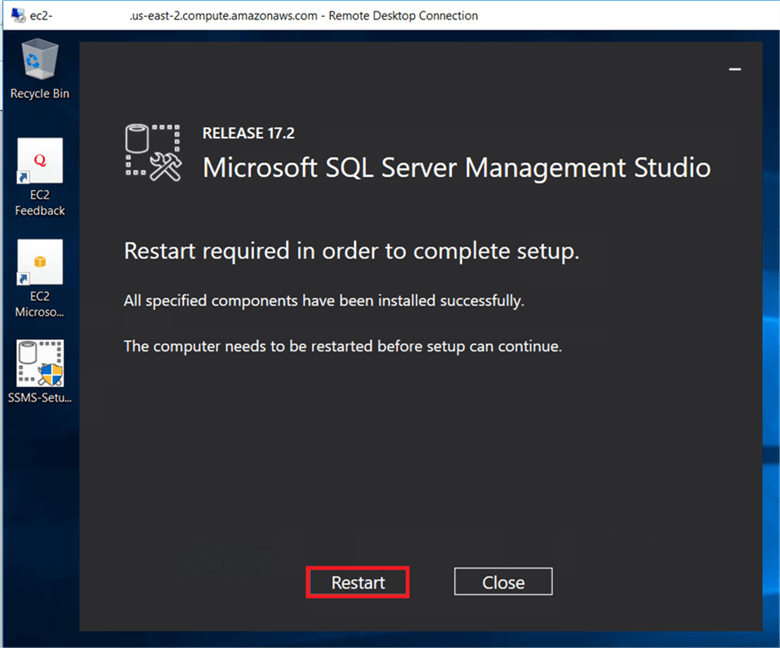
On the Microsoft SQL Server Management Studio dialog box, after SSMS installation completes click Restart to complete the setup. (It will restart the server).

On the Microsoft SQL server Management Studio dialog box, after SSMS installation successfully completed click on Restart to complete the setup. (It will restart the server). - Description: On the Microsoft SQL server Management Studio dialog box, after SSMS installation successfully completed click on Restart to complete the setup. (It will restart the server).

After installation is complete your startup menu should look like below.

After installation complete your startup menu look as below.  - Description: After installation complete your startup menu look as below.

The SQL Server Management Studio install needs to be completed on all other nodes if you want to use this from each server.

Conclusion

In this tip we discussed the SQL Server 2016 stand-alone installation and configured SQL Server on AGReplica01, AGReplica02, AGReplica03 named instances and installed SQL Server Management Studio.

In part 4 of this series, we will configure SQL Server 2016 AlwaysOn in AWS.

Next Steps


sql server categories

sql server webinars

subscribe to mssqltips

sql server tutorials

sql server white papers

next tip


About the author
MSSQLTips author Pinakin Patel Pinakin Patel is a SQL Server Admin / AWS Solutions Architect with experience in SQL Server 2000 to 2016.

This author pledges the content of this article is based on professional experience and not AI generated.

View all my tips


Comments For This Article


get free sql tips
agree to terms