By: Pinakin Patel | Comments | Related: > Amazon AWS
Problem
In a previous tip, SQL Server on Linux – Part1, we saw how to build a Red Hat Enterprise Linux 7.4 on Elastic Compute Cloud (EC2), and we converted perm files into ppk format to connect a terminal session using PuTTy to connect to the Red Hat server. In Part 2 of this series, we will walk thru how to install SQL Server 2017 on Linux and connect to SQL Server 2017 on Linux using SQLCMD and SSMS.
Solution
SQL Server on Linux supports many features and there are some features which are not supported under the unsupported feature or service section and known issues.
You can download SQL Server for Linux from here.
To install SQL Server on Linux you need to build the Linux machine (virtual sever), you can download the Red Hat operating system from the Red Hat site or you can use an AWS EC2 or Azure virtual server instance to install SQL Server on Linux. In Part 1 we walked thru how to connect Red Hat Enterprise Linux 7.4 using a PuTTy session. I created a superuser ‘pinakin’ and I logged in with this superuser id. To login for the first time you need to follow the same steps we did in Part 1 after that you can create the superuser and login with that user. Here I am not adding password credentials as I have added my user id into the system privilege group with NOPASSWORD.
We will follow the below steps to install SQL Server on Linux.
Step 1 - Download Microsoft SQL Server Red Hat repository file
Here we will walk thru each component. The first command that you see is “Sudo” and what that does is it allows us to execute the subsequent command with escalated privileges (system admin). So what this command will do is it's going to take the content of the URL as the last parameter specified at end of the URL https://packages.microsoft.com and it will download the specified files into the parameter specified – o, and it will create the new repository /etc/yum.repos.d/mssql-server.repo and download to the repository location.
First we need to download the SQL Server repository to the Linux server and the download package will be saved under /etc/yum.repos.d/mssql-server.repo. To download the repository, we will run the below command using a terminal session.
sudo curl -o /etc/yum.repos.d/mssql-server.repo https://packages.microsoft.com/config/rhel/7/mssql-server-2017.repo
On the terminal window the configuration file download progress in %, total time and other related information appears.

Step 2 - Download the production repository file
Inside the production repository the mssql-tools package has all the client tools that we need to installed. To download production repositories, we will run below command using terminal session.
sudo curl -o /etc/yum.repos.d/msprod.repo https://packages.microsoft.com/config/rhel/7/prod.repo
On the terminal session window, the configuration file shows the download progress in %, total time and other related information.

To examine the contents of the repository files, let’s run the below command and in the output you will see the repository (package) name and baseurl that is the location of the package on the website.
/* To examine the content of the repository files */
More /etc/yum.repos.d/mssql-server.repo
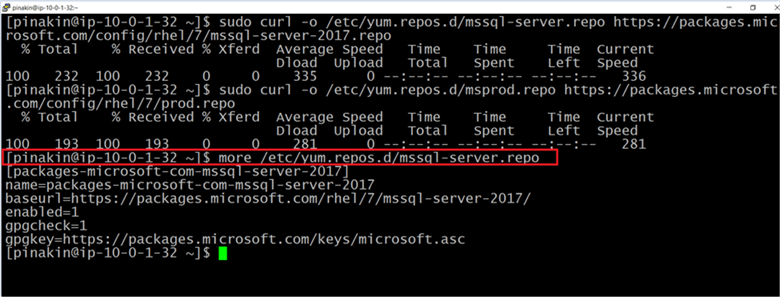
As we have downloaded both repository files from the Microsoft website URL, and by running the below command we can see the all packages have been downloaded and now they are on the server.
Sudo yum search msssql
The list of components are:
- Mssql-server.x86_64: Microsoft SQL Server Relational Database Engine
- Mssql-server-agent.x86_64: Microsoft SQL Server Agent
- Mssql-server-fts.x86_64: Microsoft SQL Server Full Text Search
- Mssql-server-ha.x86_64: High Availability support for Microsoft SQL Server Relational Database Engine
- Mssql-server-is.x86_64: Microsoft SQL Server Integration Services
- Mssql-tools.x86_64: Tools for Microsoft(R) SQL Server(R)

Step 3 - Install SQL Server on Red Hat Enterprise Linux 7.4 EC2 Instance
Now we have the required packages on the Linux server, so let’s start the installation. We will use the sudo yum install command to install the package on Linux. Run the below command to install SQL Server on this Red Hat enterprise server in AWS.
#Install SQL Server on Red Hat Enterprise Linux 7.4 EC2 instance
Sudo yum install msssql-server msssql-server agent
Once you hit the enter key it will start executing the command. When the execution process starts it will first check some dependencies followed by checking the required package. Once it is done, it will provide the total downloaded size in MB and installed size in MB; it will ask you to download and install it. To download and install hit “y”.
You can see the mssql-server-14.0.3022.28 package is downloading and the status is 21% complete along with size and ETA to complete.
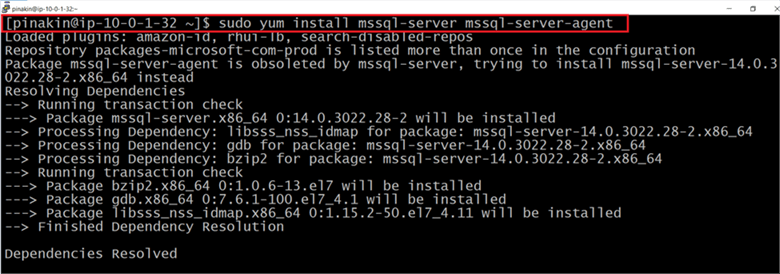
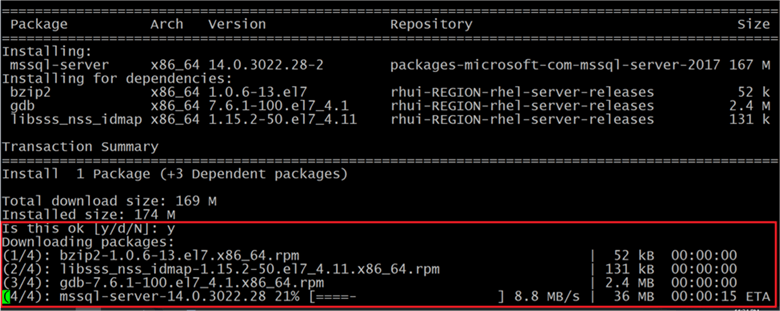
Once the package download is complete it will start the installation process as shown below.
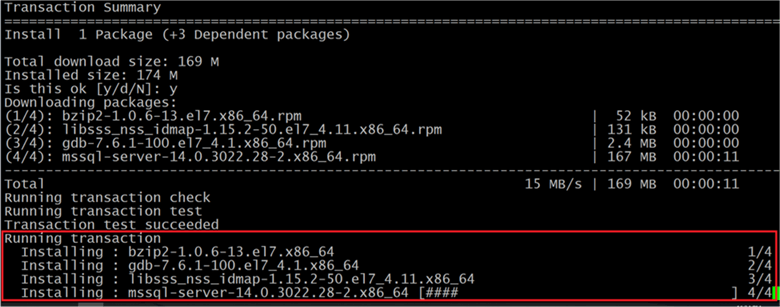
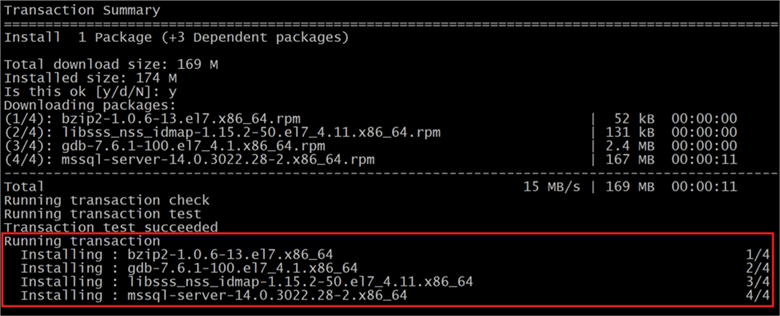
Once the installation is complete it will appear as complete! The mssql-server package installation has been completed.
Step 4 - Complete the setup of Microsoft SQL Server installation
To complete the setup of the Microsoft SQL Server installation you need to run the below command.
/* to complete the setup of Microsoft SQL Server installation */
Sudo /opt/mssql/bin/mssql-conf setup
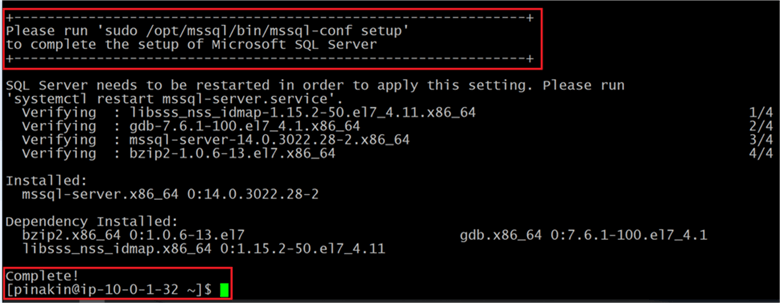
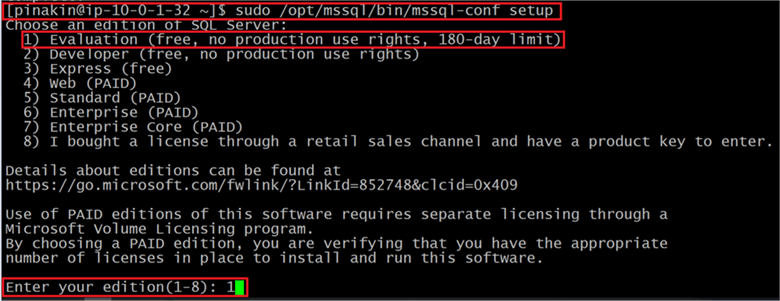
Once you run the command it will ask you to select the edition of SQL Server, here I am installing the evaluation version.
Note: You can select any version but note that Web, Standard, Enterprise, and Enterprise Core are paid licensed versions. For more information click here.
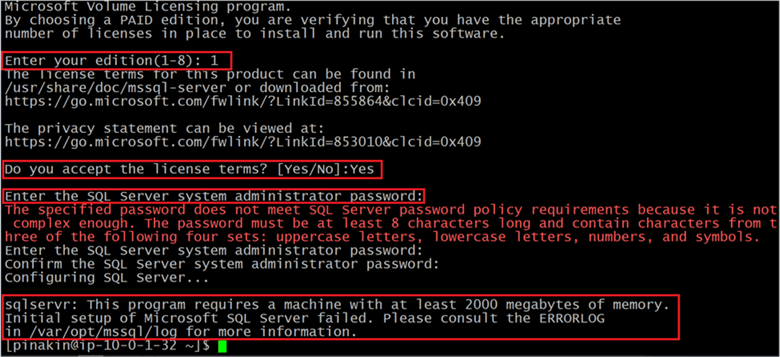
Then you need to accept the license terms by typing YES and hit the enter key to the process as shown below.
It will then ask you to enter a strong password for the SA account. Enter the SA password and then re-enter the password again.
Note: The SA password must be at least 8 characters long and contain character that include: uppercase letters, lowercase letters, numbers and symbols or it will throw an error as shown below.
Here I have entered SA password, but due to low memory it did not allow me to configure SQL Server on Linux. As you can see the error “sqlserver: This program requires a machine with at least 2000 megabytes of memory. Initial setup of Microsoft SQL Server failed. Please consult the ERRORLOG...”
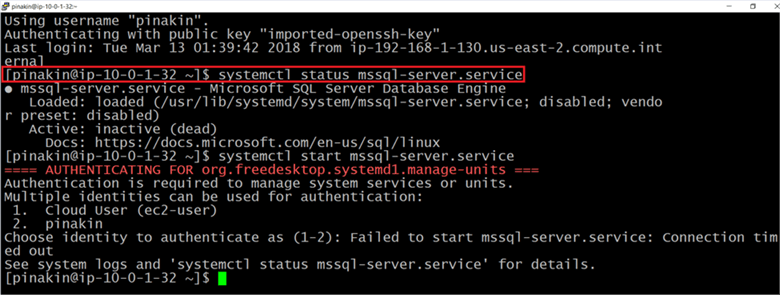
Let's check to see if this really worked or not. We can run the following to check to see if the SQL Services are running or not using the below commands.
/* Check SQL server service status */
Systemctl status mssql-server.service

/* To start SQL Service */
Systemctl start mssql-server.service
We can see below the service is not running and we cannot start the service.
To fix this, let’s change the instance type from t2.small to t2.medium so we have more memory. On the AWS management console under the instance as you can see the Linux server is running on a t2.small instance type. Now we will stop the instance and change the instance type from t2.small to a t2.medium instance type.

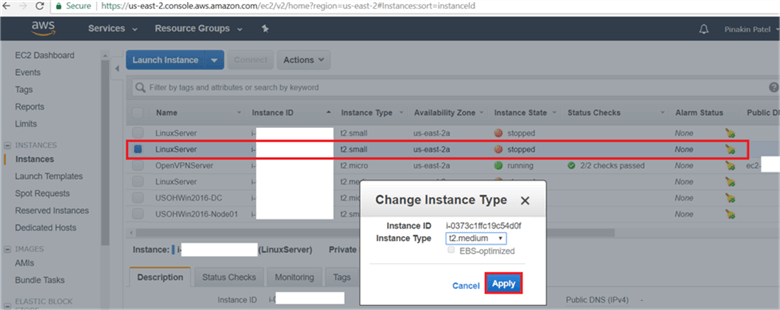
Once the instance type has been changed to t2.medium we will start the EC2 instance again and connect with a the PuTTy terminal session.

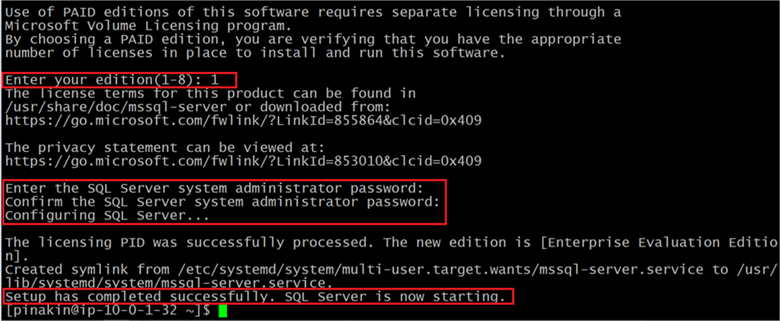
As we had a low memory error and we were not able to complete the setup of Microsoft SQL Server installation. We will run the same command again as we did earlier and complete the setup of the Microsoft SQL Server installation.
To complete the setup of Microsoft SQL Server installation you need to run below command.
/* to complete the setup of Microsoft SQL Server installation */
Sudo /opt/mssql/bin/mssql-conf setup
Enter the edition again and a strong password and we can see that the SQL setup has completed successfully. SQL Server is now starting.
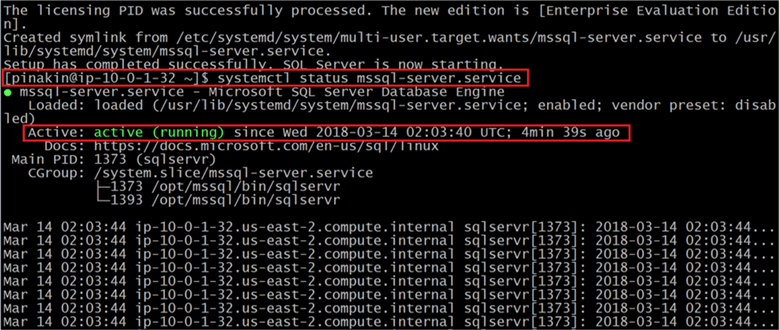
Now let’s see one more time if the SQL services are enabled and active (running). To check SQL Services status is up and running, or not we will run below command.
/* Check SQL server service status */
Systemctl status mssql-server.service
We can see mssql-server.service – Microsoft SQL Server Database Engine is active (running) and enabled. The mssql-server.service – Microsoft SQL Server Database Engine and is Loaded:loaded and the mssql-service is enabled Active:Active (running) since Wed 2018-03-14 02:03:40 UTC; 4 min 39s ago.
Step 5 - Enable SQL Server Agent
To use SQL Server Agent on Linux, you must first need to enable the SQL Server Agent on a machine that already has SQL Server 2017 installed. To enable the SQL Server Agent we will run the below command. Once SQL Server Agent is enable you need to restart the mssql-server.service follow by that you need to provide the authentication along with password. For more information click here.
/* To enable the SQL Server agent */
sudo /opt/mssql/bin/mssql-conf set sqlagent.enabled true

Step 6 - Install SQL Server Tools
To connect to SQL Server, you need to download and install the mssql-tools package. To download the mssql tools package run the below command.
/* download Microsoft Red Hat repository package file. */
sudo curl -o /etc/yum.repos.d/msprod.repo https://packages.microsoft.com/config/rhel/7/prod.repo
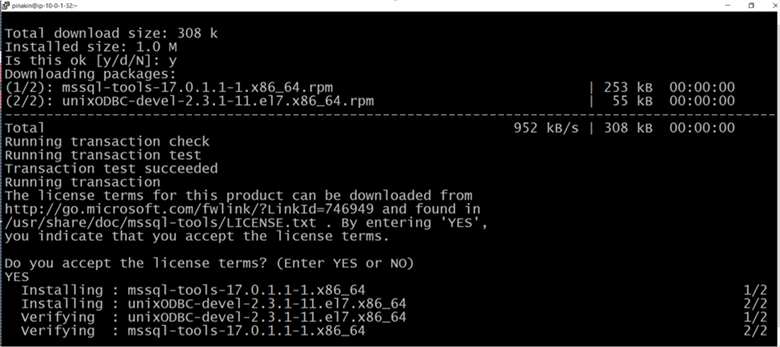
Once you hit the enter key it will start executing the above command. When the execution process starts, it will first check some dependencies followed by checking the download required packages. Once it is done, it will provide the total download size in MB and installed size in MB and it will ask you to download and install it, to download and install hit “y”.
You can see the mssql-tools-17.0.1.1-1.x86_64.rpm package is downloaded, accept the license terms to complete the install.

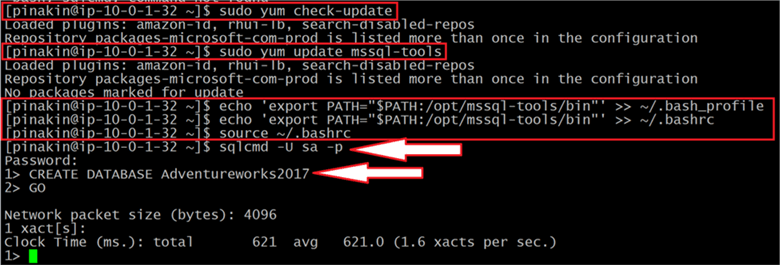
Add /opt/mssql-tools/bin/ to your PATH environment variable. This allows you to run the tools without specifying the full path. Run the following command to modify the PATH for both login sessions and interactive/non-login. For more information click here.
Step 7 - Connect to SQL Server using SQLCMD
To connect SQL Server using sqlcmd we will use the below command, it will ask for the SA password to connect to SQL Server. For more information click here.
/* to connect SQL server using SQLCMD command utility */
Sqlcmd –U sa –p
Finally, we have connected to SQL Server on Linux in AWS using the SQLCMD command utility. Now let’s create a database. To create a database, we will run the following T-SQL command using SQLCMD.
Note: To execute the any SQL statements you need to put GO after the T-SQL statements.
CREATE DATABASE Adventureworks2017
GO
As you can see in SSMS and the sqlcmd utility that the adventureworks2017 database has been created successfully.
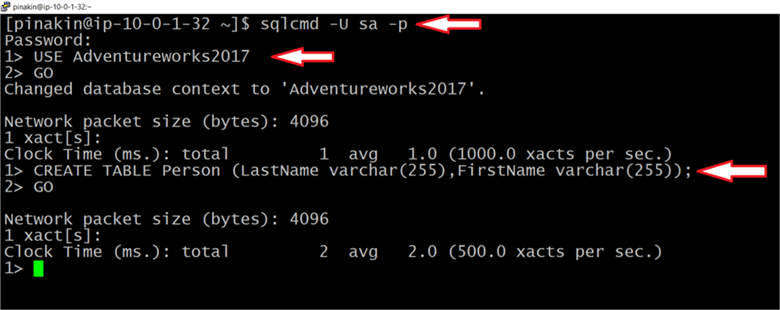
On the SQLCMD terminal window you can see that I have created a table called Person.
Step 8 - Connect to SQL Server using SSMS
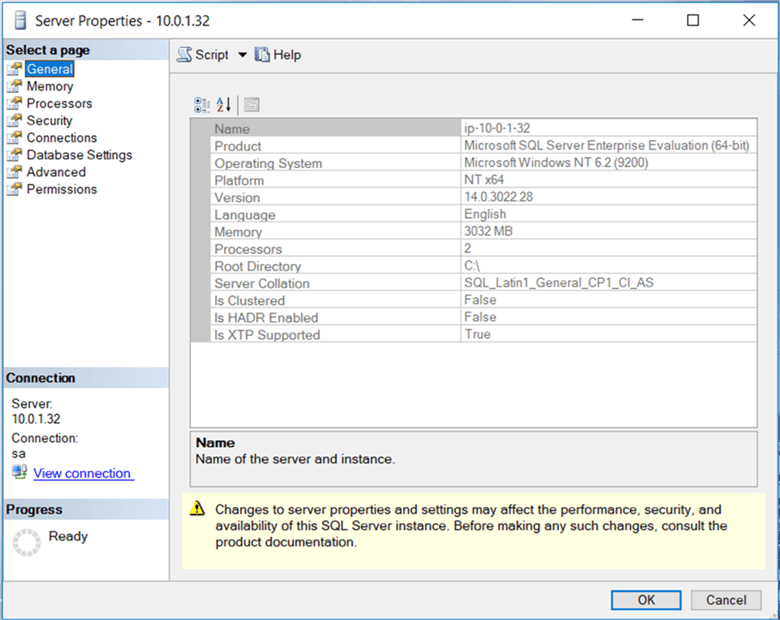
In SSMS, you can see that we have to connect to SQL Server on Linux using SQL Server authentication and we can see that the we have installed Microsoft SQL Server (RTM) Enterprise evaluation edition (64-bit) on Linux (Red Hat Enterprise Linux server 7.4).
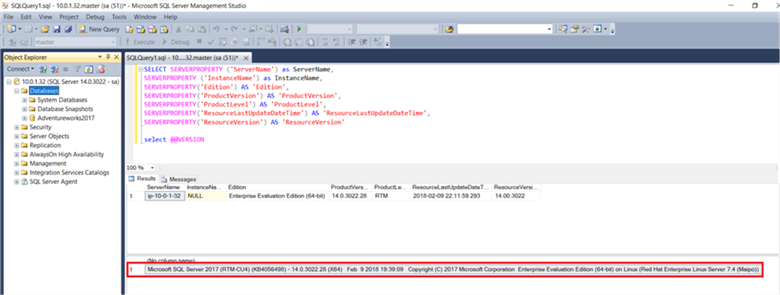
Right click on server and go to Properties and we can see some of information as shown below.
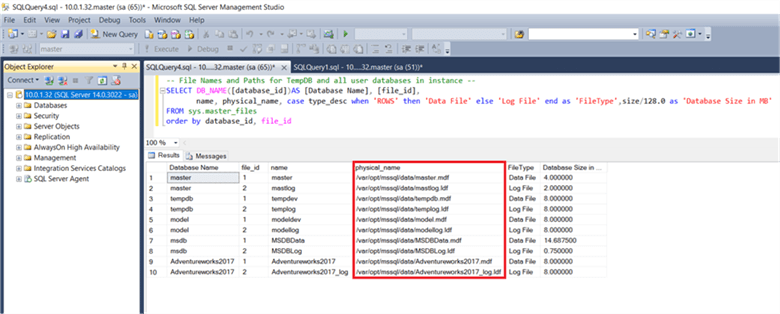
In an SSMS query window we can see the physical files locations along with file types and database size in MBs using the query below.
Conclusion
In this article we installed SQL Server on Linux along with SQL tools and created a test database and table in AWS.
Next Steps
- How to build an Enterprise Environment in AWS for SQL Server check here
- How to build RDS Environment in AWS for SQL Server click here
- Implement SQL Server High Availability and Disaster Recovery on Amazon EC2 - Part 1 click here
- Implement SQL Server High Availability and Disaster Recovery on Amazon EC2 - Part 2 click here
- Implement SQL Server High Availability and Disaster Recovery on Amazon EC2 - Part 3 click here
- Implement SQL Server High Availability and Disaster Recovery on Amazon EC2 - Part 4 click here
- Migrating On-Premises SQL Server Data to Amazon RDS click here
- Check out these other related tips
About the author
 Pinakin Patel is a SQL Server Admin / AWS Solutions Architect with experience in SQL Server 2000 to 2016.
This author pledges the content of this article is based on professional experience and not AI generated.
View all my tips


