Implement SQL Server High Availability and Disaster Recovery on Amazon EC2 - Part 2

By:   |   Comments   |   Related: > Amazon AWS


Problem

In a previous tip, Implement SQL Server High Availability and Disaster Recovery on Amazon EC2, we discussed hardware and software requirements and installed the .NET Framework and Failover Cluster Feature in each of the Elastic Compute Cloud (EC2) instances.

In this tip we will walk thru validation of the Windows Server Failover Cluster configuration steps and build the Windows Server Failover Cluster in the Amazon Web Services (AWS) cloud.

Solution

Setup DHCP or static windows cluster in AWS

In the Amazon Web Services cloud you can create a Windows Failover Cluster using EC2 instance servers using either of these options:

  • DHCP cluster – When the network configuration setup obtains an IP address automatically then the system will configure the Window Failover Cluster as DHCP. This means the IP address will come from DHCP and can change when the IP lease expires and a new IP address can be assigned. When you configure Windows Failover Cluster with DHCP, in the Access Point for administering the cluster dialog box you need to enter the virtual hostname name and the participating cluster nodes will automatically get the IP address during the cluster creation.
  • Static cluster – When you define the IPs in the network configuration then the system will setup as a static Windows Failover Cluster. In this scenario, you need to put all of the cluster nodes private IP addresses in the Access Point cluster dialog box along with the virtual hostname and IP addresses for all of the participant cluster nodes.

In the cloud, a Windows Failover Cluster is slightly different compared to an on-premises cluster configuration. You can use either option, but DHCP may fail if the IP address resource ‘cluster IP address’ cannot be brought online because a duplicate IP address was detected on the network. So, please ensure all IP address are unique.

Configuration Validation

After completing all requirements, you need to validate the Windows Cluster Failover configuration. Once the validation finishes, review the report to see if you have any warnings or failures in the configuration report.  You need to correct the warnings or failures before you start to configure the windows cluster. In a production environment you should resolve all issues before moving forward.

Go to the Failover Cluster Manager console, under the management section click on Validate Configuration and this will run a validation configuration wizard.

Go to the failover cluster manager console, under the management section click on validate configuration link and this will run validate a configuration wizard. - Description: Go to the failover cluster manager console, under the management section click on validate configuration link and this will run validate a configuration wizard.

On the Select Server or a Cluster dialog box, enter the hostnames of the server nodes that will be part of your Windows Failover Cluster and click Next.

On the Select Server or a Cluster dialog box, enter the hostnames of the server nodes that you want to add as member of your windows failover cluster and click on Next. - Description: On the Select Server or a Cluster dialog box, enter the hostnames of the server nodes that you want to add as member of your windows failover cluster and click on Next.

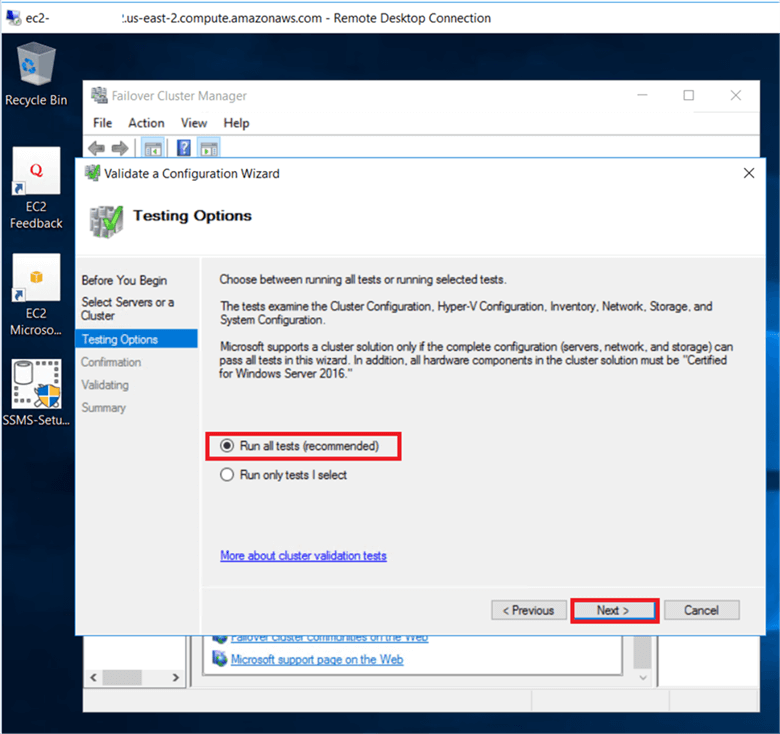
On the Testing Options dialog box, select Run all tests (recommended) and click Next. This will run all the required tests to validate whether or not the server nodes are OK for the Windows Failover Cluster.

On the Testing Options dialog box, Select Run all tests (recommended) and click Next. This will run all the required tests to validate whether or not the server nodes are OK for the windows failover cluster. - Description: On the Testing Options dialog box, Select Run all tests (recommended) and click Next. This will run all the required tests to validate whether or not the server nodes are OK for the windows failover cluster.

On the Confirmation dialog box, click Next. This will run all the required validation tests.

On the Confirmation dialog box, click Next. This will run all the required validation tests. - Description: On the Confirmation dialog box, click Next. This will run all the required validation tests.

On the Validating dialog box, it will show the tests are running.

On the validating dialog box, it will appear as tests are running. - Description: On the validating dialog box, it will appear as tests are running.

On the Summary dialog box, verify that all the selected checks return successful results.

On the Summary dialog box, verify that all the selected checks return successful results. - Description: On the Summary dialog box, verify that all the selected checks return successful results.

Note, on the Cluster Validation Wizard report you may see Warning messages about network, disk configuration issues, missing security updates or software update levels on all the server nodes, incompatible drivers, etc. The general recommendation has always been to resolve all errors and issues that the Cluster Validation Wizard reports prior to proceeding with the Windows Failover Cluster configuration.

Note on the report the Cluster Validation Wizard may report Warning messages of network, disk configuration issues, missing security updates or software update level on all the server nodes, incompatible drivers, etc. The general recommendation has always been to resolve all errors and issues that the cluster validation Wizard reports prior to proceeding with the windows failover cluster configuration. And it is in the report. - Description: Note on the report the Cluster Validation Wizard may report Warning messages of network, disk configuration issues, missing security updates or software update level on all the server nodes, incompatible drivers, etc. The general recommendation has always been to resolve all errors and issues that the cluster validation Wizard reports prior to proceeding with the windows failover cluster configuration. And it is in the report.

Creating Windows Server Failover Cluster in AWS

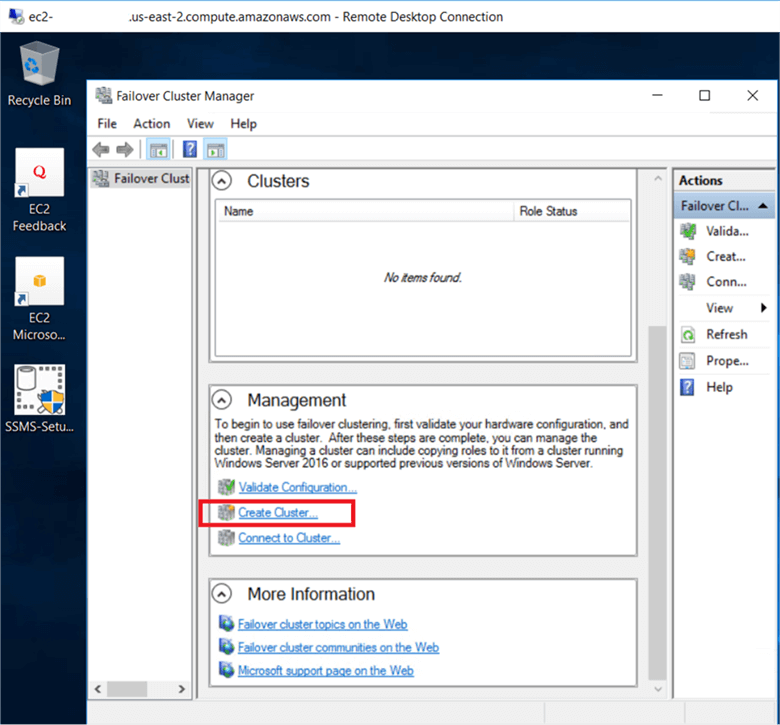
Go to the Failover Cluster Manager console, under the Management section click on Create Cluster and this will run the create cluster wizard.

Go to the failover cluster manager console, under the management section click on create cluster link, and link and this will run create cluster wizard. - Description: Go to the failover cluster manager console, under the management section click on create cluster link, and link and this will run create cluster wizard.

On the Select Servers dialog box, enter the hostnames of the server nodes that will be part of your Windows Failover Cluster and click Next.

On the Select Servers dialog box, enter the hostnames of the server nodes that you want to add as a member of your windows failover cluster and click on Next. - Description: On the Select Servers dialog box, enter the hostnames of the server nodes that you want to add as a member of your windows failover cluster and click on Next.

On the Access Point for Administering the Cluster dialog box, enter the Cluster Name and secondary IP addresses that were assigned to the Elastic Compute Cloud (EC2) servers. 

 On the Access Point for Administering the Cluster dialog box, enter the virtual hostname and Secondary IP address that assigned to EC2 instance server to administer the windows failover cluster and click Next.  - Description: On the Access Point for Administering the Cluster dialog box, enter the virtual hostname and Secondary IP address that assigned to EC2 instance server to administer the windows failover cluster and click Next.   Note: In Amazon Web Services (AWS) you need to put all cluster nodes, private IP address as shown below if the subnet network are on separate availability zones. Here it is slightly different compared to the On-premises cluster configuration.

Note: In Amazon Web Services (AWS) you need to put all the cluster nodes private IP addresses as shown below if the subnet network is on separate availability zones. This is slightly different compared to an on-premises cluster configuration.

On the Access Point for Administering the Cluster dialog box, after entering the Cluster Name and secondary IP addresses it will appear as shown below and then click Next. (I added in the host names to the screenshot for clarification.)

On the Access Point for Administering the Cluster dialog box, after entering the virtual hostname and Secondary IP address that assigned to EC2 instance server to administer the windows failover cluster it appear as shown below. - Description: On the Access Point for Administering the Cluster dialog box, after entering the virtual hostname and Secondary IP address that assigned to EC2 instance server to administer the windows failover cluster it appear as shown below.

If you are configuring with DHCP, on the Access Point for Administering the Cluster dialog box, enter the Cluster Name only and the participating cluster nodes will automatically get the IP address when the Windows Cluster creation is in progress. (Don’t get confused – you will only see one of these configuration options. I just wanted to show you what they both looked like.)

If you are configuring with DHCP option the Access Point for administering the cluster dialog box, enter the virtual hostname name only and the participant cluster nodes system will automatically take IP address when windows cluster creation is in progress. (Don't get confused you will see either of dialog box, as I created both so I took screen shot from DHCP configuration and included here) - Description: If you are configuring with DHCP option the Access Point for administering the cluster dialog box, enter the virtual hostname name only and the participant cluster nodes system will automatically take IP address when windows cluster creation is in progress. (Don't get confused you will see either of dialog box, as I created both so I took screen shot from DHCP configuration and included here)  On the Access Point for Administering the Cluster dialog box, for DHCP configuration appear as below.

If you are configuring with DHCP, on the Confirmation dialog box, verify the Windows Failover Cluster nodes and click Next. This will configure Failover Clustering on three nodes that will act as nodes in your Windows Failover Cluster.

On the confirmation dialog box, verify the windows failover cluster nodes and click Next. This will configure Failover Clustering on three server's nodes that will act as nodes in your windows failover cluster. - Description: On the confirmation dialog box, verify the windows failover cluster nodes and click Next. This will configure Failover Clustering on three server's nodes that will act as nodes in your windows failover cluster.

If you are configuring with DHCP, on the Confirmation dialog box, verify the Windows Failover Cluster static IP addresses and click Next.

On the Confirmation dialog box, verify the windows failover cluster Static IP address and click Next.  - Description: On the Confirmation dialog box, verify the windows failover cluster Static IP address and click Next.

On the Creating New Cluster dialog box, we can see the Windows Cluster creation is in progress.

On the creating New Cluster dialog box, Windows cluster creation is in progress. - Description: On the creating New Cluster dialog box, Windows cluster creation is in progress.

On the Summary dialog box, verify that the report returns that the Windows Cluster was successfully created.

On the Summary dialog box, verify the report returns windows cluster successfully created in result and Click Finish. - Description: On the Summary dialog box, verify the report returns windows cluster successfully created in result and Click Finish.

If we scroll down in the dialog box, we can see Warnings about setting up a witness.

On the select quorum witness dialog box, select the Configure a file share witness, here you can select configure disk witness as well but as stated earlier you need to do some additional steps. In configuring a cloud witness you need to provide Azure information, here one option left as to configure a file share witness. - Description: On the select quorum witness dialog box, select the Configure a file share witness, here you can select configure disk witness as well but as stated earlier you need to do some additional steps. In configuring a cloud witness you need to provide Azure information, here one option left as to configure a file share witness.

On the Create Cluster report page, the report returns that the windows cluster successfully created.

On the cluster Report page, report returns windows cluster successfully created. - Description: On the cluster Report page, report returns windows cluster successfully created.

Verify the Windows Cluster is Running

On the Failover Cluster Manager console, verify the cluster resources is up and running.

On the Failover Cluster Manager console, verify the cluster resources is up and running. - Description: On the Failover Cluster Manager console, verify the cluster resources is up and running.

Configure Windows Cluster Quorum Settings

In order to have a healthy Windows Cluster configuration, you must configure a witness to have a quorum in the event of a failure and therefore a failover to take place. 

On the Failover Cluster Manager console dialog box, right-click on the cluster name and go to More Actions > Configure Cluster Quorum Settings.

On the Failover Cluster Manager console dialog box, Right-click on cluster resource and go to the More Actions and click on Configure Cluster Quorum Settings. - Description: On the Failover Cluster Manager console dialog box, Right-click on cluster resource and go to the More Actions and click on Configure Cluster Quorum Settings.

On the Select Quorum Configuration Option dialog box, choose the option to Select the quorum witness and click Next.

On the Select Quorum configuration option dialog box, select the Quorum witness and click Next. In Advance Quorum configuration you will get option to select Node majority but as it does not provision so it will go to next step without changing any value. - Description: On the Select Quorum configuration option dialog box, select the Quorum witness and click Next. In Advance Quorum configuration you will get option to select Node majority but as it does not provision so it will go to next step without changing any value.

On the Select Quorum Witness dialog box, select the Configure a file share witness and click Next. You could select Configure a disk witness, but you need to do some additional steps to get this option setup. In Configure a cloud witness you need to provide additional Azure information.  We will use Configure a file share witness.

On the Select quorum witness dialog box, select the Configure a file share witness and click Next. Here you can select Configure disk witness as well but as stated earlier you need to do some additional steps. In configure a cloud witness you need to provide Azure information; Herein only one option left as configure a file share witness. - Description: On the Select quorum witness dialog box, select the Configure a file share witness and click Next. Here you can select Configure disk witness as well but as stated earlier you need to do some additional steps. In configure a cloud witness you need to provide Azure information; Herein only one option left as configure a file share witness.

On the Configure File Share Witness dialog box, provide the File Share Path and click Next.

On the Configure File Share Witness dialog box, provide the File Share Path and click Next. - Description: On the Configure File Share Witness dialog box, provide the File Share Path and click Next.

On the Conformation dialog box, verify the information and click Next.

On the Conformation dialog box, verify the information and click Next. - Description: On the Conformation dialog box, verify the information and click Next.

On the Summary dialog box, verify the witness voting configuration changes and click Finish.

On the Summary dialog box, verify the witness voting configuration changes and click Finish. - Description: On the Summary dialog box, verify the witness voting configuration changes and click Finish.

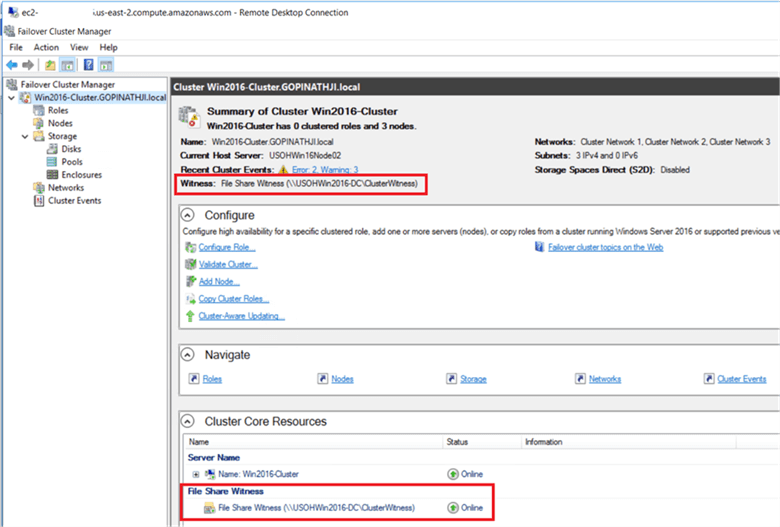
On the Failover Cluster Manager console, verify the quorum configuration is using the file share witness and the file share witness and cluster resources are up and running.

On the Failover Cluster Manager console, verify the quorum configuration is using file share witness, file share witness and cluster resources are up and running. - Description: On the Failover Cluster Manager console, verify the quorum configuration is using file share witness, file share witness and cluster resources are up and running.

If we choose the Disk Witness option instead, on the Failover Cluster Manager console, under the Storage option, we add a disk to the cluster for the witness disk.

On the Failover Cluster Manager console, under the storage option, we added disk into cluster to use witness as disk. - Description: On the Failover Cluster Manager console, under the storage option, we added disk into cluster to use witness as disk.

If we choose the Disk Witness option instead, on the Failover Cluster Manager console, verify the quorum configuration is using the disk witness and the disk witness and cluster resources are up and running.

On the Failover Cluster Manager console, verify the quorum configuration is using disk witness, disk witness and cluster resources are up and running. - Description: On the Failover Cluster Manager console, verify the quorum configuration is using disk witness, disk witness and cluster resources are up and running.

Conclusion

We covered the difference between DHCP and Static cluster and validated the cluster configuration.  We then created a 3 node cluster with Elastic Compute Cloud (EC2) instances on the Amazon Web Services (AWS) and configured the file share witness and the disk witness. In Part 3 of this series we will install stand-alone SQL Server 2016 on three nodes of the cluster in Elastic Compute Cloud (EC2) instance server in Amazon Web Services (AWS).

Next Steps


sql server categories

sql server webinars

subscribe to mssqltips

sql server tutorials

sql server white papers

next tip


About the author
MSSQLTips author Pinakin Patel Pinakin Patel is a SQL Server Admin / AWS Solutions Architect with experience in SQL Server 2000 to 2016.

This author pledges the content of this article is based on professional experience and not AI generated.

View all my tips


Comments For This Article


get free sql tips
agree to terms