By: Rick Dobson | Comments | Related: 1 | 2 | 3 | 4 | 5 | 6 | 7 | 8 | > Temp Tables
Problem
It is sometimes convenient to populate permanent tables with temporary data. Permanent tables used to store temporary data are often called staging tables. Data from an external source, such as a daily data feed or a legacy application scheduled for migration to a new application, can be copied to a permanent table or a suite of staging tables. In this way, the data from the external source can be processed before its transfer to another permanent table that is part of a database supporting an enterprise application. Intermediate level processing between an external source and a staging table can fulfill multiple objectives, such as data cleansing, computing values based on source data, re-shaping and/or re-distributing source data layout to one that matches the needs of a relational database application or a data warehouse.
Solution
For the examples below we are using the AdventureWorks2014 database. Download a copy and restore to your instance of SQL Server to test the below scripts.
Strategies for Managing Temporary Data in Permanent Tables in SQL Server
You may be wondering why not always store temporary data in one or more temp tables? Temp tables can be a worthy choice for mid-sized data migrations. However, as the size of the input data grows, the input data will compete more aggressively with other applications that require resources from the tempdb system database. This can lead to degraded performance in your ETL solution as well as other internal SQL Server applications that require support from the tempdb system database. When using one or more permanent tables as staging tables, you can allocate enough dedicated space for the database holding your staging tables in permanent tables, which eliminates one source of contention with other database applications. It is also advantageous to import temporary data into permanent tables because permanent tables have a lifetime that extends beyond the lifetime of the application initially creating them.
The more processing steps required by an ETL application, the better a candidate the ETL solution is for use with permanent tables. If several successive rounds of transformations are required, then architecting a solution with more than one permanent table may be a good approach. An initial round of transformation may focus on getting all the data into a database properly. This can involve trapping for invalid or missing data. After the data are initially cleansed and saved in a staging table, you may need more processing to distribute a single large table with columns for several different relational tables.
This article includes two examples that demonstrate how to migrate data from an external source to a permanent SQL Server table. The external source is a file, such as one delivered from a client to a service organization. The immediate destination is a SQL Server staging data. After a staging table is properly configured based on source data, the staging data contents can be transferred to permanent data table(s) in a data warehouse or relational database. The demonstrations in this article assume the external source has a csv (comma separated value) layout.
- The first example assumes the csv file has no invalid data.
- The second example demonstrates modifications to the first example that check for invalid date field values.
This kind of progressive refinement of a formulation is not that atypical. With many ETL solutions, you do not know the kinds of errors that can occur. Checking for errors that never occur can unnecessarily slow an ETL solution. Therefore, you may care to refine validation efforts based on data errors after you encounter them.
Importing from a CSV File Without Checking for Invalid Data
Here's a sample csv file named aw14_emp_person.csv displayed in a NotePad++ session. This is our external data source for the first example. The first row shows column headers. The second through the sixteenth rows show successive data rows in the file. The data values are derived from a query for the Employee and Person tables in the Adventureworks2014 database. The two tables are joined by BusinessEntityID values. FirstName and LastName values are from the Person table. All other columns are from the Employee table. For future reference, please note that the BirthDate and HireDate columns appear in YYYY- MM-DD format. The next demonstration illustrating data validation requires a different data type for dates.

The following script defines a staging table named aw14_emp_person in the Temporary_Data_Stores_Tutorial database. The staging table is the SQL Server target for the data in the external data source.
You could use a smarter process for dropping a previously existing version of the staging table, but unconditionally dropping the table works so long as the code to drop a table is in a batch by itself. If the table does not exist, the script generates an error at this point, but the error does not block the execution of the script in the following batch with the create table section.
-- set database context
USE [Temporary_Data_Stores_Tutorial]
GO

-- clean data demo for aw14_emp_person staging table
-- drop aw14_emp_person table
DROP TABLE aw14_emp_person
GO

-- create aw14_emp_person table
CREATE TABLE aw14_emp_person
(
   BusinessEntityID int
  ,FirstName nvarchar(50)
  ,LastName nvarchar(50)
  ,JobTitle nvarchar(50)
  ,BirthDate date
  ,MaritalStatus nchar(1)
  ,Gender nchar(1)
  ,HireDate date
)
GO
The next script includes a BULK INSERT statement for reading the external data source and transferring its contents to the aw14_emp_person table in the Temporary_Data_Stores_Tutorial database. The code assumes the external data source is in the c:\temp folder.
-- bulk insert aw14_emp_person.csv
-- into fresh copy of aw14_emp_person table
BULK INSERT aw14_emp_person
FROM 'C:\temp\aw14_emp_person.csv'
WITH
(
    FIRSTROW = 2,
    FIELDTERMINATOR = ',',  --CSV field delimiter
    ROWTERMINATOR = '\n'
)

-- display aw14_emp_person table row values
SELECT * FROM aw14_emp_person
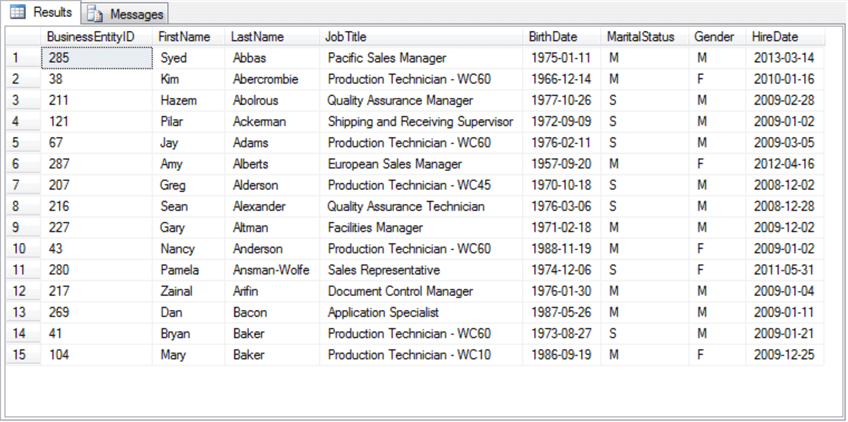
The preceding script ends with a select statement to display the contents of the aw14_emp_person table. The following screen shot displays the contents of the staging table in a SSMS Results tab. Notice that there are fifteen data rows, and the data row values exactly match those within the NotePad++ session from the preceding screen shot.
Importing from a CSV File with Checking for Invalid Data
The previous ETL demonstration worked because all the data was valid. However, it sometimes happens that when you load data provided by someone else, there is an error in the data. This demonstration illustrates this kind of problem with a HireDate column value for Hazem Abolrous, the Quality Assurance Manager, whose BusinessEntityID value is 211. This employee should have a hire date of February 28, 2009.
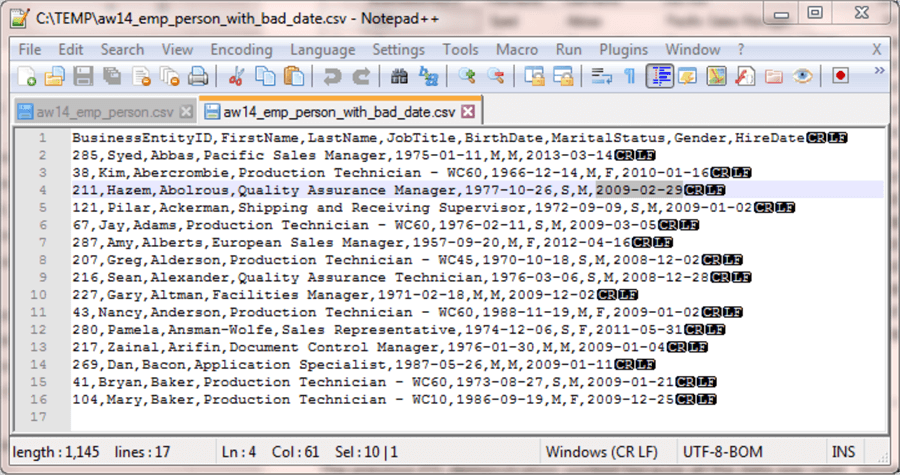
However, what if the external data source was submitted with an invalid hire date? Let's say that the hire date for Hazem was designated as February 29, 2009 in an external data source. This is an invalid date because there is no February 29 in 2009. The external source with the invalid date has the name aw14_emp_person_with_bad_date.csv; it is again saved in the c:\temp folder. Here's an image of the file in a NotePad++ session. The erroneous date is highlighted at the right edge of the fourth row.
When the BULK INSERT script is run from the prior example to load data from the aw14_emp_person_with_bad_date.csv file to the aw14_emp_person table, it fails with an error message number of 8118 and a message of "Error converting data type DBTYPE_DBDATE to date". This error indicates the code detects the bad date value for Hazem. Additionally, the error level is 16 so the aw14_emp_person table is never populated.
This outcome is reasonable in one sense because the attempt to read the data failed. On the other hand, there are fourteen rows with valid data in the aw14_emp_person_with_bad_date.csv file. However, BULK INSERT allows alternate settings that allow two advantages.
- First, one of the advantages is that rows with valid data are transferred to the aw14_emp_person table.
- Second, rows with bad data are returned for remedial action, such as fixing them or returning them to the data provider for appropriate correction.
The ERRORFILE setting can enable a BULK INSERT statement to import rows to a staging table with valid data and identify rows with invalid data from the external data file. The next example shows one way of using this setting with SQL Server 2014. The usage for the BULK INSERT ERRORFILE setting has evolved with subsequent SQL Server versions (2016 and 2017 in Azure). See this link for more information about the BULK INSERT ERRORFILE setting for SQL Server versions after SQL Server 2014.
Checking for invalid dates requires an additional modification besides use of the ERRORFILE setting. Instead of using a date data type for the HireDate, the HireDate column in the aw14_emp_person table must be defined with a datetime data type. The need for the modification to date columns only applies when there is a bad date in a column of date values. After the conversion, your code can convert datetime values back to date values with built-in SQL Server functions.
Here's the script file illustrating the design guidelines for checking for invalid date values. The code converts both the BirthDate and HireDate columns from a date type to a datetime type. The ERRORFILE setting points to a file named Err_BULK_INSERT.txt in the c:\temp folder. This file contains any rows with invalid data as they appear in the external data source. By using the ERRORFILE setting, the BULK INSERT command can succeed for rows with valid data, and the command can flag rows with invalid data.
-- erroneous data demo for aw14_emp_person staging table
-- remember to check Err_BULK_INSERT.txt for bad data rows
-- also, remember to erase the Err_BULK_INSERT.txt file
-- before re-running BULK INSERT with corrected data
-- drop aw14_emp_person table
DROP TABLE aw14_emp_person
GO

-- create aw14_emp_person table
CREATE TABLE aw14_emp_person
(
   BusinessEntityID int
  ,FirstName nvarchar(50)
  ,LastName nvarchar(50)
  ,JobTitle nvarchar(50)
  ,BirthDate datetime
  ,MaritalStatus nchar(1)
  ,Gender nchar(1)
  ,HireDate datetime
)
GO

-- bulk insert aw14_emp_person.csv
-- into fresh copy of aw14_emp_person table
BULK INSERT aw14_emp_person
FROM 'C:\temp\aw14_emp_person_with_bad_date.csv'
WITH (
  FIRSTROW = 2,
  ROWTERMINATOR = '\n',
  FIELDTERMINATOR = ',',
  ERRORFILE = 'C:\temp\Err_BULK_INSERT.txt'
  )

-- display aw14_emp_person table row values
SELECT * FROM aw14_emp_person
The Messages tab after running the preceding script identifies the rows and columns with invalid data. Additionally, the Messages tab reports how many rows were successfully transferred from the external data source to the target staging table. Here's the Messages tab from running the preceding script.

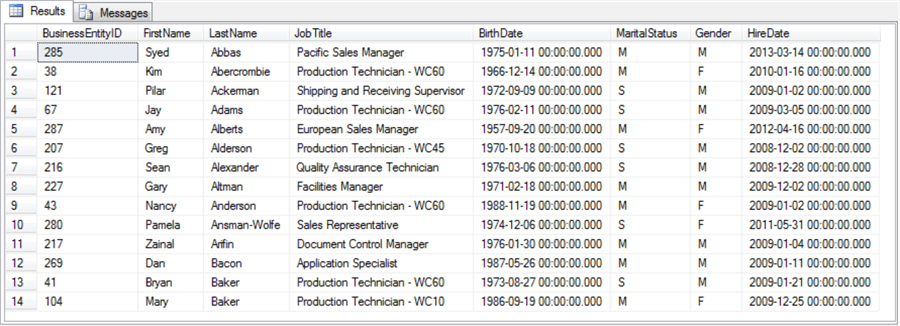
Notice that fourteen of the fifteen data rows in the external data source were transferred to the staging table. Here's the Results tab with the fourteen successfully transferred rows. Notice that the BirthDate and HireDate columns appear in datetime format (YYYY-MM-DD HH:MM:SS:MSC); the MSC abbreviation refers to milliseconds.
The error file (Err_BULK_INSERT.txt) populates the c:\temp folder. The ERRORFILE setting also causes another file to be created and populated with SQL Server system messages for bad data rows. The name of this other file is the filename designated in the ERRORFILE setting with a trailing string of ".Error.Txt".
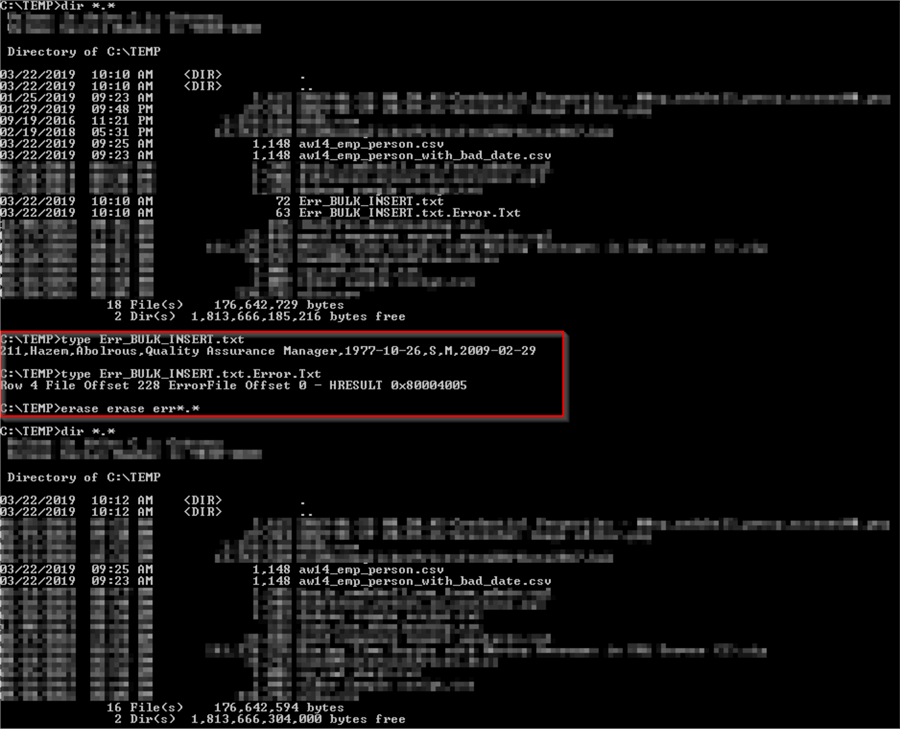
The following cmd window shows
- selected directory content for the c:\temp folder after the preceding scripts runs; see the output before the area with the red border
- the content of the Err_BULK_INSERT.txt and Err_BULK_INSERT.txt.Error.Txt files along with Windows batch commands for erasing these files; the content is in the area with the red border
- selected directory content for the c:\temp folder after removing the files with error information generated by the ERRORFILE setting; see the output after the area with the red border
You, or the original provider of the external source data, can use the content in the files populated as a result of the ERRORFILE setting to help track down and correct bad data.
If desirable, you can persist the contents of the Err_BULK_INSERT.txt elsewhere with a different name prior to deleting the file. In any event, you must delete the Err_BULK_INSERT.txt and Err_BULK_INSERT.txt.Error.Txt files prior to attempting to re-run the script for importing the external data source. If the files already exist, the script will fail.
Next Steps
Here are some links to resources that you may find useful to help you grow your understanding of content from this section of the tutorial.
- What is a staging table?
- Creating fact and dimension tables creation from staging tables
- BULK INSERT (Transact-SQL)
- Import CSV file into SQL Server
- SQL Server Bulk Insert Row Terminator Issues
- Using a Simple SQL Server Bulk Insert to View and Validate Data
- Bulk Insert in SQL server
- Error converting data type DBTYPE_DBDATE to date
- date (Transact-SQL)
- datetime (Transact-SQL)
- Microsoft SQL Server Date and Time Functions with Examples


About the author
 Rick Dobson is an author and an individual trader. He is also a SQL Server professional with decades of T-SQL experience that includes authoring books, running a national seminar practice, working for businesses on finance and healthcare development projects, and serving as a regular contributor to MSSQLTips.com. He has been growing his Python skills for more than the past half decade -- especially for data visualization and ETL tasks with JSON and CSV files. His most recent professional passions include financial time series data and analyses, AI models, and statistics. He believes the proper application of these skills can help traders and investors to make more profitable decisions.
This author pledges the content of this article is based on professional experience and not AI generated.
View all my tips
