Problem
Microsoft offers many services on the Windows platform that when made to work together can create a SQL Server Failover Cluster on Azure virtual machines. In this tip, we will cover how to set up an SQL Server Failover Cluster (FCI) with Windows Failover Cluster Services running on Azure.
Solution
For our solution, we will be using a number of Windows services and technologies on Windows Server that will work together to help us achieve configuring a failover cluster instance with SQL Server on Azure virtual machines.
Below are the services that we will be configuring in Windows Server on the Azure virtual machines:
- Windows Failover Cluster Service
- Clustered Shared Volumes
- Storage Spaces Direct (S2D)
- SQL Server
For Part 1 of the solution, we will build the foundation first. We will be building a failover cluster service with 2 nodes, each of the nodes will have their own data and log disk that we will be enabling the Storage Spaces Direct (S2D) to create a clustered shared volume. For the cloud witness for the failover cluster, we will be using an Azure storage account and for virtual machine backups, we will use Azure recovery vault.
For Part 2 of this solution, we will setup a SQL Server failover cluster instance behind an Azure internal load balancer.
The following diagram summarizes the complete solution we want to build.

Azure Resources
To build the foundation for our solution, you will need to create the following Azure resources created on the Azure portal. If you do not have an Azure portal account yet, here is a link to help get you started on creating a free account.
It is highly recommended to create these items under one resource group for ease of management, and you can simply delete the resource group itself once you have completed your test to avoid unnecessary costs.
- 1 Resource Group
- 2 VMs running Windows 2019 Datacenter edition and must be joined to your test or corporate domain
- 1 Availability Set – Place the 2 Azure VMs in this availability set
- 1 Data disk, storage type of Premium SSD, 50GB for this test, per virtual machine
- 1 Log disk, storage type of Premium SSD, 50GB for this test, per virtual machine
- 1 Internal Load Balancer
- Azure Storage Account
- A network security group that will allow connectivity to SQL Server default ports 1433 and allow RDP to port 3389
Windows Server 2019 is the latest edition of the Windows Server family as of the writing of this article. Windows Server Failover Cluster (WSFC) is the most reliable cluster service when running a SQL Server Failover Cluster Instance. For this solution, we will be using Windows Server 2019 for both of the virtual machines.
Windows Failover Cluster Service
For our setup on the Azure VM, you will need to add the Windows Failover Cluster feature to each of the virtual machines. Here is a very good article to guide you in every step of the way. It is also a good idea to prepare your preferred SQL Server 5 with role name and cluster name. You may need to work with your domain administrator to have these names pre-staged on the corporate active directory.
For the cluster witness, will be using a cloud witness that will be stored in our Azure storage account. Once you have completed the configuration for the Windows Service Failover Cluster in each of the Azure virtual machines, proceed to setup the cloud witness.
Below are the steps to configure the cloud witness hosted on the Azure storage account:
- From the Failover Cluster Manager console, right click on the cluster name, select More Actions and select Configure Cluster Quorum Settings. This will launch the ‘Configure Cluster Quorum Wizard’.
- Select the radio button for ‘Select the quorum witness’. Click Next.
- Select the radio button for ‘Configure a cloud witness’. Click Next.
- On the next window, enter the details for your Azure storage account. You will need the Azure storage account name and the access keys. In the Azure portal, these can be retrieved on the storage account blade and selecting the Access Keys on the left pane menu.


Click the Next button, then click Finish to complete the setup of the quorum cloud witness.
At this point, you should have the 2 Azure virtual machines configured as part of a 2 node failover cluster with a cloud witness. It is a good idea to move the cluster resource from node 1 to node 2 and back to test the failover cluster.
Storage Spaces Direct
The next step is to configure the Storage Spaces Direct (S2D) on both the Azure virtual machine. The Storage Spaces Direct is another Windows Server feature, available in Windows Server 2016 and 2019 that we will need to build a clustered storage in our newly configured failover cluster. Here is a great video that describes the Storage Spaces Direct in detail.
Before you enable the S2D feature, make sure the Azure disks are attached to the virtual machines, a partition has not been created, no data exists on the disks and the disks are not formatted. Enabling S2D can be easily achieved by the PowerShell script below. Make sure to run the below PowerShell locally on each of the virtual machines and with elevated permissions as an administrator.
Enable-ClusterS2D
New-Volume -StoragePoolFriendlyName S2D* -FriendlyName Data -FileSystem CSVFS_ReFS -Size 50GB
New-Volume -StoragePoolFriendlyName S2D* -FriendlyName Log -FileSystem CSVFS_ReFS -Size 50GB
It is a good reminder to use friendly names for your volumes such as ‘Data’ for the SQL Server data or mdf files and ‘Logs’ for the SQL Server transaction log or ldf files. In this way, you can easily recall during SQL Server installation which cluster storage to use for data and for logs.
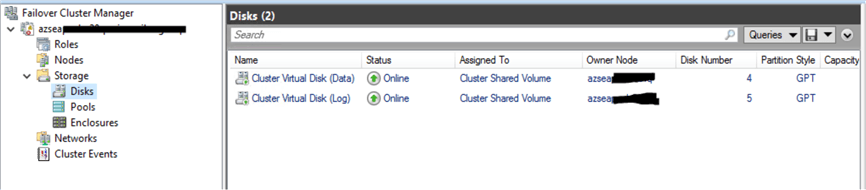
Once the PowerShell script is executed successfully, you can go back to the failover cluster manager console, go to Storage > Disks to see that the cluster virtual disk for Data and for Log are both present.
Open File Explorer, check the local C:\ drive and make sure that the Cluster Storage folder is present on both virtual machines. Inside the Cluster Storage folder, 2 more folders for Data and Log should be available. To test this further, try to create a sample txt file in one of the cluster shared volumes. Switch between the 2 nodes of the cluster resources, the sample file you created should be present on both of the virtual machines.
At this point, you should have completed the following:
- Creation of the required resources on the Azure portal
- Set up of failover cluster with 2 nodes
- Configure the cloud witness in the failover cluster manager
- Configure clustered shared volumes with Storage Spaces Direct on each of the nodes
For part 2 of our solution, we will be installing the SQL Server failover cluster instance and configure the Azure internal load balancer to point to the cluster SQL Server role.
Next Steps
Check out these other articles for running SQL Server on Azure:
- Tips on SQL Server on Azure
- Azure HA and Disaster Recovery Options for MS SQL Server
- More tips on configuring SQL Server Clustering

Carla Abanes is a certified Microsoft SQL Server Database Administrator with extensive experience in data architecture and supporting mission critical databases in production environments. She is based in Manila and wears 2 hats at work as a SQL Server Technical Lead and as a Cloud Architect.
She holds a certification in AWS Solutions Architect – Professional and Azure Administration. I am passionate about conceptualizing proof-of-concepts, turning ideas into real applications and overcoming challenges that come with the execution and delivery of solutions.


