By: Ian Fogelman | Comments | Related: More > Snowflake
Problem
You have just implemented a mass exodus from your on-premises data warehouse to Snowflake. Now that the schema and data portions of your migration are completed, you have one final migration type and this is the workflows that operated in your previous environment (think SQL Server Agent jobs in SQL Server terms). These workflows are largely batch processing loads from different data sources on a particular schedule. The problem we will be looking at today is how to implement these workflows in the new Snowflake environment.
Solution
For the solution to this problem, we will be covering Snowflake tasks. Snowflake tasks are schedulable scripts that are run inside of your Snowflake environment. This tip will cover:
- Introduction to Snowflake
- High level concepts of a task
- Building a simple task
- Turning a task on and off
- Adding descending tasks onto an existing task
Requirements:
- A free Snowflake instance.
Introduction to Snowflake
Snowflake is the first cloud first data warehouse solution, the service is built on top of the customer's choice of cloud provider (AWS, Azure or GCP) infrastructure.
Snowflake SQL is ANSI compliant and supports common analytic and windowing functions. You will definitely notice some unique syntax in Snowflake, but you will also notice some similarities coming from a heavy SQL Server background the transition has been reasonable for me.
In terms of what the IDE is for Snowflake it is entirely web based. To interact with your instance, you will navigate to your unique URL for example XXXXXXXX.us-east-1.snowflakecomputing.com. Once logged in you will be in the main web GUI, this is the main IDE and can start interacting with your data assets. Also, for reference each query tab in the Snowflake console is referred to as a "worksheet". These "worksheets" are automatically saved and can be reviewed at any time, which is equivalent to a tab history feature.
What is a Snowflake task?
The Snowflake documentation defines tasks as having the ability to execute single SQL statements including calling a stored procedure. Tasks in Snowflake may only be run by a schedule. DDL statements relevant to Snowflake tasks are as follows:
| Name | Description |
|---|---|
| CREATE TASK | Create a new task, also takes parameter for scheduling |
| ALTER TASK | Alter an existing task |
| DROP TASK | Delete an existing task |
| DESCRIBE TASK | Returns task meta data. Must be owner of the task to view this data |
| SHOW TASKS | Provides a list of tasks available to the current role |
Scheduling a Snowflake task
The Snowflake task engine has a CRON and NONCRON variant scheduling mechanisms. The CRON variant should look familiar syntactically if you are an avid Linux user. CRON or CRONTAB is the Linux version of Windows task schedule. It is extremely simplified in regards to how it runs a job. It supports a few parameters and points to a SQL statement as part of the task definition. The parameters control the frequency of the job being run, days of week and time.
Here is a table with a few configurations and descriptions of CRON job timings to give you an idea of how it works.

Building a simple Snowflake task
In this example, the task we will be inserting a random letter as well as a timestamp into our TASKDEBUG table. The timestamp column will allow us to see the schedule of the job executing.
Start by creating a database and setting the database context in your Snowflake worksheet.
CREATE DATABASE MSSQLTIPS;
USE MSSQLTIPS;
Here is an example script creating a task using NON-CRON notation:
CREATE OR REPLACE TASK TASK_DEBUG
  WAREHOUSE = COMPUTE_WH
  SCHEDULE = '1 MINUTE'
  TIMESTAMP_INPUT_FORMAT = 'YYYY-MM-DD HH24'
AS
insert into taskdebug
with arr as (select array_construct('A','B','C','D','E','F') arr)
select arr[ABS(MOD(RANDOM(), array_size(arr)))],CURRENT_TIMESTAMP() from arr;
Here is the same script using CRON notation.
CREATE OR REPLACE TASK TASK_DEBUG
  WAREHOUSE = COMPUTE_WH
   SCHEDULE = 'USING CRON 1 * * * * America/New_York'
  TIMESTAMP_INPUT_FORMAT = 'YYYY-MM-DD HH24'
AS
insert into taskdebug
with arr as (select array_construct('A','B','C','D','E','F') arr)
select arr[ABS(MOD(RANDOM(), array_size(arr)))],CURRENT_TIMESTAMP() from arr;
Turning the task on and off
An important note is that even though the task is created in Snowflake, which we can verify by running the show tasks command.
--VIEW TASK WITH SHOW TASKS COMMAND
SHOW TASKS;

We can see the state is "suspended" which means the task will not be triggering. To turn our task on, we issue an alter task command.
--AFTER TASK IS CREATED, ITS INITAL STATE IS SUSPENDED, ENABLE TASK
ALTER TASK TASK_DEBUG RESUME;
Now that the task is on, we just have to wait 1 minute for the task to trigger and query the TASKDEBUG table for proof that our task is running as expected.
--WAIT 1 MINUTE
SELECT * FROM TASKDEBUG;
Adding descending tasks onto an existing task
Lastly, let's suppose that we would like another task to trigger after our initial task TASK_DEBUG runs. Snowflake offers descending task functionality; we will define a similar insert statement as previously shown. In this task we will hard code the first value as 'x' so that we can be sure the 2nd task is triggering.
Before we can stack any tasks on our initial task, we must suspend the initial task.
--TURN TASK OFF
ALTER TASK TASK_DEBUG SUSPEND;
Now that the task is in a suspended state, we can create the second task to run after the first.
--CREATE A 2ND TASKS WITH AFTER CLAUSE
CREATE OR REPLACE TASK TASK_DEBUG_2
  WAREHOUSE = COMPUTE_WH
  AFTER TASK_DEBUG --SPECIFY WHICH TASK IT OPERATES AFTER
AS
insert into taskdebug
select 'X',CURRENT_TIMESTAMP() from arr;
We can verify the task dependence by using the following query:
--CHECK DEPENTANT TASKS
select * from table(information_schema.task_dependents(task_name => 'MSSQLTIPS.PUBLIC.TASK_DEBUG', recursive => false));

Here we can verify two things, first that TASK_DEBUG_2 has a Predecessor task of TASK_DEBUG. And also, that TASK_DEBUG_2 does not have a schedule of its own.
Now turn the original task back on and also enabled the second task. Its worth noting here that TASK_DEBUG_2 must be enabled first and then the root task.
--TURN ORIGINAL TASK BACK ON
ALTER TASK TASK_DEBUG_2 RESUME;
ALTER TASK TASK_DEBUG RESUME;
Wait 1 minute for the task to run and check the TASKDEBUG table.
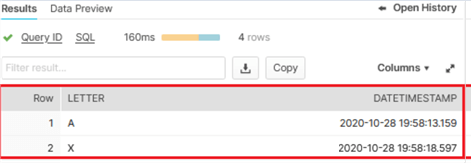
--WAIT 1 MINUTE, VERYIFY THAT 'X' AND OTHER LETTERS ARE IN THE TASKDEBUG TABLES
SELECT * FROM TASKDEBUG;
Here we can see an 'X' value and a random letter which verifies that both the tasks were operated.
To save on compute charges suspend both of the tasks.
--TURN BOTH TASKS OFF
ALTER TASK TASK_DEBUG SUSPEND;
ALTER TASK TASK_DEBUG_2 SUSPEND;
In summary tasks are very handy in Snowflake, they can be combined with streams, snowpipe and other techniques to make them extremely powerful.
Next Steps
- Check out this Snowflake overview
- For a comparison of SQL Server Agent Jobs compared to Snowflake tasks check out this article
- Look at Snowflake tasks documentation details


About the author
 Ian Fogelman is professional DBA with a hunger and interest for data science and application development. Ian enjoys leveraging cloud-based technologies and data to solve and automate tasks. Ian holds a MS in computer science with a concentration in software development. Ian is also a member of his local SQL Server user group and a member of his local data science user group in Columbus Georgia.
This author pledges the content of this article is based on professional experience and not AI generated.
View all my tips
