Problem
Azure Databricks is a fully managed Apache Spark environment that allows data engineers and data scientists to concentrate on data instead of managing a cluster of virtual machines. At the heart of every data lake is an organized collection of files. Companies that leverage a data governance framework are generally more organized than ones who do not have any standards in place.
Regardless of how organized the folders and files are, development must be able to manage these objects in the file system. By default, Azure Databricks is connected to what is considered local storage. This storage cannot be accessed with typical tools such as Azure Data Explorer or PowerShell.
In this article we look at how you can manage the local file system and the commands to use within in a Databricks Workspace.
Solution
Azure Databricks provides many ways to manage both directories and files contained within the local filesystem. We will go through three common ways to work with these file system objects.
Business Problem
Our boss asked us to create a sample data lake using the delimited files that were supplied with the AdventureWorks database. The actual deployment of the Azure infrastructure was done earlier in the year and can be seen below on a private dashboard. The only object of interest for this tip is the Azure Databricks workspace. I am assuming that you have a working knowledge of Databricks. I will be exploring how to manage local files and local folders at a detailed level.

Spark Cluster
The maintenance of the Databricks cluster is fully managed by Azure. However, the definition and start of the cluster is the responsibility of the user. The image below depicts the architectural design behind a cluster. Each cluster has 1 driver node and N executor nodes.
The driver node excepts the request from the presentation plane (Databricks User Interface) to run either a single cell or all cells in a notebook. The catalyst optimizer validates the code in the cells, generates several logical plans, picks the physical plan with the best cost threshold, and generates Java Byte Code that can be run on the executors. Each driver and executor node are a virtual machine that runs the application code in a JVM. That way, different applications executing the code on the cluster are isolated from each other. The driver node understands how to execute Linux system commands.

To start our AdventureWorks exploration, we must define and start a cluster. I choose to name my cluster “cmd-sample-cluster” since I was creating a prototype notebook using the Common Data Model SDK beforehand. This cluster has 1 driver node and between 2 and 8 worker nodes. As an administrator of a Databricks cluster, you can choose from three types of cluster modes: single node, standard, and high concurrency. Please choose the middle option for now. There are many versions of the Databricks runtime. Anything before version 7.0 runtime supports Spark 2.0. Otherwise, the runtime supports Spark 3.0 by default. The most important setting to choose is the auto terminate period. Make sure you set this option otherwise you will be charged for computing power every hour the cluster is up.

To recap, the creation and starting of a cluster is vital to running Databricks notebooks. See the documentation for more details on clusters.
Databricks Workspace
There are two ways in which the workspace can be organized. The shared workspace allows folders and/or notebooks to be collaborated on. The image below shows two folders existing under this workspace. Today, we are talking about managing the local Databricks Files System (DBFS). Therefore, the “dbfs-local-article” folder contains the notebook we are working on. The several notebooks associated with this article will be in the “delta-lake-article” folder. While the folder naming is not riveting, it does express the purpose of the objects contained within.

The user workspace allows each Azure Active Directory user to create their own folders and files. We can see that the Azure subscription owner, craftydba@outlook.com, is the default user. I added my friend dilbert@craftydba.com to the workspace as an additional administrator.

Creating our first notebook is very easy. Find the dbfs-local-article folder within the workspace and click the drop-down arrow. There will be a menu option to create notebook. While Databricks supports many different languages, I usually choose a Python notebook due to the wide use of the language. The image below shows our notebook named “nb-work-with-files“. Please notice the large C in blue on the top right area. This is a notification telling you that another user has this notebook open at the same time. Of course, it is just me in another web browser accessing the notebook.

Like any process that is coded, it is important to use comments and document headers to accurately describe the algorithm used to accomplish the business purpose. Notebooks support many different magic commands. The markdown command allows graphics such as my “crafty dba” avatar to be added for a nice visual effect. Again, I cannot stress how important it is to document your code. As a consultant, I see many companies have hundreds of lines of code without an author’s name, the date the code was last updated, and the purpose of the notebook.
In a nutshell, use a shared workspace for any work that will be collaborated on by a team of developers or called from by Azure Data Factory. The user workspace is reserved for private development or prototypes of sample code.
Uploading Files
The Databricks icon on the left side menu brings the user to the main page. Sections of the main page are grouped into actions that are similar. The common tasks section contains hot links to tasks that are executed by a data engineer on a daily basis. The recents section of the screen shows notebooks that were recently worked on. The Import & Explore Data section is dedicated for importing and exploring data files. Most names are hyper-link sensitive on this page. Let’s start importing two AdventureWorks delimited text files now.

Use the upload file tab dialog box to copy files from your local laptop to the Azure Databricks service. The image below shows that the currency dimension file has been uploaded to the table’s subdirectory. We are going to skip the creation of hive tables for these files at this time. Please repeat the import process for the accounts dimension file.

The DBFS tab dialog box allows a user to explore the file system using a graphical user interface. We can see 4 files exist in the tables sub-directory. The first two data files belong to the AdventureWorks database. The next file is the avatar image that was used in my mark down file header. The last file is used to create the data lake programmatically in the next article. I left this file in this directory intentionally. Many times, we will want to work on all CSV files except one or two. The existence of this file allows us to explore this use case later.

The uploading of data files to the Azure Databricks Local Files System can be achieved using a very simple dialog box.
Databricks File System
You can work with files on DBFS or on the local driver node of the cluster. You can access the file system using magic commands such as %fs (files system) or %sh (command shell). Listed below are four different ways to manage files and folders. The top left cell uses the %fs or file system command. The bottom left cell leverages the dbutils.fs Python library. When passing parameters using these two techniques, it is assumed that the root folder is represented by /. The top right cell relies upon the os Python library and allows the execution of operating system specific commands. The bottom right cell calls the %sh or system shell command. When passing parameters using these two techniques, it is assumed that the root folder is represented by /dbfs/.

Most command line programs have a help option. The %fs magic command is no different. We can see there are two sub-libraries that are implemented. The fsutils library is focused on manage files and folders. We will be discussing all the commands listed below except the head and put commands since they are not that useful. Databricks uses a FUSE mount to provide local access to files stored in the cloud. This mount is a secure, virtual filesystem. I will be talking about working with remote storage using the mount library in a future article.

There are many ways to work with folders and files stored in the Databricks File System. In the next few sections, we will be covering three ways to execute each command. Enter each command into a new cell and execute the cell to see the results.
List Files and Directories
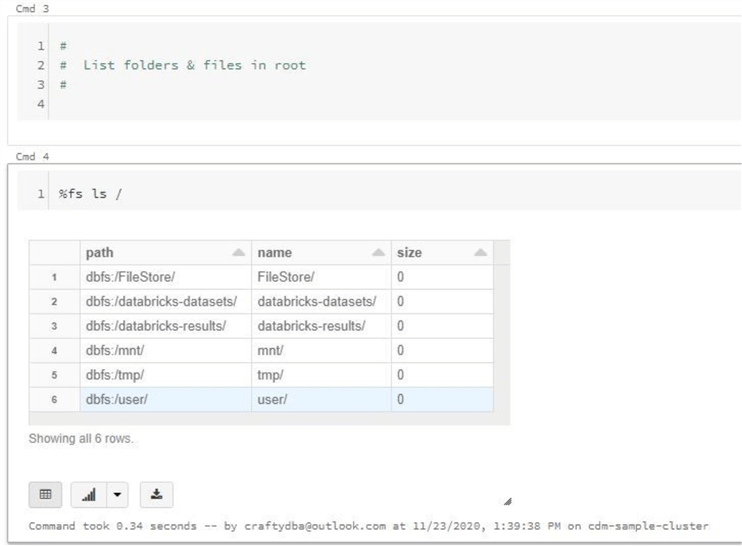
The most basic system command is to list the contents of a directory stored within the virtual file system. The three lines of code below show three different ways to execute the ls command to achieve the same result.
#
# List root directory - 3 different ways
#
%fs ls /
dbutils.fs.ls("/")
%sh ls /dbfs/
The image below shows cell 4 using the %fs magic command to list file and folders in the root directory.
There are three directories in the output that I would like to point out. First, the /FileStore/ directory is where uploaded files are stored by default. Second, the /databricks-datasets/ directory contains a bunch of example files that are useful when learning data engineering or data science. Last, the /mnt/ directory is where remote cloud storage can be FUSED to the filesystem by a user.
The next two cells perform the same operation using different commands. Output from all three commands are different. The first output looks like a data frame that can be analyzed with built in charting. The second output is a dictionary of FileInfo objects. The third output is just clear text.

Default Upload Directory
Previously, we uploaded both the account and customer dimensional files. While the files have a csv extension, the Microsoft database repository has stored the files in pipe delimited format. The code below shows how to list the contents of the default upload folder.
#
# List default upload folder - 3 different ways
#
%fs ls /FileStore/tables/
dbutils.fs.ls("/FileStore/tables/")
%sh ls /dbfs/FileStore/tables/
Again, I could show you the output of all three commands. However, it is just not that interesting.

Make Directory
The mkdirs command allows the user to create a directory to house the AdventureWorks data files. The code below shows three different ways to create the user defined directory.
#
# Create adventure works directory - 3 different ways
#
%fs mkdirs advwrks
dbutils.fs.mkdirs("/advwrks/")
%sh mkdirs /dbfs/advwrks
Some of the system commands return a Boolean output. A false value indicates the fact that the command failed. A true value indicates that the command succeeded.

Read CSV File
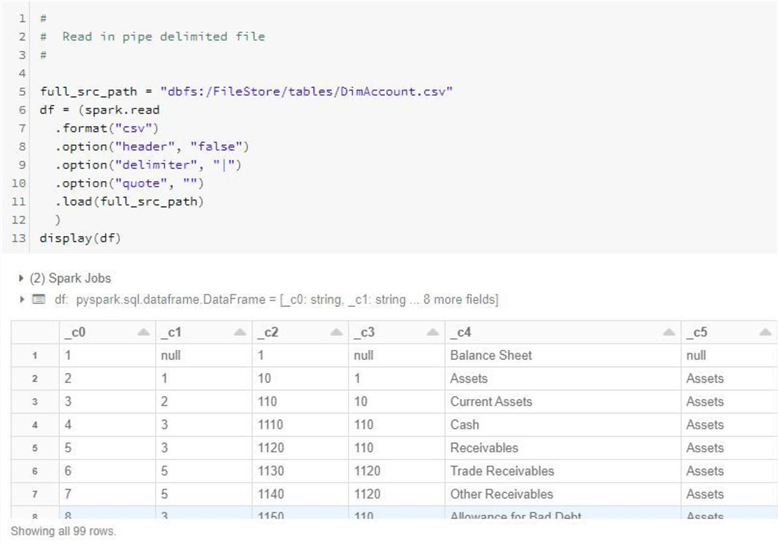
The code below sets the full_src_path variable to the location of the account file in the default directory. The pyspark.sql module contains a function called spark.read. This function has many different parameters that can change the behavior of the code execution. We can see that the file is considered a csv format with no header and a pipe delimiter. The df variable contains all the data read in from the file in a Spark DataFrame. The display function outputs the data in a readable format.
I can see two problems from the output. First, we can see that we are missing column headers. If we are going to post this data in the future to the hive catalog, this issue has to be fixed. Second, the schema of the data file was inferred by default. Therefore, we should supply our own schema to guarantee the correct format.
This section was meant as a teaser for my next article. We have a lot more to learn about reading and manipulating data.
Copy Files and Directories
The cp command allows the user to make a copy of the files from one directory to another. The code below shows three different ways to copy DimAccount.csv file stored in the tables directory to the advwrks directory.
#
# Copy over file 2 advwrks - 3 different ways
#
%fs cp /FileStore/tables/DimAccount.csv /advwrks/DimAccount.csv
dbutils.fs.cp("/FileStore/tables/DimAccount.csv", "/advwrks/DimAccount.csv")
%sh cp /dbfs/FileStore/tables/DimAccount.csv /dbfs/advwrks/DimAccount.csv
Some of the system commands return a Boolean output. A false value indicates the fact that the command failed. A true value indicates that the command succeeded. The copy command only produces Boolean outputs.

Move and/or Rename Files
The mv command allows the user rename files in an existing directory or move files to another directory. The code below shows three different ways to add a time stamp to the CSV file. Since the naming conventions of our company uses lower case names, the capitalization of the file name has been changed.
#
# Rename csv file - 3 different ways
#
%fs mv /FileStore/tables/DimAccount.csv /advwrks/dim-account-20201201-101530.csv
dbutils.fs.mv("/FileStore/tables/DimAccount.csv", "/advwrks/dim-account-20201201-101530.csv")
%sh mv /dbfs/FileStore/tables/DimAccount.csv /dbfs/advwrks/dim-account-20201201-101530.csv
Some of the system commands return a Boolean output. A false value indicates the fact that the command failed. A true value indicates that the command succeeded. The move command only produces Boolean outputs.

Remove Files & Directories
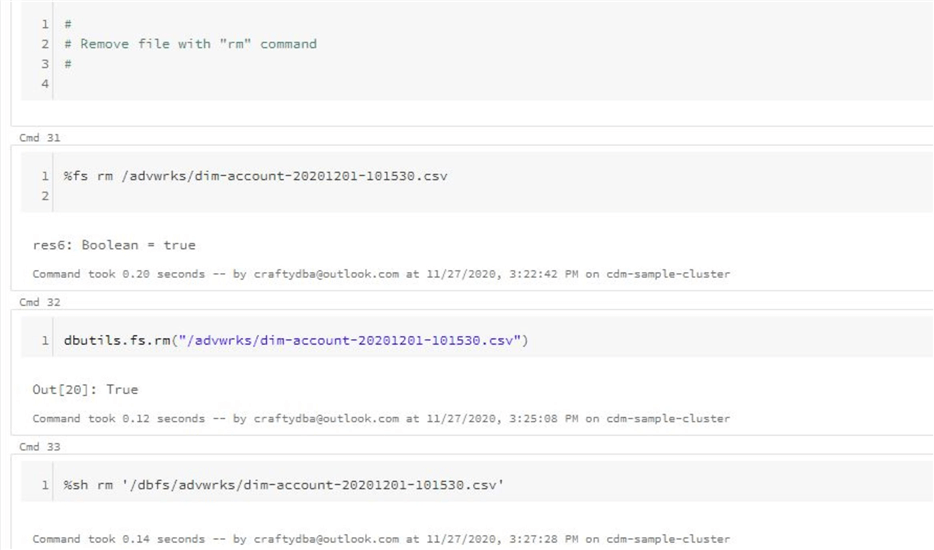
The rm command allows the user to remove files or folders. The code below shows three different ways to remove the CSV file from the advwrks directory.
#
# Remove csv file - 3 different ways
#
%fs rm /advwrks/dim-account-20201201-101530.csv
dbutils.fs.rm("/advwrks/dim-account-20201201-101530.csv")
%sh rm /dbfs/advwrks/dim-account-20201201-101530.csv
Some of the system commands return a Boolean output. A false value indicates the fact that the command failed. A true value indicates that the command succeeded. The remove command only produces Boolean outputs.
The code below shows three different ways remove the advwrks directory.
#
# Remove adventure works directory - 3 different ways
#
%fs rm -r advwrks
dbutils.fs.rm("/advwrks", recurse=True)
%sh rm -r /dbfs/advwrks

Now that we have explored all the simple commands to manipulate files and directories, let’s work on something more complex. There are many times where you want to combine all the files in each directory into an archive file that is compressed to save file space. How can we perform this action with Azure Databricks?
How to make a tarball?
Most Unix software on the net is distributed in the form of a tarball. This means that all the files have been packed into a tar file which has been compressed with g-zip to save space. The file name thus ends up having extension tar.gz.
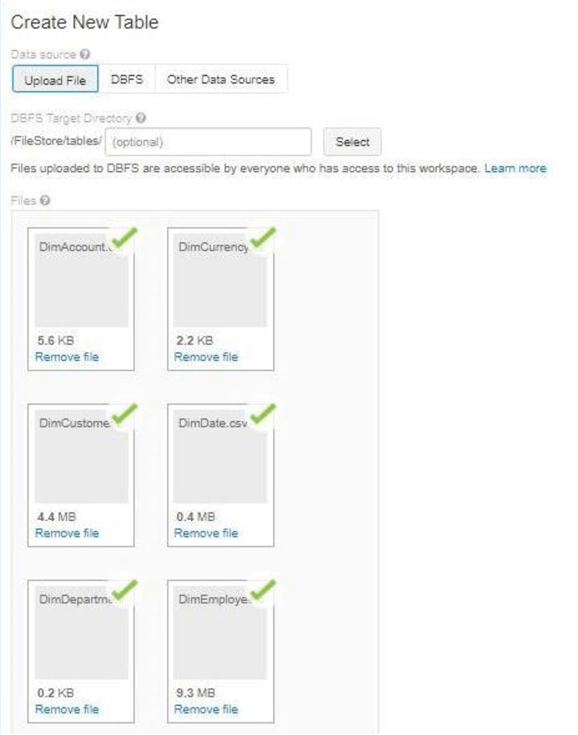
We need to load a lot more files into the default upload directory. In a prior section, I loaded a single file at a time. But in reality, the Databricks Graphical User Interface allows for a selection of files to be uploaded. The image below shows all the delimited files from the AdventureWorks database being uploaded to the /FileStore/tables directory.
The Databricks Graphical User Interface is based upon Jupyter Notebooks. The IPython kernel supports many different magic commands. One command we did not go over yet is %%bash. We will be calling the bash shell in the examples below.
The wc command allows the develop to count the number of csv files. This was achieved by piping the output of the ls command to the wc command. The setup_data_lake.csv file is throwing a monkey wrench in the whole design. How can we create a list of files that does not include this file?

The find command is used to retrieve a list of files in a given directory given a naming pattern. In our case, we want all CSV files in the default upload directory. To remove any unwanted entries, we can use the grep command to filter the file listing. Last but not least, we want to save the final output to a text file called list.txt. This task can be achieved by piping and redirecting the output in the image below.

Next, we want to create a tarball file named advwrks.tar.gz in the parent directory called /FileStore. The -T parameter of the tar command allows the developer to pass the list of files to combine and compress into the final file.

The bash shell supports a variety of programming constructs including a for loop. The cat command creates an array of files that can be enumerated. Usually, the sources files that are stored in the tarball are removed from the system. The image below shows the correct command to remove the AdventureWorks files.

The problem with using magic commands is the fact that no error handling is used. If we run the same code a second time, we end up with an error since the file entries in the list.txt no longer exists.

Finally, if we were to package up this code into a callable notebook, we would want to remove the temporary list.txt file. In fact, we would want to make this file name and location unique so that multiple programs can call the same logic at the same time.

Summary
Today’s article was an introduction to the wonderful world of Databricks. Azure Databricks is a mature platform that allows the developer to concentrate on transforming the local or remote file system data without worrying about cluster management. The local Databricks File System (DBFS) is a restricted area that can only upload or download files using the either the Graphical User Interface or the Databricks Command Line Interface (CLI).
Regardless if files or folders are stored locally or remotely, the data engineer must know how to do the following tasks: make new directories, upload files, copy files, rename files, move files, remove files, and remove directories. These simple operating specific tasks can be accomplished in at least four different ways. We explored how to complete many of these tasks in the sections above.
Many times, the developer will need to string a bunch of commands together to perform a complex action. The ability to create a tarball from AdventureWorks data files is one such task. We learned how the find, grep, tar, and cat commands can be used together to accomplish a complex task. Parameters can be passed from the Python Notebook to the operating system by using environmental variables. I will leave this as an exercise for you to complete.
Next time, I will talk about two secure ways to attach or remote storage. Also, we will want to talk about how to create quality zones in the data lake. Typically, a company uses a bronze (raw) zone, silver (refined) zone and gold (trusted) zone to separate the quality of the data files. This quality rating is subjective in nature. At the end of the next article, we will be ready to transform the raw AdventureWorks csv files into refined delta tables.
Finally, here is an exported Python notebook from this tip and a zip file containing all the files from the Adventure Works database.
Next Steps
- How to securely connect to remote storage with Databricks
- How to create a delta lake using Azure Databricks
- How can Power BI consume trusted files in the Data lake
- How to read from and write to various file formats
- How to log data engineering jobs with Azure SQL database

John Miner is a Senior Data Architect at Insight Digital Innovation helping corporations solve their business needs with various data platform solutions.
He has over thirty years of data processing experience, and his architecture expertise encompasses all phases of the software project life cycle, including design, development, implementation, and maintenance of systems.
His credentials include undergraduate and graduate degrees in Computer Science from the University of Rhode Island. Also, he has earned certificates from Microsoft for Database Administration (MCDBA), System Administration (MCSA), Data Management & Analytics (MCSE), Data Science (MPP), Databricks Certified, and Fabric Certified.
John has been recognized with the Microsoft MVP award nine times for his outstanding contributions to the Data Platform community.
When he is not busy talking to local user groups or writing blog entries on new technology, he spends time with his wife and daughter enjoying outdoor activities. Some of John’s hobbies include wood working projects, crafting a good beer and playing a game of chess.
- MSSQLTips Awards: Author of the Year – 2019, 2022, 2023 | Champion (100+tips) – 2023


Dear Reader,
There are several ways to solve this problem.
1 – Enable Unity Catalog. This is a larger undertaking but allows for delta sharing between workspaces.
2 – Enable AD Credential pass through with a high concurrency cluster.
https://learn.microsoft.com/en-us/azure/databricks/archive/credential-passthrough/adls-passthrough
Both these approaches use the IAM (RBAC) and ACL controls on the data lake to determine if a user can remove a file or not.
Another approach is not to give the users access to a cluster that can read or write files. That will be done by engineering.
3 – Enable table access controls. Both 2 and 3 are legacy ways to control access. Databricks suggests unity catalog, but the existing hive catalog tables/views will have to be rebuilt (AFIAK).
https://docs.databricks.com/en/data-governance/table-acls/table-acl.html
In summary, if you do not want to use unity catalog, use options 2 or 3. Otherwise, enable the unity catalog and rebuilt your data layer.
How to restrict dbutils.fs.rm command to run in Azure databricks cluster? Please suggest…
You can now explore, and upload files to DBFS via the UI – https://docs.databricks.com/data/databricks-file-system.html#browse-dbfs-using-the-ui