Problem
As modern data and analytics platforms continue to evolve from PaaS to SaaS models, organizations seek to understand the more optimal ways to manage their data. Within the Databricks platform, the Unity Catalog has emerged as a unified governance solution for data and artificial intelligence (AI) assets within the Lakehouse, which provides centralized access control, auditing, lineage, and data discovery capabilities across Databricks workspaces. However, customers want to understand ways to set up the Unity Catalog to reap the benefits of its capabilities.
Solution
Unity Catalog has several benefits that make it an efficient resource for managing fine-grained data permissions with ANSI SQL or the UI. It helps organizations govern their Lakehouse assets and delegate access appropriately for internal consumption. Some significant benefits of the Unity Catalog include:
- Unified Data Access Policies: Administer data access policies across all workspaces from one central location.
- Standardized Security: Utilize a security model based on ANSI SQL for granting permissions within your data lake.
- Automatic Auditing and Lineage Tracking: Capture user-level audit logs and data lineage information for comprehensive data management.
- Efficient Data Discovery: Tag, document, and search for data assets with ease.
- Operational Data Access: Access and query operational data, including audit logs and lineage, through Unity Catalog.
- Comprehensive Data and AI Visibility: Discover and classify various data types and AI assets across any cloud.
- Unified Permission Management: Simplify access control by defining policies for data and AI assets through a single interface.
- AI-Powered Monitoring: Automate monitoring, error diagnosis, and quality maintenance for data and ML models.
- Open Data Sharing: Easily share data and AI assets across clouds, regions, and platforms using the integrated Delta Sharing feature.
Now that we know the benefits of the Unity Catalog, let’s walk through a hands-on demo covering how to set up the Unity Catalog and work with its new Volumes feature within Azure Databricks.
Prerequisites
This section covers several prerequisite setup steps that must be completed before working with Unity Catalog.
Step 1
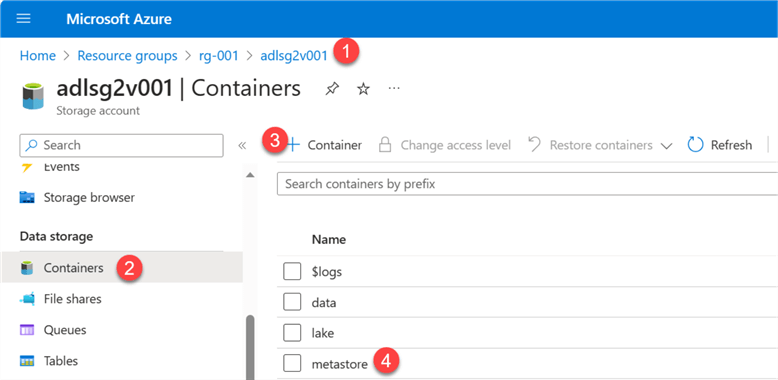
Ensure you have an Azure Data Lake Storage Gen2 account created in your Azure Account. Also, create an empty container with an intuitive name (e.g., ‘metastore’), which we will use to bind to the Unity Catalog.
Step 2
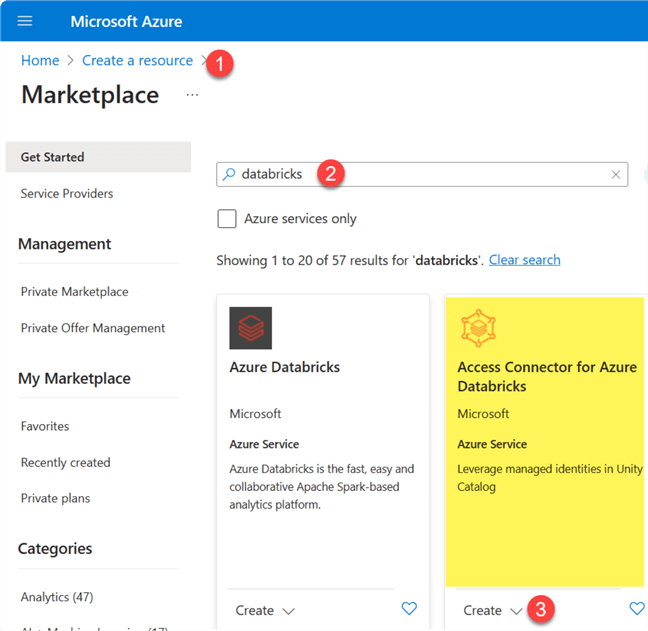
Next, create a new Access Connector for Azure Databricks from the new resources Marketplace within the Azure portal. The Access Connector for Azure Databricks connects managed identities to an Azure Databricks account for accessing data registered in the Unity Catalog.
Step 3
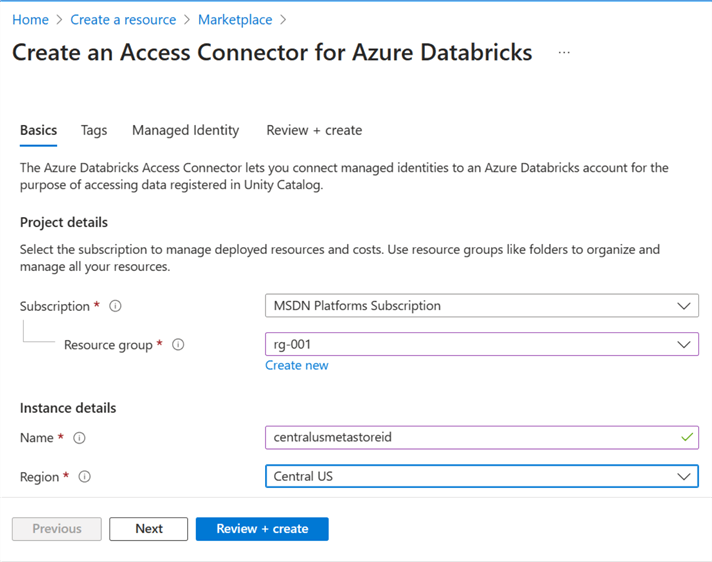
Follow the basic steps to name the project and instance details for the resource creation process, and then click Review + create.
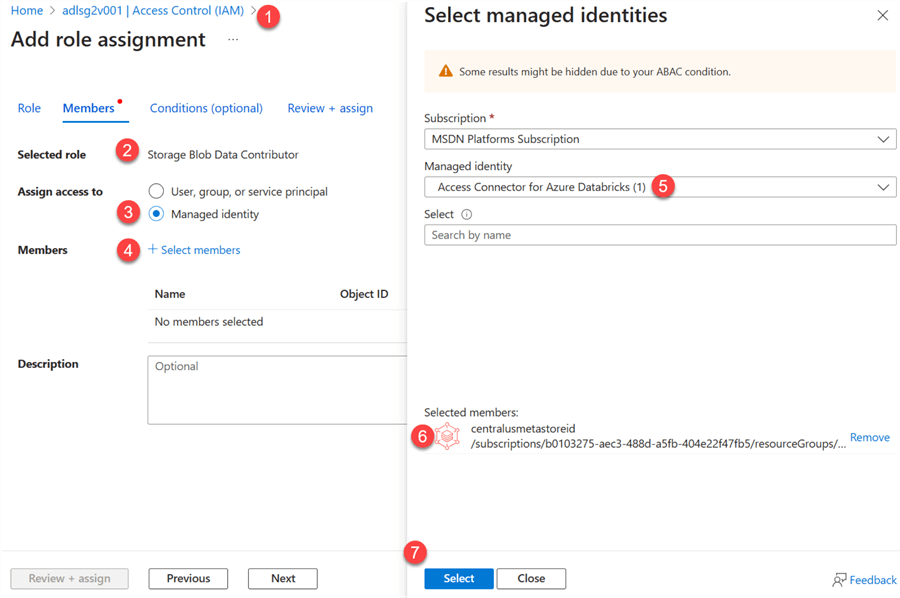
Step 4
Once created, navigate to Access Control (IAM) within your ADLS Gen2 account and Assign the Storage Blob Data Contributor role as Managed Identity to the Access Connector for Azure Databricks, which you created in the previous step.
Step 5
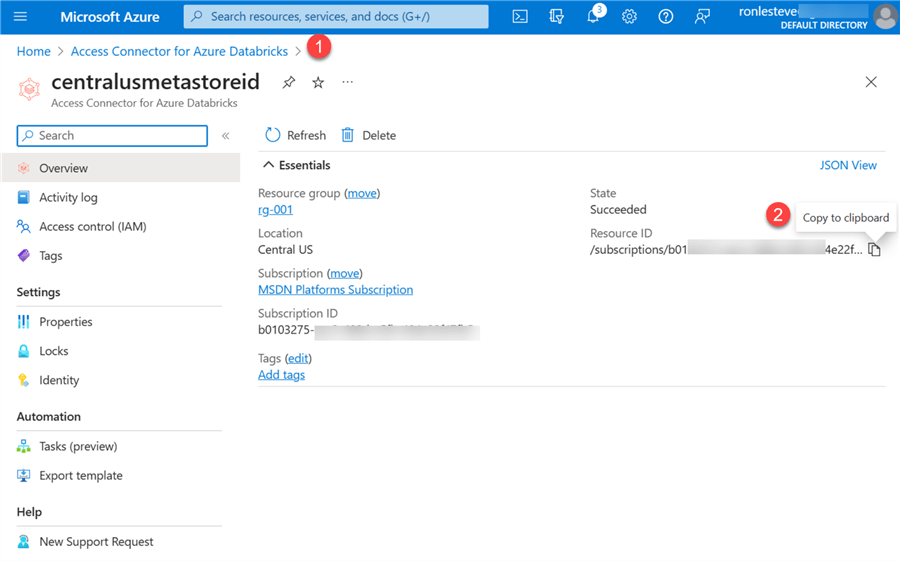
Navigate to the Access Connector’s overview page and copy the resource ID to a notepad because it is needed during the Unity Catalog setup.
Step 6
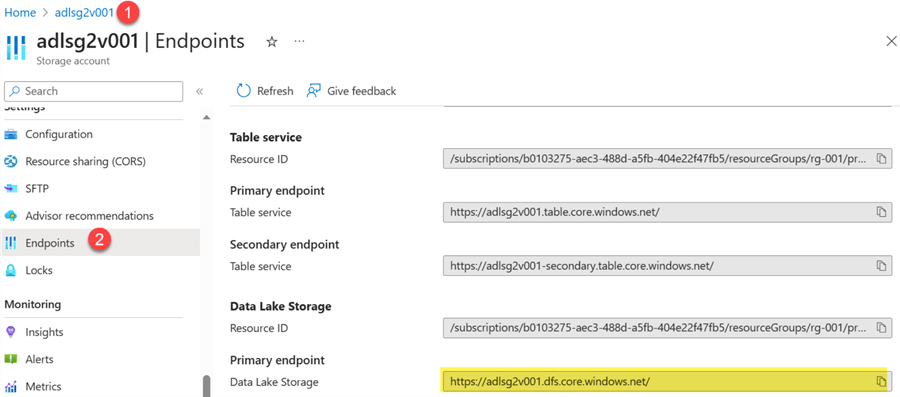
You’ll also need your ADLSg2 primary endpoint, so copy and paste this into a notepad as well.
Step 7
Navigate to your Databricks Account by selecting ‘Manage Account.’ Ensure a Global AD Admin has given you access to the Account Admin Console.

Step 8
To grant Account Admin access, a Global AD Admin must navigate to the Management Account page and assign your user account the ‘Account Admin’ role.

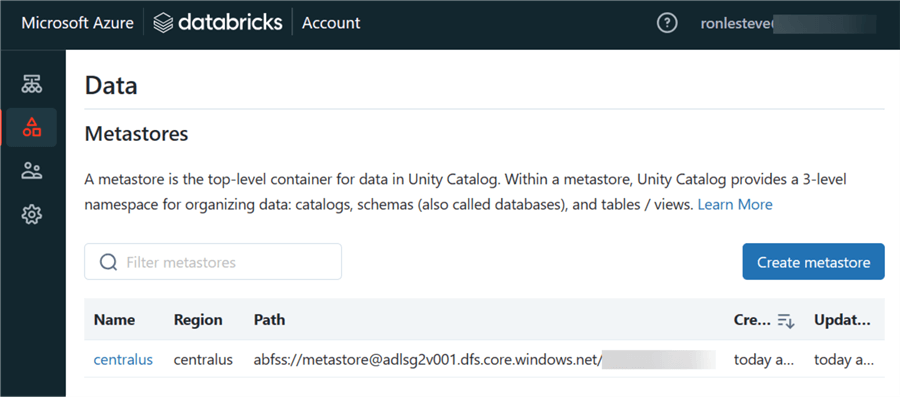
Create the Unity Catalog Metastore
Congratulations! The basic pre-requisite requirements are complete. You are now ready to begin creating your Unity Catalog metastore. Begin by navigating to the Data tab in your Databricks workspace and select ‘Create metastore.’

Next, enter the basic requirements needed to create the metastore:
- Name: Give it an intuitive name, such as a region name.
- Region: Select your region, preferably the one where your Databricks instance is created.
- ADLS Gen2 Path: Paste your primary ADLS g2 endpoint. Remove the https:// portion and append it with your metastore@ container name.
- Access Connector Id: Paste your Access Connector Id from the notepad.
Click Create.

You will also need to assign your metastore to your workspaces. If you have multiple workspaces, you can select as many as you like to be associated with the Unity Catalog metastore. Click Assign to complete this process.

Click Enable to complete this process.

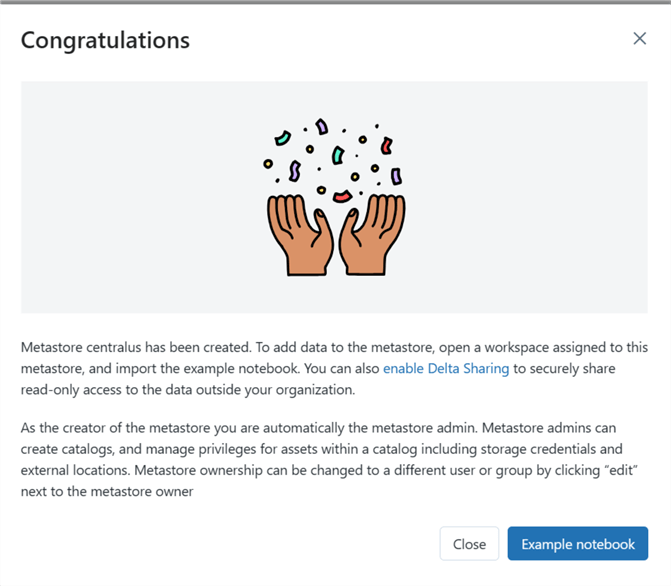
If everything is set up as expected, you’ll receive the following notification that the Unity Catalog metastore has been successfully created.
When you navigate to the Data Catalog tab, you’ll see the new metastore available for use.
Enable Cluster for Unity Catalog
Now that you have the Unity Catalog running, you must also set up your cluster for use with the Unity Catalog.
There are a few quick steps to enable this. Firstly, navigate to Admin Settings in your workspace and enable ‘Cluster, Pool, and Job Access Control’ along with ‘Table Access Control.’ You can read more about their features in the figure below.

The final step of the cluster setup is to navigate to your ‘Compute’ and create a new cluster with ‘Shared Compute.’ A shared compute cluster in Databricks is a multi-user cluster with data isolation, and it’s compatible with the Unity Catalog when the workspace is attached to a Unity Catalog metastore and uses a Unity Catalog-capable access mode.
Select a runtime version, specify your cluster termination settings, and click Create compute.

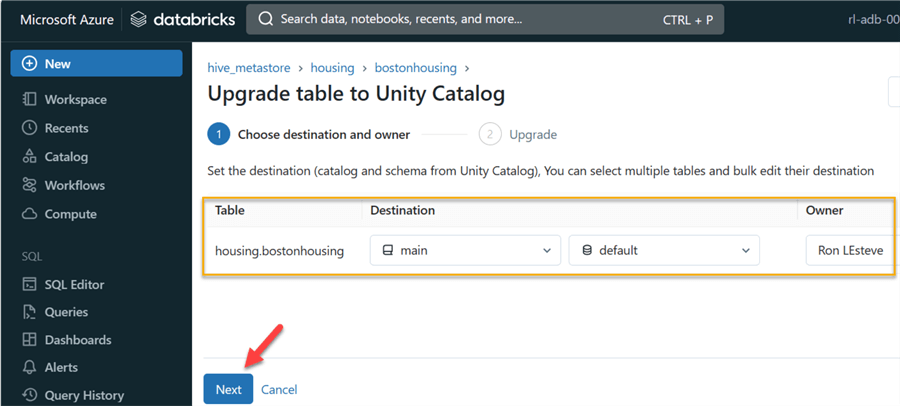
Upgrading Existing Catalog
You can now see your Catalog Explorer with your existing hive_metastore if you’ve used Databricks before Unity Catalog. You can upgrade your existing hive_metastore tables to the new Unity Catalog format. Click Upgrade.

The upgrade process is simple and only requires selecting a destination catalog and schema through the UI.
Creating a New External Location
Now that we’ve seen how to upgrade an existing table to Unity Catalog, let’s explore how to create a new external cloud storage location that will allow access to data stored on your cloud tenant. This is also accomplished through the UI within the Unity Catalog.
If you’ve previously mounted an ADLS Gen2 or other cloud storage account, you can select ‘Copy from mount point.’ You could also enter your ADLS Gen2 URL, choose your storage credential, and click Create.
This sets us up for creating new Volumes and Catalogs in the next section.

Create a New Catalog
A new Catalog can be created with either the UI within the Catalog Explorer or with ANSI SQL within your notebook. To create a Catalog with the UI, fill in the required details and click Create.

To create the Catalog in a notebook, use code like the following to create the catalog and schema:
%sql
CREATE CATALOG bronze;
%sql
USE CATALOG bronze;
CREATE SCHEMA sources;
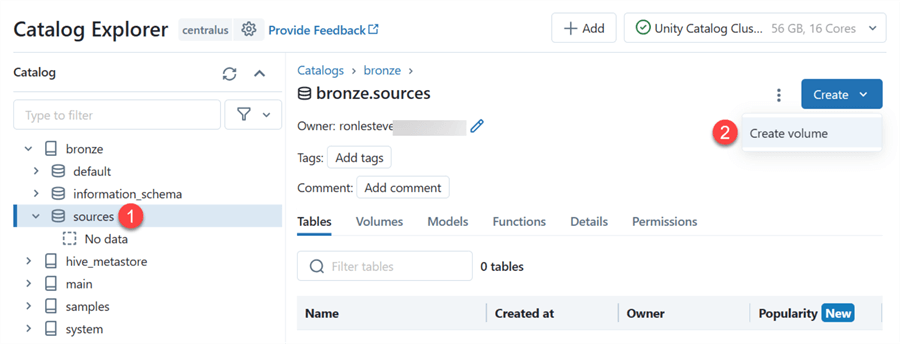
Create New Volume
Now that we have created a Catalog and Schema, we can create a Volume to bind our ADLSgen2 external location as a data source. A volume in Databricks Unity Catalog is a catalog object representing a logical storage unit in a cloud object storage location, providing capabilities for accessing, storing, governing, and organizing files.
Click Create volume.
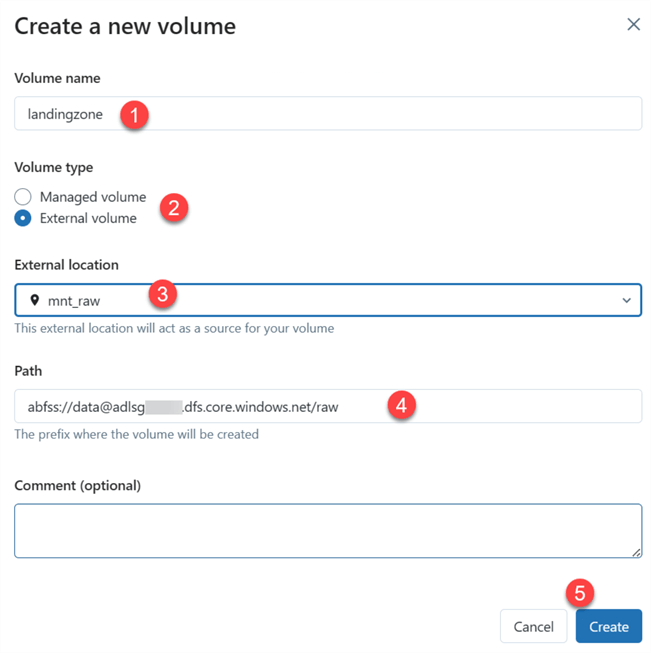
A managed volume is a governed storage volume created within the default storage location of the containing schema, while an external volume is a governed storage volume registered against a directory within an external location using governed storage credentials.
Let’s first create an external volume from the external location we created in the previous steps.
Notice that the ADLSgen2 external location is now linked to the Unity Catalog and can benefit from the governance features and permissions for more fine-grained access control of raw source data within the lake. By referencing the Volume path in your notebook code, you can access additional capabilities such as Streaming Autoloader(cloudfiles) and more, all governed by the Unity Catalog. As you build out your Lakehouse medallions with the Unity Catalog, you’ll reap even more benefits with lineage tracking, history, sample data, columns, details, etc.

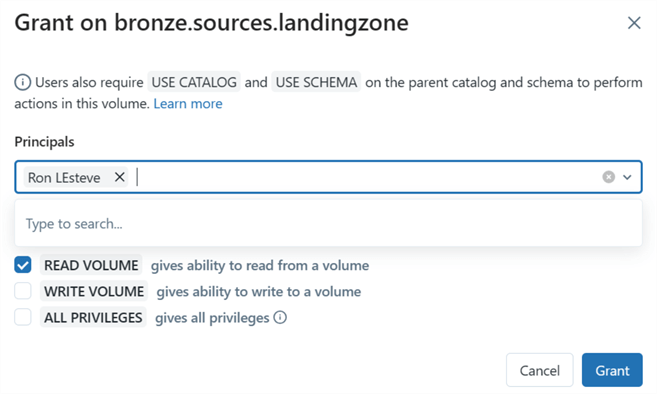
For example, we can grant a user only Read access to a volume through the UI or with SQL commands in a notebook.
Previously, we created an external volume linked to an existing ADLSg2 container mount point. You could also create a managed volume, which would look similar, and upload data to the volume.
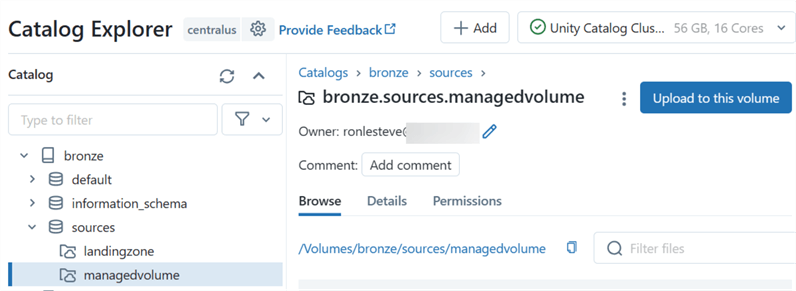
The most significant difference is that the data you upload to the managed volume will be uploaded to the metastore ADLSg2 container specifically created for the Unity Catalog and bound to it.
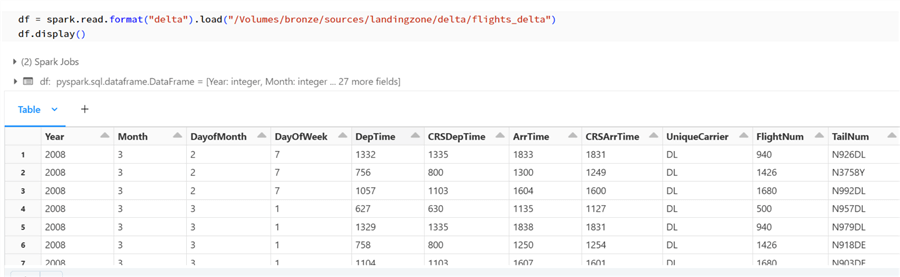
Query Data Volumes
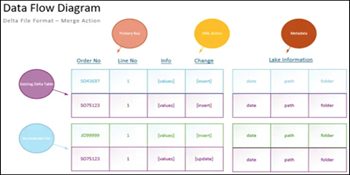
In the previous sections, we created Unity Catalogs and Volumes. It is interesting to note that the volumes can be referenced in code within a notebook to easily work with it, just as you would work with a mount point. The following code queries Delta files in my external volume within the Unity Catalog:
df = spark.read.format("delta").load("/Volumes/bronze/sources/landingzone/delta/flights_delta")
df.display()
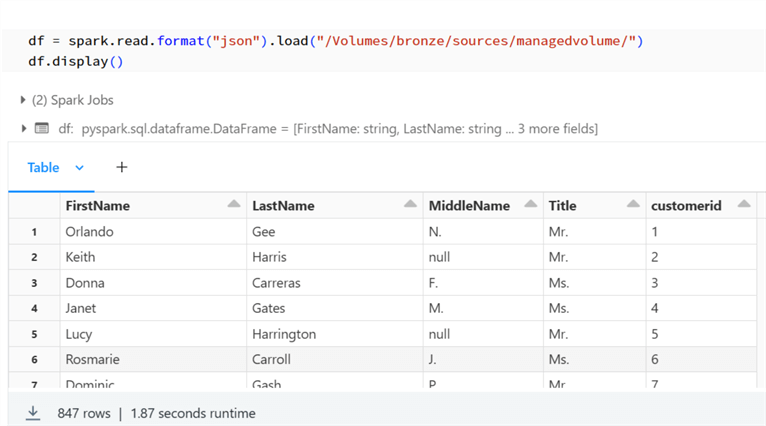
Similarly, I can also query JSON files in my managed volume within the Unity Catalog.
df = spark.read.format("json").load("/Volumes/bronze/sources/managedvolume/")
df.display()
Summary
The Unity Catalog is a great way to manage and govern Lakehouse assets. However, its setup is not as intuitive as expected. With Azure’s Synapse Analytics PaaS platform slowly evolving into its SaaS-based Fabric offering, we may hope Databricks will also become more SaaS-oriented and limit the amount of convoluted setup steps for the end user.
The Unity Catalog is a tool for both customers embarking on their modern data lakehouse journey and those evolving to new governance approaches with their existing lakehouse. It appears to be an excellent capability that brings standardized security, unified data access policies and permission management, auditing, lineage tracking, data discovery, data accessibility, and more. Furthermore, it also has the potential to easily govern AI and ML assets and integrate with Delta Sharing features, making it easy to consume and share data and AI assets in a central and well-governed location.
Next Steps
- For more information on Unity Catalog Volumes, read Announcing Public Preview of Volumes in Databricks Unity Catalog | Databricks Blog
- Read more about how to Enable Hive metastore table access control on a cluster (legacy) | Databricks
- Learn about how to Manage cluster policies – Azure Databricks | Microsoft Learn

Ron C. L’Esteve is a Data and AI Leader and professional Author residing in Chicago, IL, USA. He is well-known for his impactful books and article publications on Azure Data & AI Architecture, Engineering, and Leadership. Ron holds a Master of Business Administration (M.B.A.) and Master of Science in Corporate Finance (M.S.F.) from Loyola University Chicago. Ron possesses deep technical skills and experience in designing, implementing, leading, and delivering modern Azure Data & AI projects for numerous clients around the world. He is a Motorola Certified Six Sigma Green Belt, a Microsoft Global Challenger, and also holds numerous additional Microsoft, Snowflake, and Databricks professional certifications in Big Data Engineering, Artificial Intelligence, Apache Spark and Data Platform Architecture.
- MSSQLTips Awards: Champion (100+ tips) – 2023 | Author of the Year – 2020-2021 | Rookie of the Year – 2019