Problem
I explained how to install VMware Workstation in my previous article. I would recommend you read that article if you want to setup a similar environment for your SQL Server testing or lab. In this tip, I will explain how to configure a virtual machine using VMware Workstation 14.
Solution
A virtual machine is a software-based computer that runs and functions like a physical computer. One or many virtual machines can be hosted on a host computer. Each virtual machine will have its own operating system that will function separately from other virtual machines hosted on the same computer. Virtual machines are used to virtualize the server infrastructure to consolidate the compute resources and improve efficiency that results in cost optimization.
I will show you how to create multiple virtual machines using this software with different operating systems to fulfill your requirements.
Step by Step Process to Create a Virtual Machine using VMware Workstation
Before creating a virtual machine, I would recommend you download or copy the operating system installer ISO image to the machine where you are going to create the virtual machine. You can create the virtual machine without the operating system installers, but you will not be able to power them on. You can later mount the operating system installer file and power on the virtual machine to start the installation.
I have downloaded a Windows Server 2016 image to install it on this newly created virtual machine. You can download Windows Server images from the Microsoft website. I am using the evaluation version that is available for 180 days. Let’s go ahead and start creating the virtual machine for our Windows Server 2016 operating system.
1 – Double click "VMware Workstation" shortcut to launch it. Below is the image of this tool. You can see there are three options shown. One option is "Create a New Virtual Machine". Click on this to open a window which will allow us go through the virtual machine creation.

2 – Once you click on the option to create a virtual machine, you will see a window named "New Virtual Machine Wizard". You can see that there are two options showing, Typical and Custom. I chose "Typical" and selected "Next" to go to the next window.

3 – The next screen will appear to select the operating system image file that you want to install on this virtual machine. If you do not want to install the operating system right now, choose "I will install the operating system later" and select "Next".

If you have an operating system installation file that you want to install, choose the option for your installer file type from the image above. I am choosing the second option because I have Windows Server 2016 ISO image. Then select the location where you have saved your operating system ISO image and select the file for installation. You can see that the virtual machine creation window has detected the operating system version as shown in the image below. This shows that our installation image is healthy and we ready to go ahead with installation. Sometimes, this wizard will not detect the operating system. This means that either your installer file is corrupt or that you have selected a legacy or a non-supported version for VMware Workstation.
We can also see that this wizard has detected that this version of operating system is supported by the Easy Install feature. Easy Install will install operating systems with default values and you don’t need to manually enter a lot of details. It may ask you to create a user and admin password. Of course, you can change these default values at a later time.

4 – The next window will open so you can fill the details for the "Easy Install Information" where you should enter the product key of operating system if you have one. If you don’t have a product key, you can leave this section empty. After the product key, choose the operating system version from the drop down. As this wizard has automatically detected the OS version, you can see Windows Server 2016 is already selected in the image below. Also, you can Personalize Windows and create a user name and password that you will use to login to the new virtual machine.

I have entered all details and clicked “Next” to proceed. We will get another pop-up window mentioning that we haven’t entered the product key of the operating system. You can ignore this warning and click “yes” to proceed since we are using an eval version of Windows Server 2016.

5 – The next window will ask you to enter the name of the virtual machine and to select the location where you want to save the virtual machine. This location must have enough space to host the machine files. All files related to the virtual machine will be saved in this location.
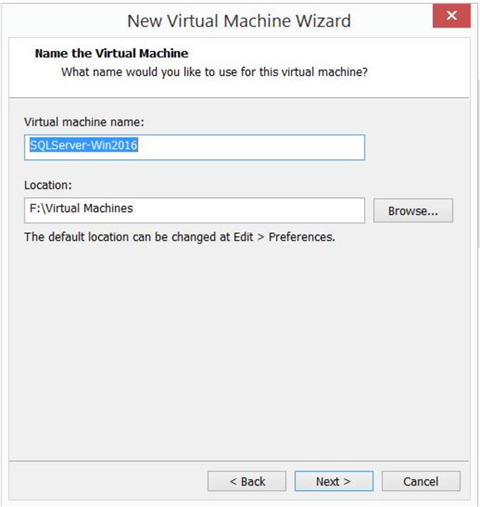
I have chosen the name of the virtual machine as "SQLServer-Win2016" and the location as "F:\Virtual Machines". Select "next".
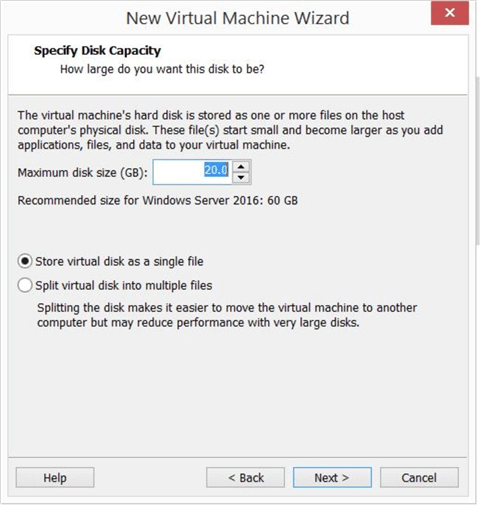
6 – The next wizard will ask us to configure storage. Here we can put the maximum size of the disk that will be mounted to this virtual machine. You can split this disk into multiple files per your requirements by choosing the radio button shown below. Click "Next" to choose your desired configurations.
7 – You will see a window where you can review and validate all configuration parameters that are chosen by default by this wizard or what you selected during the install steps.
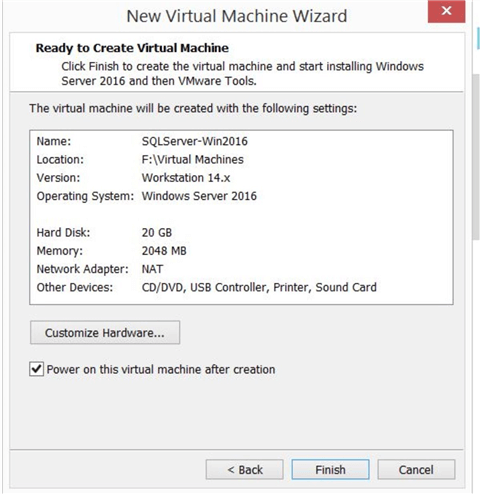
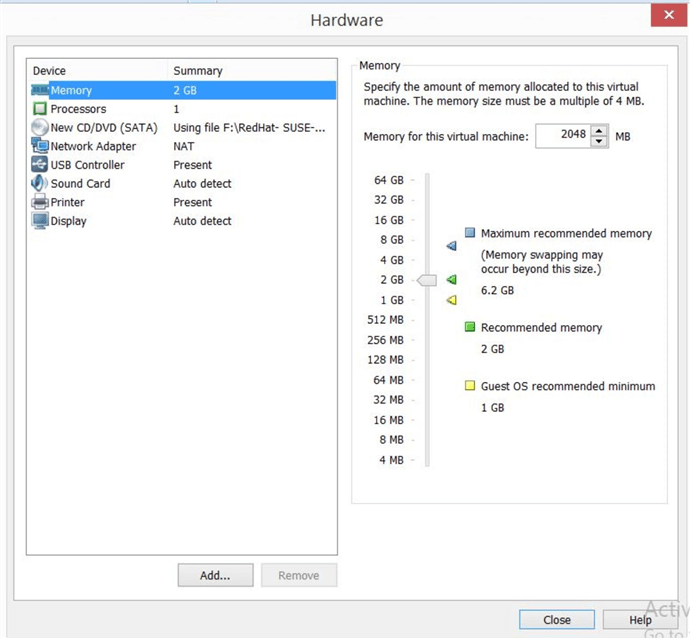
If you look at the image below, there is a tab named "Customize Hardware…" that can be used to modify any of the parameters that are showing the wrong value. Just click on the tab and you will see the window below.
You can see all the parameter options that are shown in the image below. Click the device option on the left and choose the value on the right. You can see that the memory option is selected by default where 2048 MB is the configured value. You can increase or decrease it based on your need.
Once you have validated all configuration options, click "Finish" to setup the virtual machine. If you want to power it on immediately select the option shown in the image above.
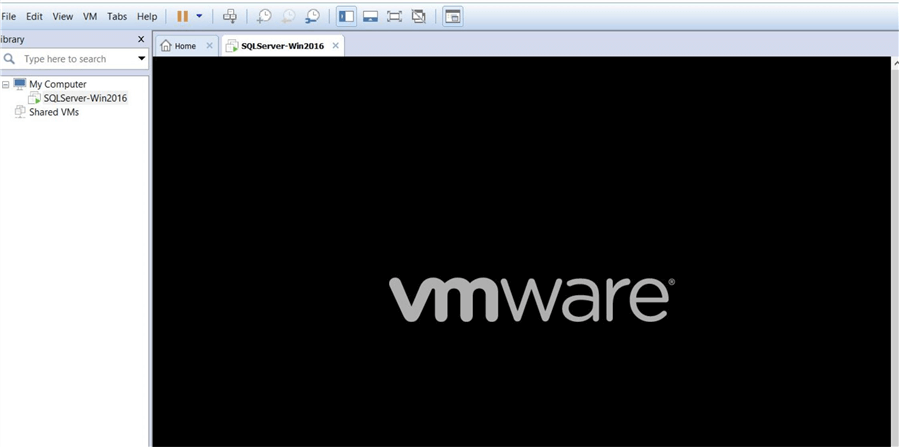
8 – Once you select "Finish", a virtual machine will be created in the left side pane of the VMware Workstation. If you chose to power it on after creation, you will see the machine starting up as shown below. Also, the files for the VM will be created in the location where you have chosen to create this virtual machine.
Once the virtual machine powers on, it will start reading the operating system ISO file for installation. The image below will appear depicting that the operating system setup is starting to install. You need to follow all of the normal steps to install the operating system for this virtual machine.

Next Steps
You learned how to setup a virtual machine using VMware Workstation and how to alter the system resource configurations for a virtual machine as well. In my next article I will be show you how to install Windows Server 2016 on this newly created virtual machine.
Read more articles on SQL Server:
- Read my other articles on multiple SQL Server topics.
- Read more articles on SQL Server Clustering and SQL Server Availability Groups in attached links.
- You can also read more article on SQL Server Management Studio.
- Explore more knowledge on SQL Server Database Administration Tips.

Manvendra is a passionate database lover currently working as a Technical Architect at one of the top MNCs. He has extensive experience on all versions of SQL Server since 2000 and has built Big Data skills. He has lead projects on the following database features: Database Mirroring, Always ON, Replication, Log Shipping, Geo-Clustering and Performance Tuning and delivered many SQL Server projects on consolidation, upgrades, heterogeneous replication, HA / DR solutions, automation and major performance tuning projects. You can also follow Manvendra on his blog, Twitter, LinkedIn and Facebook.
- MSSQLTips Awards: Champion (100+ tips) – 2018 | Author Contender – 2015-2018, 2021-2022