Problem
In previous tips, I explained how to install VMware Workstation 14 to create virtual machines and also how to setup virtual machines using VMware workstation. In this article we look at how to install Windows Server 2016 on a newly created virtual machines using VMware workstation 14.
Solution
Windows Server 2016 is one of the most popular server operating systems in today’s world and we will walk through the steps of installing in on a new VM.
Step by Step Process to Install Windows Server 2016 on a Virtual Machine
I will start this tip where I ended my previous one. This tip will start from the last step and proceed to the next steps for installation of the operating system Windows Server 2016.
NOTE: I have downloaded a Windows Server 2016 image to install it on this newly created virtual machine. You can download a Windows Server 2016 image from this Microsoft website. I am using an evaluation version that is available for 180 days.
1 – After downloading the Windows Server 2016 ISO image, you need to mount it in your target virtual machine to start the installation. If you are creating a new virtual machine, you can choose this ISO image during the VM creation. Once the virtual machine is powered on it will start reading the operating system ISO file for installation and you will see the below image showing that the setup is starting. You need to follow all sequential steps to install the operating system.

2 – You will see the below image asking you to make some choices for the installation. There are 3 options to choose here:
- Language to install
- Time and currency format
- Keyboard or input method
Choose the appropriate value for each option and click "Next" to go to the next window. I have chosen the values for each entry showing in the image below.

3 – Once you click "Next", the "Install Now" button will show up to initiate the installation. Select this to get to the next window.

4 – The next window will ask you to choose the operating system edition. You can see all the options given in the below image. Choose which one you want to install. I have chosen full installation with the Datacenter Evaluation edition. Another type of operating system is Windows core edition with standard and datacenter editions. If you want a light weight OS installation, you can choose Windows core, but you will not get any GUI in this operating system type.

5 – After clicking "Next", you will see the screen below to accept the licensing agreement. Click the checkbox to accept the licensing terms. Select "Next" to proceed.

6 – Next you will see two options to choose from depending on your installation criteria. Choose the option based on your needs to proceed.

7 – Once you select the appropriate options, you will see the below image to select the location where you want to install the operating system. As we have chosen only one disk during the virtual machine creation, only one disk is showing here. You can add additional disks by selecting "New" shown in the below image.

You will see the below option once you select "New" link to add an additional disk. You can add the size and select "Apply" as shown below. Click "Next" once you have chosen the OS installation location.

8 – The operating installation will now start. You can see the installation has begun in the image below. You can also see the various stages that must be completed for this installation.

The second stage is in process and the progress bar can be seen in the installation window as shown below.

Once a stage is processed successfully, there will be a green checkmark next to it. If there are any issues, there will be a red crossbar. You can see that the first 3 stages have been successfully processed.

9 – After all stages are successfully processed, the Windows setup will restart the virtual machine to complete the installation. You can see that Windows has initiated the restart phase after processing all stages of installation that are shown in the image above.

Here, we can see the virtual machine in which we are installing the operating system has restarted.

10 – The next window will ask you to enter the administrator password. Enter a password here and press enter to finish the installation.

The above step is the last step of this installation. You can see that the Windows desktop view is showing.
Now, use Cntl+Alt+Delete to login.
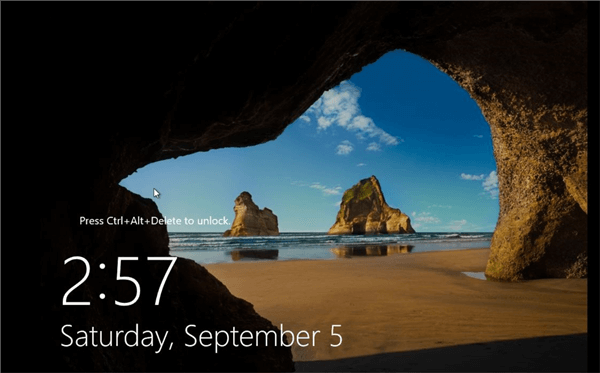
Enter the password to login to this machine and press enter.

After pressing enter, it will take some time because other configuration services will be created at the OS level. You will see the below image during this step.

Now, you have logged in to your newly installed Windows Server 2016 machine. You can see the Windows Server 2016 edition in the below image.

The Server Manager dashboard will be launched automatically once you logged in to this virtual machine. You can use this window to verify or manage server level settings.
Another pop-up window you can observe is Network configuration. If you are setting this up for testing purposes or for a lab, click "Yes" to make this virtual machine accessible to other VMs you have installed in this network.

We have installed Windows Server 2016 Datacenter edition on our virtual machine. This VM is ready for use.
Next Steps
You learned how to install Windows Server 2016 operating system in a virtual machine hosted with VMware workstation. My next article will show how to install SQL Server 2019.
Read more articles on SQL Server:
- Read more articles on SQL Server Clustering and SQL Server Availability group in attached links.
- Read more articles on SQL Server Management Studio
- Explore more knowledge on SQL Server Database Administration Tips

Manvendra is a passionate database lover currently working as a Technical Architect at one of the top MNCs. He has extensive experience on all versions of SQL Server since 2000 and has built Big Data skills. He has lead projects on the following database features: Database Mirroring, Always ON, Replication, Log Shipping, Geo-Clustering and Performance Tuning and delivered many SQL Server projects on consolidation, upgrades, heterogeneous replication, HA / DR solutions, automation and major performance tuning projects. You can also follow Manvendra on his blog, Twitter, LinkedIn and Facebook.
- MSSQLTips Awards: Champion (100+ tips) – 2018 | Author Contender – 2015-2018, 2021-2022