Problem
Microsoft has developed Azure Data Studio which is a cross-platform database tool that can be installed on many different operating systems. DBAs and Developers can use this tool to develop or manage SQL Server databases. In this tip I will explain the steps to install Microsoft Azure Data Studio on Windows.
Solution
Microsoft has developed a very powerful tool called SQL Server Management Studio (SSMS) to manage SQL Server databases, database objects, dependencies, schemas, security management and more. SQL Server Management Studio is only designed to run on Windows machines with a graphical user interface and SQLCMD for the command line. The big question is, how we can manage SQL Server databases running on Linux? Unfortunately, we can only get this user interface functionality for SQL Server databases running on Linux using SQL Server Management Studio remotely. We cannot install this software on a Linux machine. You can install SQL Server Management Studio on a Windows machine and then access the SQL Server instances running on Linux servers.
As we cannot install SSMS on Linux servers, there is a need to have a powerful tool like SSMS that can be used to install or run on any operating system. Microsoft has addressed this gap by launching another administration tool known as Azure Data Studio. This can be used to administer Azure database products as well as SQL Server running on Windows and Linux open source platforms.
Regarding MSDN, Azure Data Studio is a cross-platform database tool for data professionals using the Microsoft family of on-premises and cloud data platforms on Windows, MacOS, and Linux. Azure Data Studio offers a modern editor experience with IntelliSense, code snippets, source control integration, and an integrated terminal. It's engineered with the data platform user in mind, with built-in charting of query result sets and customizable dashboards.
I will explain the steps to install Azure Data Studio on a Windows machine.
Step by Step Process to Install Microsoft Azure Data Studio
1 – The first step to install Azure Data Studio is to download the installation package from the Microsoft website. Once you access it, you will see the screen below. Every operating system will have a different installation process. As we are installing Azure Data Studio on Windows machine, let’s download the setup given for a Windows platform.

Click on the first option of the above image that is showing the download link for a Windows machine. You will see the pop-up window at the bottom of your screen. Choose your location and click "save" to store the Azure Data Studio setup file.

2 – The next step is to run this installer. Right click the downloaded file and select "Run as administrator" as shown below.

Once you select the run as administrator option, you will get another pop-up dialog box mentioning that this installation does not require you to be an administrator. Select, "ok". If you want, you can cancel this window and execute the downloaded file directly by double clicking it.

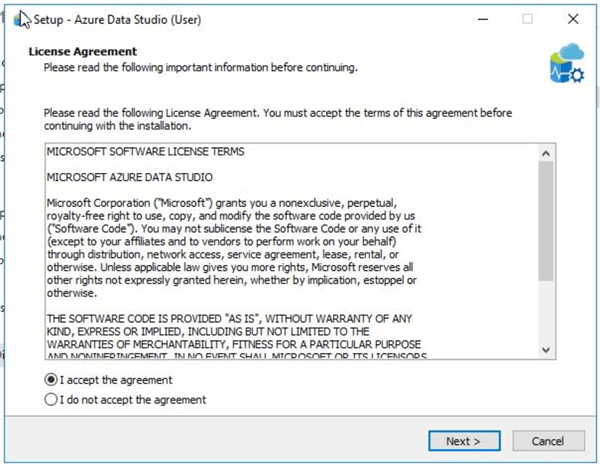
3 – The next window will appear to ask you to accept the license agreement. Choose the right radio button to accept the license terms and click "Next" to go to the next window.
4 – We need to select the location where we want to install this software. You can choose what’s best for you. I have left this installation path as it is with its default value.

5 – The next window will ask you to choose shortcut options that will appear on your desktop and the start menu post installation. You can also choose to not create a start menu folder by selecting the checkbox shown at the bottom side of the below screen. I left this with its default value and clicked "Next" to proceed.

Some other options and checkboxes will appear in the next screen that are related to the desktop and other icons as shown below.

6 – This is the last configuration window where you can review all the options you have chosen. Validate them and hit the "Install" button to start the installation.

7 – Installation will start by displaying the progress bar as shown in the screenshot below. Let it run and wait until it is complete.

Azure Data Studio has been installed as you can see below. Click "Finish" to close the installation window. If you don’t want to launch Azure Data Studio, be sure to uncheck the box before hitting the finish button as shown below.

Managing SQL Server with Azure Data Studio
8 – Next, we can validate the installation by looking at the start menu. You can see that Azure Data Studio is showing up in recently added programs. You can also check your desktop to search for a Azure Data Studio shortcut.

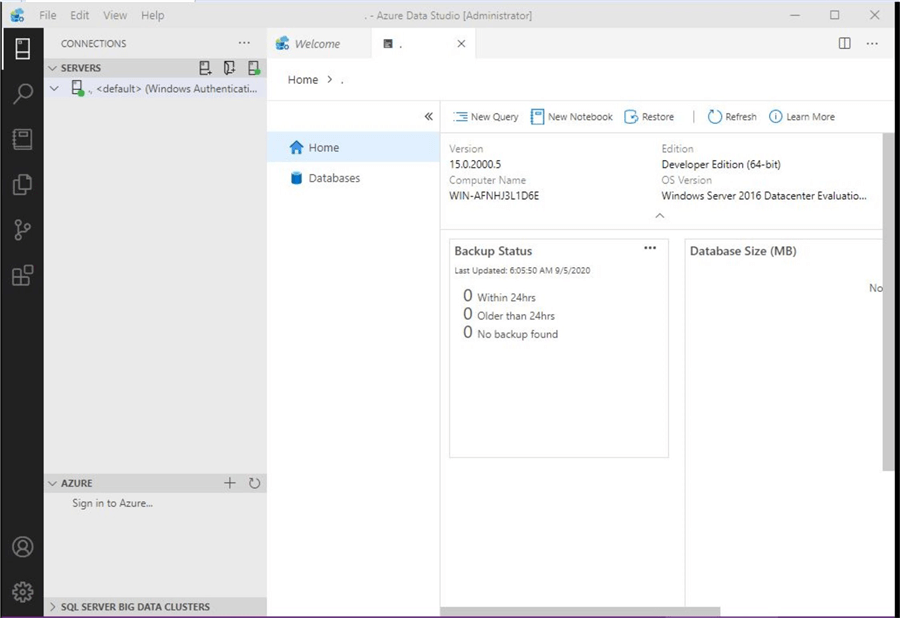
9 – Go ahead and launch Azure Data Studio to learn how to operate this tool to manage SQL Server databases. Below is the first screen you will see once you launch the Azure Data Studio. You can see that there are multiple links (Start, Deploy source code from Git, Recent, Help including Github repository) as shown in the image below. You can click "new connection" to connect to a SQL Server instance or similarly a new query link can be used to launch the query window.
You can also get multiple options by clicking on any of the icons showing on the black vertical strip on the left side of the screen.

If you want to connect to any SQL Server instance or Azure SQL Database, just click "new connection" as shown above. You will see the explorer of a new connection where another tab named "Add connection" is visible. Click the tab to enter connection details of the SQL Server instance.
Observe that there are 3 sections within this connection explorer.
- Servers
- Azure
- SQL Server Big Data Clusters
You can establish connections in their respective section. If your database is hosted in Azure, you must use Azure. If it’s a big data cluster, use the last section to establish the connection to target instances. As we have SQL Server hosted on a virtual machine, I will use first section which is servers.

Once you select "Add Connection", you will see another window on the same page to enter the connection details as shown below. Enter all mandatory details and click "connect" to establish the database connection.

Getting Started with Azure Data Studio
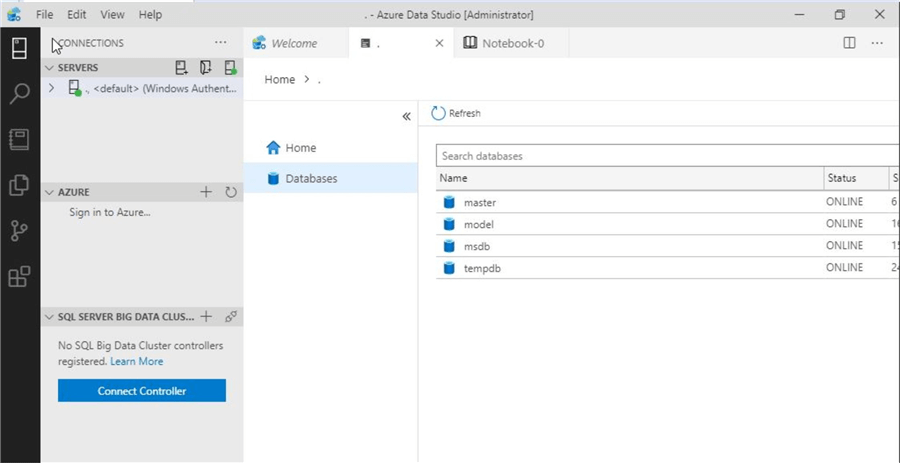
10 – I have established the database connection to my SQL Server instance hosted on the same machine. The server’s section is showing the server node details whereas the right-side pane named "HOME" is showing the rest of the details in this SQL Server instance.
At a first glance, it’s awesome to see some details without accessing any tab or property window of instance and databases. You can find the installed editions of SQL Server, database sizes, backup status, instance name, OS version, etc.
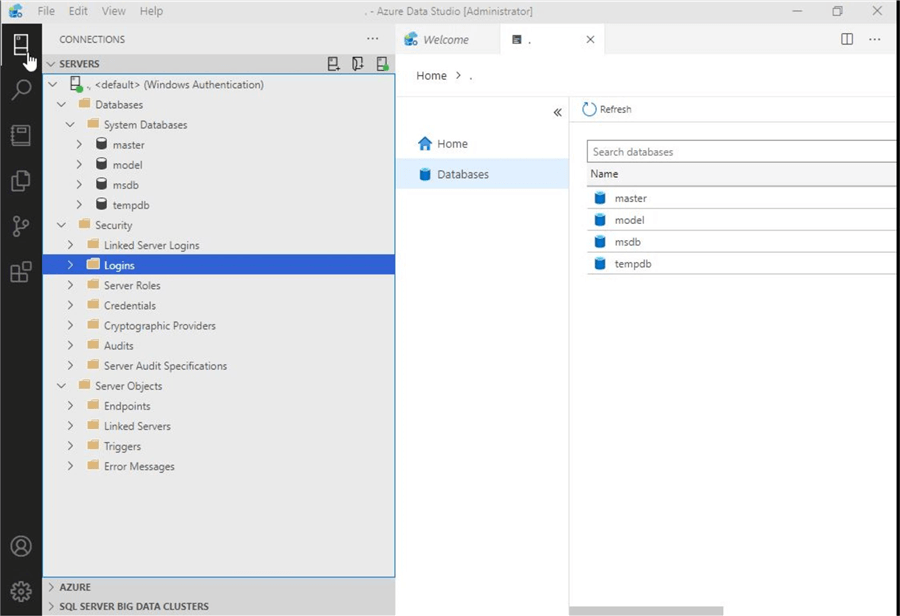
You can also expand the connected instance node from the left-side in server to see something similar to SQL Server Management Studio. Once you click on any folder in server explorer, you will see details about that folder on the home dashboard. I selected "database folder" as shown in the image below.

I further expanded the folders to see more options in instance node tree. You can see that the options are the same as in SQL Server Management Studio. Explore the many options and use them to manage your databases.
Querying SQL Server with Azure Data Studio
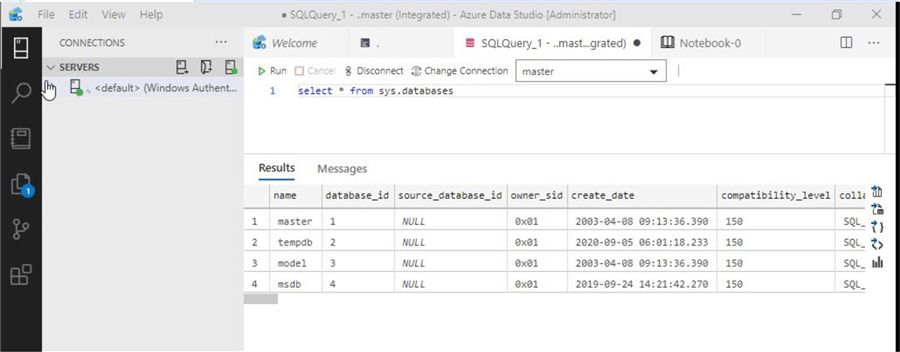
11 – We will see multiple options if we right click "connected instance". You can see these options on the screen below. Click on any one the options to demonstrate an example. I selected "New Query" to launch the query editor to run a SQL query.

You can see the query editor on right-side pane. I have written a small T-SQL statement to get the output. We can also use the intellisense feature to automatically see the drop down of all related strings including database objects.

Once I executed the above SQL statement in query editor, I received the below output in Azure Data Studio. You can also export this result to Excel, JSON, CSV or show the result in a graphical representation format. We will explore some of these options in the next step.
You can see the output in a chart format. You can switch this view to one of the many available graphical forms. You have the option to change the chart type, data direction, legends, etc. This is a great feature introduced in Azure Data Studio.

Data Visualizations in Azure Data Studio
12 – Azure Data Studio has many extensions for data visualization that needs to be installed based on your needs. You can also see this recommendation by Azure Data Studio in the above screen when we switched our output to the chart view.
There is a separate tab for recommended extensions on the black vertical strip in the left-side of the screen shown below. Select that icon to see all extensions that are available in Azure Data Studio. You will need to install them as they are not built-in such as PowerShell, Python, PostgreSQL, Machine Learning and more.

Go ahead and try connecting to other types of SQL Server deployments by accessing the connection strings in their sections as shown below.
Next Steps
Stay tunes for future articles where I will show you how to install Azure Data Studio on Linux operating systems. Read more articles on SQL Server:
- Read more articles on SQL Server Management Studio
- Explore more knowledge on SQL Server Database Administration Tips

Manvendra is a passionate database lover currently working as a Technical Architect at one of the top MNCs. He has extensive experience on all versions of SQL Server since 2000 and has built Big Data skills. He has lead projects on the following database features: Database Mirroring, Always ON, Replication, Log Shipping, Geo-Clustering and Performance Tuning and delivered many SQL Server projects on consolidation, upgrades, heterogeneous replication, HA / DR solutions, automation and major performance tuning projects. You can also follow Manvendra on his blog, Twitter, LinkedIn and Facebook.
- MSSQLTips Awards: Champion (100+ tips) – 2018 | Author Contender – 2015-2018, 2021-2022


It would be better to illustrate how to install ADS on Linux/MacOS, instead of on Windows. From SSMS 18.7 onward, Azure Data Studio will be automatically installed on Windows when installing SSMS. There is much less need to install separately on Windows.