By: Sean Lee | Updated: 2021-09-15 | Comments (2) | Related: > Partitioning
Problem
Partitioning a large table is a common database administration practice for manageability and query performance benefits in SQL Server databases. Table partitioning itself is a bit complex process, partitioning a table with columnstore index brings even more challenges. In this tutorial I will cover some of the nuances of partitioning table with a columnstore index and provide detailed guide on the partition steps as well as the implementation of partition merge and split and use partition switch to transfer data quickly and efficiently.
Solution
The main steps to partition an existing table with columnstore index are the same as those to a table with traditional rowstore index. Microsoft SQL Server partitioning is typically divided in four parts:
- Add filegroup(s) or use the existing primary filegroup.
- Create a partition function with range.
- Create a partition scheme.
- Create or modify a table and specify the partition scheme as the storage location.
We will discuss the nuances and pitfalls in the process in which we create partition table with columnstore index.
Configure SQL Server Table Partitioning
Step 1: Create Filegroup(s) or use primary filegroup
In the real world it's a good practice to create multiple file groups so each partition will be in a separate storage for very large data warehouse tables such as fact tables with tens or hundreds of millions of rows.
Here for simplicity and highlighting the difference in partitioning columnstore index tables we choose to create partition table in the primary filegroup instead of creating multiple filegroups.
Step 2: Create partition function
In this tip, we are going to create the partition based on the date\datetime column and choose the option RANGE RIGHT which means the boundary value is the first value in the right partition and all data inserted into the partition will be after the partition date, but before the start date of the next partition.
Here we use three boundary values ('2019-01-01', '2020-01-01' and '2021-01-01') to specify four partitions which hold date range values as specified in the following table:
| Partition | Values |
|---|---|
| 1 | < 2019-01-01 |
| 2 | >= 2019-01-01 AND < 2020-01-01 |
| 3 | >= 2020-01-01 AND < 2021-01-01 |
| 4 | >= 2021-01-01 |
Let's run the T-SQL script below to create the partition function in database [PartitionDemo]:
USE PartitionDemo
GO
CREATE PARTITION FUNCTION PF_YearlyOrder (date)
AS RANGE RIGHT FOR VALUES
('2019-01-01', '2020-01-01', '2021-01-01'
)
GO
Step 3: Create partition scheme
The partition scheme maps the logical partitions of the partition function to physical filegroups. Here we map the partitions to the primary filegroup. The code looks like this:
USE PartitionDemo
GO
CREATE PARTITION SCHEME PS_YearlyOrder
AS PARTITION PF_YearlyOrder
ALL TO ([PRIMARY])
GO
Step 4: Create partition table
Finally, it is time to create a table using above partition scheme to partition the data accordingly. Here we want to create a brand-new table and have a clustered columnstore index in the table from the very beginning. The following T-SQL code will create the partitioned table using the partition scheme specifying the OrderDate column as the partitioning column.
USE PartitionDemo
GO
CREATE TABLE FactOrderDemo (
   OrderDemoKey bigint IDENTITY(1,1) NOT NULL,
   OrderDate date NOT NULL,
   OrderQuantity int NOT NULL,
   OrderType varchar(20) NOT NULL,
   INDEX CIX_FactOrderDemo_OrderDate CLUSTERED COLUMNSTORE
) ON PS_YearlyOrder(OrderDate);
GO
You'll notice that the OrderDate column has a data type of date, which matches the boundary values that we specified when creating the partition function PF_YearlyOrder.
Please note that clause ON PS_YearlyOrder(OrderDate)specifies the partition scheme name and goes on the outside of the creating table end parenthesis.
We can take another method to create the partitioned table without having the columnstore index from the start, but add the clustered columnstore index later.
First recreate the table without the clustered columnstore index:
USE PartitionDemo
GO
DROP TABLE FactOrderDemo
GO
CREATE TABLE FactOrderDemo (
   OrderDemoKey bigint IDENTITY(1,1) NOT NULL,
   OrderDate date NOT NULL,
   OrderQuantity int NOT NULL,
   OrderType varchar(20) NOT NULL
) ON PS_YearlyOrder(OrderDate);
GO
Then add the clustered columnstore index:
USE PartitionDemo
GO
CREATE CLUSTERED COLUMNSTORE INDEX CIX_FactOrderDemo_OrderDate
ON FactOrderDemo
ON PS_YearlyOrder (OrderDate)
GO
Please notice that clause ON FactOrderDemo doesn't specify a column or column list after the table name FactOrderDemo. When creating a clustered columnstore index, there is no need to specify key columns as a clustered columnstore index defines the physical structure of the data storage, all columns in the table are included by default. In fact, if you try to do so like below:
USE PartitionDemo
GO
DROP INDEX CIX_FactOrderDemo_OrderDate ON FactOrderDemo
GO
CREATE CLUSTERED COLUMNSTORE INDEX CIX_FactOrderDemo_OrderDate
ON FactOrderDemo (OrderDemoKey, OrderDate)
ON PS_YearlyOrder(OrderDate)
GO
The script will fail with an error:
The statement failed because specifying a key list is not allowed when creating a clustered columnstore index. Create the clustered columnstore index without specifying a key list.
However, when creating a non-clustered Columnstore index, you MUST specify the column key values for the table, otherwise you will have an error like "The statement failed because specifying a key list is missing".
Inserting sample data into partitioned table
The above four steps complete the table portioning process, and now let's fill the table with some sample data. In real work we can have tens of millions of rows in a partitioned table. Here we only insert a few rows for simplicity and demonstration purpose.
INSERT INTO FactOrderDemo(
      OrderDate
     ,OrderQuantity
     ,OrderType
  )
VALUES
  ('2018-10-18',  108,  'Domestic'),
  ('2019-01-01',  204,  'Domestic'),
  ('2019-05-24',  198,  'International'),
  ('2019-10-11',  87,   'Domestic'),
  ('2020-01-06',  269,  'Domestic'),
  ('2020-09-24',  309,  'International'),
  ('2020-11-26',  136,  'International'),
  ('2021-01-09',  212,  'Domestic'),
  ('2021-05-24',  98,   'International')
GO
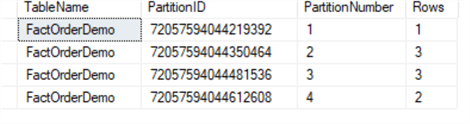
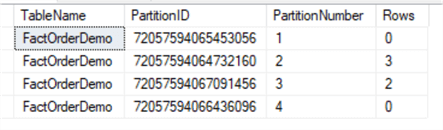
To get the basic information about the table partition such as partition number, rows in each partition, we can run the T-SQL script below:
SELECT o.name AS TableName, partition_id AS PartitionID, partition_number AS PartitionNumber, Rows
FROM sys.partitions p
INNER JOIN sys.objects o ON o.object_id = p.object_id
WHERE o.name = 'FactOrderDemo'
GO
You get results below:
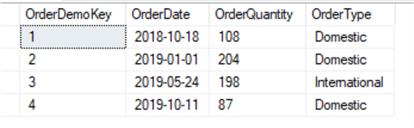
You can query the table as usual, but you can also specify which partition you want to select the data from by using $PARTITION system function in your WHERE clause. Below is how you can return all rows from the first partition:
SELECT * FROM FactOrderDemo
WHERE $PARTITION.PF_YearlyOrder(OrderDate) = 1;
GO
The result is as below:

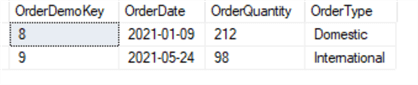
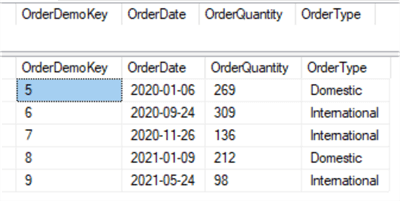
Or select all rows from the fourth partition:
SELECT * FROM FactOrderDemo
WHERE $PARTITION.PF_YearlyOrder(OrderDate) = 4;
GO
We get this result:
Partition split and merge with columnstore index table
MERGE and SPLIT are the common operations for managing SQL server partitions. By running a MERGE or SPLIT alter partition function statement, we can split one table partition that uses the partition function into two partitions or merge two partitions into one partition.
Here we need to know a BIG DIFFERENCE for a partitioned table which has columnstore index. Unlike regular rowstore partitioned table, SQL Server does NOT allow you to split and merge non-empty columnstore partitions. In other words, in order to split or merge partitions, you have to first get rid of the data in the involved partitions.
Here we will demonstrate the simple and efficient workaround to perform partition merge and split in columnstore index table step by step:
- Create staging table with the same structure as the main partition table.
- Switch partition(s) from the main table to the staging table.
- Perform partition SPLIT or MERGE in the main table as the partition(s) in the main table will be empty now after the previous step
- Switch partition(s) back from staging table to the main table if necessary; we can also archive or truncate old data in the staging table.
Let's demonstrate the above steps in detail. Assume we only want to keep previous three years data in the main table. And assume we have reached the year 2022, so we need to drop the data from the year 2019 and before, we will also need to add the data for the year 2022 and still keep every year's data in separate partition.
We can achieve the above by merge the first two partitions -original partition 1 and 2- into one partition storing the data before the year 2020. We can then split the last partition -the original partition 4 into two partitions so we will have a new partition hosting data for year 2022.
MERGE
Let's demonstrate partitions MERGE first.
Step 1: Create a staging table
We first create a staging table called FactOrderDemoArchive which will be used to store data of partition 1 and 2 from main table FactOrderDemo. To be able to switch data between main table and staging table, the staging table has to have the same structure as the main table including index and partition.
We'd better create its own partition function and partition scheme for the staging table to avoid interfering the operations in the main table.
USE PartitionDemo
GO
CREATE PARTITION FUNCTION PF_YearlyOrderArchive (date)
AS RANGE RIGHT FOR VALUES
('2019-01-01', '2020-01-01'
)
GO

CREATE PARTITION SCHEME PS_YearlyOrderArchive
AS PARTITION PF_YearlyOrderArchive
ALL TO ([PRIMARY])
GO

CREATE TABLE FactOrderDemoArchive (
 OrderDemoKey bigint IDENTITY(1,1) NOT NULL,
 OrderDate date NOT NULL,
 OrderQuantity int NOT NULL,
 OrderType varchar(20) NOT NULL,
      INDEX CIX_FactOrderDemoArchive_OrderDate CLUSTERED COLUMNSTORE
) ON PS_YearlyOrderArchive(OrderDate);
GO
Step 2: Switch two partitions out
Now we can switch partition 1 and 2 from main table FactOrderDemo to this newly created staging table FactOrderDemoArchive:
ALTER TABLE dbo.FactOrderDemo SWITCH PARTITION 1
TO dbo.FactOrderDemoArchive PARTITION 1;
GO
ALTER TABLE dbo.FactOrderDemo SWITCH PARTITION 2
TO dbo.FactOrderDemoArchive PARTITION 2;
GO
You can query staging table FactOrderDemoArchive:
SELECT * FROM dbo.FactOrderDemoArchive
The result shows:
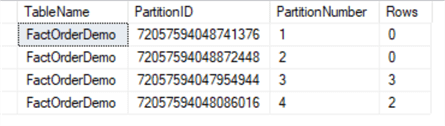
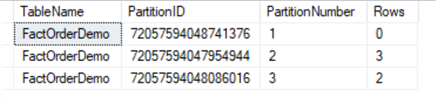
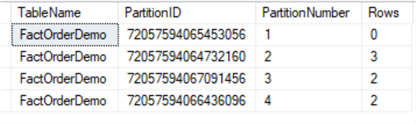
We can also query table FactOrderDemopartition information:
SELECT o.name AS TableName, partition_id AS PartitionID, partition_number AS PartitionNumber, Rows
FROM sys.partitions p
INNER JOIN sys.objects o ON o.object_id = p.object_id
WHERE o.name = 'FactOrderDemo'
ORDER BY partition_number;
GO
We can see partition 1 and 2 are empty now:
Step 3: Perform partition MERGE
As the partition 1 and 2 are empty now, we can perform a MERGE operation on columnstore index table FactOrderDemo:
ALTER PARTITION FUNCTION PF_YearlyOrder()
MERGE RANGE ('2020-01-01');
GO
By changing the partition RANGE (boundary_value), we just merged the two empty partitions.
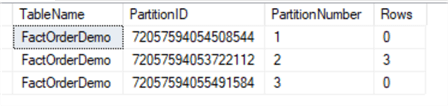
Let's query table FactOrderDemopartition information again:
SELECT o.name AS TableName, partition_id AS PartitionID, partition_number AS PartitionNumber, Rows
FROM sys.partitions p
INNER JOIN sys.objects o ON o.object_id = p.object_id
WHERE o.name = 'FactOrderDemo'
ORDER BY partition_number;
GO
We can see previous four partitions have been decreased to three now as the original partition 1 and 2 have merged into one partition.
Step 4: Archive or truncate old data in the staging table
Finally we can save the staging table FactOrderDemoArchive to an external disk or some other places for historical data keeping and trend analysis. We can also just truncate the data or drop the table FactOrderDemoArchive if no longer needed.
SPLIT
Next let's demonstrate partition SPLIT using the same approach.
Step 1: Create a staging table
We first create a staging table called FactOrderDemoTemp which will be used to store data of the last partition _ partition 3 after the merge from main table FactOrderDemo.
Again we'd better create its own partition function and partition scheme for the staging table to avoid interfering with the main table such as locking the table.
USE PartitionDemo
GO
CREATE PARTITION FUNCTION PF_YearlyOrderTemp (date)
AS RANGE RIGHT FOR VALUES
('2020-01-01', '2021-01-01'
)
GO

CREATE PARTITION SCHEME PS_YearlyOrderTemp
AS PARTITION PF_YearlyOrderTemp
ALL TO ([PRIMARY])
GO

CREATE TABLE FactOrderDemoTemp (
 OrderDemoKey bigint IDENTITY(1,1) NOT NULL,
 OrderDate date NOT NULL,
 OrderQuantity int NOT NULL,
 OrderType varchar(20) NOT NULL,
      INDEX CIX_FactOrderDemoTemp_OrderDate CLUSTERED COLUMNSTORE
) ON PS_YearlyOrderTemp(OrderDate);
GO
Step 2: Switch partition out
Now we can switch the last partition _partition 3 from main table FactOrderDemo to this newly created staging table FactOrderDemoTemp:
ALTER TABLE dbo.FactOrderDemo SWITCH PARTITION 3
TO dbo.FactOrderDemoTemp PARTITION 3;
GO
You can query staging table FactOrderDemoTemp:
SELECT * FROM FactOrderDemoTemp
The result shows:

We can also query table FactOrderDemopartition information:
SELECT o.name AS TableName, partition_id AS PartitionID, partition_number AS PartitionNumber, Rows
FROM sys.partitions p
INNER JOIN sys.objects o ON o.object_id = p.object_id
WHERE o.name = 'FactOrderDemo'
ORDER BY partition_number;
GO
We can see partition 3 is empty now:
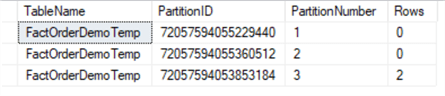
We can also query table FactOrderDemoTemppartition information:
SELECT o.name AS TableName, partition_id AS PartitionID, partition_number AS PartitionNumber, Rows
FROM sys.partitions p
INNER JOIN sys.objects o ON o.object_id = p.object_id
WHERE o.name = 'FactOrderDemoTemp'
ORDER BY partition_number;
GO
We then will see table FactOrderDemoTemppartition 3 has two rows:
Step 3: Perform partition SPLIT
As the partition 3 is empty now, we can perform SPLIT operation on columnstore index table FactOrderDemo.
We use the ALTER PARTITION FUNCTION statement to split the partition. We will split partition 3 into two partitions, the newest partition will used to store data of the year 2022.
Before splitting the partition range with the new value, we need to assign the next usable filegroup to the partition scheme, here we do this by assigning the NEXT USED property to the PRIMARY filegroup.
ALTER PARTITION SCHEME PS_YearlyOrder NEXT USED [Primary];

ALTER PARTITION FUNCTION PF_YearlyOrder()
SPLIT RANGE ('2022-01-01');
GO
By adding the partition RANGE boundary_value '2022-01-01', we just have split partition 3 into two partitions.
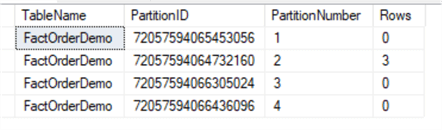
Let's query table FactOrderDemopartition information again:
SELECT o.name AS TableName, partition_id AS PartitionID, partition_number AS PartitionNumber, Rows
FROM sys.partitions p
INNER JOIN sys.objects o ON o.object_id = p.object_id
WHERE o.name = 'FactOrderDemo'
ORDER BY partition_number;
GO
We can see previous three partitions have been increased to four now as the original partition 3 split into two partitions.
Step 4: Switch partition(s) back from staging table to the main table
After the partition SPLIT operation, we will switch the partition back from the staging table FactOrderDemoTemp to main table FactOrderDemo.
To be able to switch back the partition from the staging table to the main table, the two tables need to have the same structure. We just split the last partition of the main table, so we have to split the last partition of the staging table FactOrderDemoTemptoo.
As we already know, we can't split a non-empty partition in table with columnstore index. To get around that, we will first drop the clustered columnstore index in the staging table, perform the SPLIT, then recreate the clustered columnstore index. Below are the T-SQL scripts:
-- Drop the clustered columnstore index
DROP INDEX CIX_FactOrderDemoTemp_OrderDate ON dbo.FactOrderDemoTemp
GO

-- Perform SPLIT
ALTER PARTITION SCHEME PS_YearlyOrderTemp NEXT USED [Primary];

ALTER PARTITION FUNCTION PF_YearlyOrderTemp()
SPLIT RANGE ('2022-01-01');

-- Recreate the clustered columnstore index
CREATE CLUSTERED COLUMNSTORE INDEX CIX_FactOrderDemoTemp_OrderDate
ON FactOrderDemoTemp
ON PS_YearlyOrderTemp(OrderDate)
GO
Now we can switch the partition back from the staging table FactOrderDemoTemp to the main table FactOrderDemo.
ALTER TABLE dbo.FactOrderDemoTemp
SWITCH PARTITION 3 TO dbo.FactOrderDemo PARTITION 3;
We can see partition 3 in the main table has two rows of data now by query partition information again:
SELECT o.name AS TableName, partition_id AS PartitionID, partition_number AS PartitionNumber, Rows
FROM sys.partitions p
INNER JOIN sys.objects o ON o.object_id = p.object_id
WHERE o.name = 'FactOrderDemo'
ORDER BY partition_number;
GO
Result shows:
We can query the staging table FactOrderDemoTemp and the main table FactOrderDemo:
SELECT * FROM FactOrderDemoTemp;
SELECT * FROM FactOrderDemo;
The staging table is empty and the year 2021 data are back in the main table:
Finally, we can insert some sample data of the year 2022 into the main table FactOrderDemo:
INSERT INTO FactOrderDemo(
  OrderDate
 ,OrderQuantity
 ,OrderType
  )
  VALUES
  ('2022-01-04',  228, 'Domestic'),
  ('2022-01-18',  108, 'International')
By running the partition information query again for the main table, we can see the year 2022 data is stored in its own partition _that's partition 4 which is created by the partition SPLIT:
This is the end of partition SPLIT demonstration.
After the above partition MERGE and SPLIT operation, the main table FactOrderDemo still has four partitions but hold values slid one year forward as specified in the following table:
| Partition | Values |
|---|---|
| 1 | < 2020-01-01 |
| 2 | >= 2020-01-01 AND < 2021-01-01 |
| 3 | >= 2021-01-01 AND < 2022-01-01 |
| 4 | >= 2022-01-01 |
Next Steps
- Please read tip How to Partition an existing SQL Server Table on steps to perform partition on an existing large table in SQL Server database.
- Tip Implementation of Sliding Window Partitioning in SQL Server to Purge Data provides an excellent walkthrough to purge data using partition switching also known as "Sliding Window".
- To understand SQL Server columnstore indexes including creation and maintenance, please read tip SQL Server Clustered and Nonclustered Columnstore Index Example.
- SQL Server Index Architecture and Design Guide contains information on index architecture, and best practices to design effective indexes to meet application needs.


About the author
 Sean Lee has been a SQL Server Database Administrator for over 20 years. He obtained his MCSE Data Management and Analytics in 2016. He is also the founder of SharpSQL.com.
This author pledges the content of this article is based on professional experience and not AI generated.
View all my tips
Article Last Updated: 2021-09-15
