Problem
Databricks is one of the best tools for data exploration. It allows us to connect and query any data management service or read files in various formats. Databricks runs on every major public cloud, Azure, AWS, Google and is tightly integrated with the cloud security, storage, and other cloud services. Databricks allows you to use the SQL language or programming languages like Scala or Python in a rich web interface based on Jupyter Notebooks. To read more on Jupyter notebooks, click here. When your data processing notebooks are ready, you can schedule them to run on a recurrent basis using Databricks job.
Frequently, you would want to improve your code without breaking the main version used in the job. Similarly, if you are working alongside other Data Engineers you may want to avoid seeing other people changes in the same notebooks. Each developer would like to work on his own notebook version in a way that would allow easy changes merging after the development was done.
Solution
Recently Databricks has added a source control support. It allows us to manage notebooks in Azure DevOps repos, GitHub or other systems based on git. Git is a free, open-source, distributed version control system. It is very popular and 90% percent of the code in the world resides on source control platforms that are built on a top of Git, like GitHub, Azure DevOps or GitLab.
Git short introduction
Git is a software that is running locally on your computer. In Databricks, Git is pre-installed inside the Databricks environment. GitHub/GitLab/Azure DevOps – are online hosts that allow sharing code between developers. Each of the servers has some specific features that differ from one another. Git repository (repo) contains all folders, files and changes history. There is always a local repository and optional remote repository (on online host) configured.
- Commit: change to file or changes in multiple files.
- Push: operation to upload your locally committed files and history of changes to the remote repository.
- Pull: operation to download changes, made by others, from remote repository to your local repository
- Branches: If we want to change the code, we will create a new code branch which will include all code from the main branch. After changes were done and tested, we can merge the development branch into the main branch.
You can read more about Git here.
Getting back to Databricks, the job will execute the code from the Git main branch and a developer will code new features on the Git side branches. For the below example I will use GitHub as an online host.
Setup GitHub
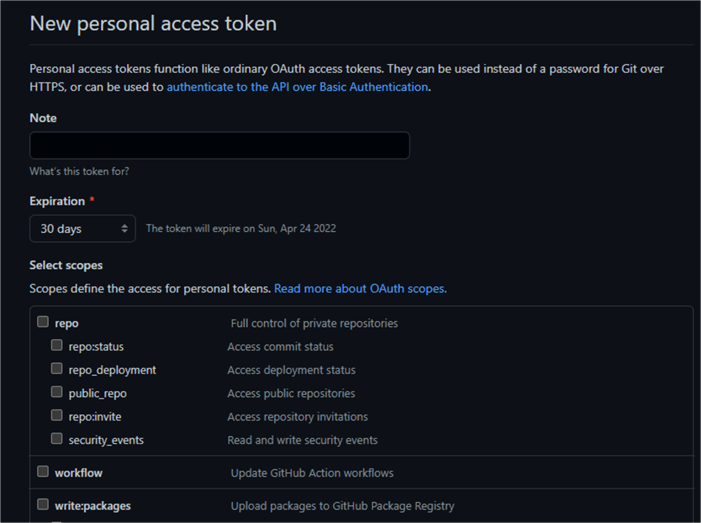
- First, we will need to generate a user token in GitHub. This token will be used as a secret to push and pull changes to the remote repository.
- Click on your GitHub username and go to “Settings”, then to “Developer Settings” and finally to “Personal access tokens”.
- Click on “Generate new Token”. Copy the token because you can see it only once (only after generation). You will be able to use it, as a password, to access any of your repositories.

- You can set token permissions here as well as a token expiration (which is optional). The main permissions that you will need are full control of your private repositories.
- Now you can create a new GitHub repository and save the HTTPS path that you will use to access the repository.

Databricks Setup
- Inside Databricks, go to “User Settings”. In the “Git Integration” tab, choose any user which will be used to sign your code changes. Put in the generated token. Multiple users can use the same token.


- Main branch configuration: In the Repos tab, first we will create a new folder. I have called it “GitHubRepo”. It’s important to avoid creating reports under your username if you plan to allow multiple people to use it. After the folder has been created, add local repository by clicking on the “Add repo” button and link it to the remote repository by using the https path that you saved. Since I will be going to link this repo to the main branch of the remote GitHub repository, I will call it "main_branch".


Now you can create notebooks or move existing notebooks to the new local repo.
When you are ready to commit, click on the "main" button to reach the Databricks source control UI. Here you can commit your changes to the remote repository.

From now on, you can use this notebook in a job.
- Development branch configuration: I will add a new local repository and link it to the same remote GitHub repository. I will be the only user of this repository so I will create it under my user. I will call it "maria_development_branch". Now, I will go to the Databricks Source Control UI and will add a new branch “maria_playground”.

This way multiple developers can work on personal development branches and change the notebooks without seeing each other’s changes. After the code changes were tested, each developer can merge the changes into the main branch and other developers can pull the changes.
Next Steps
- Read more about GitHub vs GitLab
- Azure DevOps Services version control
- How to Integrate Azure DevOps within Azure Databricks video

Maria Zakourdaev is a Data Platform Microsoft MVP and a technology expert with more than 20 years of experience, a community leader with a profound knowledge of Microsoft products and services, while also being able to bring together diverse platforms, products, and solutions to solve real-world problems.
Maria has a hands-on experience managing various data management technologies in Azure, AWS and Google public cloud platforms, including SQL Server, Azure CosmosDB, AWS DynamoDB, MemSQL, MySQL, Postgresql, Snowflake, Redis, Amazon Redshift, Couchbase and Elasticsearch, Spark, Databricks, Big Query.
Maria is an organiser of the annual conference “Data TLV” ( ex “SQL Saturday Israel”), a free training event for any data professionals: http://datatlv.com.
- MSSQLTips Awards: Trendsetter (25+ tips) – 2022 | Author Contender – 2022 | Rookie Contender – 2018


There’s definitely a lot to know about this issue. I really like all the points you made.