By: Temidayo Omoniyi | Updated: 2023-11-10 | Comments | Related: > Azure Databricks
Problem
In today's world, having an environment where developers can collaborate and have code reviews is essential for most software personnel and technological companies. Being able to vet developer code before being pushed to the production environment is immensely important. The issue of manually moving notebooks from one workspace or folder can be tiring, and a solution is needed.
Solution
With the introduction of Git Integration Repo in Databricks workspaces, a developer can now collaborate with other developers for their data engineering, science, and analytic project in a single workspace and provides version control for different stages of code.
What is GitHub?
GitHub is a cloud-based hosting platform that enables developers to store and manage their code and monitor and manage changes over time. GitHub is built on top of Git, a distributed version control system that offers an intuitive graphical user interface (GUI).
GitHub Features
GitHub is a version control platform that helps developers improve their code using the best software practices:
- Version Control: This platform makes it easy for developers to keep track of changes in multiple code versions, backtrack, or resort to a previous version and see changes being made.
- Code Review: This feature enables developers to review and modify code before being merged to the main branch.
- Collaboration: This feature makes working together on code projects simple for developers. Developers can create branches to work on new features or problem fixes without affecting the main source. Once their changes are made, they can be merged back to the main branch with the pull request command.
- Continuous Integration and Continuous Delivery (CI/CD): This is by far the most important feature of GitHub. It helps automate code building, testing, and deployment, making it possible to release new features rapidly and safely, always keeping the code in a deployable state.
Databricks Repos
Azure Databricks Repos provides a graphical Git client and APIs. This enables standard Git activities such as cloning repositories, pushing and pulling, branch management, and visual comparison between different commits.
Within the Databricks Repos, code developed for different data-related projects can follow the best practices using Git for version control, collaboration, and CI/CD.
Possibilities with Databricks Repos
Databricks Repos comes with all the functionalities of Git:
- Remotely clone, push to, and retrieve the Git repository.
- Developers can create, work, and maintain feature branches before merging to the main branch. In this way, it resolves the problem of conflicts between multiple branches.
- Provide the ability to create, edit, and modify notebooks, including IPYNB notebooks.
Databricks Supported Git Provider
Azure Databricks supports the following providers:
- GitHub and GitHub AE
- GitLab
- Azure DevOps
- Bitbucket Cloud
- Bitbucket Server
- AWS CodeCommit
We will use the GitHub provider for this article; subsequent articles will explain the other providers.
Configure Git Integration for Databricks Workspace
Get Username and Personal Token Account
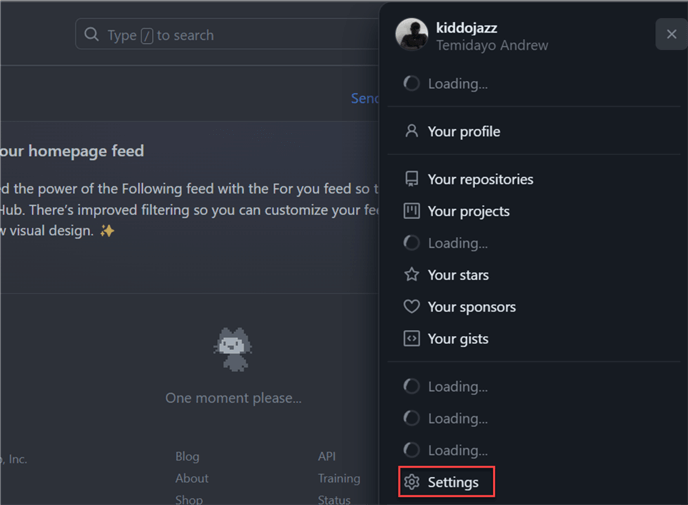
Step 1: Personal Token Account. To get the personal access token, log in to your GitHub.com account. On your GitHub homepage, click your profile icon at the top right corner and select Settings.
Step 2: Generate Token. In your settings environment, at the left pane, scroll to the bottom and select Developer Settings. This should open another window.
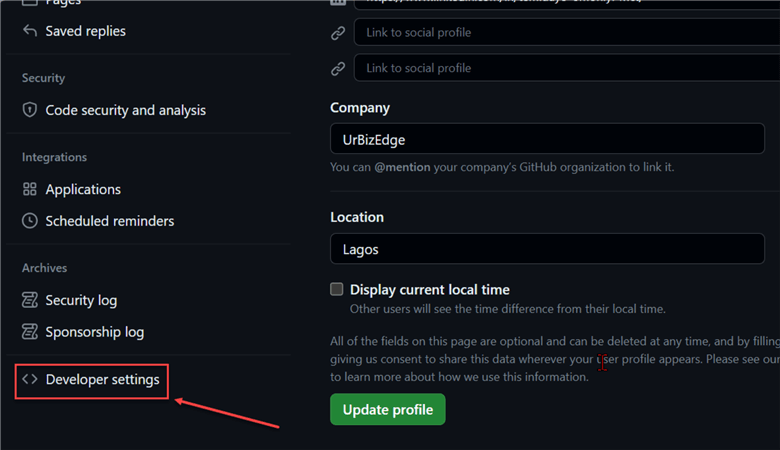
In the Developer Settings window, click on the Personal access tokens and select Tokens(classic). This should open a new pane where you are expected to Generate a new token.

Note: You may be prompted to authenticate your login credentials at this stage. For this article, I used the GitHub mobile version for the authentication.
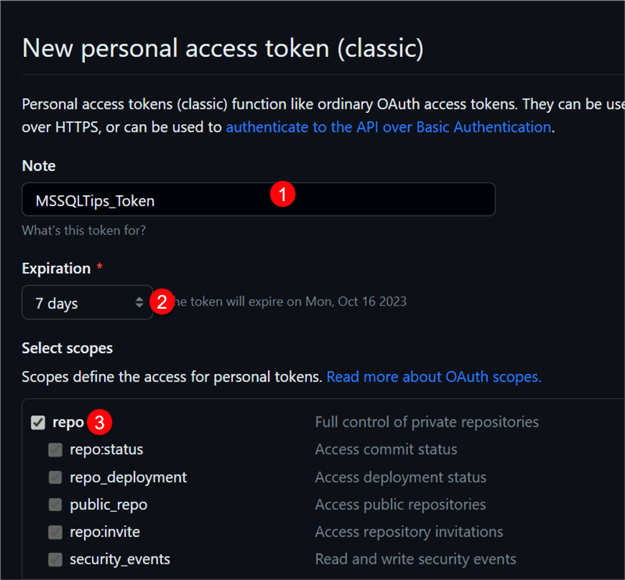
Step 3: Setting New Personal Access Token. In the new window, fill in the following information:
- Note: Provide a name to identify your token easily.
- Expiration: Choose a timeframe. This is a tradeoff between convenience and security. The longer the expiration days, the more risks you may encounter if it falls into the wrong hands.
- Repo: Check the repo box.
Scroll to the bottom and select Generate token.
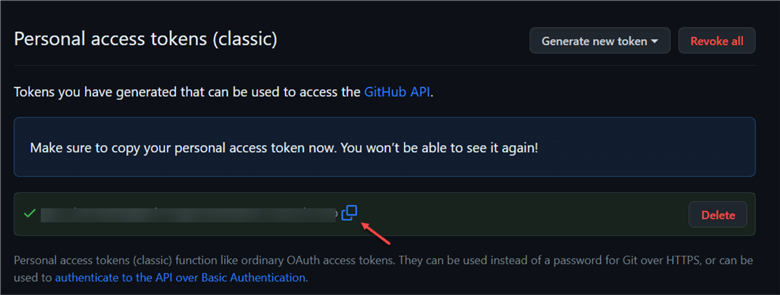
In the new window, copy the generated personal access token and paste it to a private and secure place, as you will not see it again.
Integrate Workspace with GitHub
Now that we have generated our personal access token, we need to integrate Databricks workspace with GitHub.
Use the following steps to integrate GitHub to the Databricks workspace:
Step 1: Link Account. To link an account in the Databricks workspace, from your workspace, click User Settings at the top right corner and select Linked accounts.

Step 2: Git Provider and Activate. For the next step, fill in the following configuration:
- Git Provider: We will use the GitHub provider for this.
- Link: Select the Personal access token.
- Git provider username or email: Use the same email or username as your GitHub account.
- Token: Paste the generated token from the GitHub account.
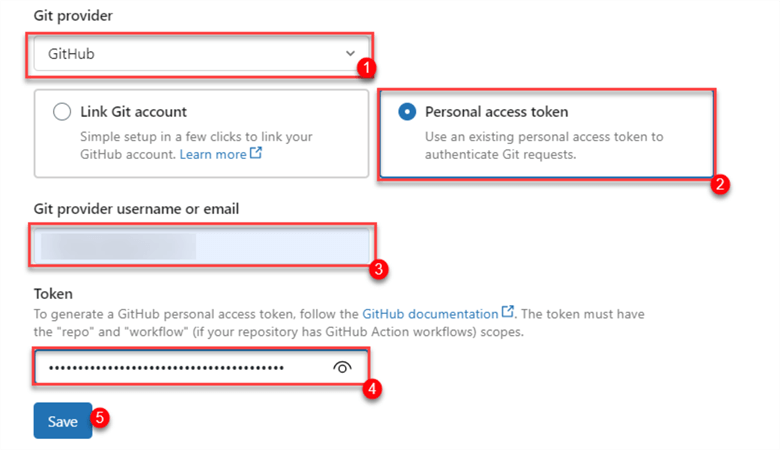
Now, click Save to fully integrate GitHub with Databricks workspace.
Create GitHub Repository
GitHub Repository is a central storage for code, documents, and other related project assets. It usually serves as a hub for developers to collaborate, keep track of changes, and control code versions. Each Databricks repo is marked as a GitHub repository.
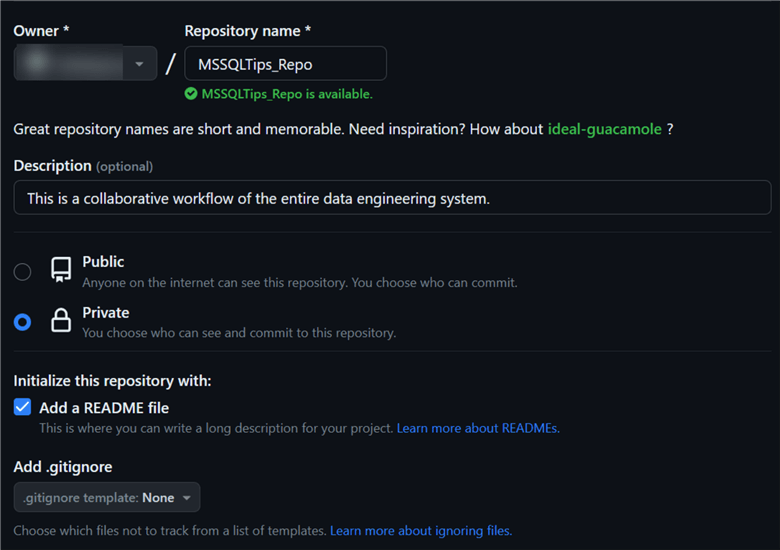
Step 1: Add Repo. To add a new Repo, click Add Repo and fill in the information in the image below. We will be using a private repo as it will be for organizational use, and we do not want such a repository to be in public view.
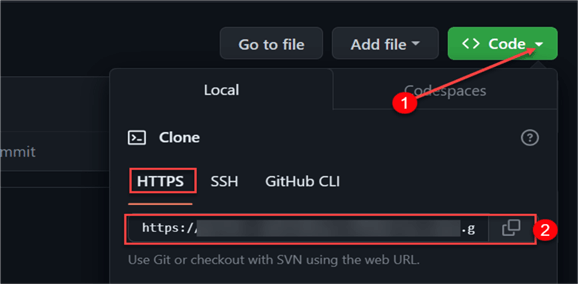
Step 2: Copy Repo Link. Click the Code icon in the just created repo, copy the URL (HTTPS) link, and head back to your Databricks workspace.
Add Databricks Repo
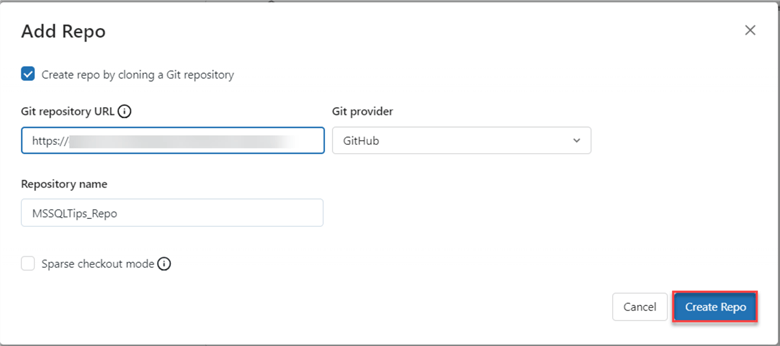
In your Databricks workspace, click Repos and create a new Repo.

In the new window, fill in the Repo link (HTTPS) you copied from GitHub and click Create Repo. This will create an underlying repo in your Databricks workspace.
Create Branch
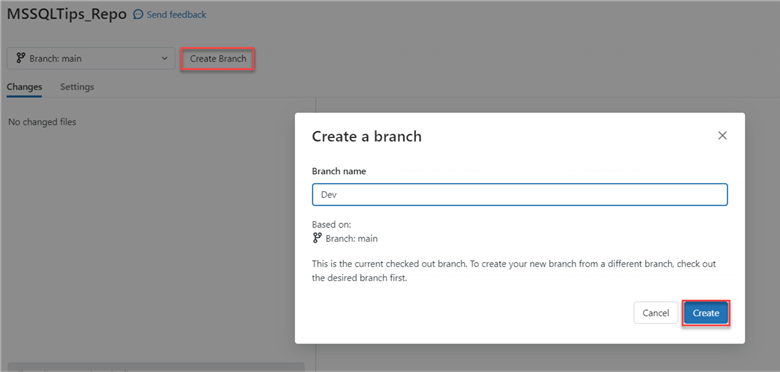
In standard practice, it is best to create a development branch where code is developed before moving it to the main branch. Click the main icon. This will open another window.

In the new window, click Create Branch, name it Dev, and switch to the Dev branch. Click Create.
Create Notebook
Before creating a Notebook in Databricks workspace, create a Folder to house your different notebooks.
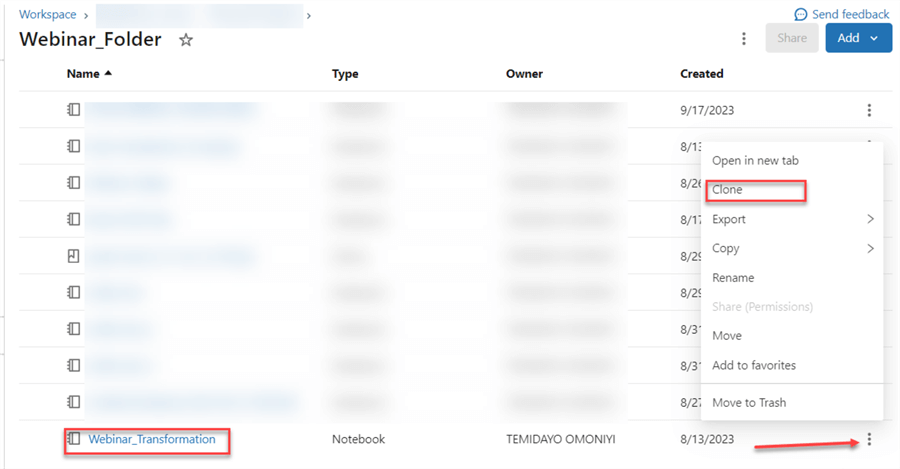
There are three ways to create notebooks in the Databricks Repo folder: creating a new notebook, importing a notebook, or cloning an existing notebook. Let's try cloning an existing Repo from our Databricks workspace for this article.
Clone Existing Notebook. To clone an existing notebook to the Dev Repo environment, navigate to the notebook you want to use, click on the three dots, and clone to the Repo directory.
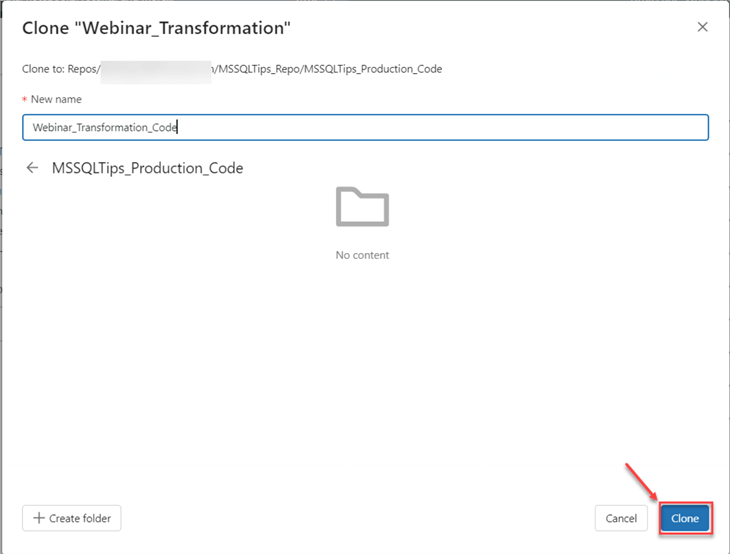
You can rename the clone notebook and then click Clone.
Commit & Push
Commit and Push are two key features in the version control system in GitHub.
- Commit is used to save a snapshot of your code change in your local repository. This enables you to monitor your development over time and time travel, if necessary, to a previous version.
- Push is used to send commit to the GitHub repository branch. This allows other collaborators with access to the repository to see your modifications.
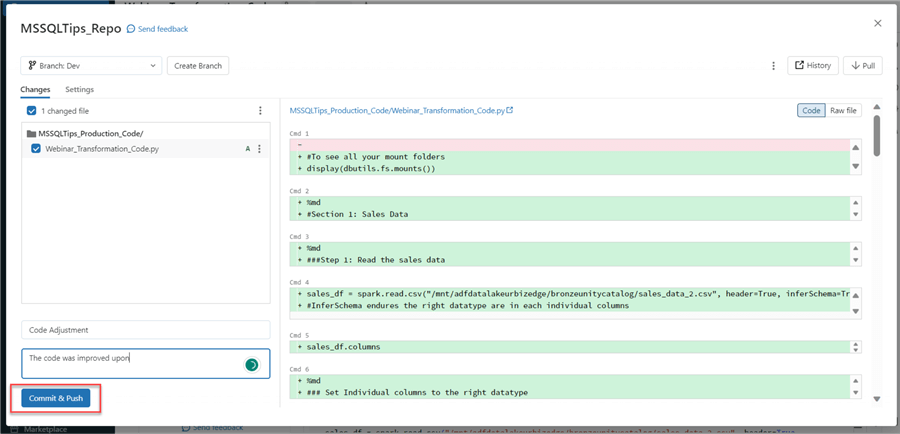
To commit and push your code, click the Dev icon (image below). This will take you to another window.
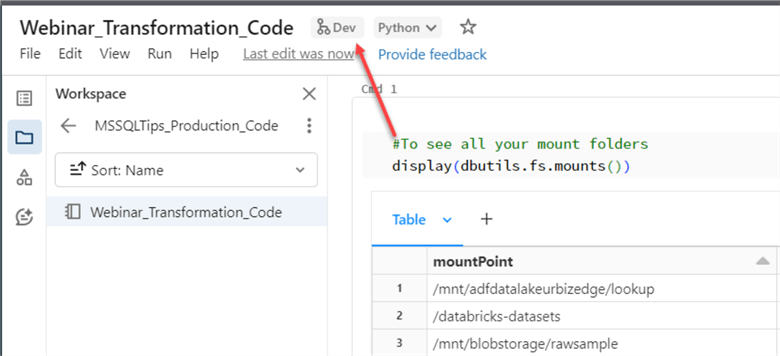
In the new window, you will see some changes. Click Commit & Push. This will take the code to the Dev branch.
Compare & Pull Request
This GitHub feature allows users to compare changes with the other branches before being requested to merge with the main branch.
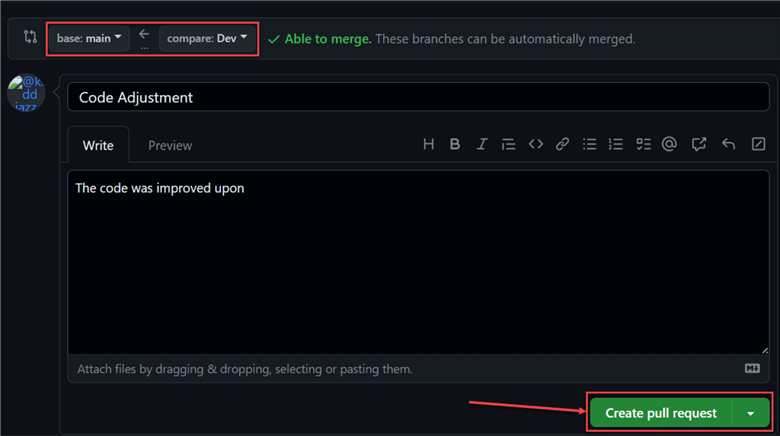
To perform this function, head to your GitHub.com site. Locate the repo we created earlier. Click on the Compare & pull request tab. This should take you to another window where you will perform the pull request function.

In the new window, we are comparing the Dev branch and the main branch. Click Create Pull request.
Merge Pull Request
Now that we have successfully created a Pull request, we need to merge it to the main branch by clicking Merge Pull Request. Add a Comment if needed.
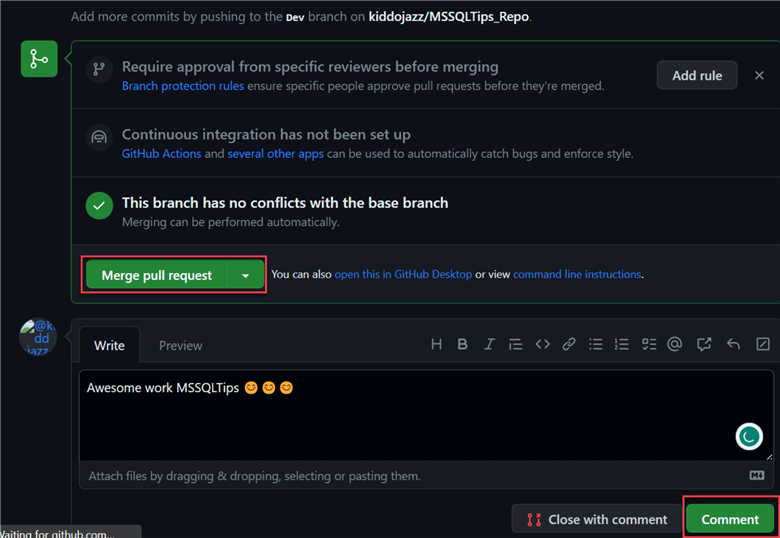
After successfully merging the notebook with the main branch, head back to your Databricks Repo and switch to the main branch. You will notice the notebook has been added to the main branch.

Conclusion
This article taught us how to generate a personal token in GitHub and integrate it with the Databricks workspace. We also discussed the importance of GitHub and developer best practices for moving the codebase from the development to the production stage. In our next article, we will discuss Databricks workflow and how to integrate our different GitHub Repo to create a complete ETL pipeline.
Next Steps
- Delta Live Tables
- Introduction to Databricks Workflows
- Managing Azure Databricks with the Azure Cloud Shell Command Line Interface
- What are Lake houses in Microsoft Fabric?
About the author
 Temidayo Omoniyi is a Microsoft Certified Data Analyst, Microsoft Certified Trainer, Azure Data Engineer, Content Creator, and Technical writer with over 3 years of experience.
 This author pledges the content of this article is based on professional experience and not AI generated.
View all my tips
Article Last Updated: 2023-11-10


