Problem
Deploying infrastructure as code allows the Azure Cloud Architect to set up Azure Services quickly. However, there are times in which changes need to be made to objects within the service after the initial deployment. How can we create, update, and/or delete objects within Azure Databricks?
Solution
The Databricks Command Line Interface (CLI) allows the Data Engineer to perform a variety of tasks from the command line versus the Azure Portal. This is great when we want to make a change, like adding a new cluster for a business line to all our environments. The Databricks CLI can be configured for both Azure Cloud Shell and standard Python installation. Today, we will learn how to use the Azure CLI with the Azure Cloud Shell.
Business Problem
Our manager at Adventure Works has asked us to explore how the Databricks CLI can perform maintenance tasks with the existing Databricks Workspace.
Here is a list of tasks that we need to investigate and figure out how to solve:
| Task Id | Description |
|---|---|
| 1 | Configure Azure Cloud Shell |
| 2 | Connect to Databricks |
| 3 | Manage Secrets |
| 4 | Manipulate The File System |
| 5 | Govern Workspaces |
| 6 | Control Clusters, Libraries and Pools |
| 7 | Review Jobs and Runs |
| 8 | Oversee Tokens and Groups |
At the end of the research, we will understand how to manage Azure Databricks using the CLI within an Azure Cloud Shell.
Task 1: Configure Azure Cloud Shell
A new dashboard was created for this article with the default name “My Dashboard.” The image below depicts three services we will discuss: the Databricks Cluster named dbs4rissug2020b, the storage account named cs210033fff97809c39, and the cloud shell. The cloud shell can be configured to accept both PowerShell and Bash commands. The image below shows the PowerShell interface being used. The storage account is tied to the cloud shell service, and we will talk about how to upload and download files to this account later.

Many of the Linux commands are supported within the Azure Cloud Shell. When executed, the code snippet below shows that the CBL-Mariner version of Linux is the operating system being used.
Cat /etc/os-release
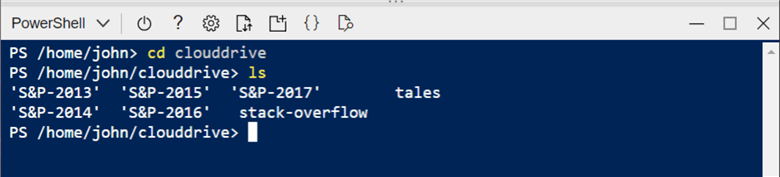
By default, we are logged into the home directory when starting the shell. Use the following Linux commands to change the working directory to clouddrive and list the contents of the directory.
cd clouddrive
ls
The image below shows that the directories contain S&P 500 stock data for 5 years, fairy tales told by the Grimm Brothers, and stack-overflow examples created for recent Azure Databricks questions. The clouddrive is tied directly to an Azure SMB file share.
The code snippet below uses the du command in Linux to list the number of files in each directory:
du --inodes
We can see in the following image that the S&P 500 contains more than 500 top U.S. companies each year. Top U.S. companies are added and deleted from the Standard & Poor’s list using the specific criteria.

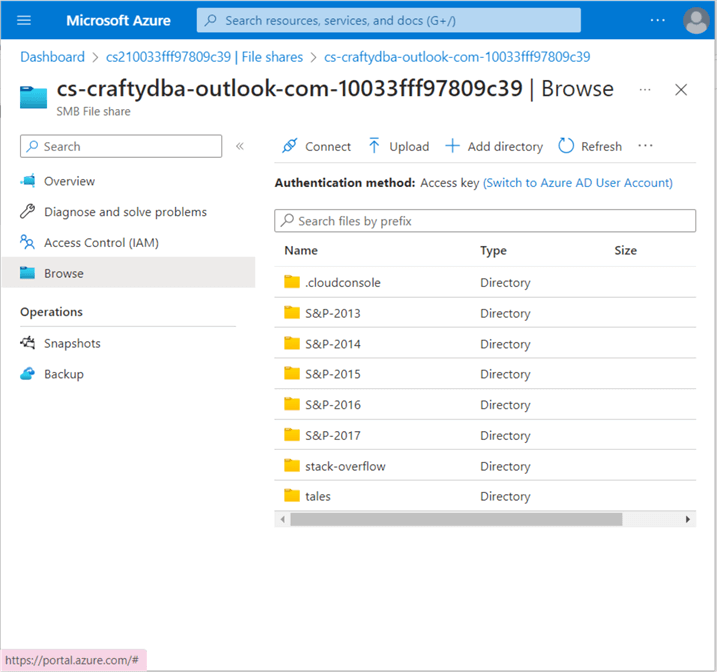
As stated, files from your local computer can be uploaded or downloaded directly to the SMB file share attached to the cloud shell session. The same Linux directories in the cloud shell are shown in the Azure portal.
Before we can use the Databricks CLI, we must install libraries that support the command line utility. Run the code below to install the library now.
pip install databricks-cli
There are many supporting packages needed by the Databricks CLI library. The pip package manager will download and install components that do not exist.

Since Cloud Shell is a shared service, any installations, such as libraries, are installed in the local user directory. We need to modify the path variable to enable the ability to call the Databricks executable from anywhere in the LINUX system.
Use the following commands if you are using the Bash shell interface.
ls .local
export PATH=$PATH:/home/john/.local/bin
env
Use the following commands if you are using the PowerShell interface.
ls .local
$env:PATH += ':/home/john/.local/bin'
$env:PATH
The image below shows the path has been updated.

Now, call the Databricks executable program without any arguments. This will display the general help on all the commands.
This tip will not discuss the following commands since they are not used every day: cluster-policies, configure, pipelines, repos, stack, and unity catalog. Please refer to the online documentation if you are interested in these topics.

Task 2: Connect to Databricks
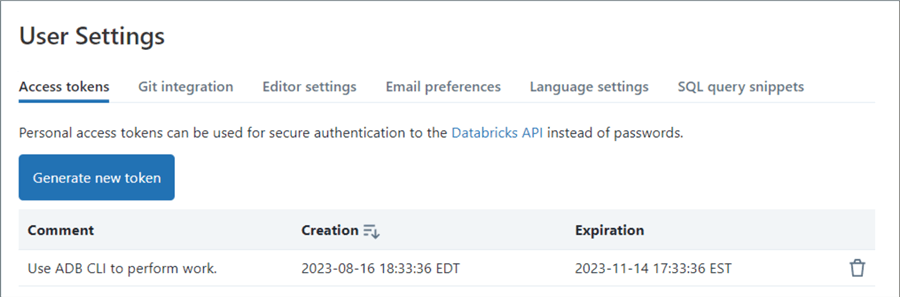
The CLI uses an Azure Databricks User Token to sign into the workspace. The user must have permission to administer the Databricks Workspace. The following image shows that the user named craftydba@outlook.com is logged into Databricks and asking for a new token. The first step is to add a comment to the request and set the expiration period.

There is one chance to capture and store the Databricks token in a safe place. Azure Key Vault is an ideal place to store this information. If you forget the token, you can always delete existing tokens and create a new one.

Looking at the access token section within Databricks, we can see both the creation and expiration dates. However, the secret or token is nowhere to be found.
We can now use the Databricks token with the CLI to authenticate to the Databricks Workspace. I will be placing code snippets for your future use within the article. However, the command line executable is self-documenting. Any command with the correct parameters either fails or brings up help via a textual man page. The code below is used to connect.
databricks configure –token
The Databricks Host name can be obtained by looking at the URL in the first image. To recap, the first step in using the Databricks CLI is configuring a token for connecting to the workspace.

Task 3: Manage Secrets
This is one of the two CLI commands that I use on a regular basis. There is no place within Azure Databricks Workspace to list secret scopes. In most cases, I use a Databricks scope that is backed by an Azure Key Vault. That way, administration of the secrets is done via the portal instead of the command line.
The image below shows the different options of the databricks secrets command.

The list-scopes option shows existing secret scopes in a given Databricks workspace. We can see that a secret scope named ss4kvs is backed by a key vault named kvs4tips2021. The list option used with a given scope allows the administrator to list the keys in the vault. We can see that usernames and passwords are stored for both a virtual machine and a SQL database. Additionally, the information to mount storage using a service principle is stored in the vault.

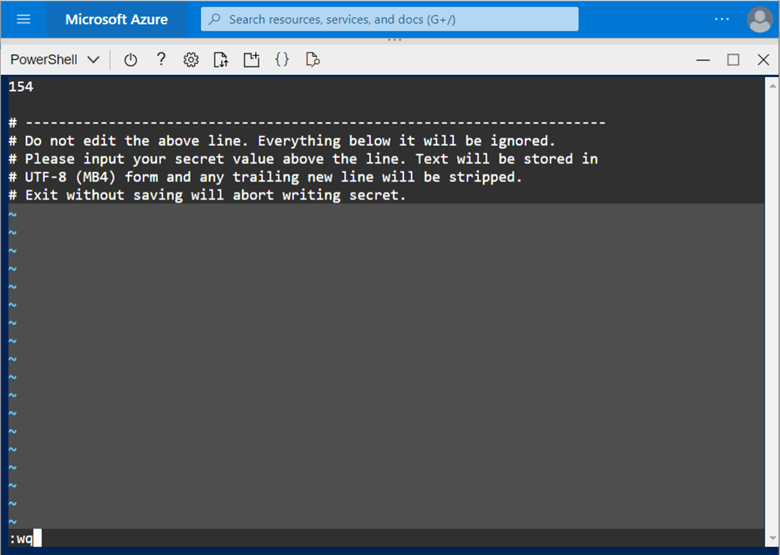
The commands below are shown in the previous and upcoming images. We need to create a local key vault named mssqltips with a secret named john-miner-id. After testing a feature that will not be used, we need to clean up.
# show existing scopes
databricks secrets list-scopes

# show secrets store in a scope
databricks secrets list –-scope ss4kvs

# create local secret scope
Databricks secrets create-scope –-scope mssqltips

# add secret (author id)
databricks secrets put –-scope mssqltips –key john-miner-id

# add value using vi

# delete local secret scope
databricks secrets delete-scope –-scope mssqltips
The image shows that the new scope and secret are created and destroyed.
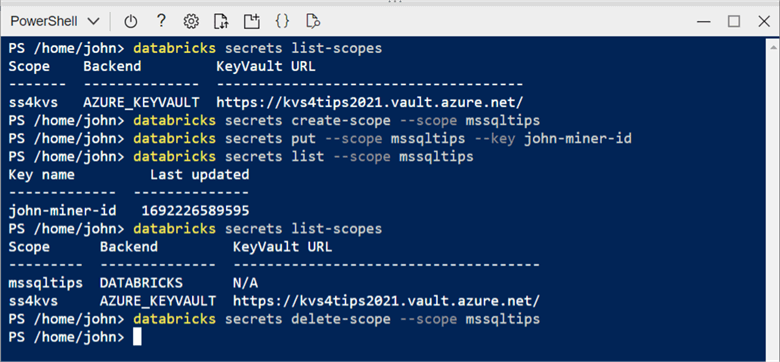
Note: We are using the Azure Cloud Shell, which is using a Linux operating system. My Author ID with MSSQLTips is 154. To enter this information, we have to use the vi editor. Check the documentation as a refresher for commands.
The databricks secrets command is invaluable since we cannot list the secret scopes via the Azure Portal.
Task 4: Manipulate the File System
The second Databricks CLI command used regularly is databricks fs. There is no easy way to upload or download files from your laptop to the local storage (DBFS) Databricks uses. Entering the command without any arguments displays the help page, as seen below.

The sample CLI code starts listing the contents of the root directory. Then, it dives deep into the sample data. The bronze directory contains copies of the sample datasets supplied by Databricks. The last step is to list the files for the lending club.
# list root
databricks fs ls

# list sample lake
databricks fs ls dbfs:/rissug

# list bronze folders
databricks fs ls dbfs:/rissug/bronze

# list bronze – lending club folder
databricks fs ls dbfs:/rissug/bronze/lending_club
The image below shows directories in the root file system.

The image below shows folders and/or files in the next three layers of the lending club folder.

Again, many of the commands are taken from the Linux system but coded for a distributed application such as Spark that might use URLs instead of mounted storage.
So far, we have looked at the ls command that lists the contents of a directory. The cool thing about the cloud shell is that we can mix and match Databricks and Linux commands. We can peek at the comma-separated data file using the cat command and pipe the standard output to the head command to limit the number of rows to five.

The CLI snippet below shows how to use the ls – list, cat – concatenate, cp – copy, and rm – remove file commands.
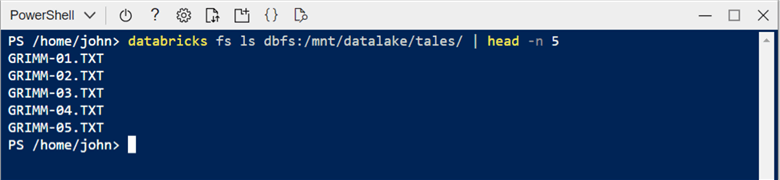
# list bronze – lending club folder
databricks fs ls dbfs:/rissug/bronze/lending_club

# show file contents (first 5 lines)
databricks fs cat dbfs:/rissug/bronze/lending_club/loan_stats_2018q2.csv | head -n 5

# copy file from dbfs to cloud shell
databricks fs cp dbfs:/rissug/bronze/lending_club/loan_stats_2018q2.csv .

# remove file from dbfs
databricks fs rm dbfs:/rissug/bronze/lending_club/loan_stats_2018q2.csv

# list bronze – lending club folder
databricks fs ls dbfs:/rissug/bronze/lending_club

# copy file from cloud shell to dbfs
databricks fs cp loan_stats_2018q2.csv dbfs:/rissug/bronze/lending_club/

# list fairy tales stored in a mounted folder
databricks fs ls dbfs:/mnt/datalake/tales | head -n 5
The image below shows the output of the above steps less the cat statement shown earlier. In this example, we are working with one file. However, the databricks fs commands will work with wild cards. Thus, the * can be used to transfer a bunch of files from the cloud shell to the Databricks file system or vice versa.

I like mounting my Azure Data Lake Storage to the cluster. The reason behind this architectural design is that most Python libraries are not Spark-aware. If you do mount storage, you can copy files from the cloud shell storage to Azure Data Lake Storage using Databricks as a pass-through.
Since the main purpose of Spark is to work with files stored in a data lake, it is very convenient that Databricks has a command that works with the file systems.
Task 5: Govern Workspaces
The primary purpose of the Data Engineering interface within Azure Databricks is to allow the developer to write notebooks (programs) in their favorite programming language. The databricks workspace command supplies the developer with options to create (mkdirs), copy into (export), copy out of (export), list (ls), and remove (rm) files and/or folders. Again, executing the command without arguments displays the help page seen in the image below.

This command is similar to the databricks fs command. The example below shows the folder structure starting at the root and ending at the shared workspace. An export of all files and folders is performed on the misc directory. The contents of the directory are shown using the ls directory.
# Show root level folders
databricks workspace list

# show shared folders
databricks workspace list "/Shared"

# export misc. directory to cloud shell storage
databricks export_dir "/Shared/misc" .

# show new directory
cd misc
ls
Next, let’s show two folders in the workspace file/folder hierarchy.

I am not showing the results of the export_dir action. However, shown below are the contents of the directory that was recursively copied. It contains various program files using the SQL, Scala, and Python languages.

The workspace command might be useful to automate the migrating notebooks. However, a right-click using the Databricks Workspace will allow an end user to create an archive file (*.dbc). This is a more convenient way to transfer many files and/or folders. See the documentation for details.
Task 6: Control Clusters, Libraries and Pools
The Spark engine depends on a cluster to run a notebook. To use prebuild code, we need to load libraries onto the cluster. We can use a pool that might have a set of warm servers to reuse to speed up the time to deploy a new cluster.
In short, these three topics are related. The image shows how both interactive and job clusters can use a defined pool to reduce startup times.

Executing the databricks clusters command allows us to see the online help.

Please read the documentation on cluster types and access modes. This has been an area of incremental change by Databricks over the last few months. The unrestricted policy needs to be selected so that we can pick workers and drivers from our predefined pool.

Executing the databricks libraries command allows us to see the online help.

I enjoy the simplicity of the Databricks cluster interface regarding libraries. It is easy to find and load a library from Maven or PyPi. I will show how other products on the market are not so simple in the future! The image below shows the pyodbc library being added to the cluster named clMsSqlTips.

Executing the databricks instance-pools command allows us to see the online help.

The image shows the cluster named polMsSqlTips. It can have from 0 to 9 virtual machines using a Standard DS3_v2 image.

Below is the list command in our sample script. Note: Many Databricks objects, such as clusters, use JSON documents during their creation. Thus, it is important to get familiar with key value pairs used by the commands.
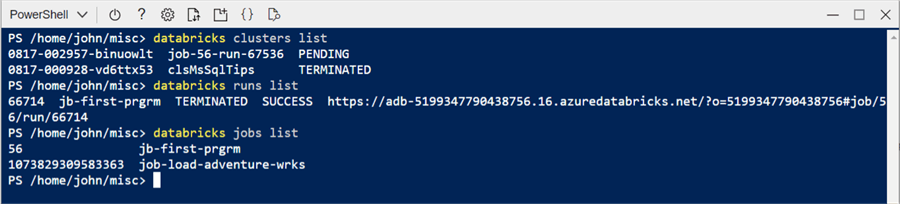
# Show clusters
databricks clusters list

# Show pools
databricks instance-pools list

# Show libraries
databricks libraries list
The image below shows the output of the script above. Since our pool has up to nine nodes, we can define two more similar-sized clusters before running out of virtual machines. The library command returns the expected JSON document.

Clusters, pools, and libraries are core to Spark computing. Knowing the Databricks CLI commands will help you manually deploy objects using speed and accuracy.
Task 7: Review Jobs and Runs
Data Engineering involves extracting, translating, and loading data (ETL). If we had to run these notebooks in the Databricks environment manually, we would have to pay people to stay up late to perform the program execution. The invention of Jobs allows us to schedule a workbook at a given time. Jobs have been enhanced with workflows in which one step can depend on another. This dependency can be expressed as a Directed Acyclic Graph (DAG). I will talk about workflows in a future article. For now, jobs can be executed. This run action can either be a success or a failure.
Executing the databricks jobs command allows us to see the online help.

The image below shows two jobs in the workflows section of the Databricks interface. These jobs were created many months ago.

Executing the databricks runs command allows us to see the online help.

The image below shows the manual execution of a job named jb-first-prgrm. This Python program just echoes “hello world.” As we can see, the start-up of a cold cluster takes a long time. That is why a pool with a time-to-live value allows these clusters to stay warm during an extensive run of many batch programs.

Since clusters are key to running jobs, I wanted a simple Databricks CLI script to list objects in our environment.
# Show clusters
databricks clusters list

# Show runs
databricks runs list

# Show jobs
databricks jobs list
The screenshot below shows the interactive cluster shutting down while the job cluster starts. Note: The job identifier is part of the cluster name. Any successful job has a URL that the end user can look at the execution trace. Lastly, both existing jobs are shown below with only names and IDs.
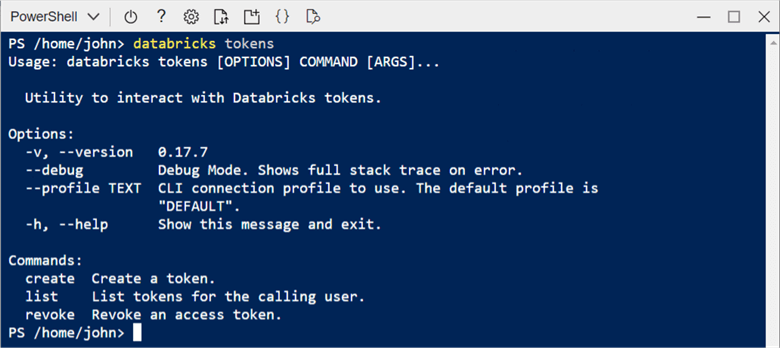
Task 8: Oversee Tokens and Groups
User-defined tokens are a mechanism in which a process like the CLI needs to be executed once. After successful authentication, the same token can be used by each command. Shown below is the help page for the databricks token command.
The snippet below shows the tokens in our Databricks workspace.
# Show tokens
databricks tokens list
User-defined tokens can be an attack vector for a hacker. We can see that two tokens are currently being used. As a Databricks Administrator, keeping track of the number of tokens in your system is important. Each token does expire, and removing unused tokens is a maintenance chore.

Typing the databricks groups command in the cloud shell will show the online help for this command.

The snippet below shows the admin group and the members within that group.
# Show groups
databricks groups list

# Show members
databricks groups list-members –group-name admins
This Databricks workspace is for personal use; hence, my craftydba@outlook.com account is the only member of the admin group.

Summary
The Azure Cloud Shell is a quickly deployed Linux server that can execute both Databricks CLI and PowerShell scripts. The output of the commands (PowerShell List) can be saved as a variable and iterated over using a for each loop. For instance, we want to add the pyodbc library to all 10 clusters defined in our environment. A noticeably short CLI script can save an administrator a lot of work. I briefly covered commands that I think are especially useful. Other commands, such as the unity catalog, are not being used by every company. I left these commands for your exploration.
Once you have an Azure Cloud Shell environment, you might want to configure the environment with additional packages. Since the environment is a shared service, the package installer will place the binaries into a local sub-directory. Do not forget to add this directory to the PATH variable. Otherwise, a fully qualified path to the executable will be required for each execution.
Not only does the Azure Cloud Shell environment give you computing power, but it also comes with storage space. Do not forget that the clouddrive directory maps to an SMB file share in Azure. Thus, you can use a tool like Azure Storage Explorer to upload and download a large number of files. This is convenient if you want to store files in the Azure Databricks File Store (DBFS).
To recap, the Databricks CLI is a handy way to interact with the Azure Service at a high level. When a new feature comes out, there may not be an associated update to the CLI. That is where interacting with the service using the REST API comes into play.
Next Steps
- Learn how to interact with the Databricks REST API.

John Miner is a Senior Data Architect at Insight Digital Innovation helping corporations solve their business needs with various data platform solutions.
He has over thirty years of data processing experience, and his architecture expertise encompasses all phases of the software project life cycle, including design, development, implementation, and maintenance of systems.
His credentials include undergraduate and graduate degrees in Computer Science from the University of Rhode Island. Also, he has earned certificates from Microsoft for Database Administration (MCDBA), System Administration (MCSA), Data Management & Analytics (MCSE), Data Science (MPP), Databricks Certified, and Fabric Certified.
John has been recognized with the Microsoft MVP award nine times for his outstanding contributions to the Data Platform community.
When he is not busy talking to local user groups or writing blog entries on new technology, he spends time with his wife and daughter enjoying outdoor activities. Some of John’s hobbies include wood working projects, crafting a good beer and playing a game of chess.
- MSSQLTips Awards: Author of the Year – 2019, 2022, 2023 | Champion (100+tips) – 2023