Problem
SQL Server stores data as rows and columns in a table. When we design SQL Server tables it is usually based on the business requirements at that point in time. Sometimes things change and we need to add columns to an existing table to address new business logic. This SQL Tutorial will allow you to learn how to add a column to an existing table using both T-SQL and the SSMS interface to support the SQL data for your project.
Solution
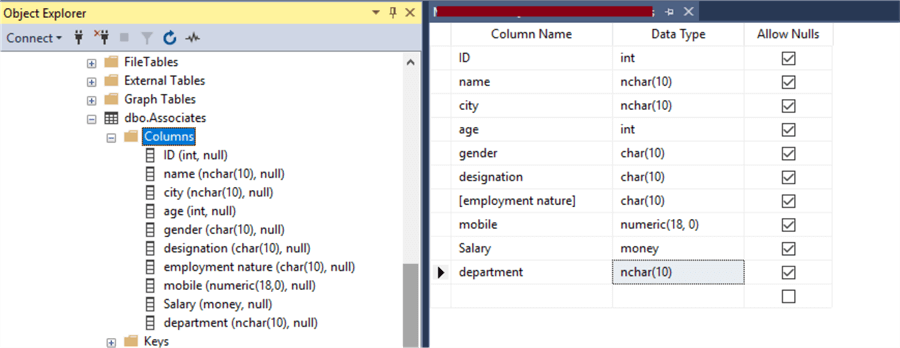
For demonstration purposes, here is a table named Associates in database TESTDB. There are several columns in this table to store data in these columns. Below is a screenshot from Object Explorer in SQL Server Management Studio (SSMS).

Now, the company requires the addition of a new column named department, where the department name will be stored for each employee.
Add a Column to a Table using SQL Server Management Studio
First, connect to the SQL Server instance in SSMS and expand the target database to add a column for a table. There are two ways to use the table design window to add a column.
Option 1
You can expand the database folder, followed by your identified table name. You can right-click on the Columns folder and choose the “New Column…” option, as shown in the image below.

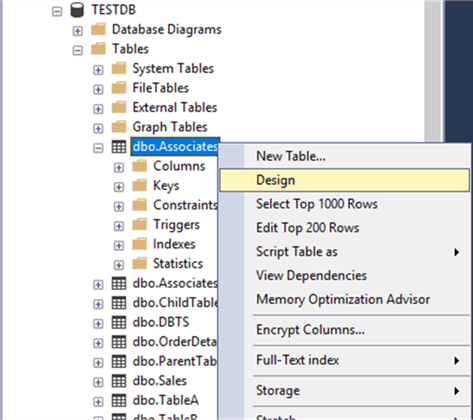
Option 2
The second option is to use the table design window by right-clicking on the target table name (dbo.Associates) and then clicking on the “Design” option, as shown below.
Once you click on any of the above two options, the screen below will appear on the right-side pane of SSMS.
If you need to add a column, you can type the column name and its data type (varchar, int, decimal, datetime, etc.), followed by checking Allow Nulls or another option is NOT NULL. This is specifying whether all rows have to have data for this column. If there is already data in the table, then you should check Allow Nulls for the new column. If there is not data in the table then you can either check or uncheck this option depending on how you will use this column. Also, make sure to choose datatypes carefully while adding a column to a table.

The details for the new column have been added as shown below. In addition, you can see the Columns Properties information where you can also make changes to the column.

Once you have entered all details and set the desired column properties, the next step is to save it by clicking the blue save icon highlighted below. After you save it, you can click on the X on the design tab to close the table design window.

You can verify the new column by refreshing the Columns folder under the table. Below you can see the new column is present in this table.

A SELECT statement can also be executed to see all columns of this table. As shown below, the newly added column is the last in this table and has no data. Next, you can add or change data by running INSERT or UPDATE statements.

Adding a Column in the Middle of a SQL Table
Whenever a column is added to a table it gets added as the last column of the table. Sometimes you want to add a column in the middle of existing columns. Although there is an option to do this, Microsoft does not recommend it as noted below.
“Changing the column order of a table may affect code and applications that depend on the specific order of columns. These include queries, views, stored procedures, user-defined functions, and client applications. Carefully consider any changes you want to make to column order before making it. The best practice is to specify the order in which the columns are returned at the application and query level.”
If you still want to add a column in a specific order, you can do it using the GUI by accessing the table designer in SSMS.
Let’s check what happens if we try to add a new column in a specific order between two existing columns. Open the table designer the same way we accessed it earlier in the tip. The below screenshot shows all the columns of table Associates.
Now, click on the column name after which you want to add your new column. Let’s assume I have to store the telephone number, so I decided to add that column after column “mobile”. To do this, right-click on column “mobile” and choose Insert Column, as shown below.

By clicking on the option, a new row will be added and the new column details can be entered. Enter the column details and properties and click the save button.

I entered:
- telephone
- numeric(18,0)
- Allow Nulls – checked
Once you click the save button you might get the below warning screen which says saving changes is not permitted and such changes require the table to be dropped and then recreated.

So, adding a column in a specific order is not an easy process, rather it is complex in that the table gets dropped and recreated with the new definition and data from old table is loaded into the new table. This activity might also require you to make application changes to prevent your application logic from breaking. For small tables this is a quick process, but tables that have lots of data this can be a pretty intensive process.
Add a Column Using a the ALTER TABLE Command
Columns can also be added to a table using the ALTER TABLE statement:
ALTER TABLE TABLENAME
  ADD ColumnName1 DATATYPE NULL,
      ColumnName2 DATATYPE NULL ;
Here is an explanation of the code:
- TABLENAME is the name of the table in which you want to add a column.
- ColumnName1 is the name of the column which you want to add.
- DATATYPE is the data type you want to use for this column’s data.
- ColumnName2 is the name of another column that you want to add. It is optional and only needed if you want to add more than one column.
The department column from the previous section has been deleted to allow it to be added again with a different data type using the T-SQL statement.
First, check the existing table and the associated columns by running the query below:
USE TESTDB
GO
SELECT TOP 1 * FROM [dbo].[Associates]
We can see the department column is not there.

Next, build a query with the help of the syntax above. The name of the column will be department and its datatype will be nchar(10), although you can choose whatever datatype works for your needs.
Run the query below with ALTER TABLE ADD COLUMN to add the column to the table:
USE TESTDB
GO
ALTER TABLE [dbo].[Associates]
  ADD department nchar(10) NULL;
Below, we can see that the query has been successfully executed.

The next step is to verify if the above command successfully added the column to the table. This can be done in SSMS by expanding the columns or you can run the same SELECT statement used above to verify the column now exists.

The column has been added and now you can plan to insert and update the data for this new column.
Next Steps
- Check out these other articles:
- Best practices for SQL Server database ALTER table operations
- Be Cautious Altering Tables Using SQL Server Management Studio SSMS
- Change SQL Server Table Structures with SQL ALTER TABLE
- Create Tables in SQL Server with T-SQL to Adding a Primary Key and Identity Column using T-SQL
- How to create a SQL Server foreign key
- SQL Server Indexes Tips
- SQL Drop Column Examples

Manvendra is a passionate database lover currently working as a Technical Architect at one of the top MNCs. He has extensive experience on all versions of SQL Server since 2000 and has built Big Data skills. He has lead projects on the following database features: Database Mirroring, Always ON, Replication, Log Shipping, Geo-Clustering and Performance Tuning and delivered many SQL Server projects on consolidation, upgrades, heterogeneous replication, HA / DR solutions, automation and major performance tuning projects. You can also follow Manvendra on his blog, Twitter, LinkedIn and Facebook.
- MSSQLTips Awards: Champion (100+ tips) – 2018 | Author Contender – 2015-2018, 2021-2022