Problem
Today’s data comes from different sources and platforms, either cloud-based or on-premises. Microsoft’s on-premises data gateway makes data migration and exchange between a cloud-based application and an on-premises data source possible. A data gateway eliminates the worry about having a secure channel for data transfer and applies access control measures between the two data stores.
Solution
With the introduction of a data gateway, data are migrated seamlessly and securely between a cloud-based application and an on-premises data source. Developers can now have a SaaS application and pull in the data from an on-premises source from different local machines. This article will cover the different applications of the Microsoft Data Gateway. First, we will create a linked connection between an on-premises data source and a Power BI service, allowing for scheduled refresh. Later, we will create a linked connection between Microsoft Power Automate Cloud and on-premises SQL Server Management Studio by updating rows in a table.
What is Data Gateway?
Microsoft Data Gateway is a software application that provides a secure connection between an on-premises data source and a cloud-based service. As a result, data may be transferred between these two sources quickly and securely. Organizations can safely access on-premises data in cloud services while maintaining databases and other data sources on their on-premises networks by using a gateway.
Note: The data from the on-premises source is not transferred to the cloud platform via gateways, but gateways establish a direct link between that platform and the on-site data source.

Reasons for a Data Gateway
Using a data gateway arises when the application or software data source is on-premises. Still, no gateway is required in scenarios where your data source is cloud-based.
Reasons for using a data gateway include:
- Connection Between On-premises and Cloud: A data gateway can connect data on-premises to the cloud. This enables you to process and analyze your data using cloud-based tools and services.
- Data Integration: Combining data from several sources using various protocols and formats is possible. They offer a centralized and uniform interface for data extraction, transformation, and loading into destination systems or data warehouses.
- Access Control and Security: Data gateways enforce security protocols and access restrictions.
- Enhanced Data Transfer: The data gateway can enhance performance by caching data in the cloud during data transfers between on-premises and cloud systems. This may shorten the time needed for data transfer.
- Improved Data Transfer Security: The data gateway improves security by encrypting data as it is being transferred. This helps in preventing unwanted access to your data.
Types of Data Gateways
The Microsoft Data Gateway is one of three types, each with multiple applications:
- Standard Gateway: This enterprise-grade solution is designed for larger organizations with more complex needs for data integration. It allows the connection of several users to various on-premises data sources. With a single gateway installed, you can use it for multiple on-premises data gateway-supported services. The standard gateway supports various cloud services like Power BI, Power Apps, Azure Logic Apps, Power Automate, Azure Analysis Services, and Dataflows.
- Personal Gateway: This free, lightweight, and small-scale gateway allows one user to connect to a source and it cannot be shared. Power BI is the sole application that may leverage an on-premises data gateway (personal mode). This gateway works effectively when you are the only one who generates reports, and there is no need to share any data sources.
- Virtual Network Data Gateway: This component within Microsoft Azure provides private and secure communication between virtual networks (VNets) and other network resources. No installation is required in this gateway because it is a Microsoft-managed service.
Installation and Configuration of Data Gateway
The Microsoft Data Gateway can be installed on any server on a local domain. The following are the minimum requirements for your data gateway to run seamlessly on your local machine:
- .NET Framework 4.7.2 (Gateway release December 2020 and earlier).
- .NET Framework 4.8 (Gateway free February 2021 and later).
- A 64-bit Windows 10 or Windows Server 2012 R2 variant that uses the most recent TLS 1.2 and cipher suites.
- 4 GB of disk space (in the default configuration) for performance monitoring logs.
Step 1: Download Data Gateway
For this article, we will use the standard enterprise gateway in the Power BI service, which we also covered in this article, “Understanding Power BI Security Options.”
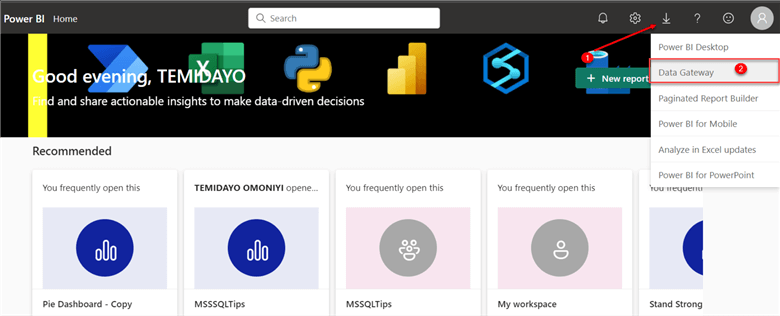
Connect to the Power BI service and click the download icon in the top right corner and select Data Gateway.
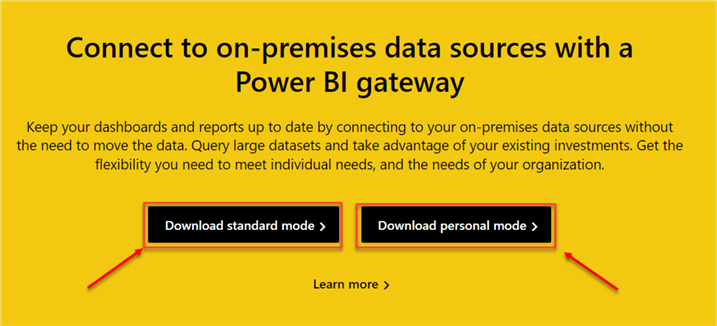
On the next screen click Download standard mode or Download personal mode and this should automatically download to your local machine. We will use Personal mode for this application, which is suitable for Power BI and only requires a few configuration settings.
Step 2: Configuration
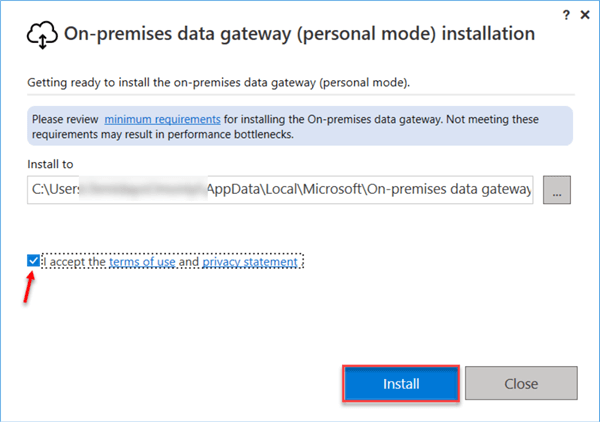
Check the box on accept all the terms and conditions, then click Install.
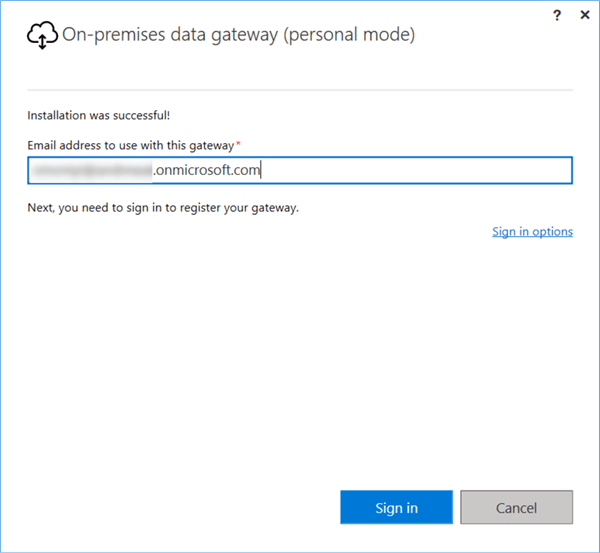
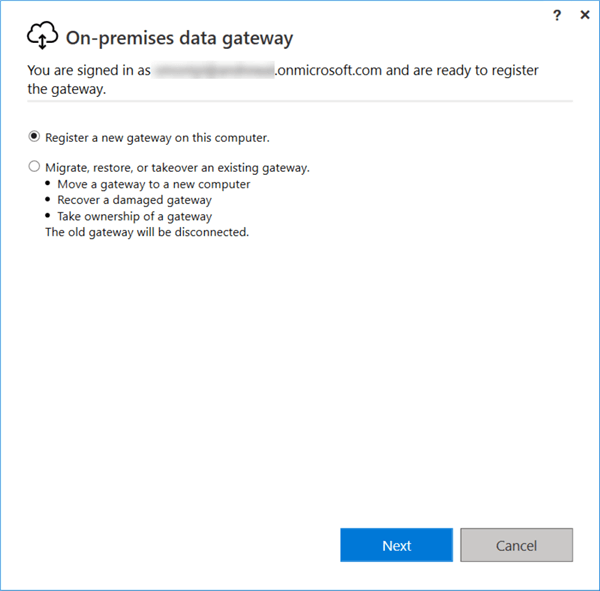
After successful installation, you must provide your email address used with the gateway and click Sign in.
You will be given two options: register a new gateway on this computer or migrate, restore, or takeover an existing gateway if you already have an existing gateway. For this tip, let’s choose to register a new gateway and click Next.
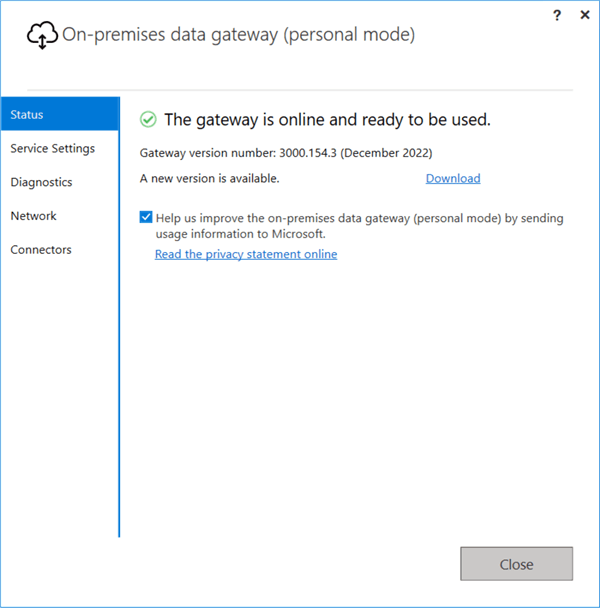
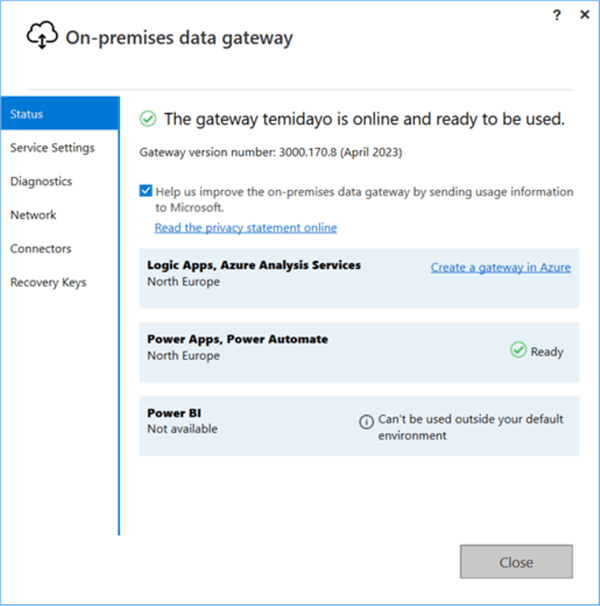
After the configuration setting, you will get a message saying the gateway is online and ready to be used, as shown in the image below.
Create Scheduled Refresh
The scheduled refresh is a feature in Power BI services that allows data to be automatically updated on a predefined schedule. It enables you to update your Power BI reports and dashboards automatically with the most recent information from your data sources. Data Gateway comes into play when you want to create a scheduled refresh. It helps by creating a connection between the Power BI service and data source, so it will update Power BI when an update occurs at the data source.
Data lineage is a part of Data Governance within Power BI. It displays which data sources are utilized by which datasets, the transformations applied, and which are subsequently used by which reports. It enables you to see your data’s upstream and downstream path, thereby providing a better understanding of how data is used and for troubleshooting problems. Click the lineage view in your Power BI workspace, which we created in the “Understanding Power BI Security Options” This will change from the list view to a lineage view.
In the lineage view, the report is from four data sources, three from the local machine and one from a web-based source. This implies that the three local sources require a proper gateway configuration.

The steps below should be followed to achieve this:
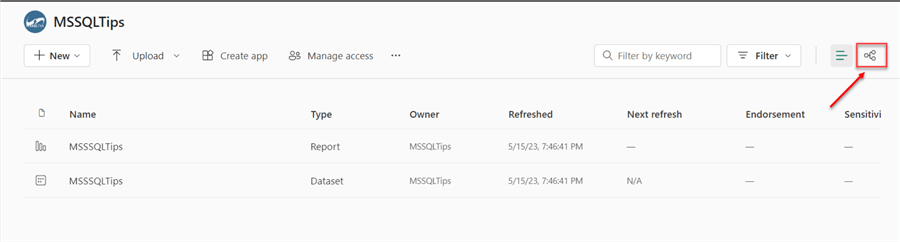
Step 1: Workspace Datasets Settings
In the MSSQLTips workspace, click the scheduled refresh button as noted below to take you to the workspace settings.
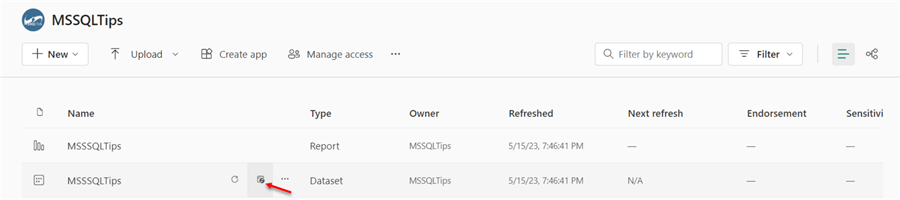
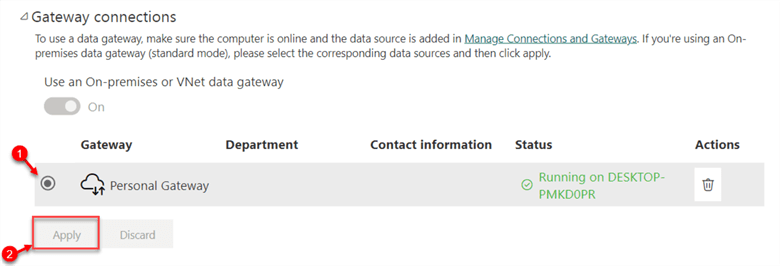
Step 2: Gateway Connections
Ensure that your Data Gateway is open and active and that you are connected to the internet. You should see in the Status that the gateway is running. If not active, select the gateway and click apply.
Step 3: Data Source Credential
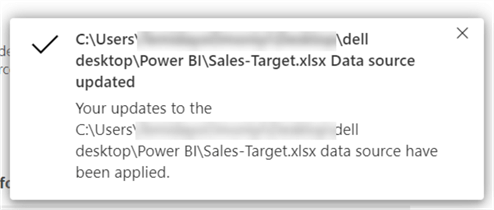
Sign in to the different data sources with the correct credentials at this stage. Click on Edit credentials and this will open a new window where you must sign in with the appropriate login details.

In the new window, ensure the following are correct:
- Path: This should be the directory of your local machine where the data is located.
- Authentication method: This type of authentication doesn’t use the Windows user account but instead uses the username and password of the application used.
- Privacy level settings for the data source: This is set to Organizational. This is the same account as the Power BI service.

Click Sign in. You should get a success message at the top right corner with the message source applied. Repeat this process for all data sources that require a gateway.
Step 4: Refresh Data
We need to configure a specific period to schedule a data refresh.
- Refresh Frequency: Two options are available, Daily or Weekly.
- Time Zone: Put your country’s time zone. By default, the refresh takes place at midnight in your country’s time zone, but you can change the time.
- Error Notification: This is an important feature. It sends errors to the workspace admin and another person you specify in your tenant whenever there is an issue with the schedule refresh.
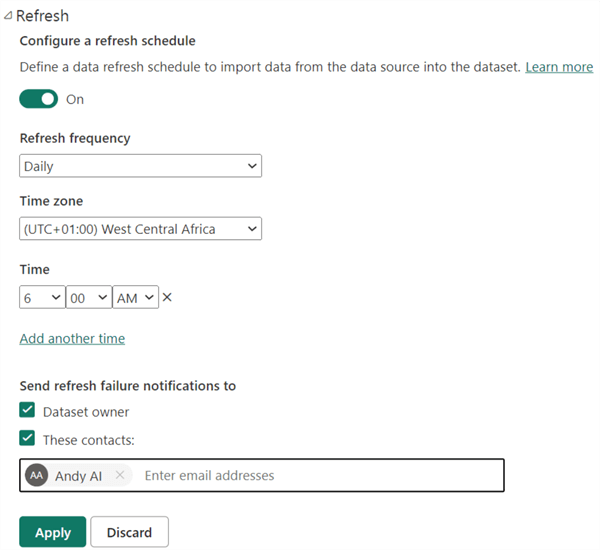
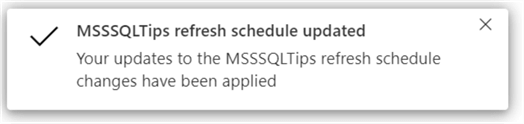
Click Apply. The notification below will appear.
File Path Error
Now that the gateway is up and working let’s discuss a likely error that might occur.
In a situation where you try setting your gateway data source and you get an error: “Prompted Failed to update data source credentials: Could not find a part of the path 'C:\Users\xxxxxxxxxxxx\Desktop\Branch-Data.xlsx’.” This error occurs when the file path provided in your local machine differs from that in the Power BI service dataset. Make sure to change the data source to the right one and republish to Power BI.
Update SQL Server Database Table Using Power Automate
The introduction of Microsoft Power Automate is a cloud-based solution that enables users to design and automate workflows between different services and applications. The enterprise/standard data gateway connects Power Automate Cloud and Microsoft SQL Server Management Studio (SSMS). For this project, I will walk through how to automatically insert data into SSMS from a Microsoft Form using Power Automate.
Let’s assume you are the Human Resource manager of an organization and you want to create an employee database capturing all the important information and store it directly into a Microsoft SQL Server database.

The project architecture above explains the entire process, which will be broken down into sections.
Create a Data Table
To complete this project, we need to create a table that will store the employee information. In SSMS or other tool, create the employee table using the query below.
create table employee_urbizedge(
   Employee_id varchar(10) primary key not null, -- This column must be a variable char, primary key and no empty cell is allowed.
   First_Name varchar(30),
   Last_Name varchar(30),
   Gender varchar(6),
   Phone_number varchar(20),
   Email varchar(320),
   Date_of_Employment date,
   Department varchar(30)
);
Setup Gateway Connection
The steps listed below will help in configuring the standard data gateway.
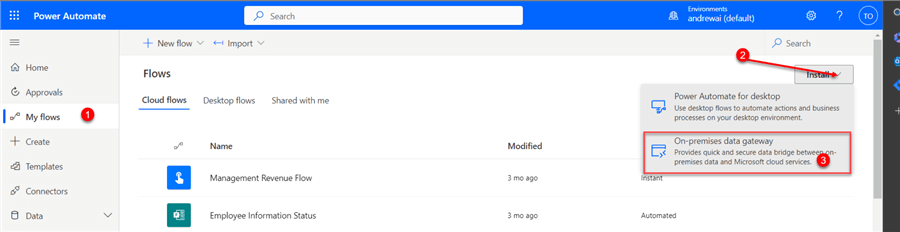
Step 1: Download the On-premises Data Gateway. In Power Automate, click the My flows tab, install the On-premises data gateway, and follow the same installation process as before.
Step 2: Get Data Source Location. This is a vital step when setting up the enterprise data gateway. You need to know where the data source is located. This only applies to people with admin privileges to the Microsoft 365 account.
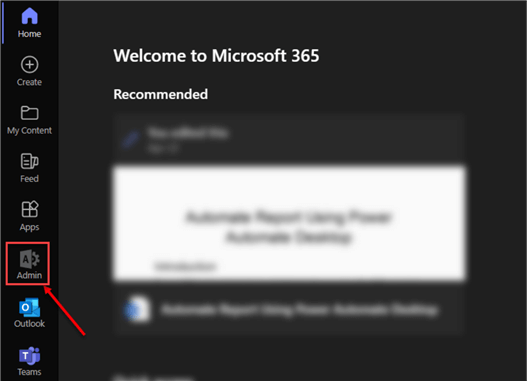
In Office 365 account, click Admin and another window will appear in the Microsoft 365 admin center.
In the admin center, expand the Settings tab and select Org Settings. In the new window, select Organization Profile, then Data Location. This will provide you with your Microsoft 365 account data location. You will notice that my data source is located in the European Union.

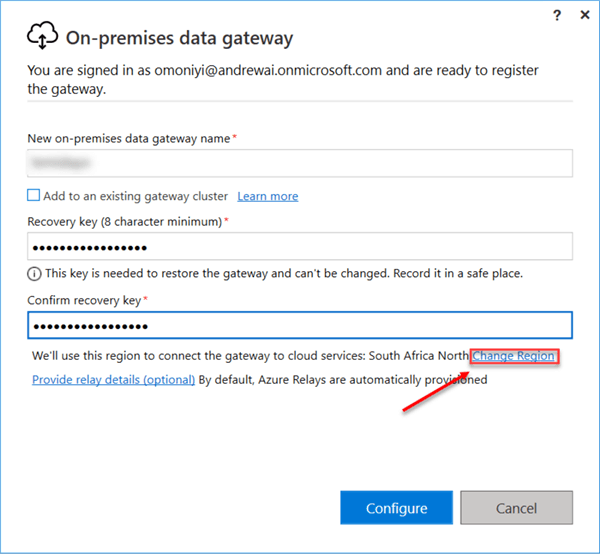
Step 3: Define Gateway and Recovery Key. Now, we need to define the gateway name and recovery key. After providing the information, click Change Region to change the data source region where Microsoft stores data.
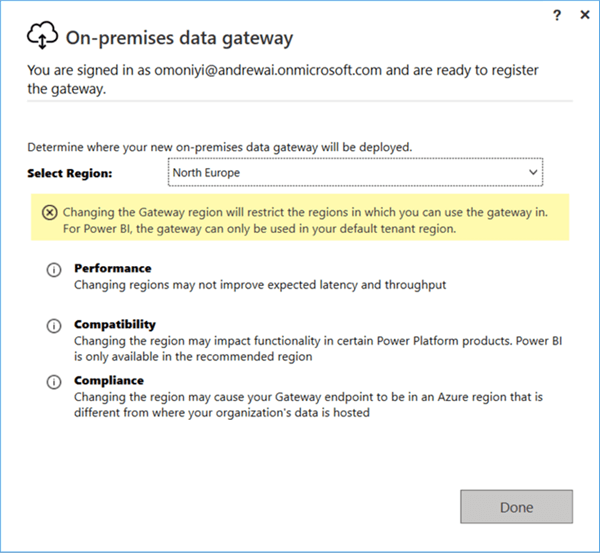
The region will be changed to the closest source, which in this case is North Europe, as seen below. Click Done and then click Configure.
Now the gateway is successfully configured and running, with location changes to North Europe.
SQL Server Data Connection
The SQL Server data connector allows for the connection between Microsoft services apps such as Azure Logic Apps, Power Automate, and Power Apps. It also enables users to perform various tasks such as data manipulation, data update, deleting, etc.
The steps listed below will help configure the SQL Server connection.
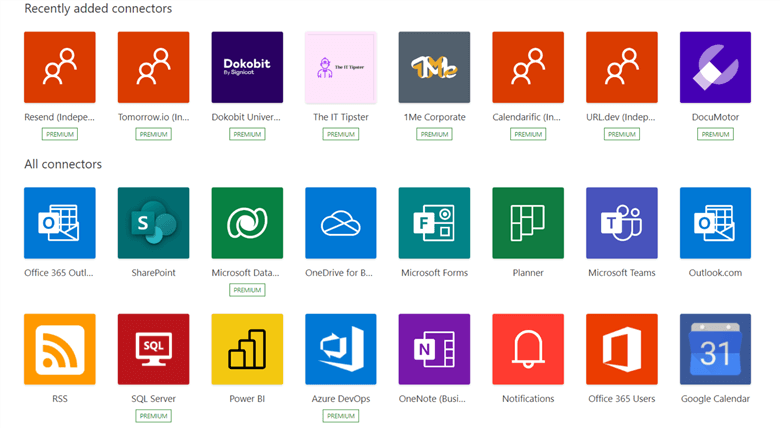
Step 1: Configure SQL Server Data Connection. In Microsoft Power Automate, click the Data drop-down menu, then select Connections. Select the new connection and search for SQL. This will show different SQL connectors. Select SQL Server.

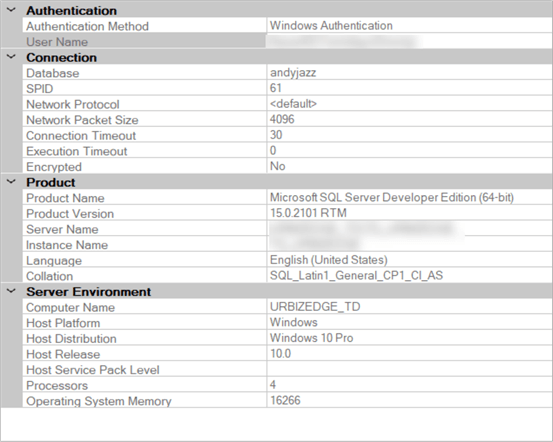
Step 2: Set Up SQL Server Configuration. Open SSMS and right-click on the database where the table is stored, then select Properties.

In the database property, click View connection properties, which should open another window that gives better configuration information.

All the information needed to configure the SQL Server in Microsoft Power Automate is available in the Connection property window.
Now, head back to Power Automate and set the following configuration for the SQL Server data connector:
- Authentication type: Windows Authentication will be used.
- SQL server name: The Server name comes from the connection property in SSMS.
- SQL database name: This is the database upon which the table is created.
- Username: This also comes from the connection property.
- Password: This is usually the SQL Server or Windows password.
- Choose a gateway: Select the Data Gateway connection being used.
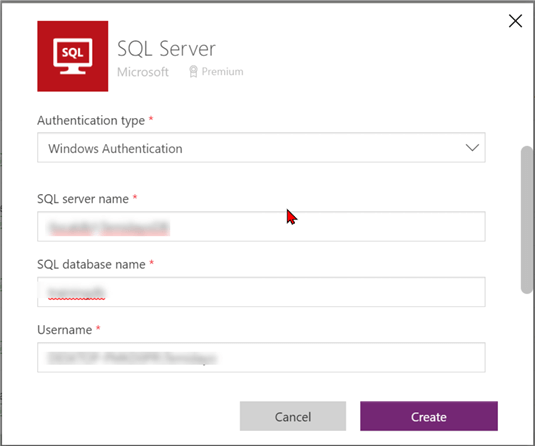
Click Create after entering the configuration settings. The configuration will take a few minutes, but you should see that the SQL Server is connected when successful.

Create Microsoft Form
Microsoft Forms is part of the Office 365 suite that allows users to create surveys, quizzes, and polls. For this project, let’s create a form using MS Forms to capture the employee data, which will later be stored in the SQL database.
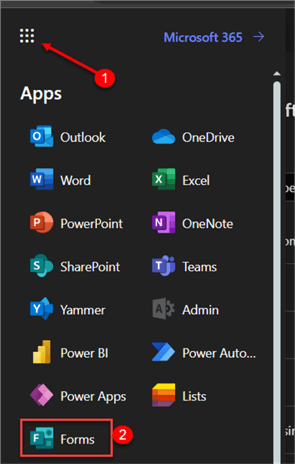
Step 1: Create a Form. In Office 365, click the App launcher and select MS Forms. This will open a new window for creating the form. Click Create New Form.
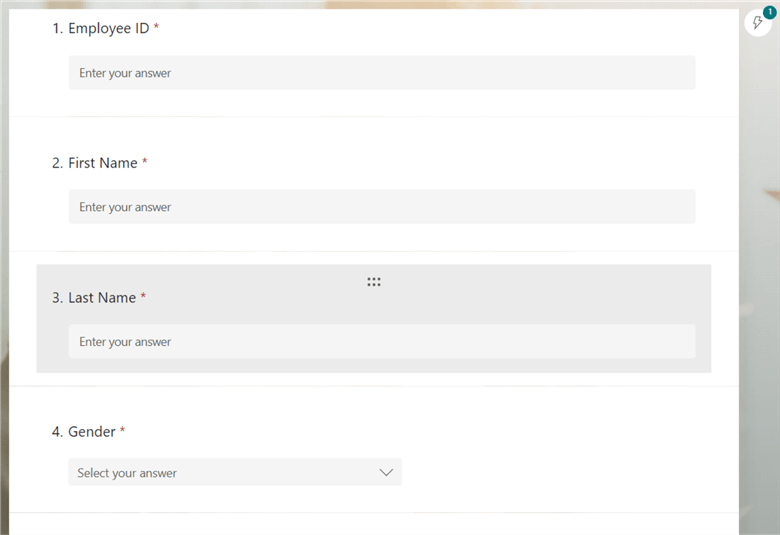
Step 2: Set Form Field. Put in all the necessary fields that will be used in the database.
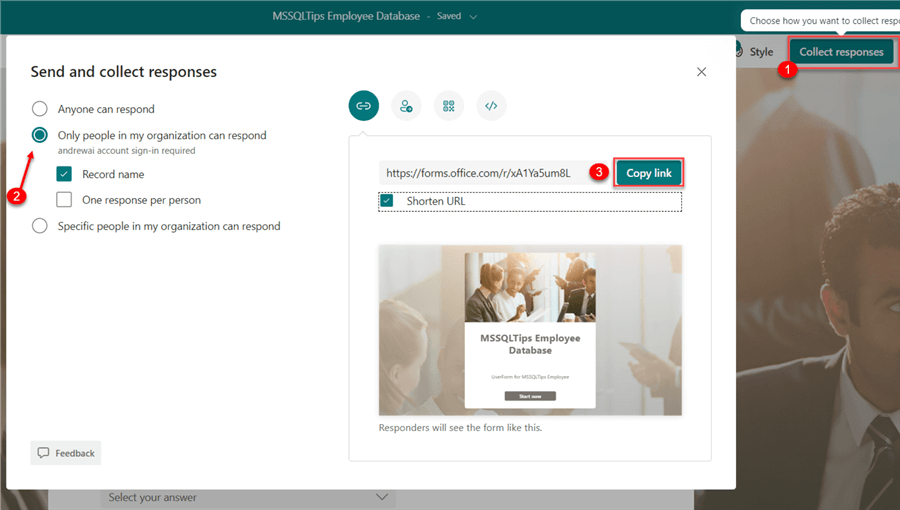
Step 3: Collect Responses. Since the form will be used to capture employee information, we need to set it so only people in the organization can fill it out.
In Forms, click Collect responses and a new window will open where you can choose who can respond: Anyone, only people in my organization, or specific people in my organization. For this tip, select the “Only the people in the organization” option. You can also copy links and share them with people in your organization. You also can determine if the respondent’s name is recorded and if people are allowed to respond only once or multiple times.
Now that we finished creating the prerequisites, we can create a flow that connects the components and automates the entire process.
Power Automate Cloud to Create Flow
Microsoft Power Automate is a cloud-based platform (SaaS) that enables users to automate repetitive processes without sophisticated coding or development abilities. It allows customers to build automated business processes and workflows across various applications and services like Office 365, Dynamics 365, OneDrive, SharePoint, and others.
To achieve this, Power Automate has different connectors that allow users to develop various business processes.
What are Triggers?
Triggers are an essential aspect of creating a flow in Microsoft Power Automate. Triggers are events or actions that start a flow. When a trigger happens, Power Automate is prompted to perform a sequence of predetermined actions. Triggers come in different forms. For this article, we will use a Cloud-based trigger when a form is submitted to start the entire flow.
Create Flow to Populate SQL Server
Now, let’s create a Power Automate flow to populate information into our database created in SQL Server.
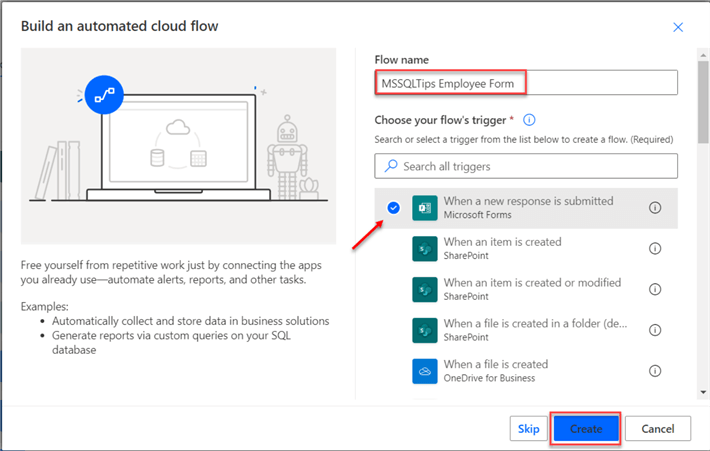
Step 1: Create Cloud Flow. In Power Automate Web, click My Flows, select New Flow, and choose Automated cloud flow from the drop-down.
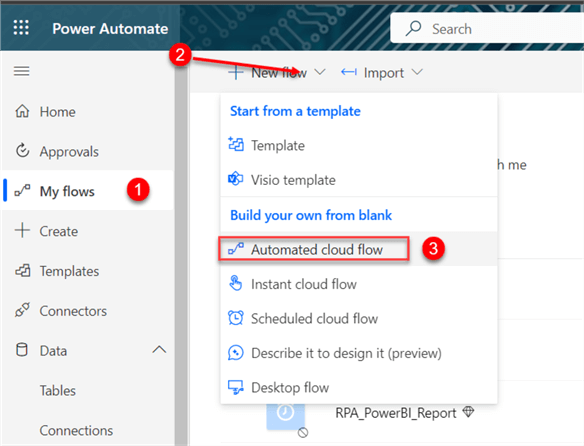
In the new window, name the flow. For the trigger, select When a new response is submitted. Click Create. This will take you to the Power Automate environment, where you can create your flow.
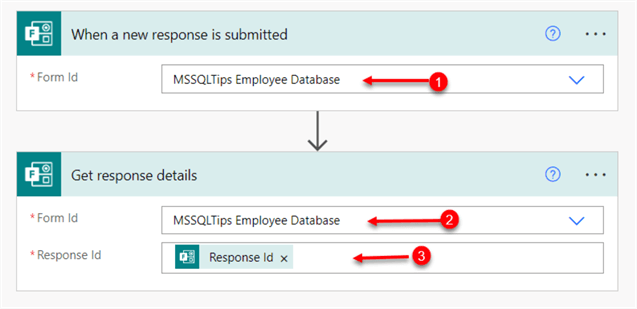
Step 2: Arrange Individual Flows. First, click on the drop-down for the Form Id and select the form created earlier from Microsoft Forms, MSSQLTips Employee Database. After that, add a new step by picking Get response details. Select the Form Id and Response Id.
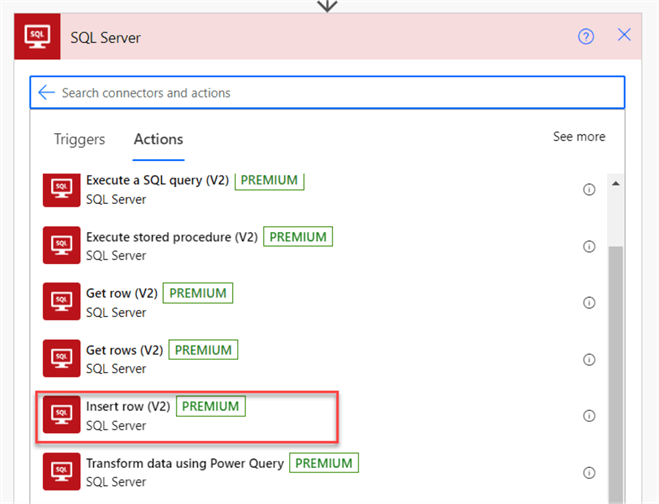
Step 3: Add SQL Server. Click New step and search for SQL Server. Select Insert row.
Once the Insert row option is selected, you need to fill in the information below and click Save.

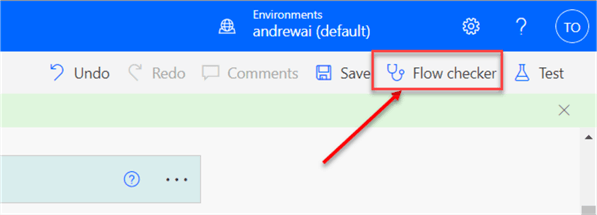
Step 4: Flow Checker and Test Flow. The Flow Checker is a tool in Power Automate that ensures you use best practices while creating flows, which encourages higher quality flows. It can be used to examine flows for errors that have previously been published or are still in progress. To use the flow checker, click Flow check in the top right corner.
Now, let’s test our flow. Clicking the Test icon in the top right corner, then select Manually. Another window will appear where you are expected to fill in the MS Form. A pop-up should appear stating, “To see it work now, submit a new response to the selected form.”

Fill in all necessary information in your Form. If successful, you will get a notification saying, “Your flow ran successfully.”

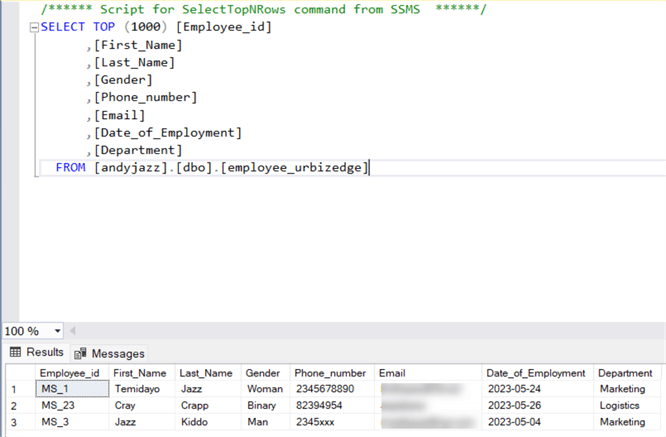
Step 5: Visualize the Result in SQL Server. This is the final step. We need to check the table created and confirm if the information from the Microsoft Form is inserted into the SQL Server table. You will notice that all the information is inserted into the database. Also, it should be stated that all information is dummy data.
Conclusion
In this tutorial, you learned about Microsoft Data Gateways and how to configure and set up the personal and enterprise standard gateway. We also connected our local machine and Microsoft Power BI services to create a scheduled refresh. We did a mini project using a standard data gateway where we inserted data into an SQL Server table directly using MS Form through the Microsoft Power Automate, with all this being possible with the data gateway.
It is preferred to have the data gateway installed on a virtual machine since it must always be online for the entire process to work.
Next Steps
- What is an on-premises data gateway?
- Create virtual network data gateways
- Check out related articles:

Temidayo Omoniyi is a Microsoft Certified Data Analyst, Microsoft Certified Trainer, Power Platform Developer, Azure Data Engineer, Content Creator, and Technical writer with over three years of experience.
Currently, he works as a data and business intelligence analyst for a training and consulting company in Lagos, Nigeria.
Temidayo enjoys creating educative content on YouTube, LinkedIn, Twitter, and other online platforms. He loves sharing his knowledge and writing about systems, applications, tools, and processes.
Apart from training, writing, and coding, you will find him watching and reading Anime. He is a big fan of DC Comics.
- MSSQLTips Awards: Trendsetter (25+ tips) – 2025 | Author of the Year – 2023, 2024


