Problem
Many companies are moving their data assets to a Delta Lakehouse design pattern. This Azure design pattern should incorporate data lake storage (ADLS), key vault services (AKVS), log analytics workspace (ALAW), and Databricks workspace (ADBW) into a holistic data engineering platform. How do we deploy and configure these services for this design pattern?
Solution
Today, we will manually deploy these services to create a Delta Lakehouse design pattern. Configuring and testing these services with Azure Databricks is crucial for a solid foundation. In the future, I will write an article on using Azure Command Line Interface (CLI) to deploy these services quickly and repeatedly via an Azure Cloud Shell.
Business Problem
Our manager at Adventure Works has asked us to move our data assets from our siloed on-premises SQL Server tables to in-cloud Delta Lakehouse design. Having the data in the Azure cloud will enable more departments at Adventure Works to access the information.
What is a Delta Lakehouse design?
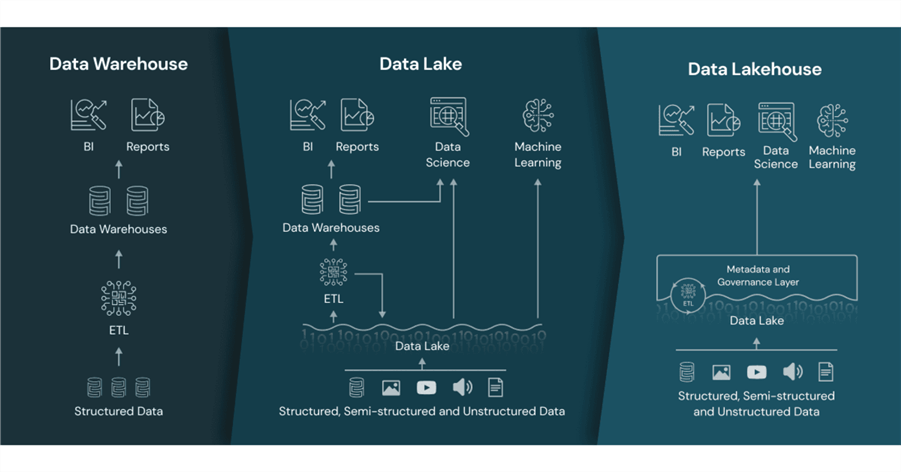
The image above (from the Databricks website) illustrates that companies before the invention of the delta file format used either a data warehouse or a data lake. The main problem with a data warehouse is the limitation of expensive disks that are finite in size. On the other hand, the older data lakes did not have a metadata and governance layer, such as a unity catalog. The delta file format has revolutionized the Spark platform by allowing database ACID properties to come to a file format.
The table below highlights the steps to deploy and configure the Delta Lakehouse:
| Task Id | Description |
|---|---|
| 1 | Azure Service Principle |
| 2 | Azure Data Lake Storage |
| 3 | Azure Key Vault Services |
| 4 | Databricks Secret Scope |
| 5 | Mounting ADL Storage |
| 6 | Create Structured Directories |
| 7 | Azure Log Analytics |
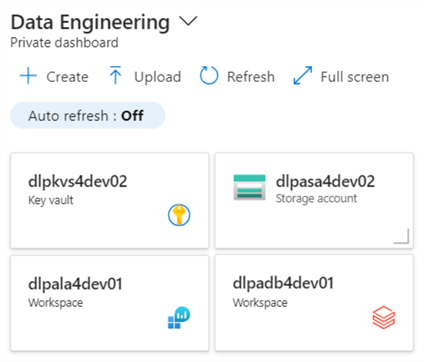
The private dashboard below shows the services deployed for the Delta Lakehouse in this article. This is the end state of the infrastructure deployments.
At the end of the article, we will understand how to deploy and configure services for a Delta Lakehouse design.
Azure Service Principle
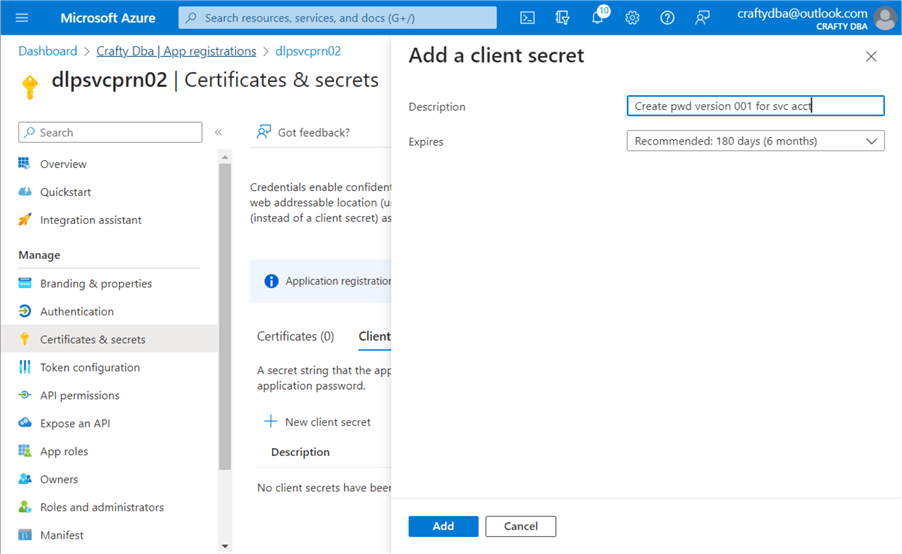
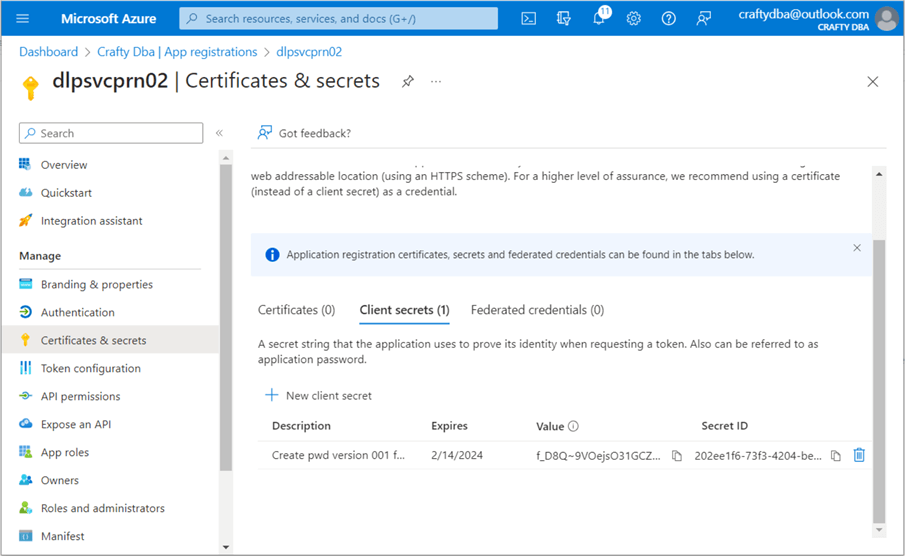
The Databricks platform uses the service principle to authenticate with Azure services such as Azure Data Lake Storage. To start our creation of a new service principle, type “azure active directory” in the search window. Next, select the highlighted active directory service and navigate to the application registrations section of the Azure Active Directory portal page. Use the plus sign to create our new service principle. The screenshot below shows our new service principle named dlpsvcprn02.

The tenant and client ID are very important pieces of information. They can be retrieved at any time from the App Registrations screen. We need to create a secret to use our service principle in a database. Navigate to the “Certificates & secrets” screen. Click the plus (+) button to create a new client secret. You will need to give the secret a description and expiration period. See the image below for details.
The client secrets screen is a one-time-only showing. The value will not be shown the next time you list the client secrets. Therefore, you need to copy the value of the secret to your text editor before leaving this screen. Better yet, store the client secret in an Azure Key Vault along with the client ID and tenant ID. Unfortunately, I have not reviewed the key vault deployment and configuration yet.
To recap, application registrations are known as service principles. This account type can be used by an application to execute business tasks against Azure services. See Azure documentation for more details.
Azure Data Lake Storage
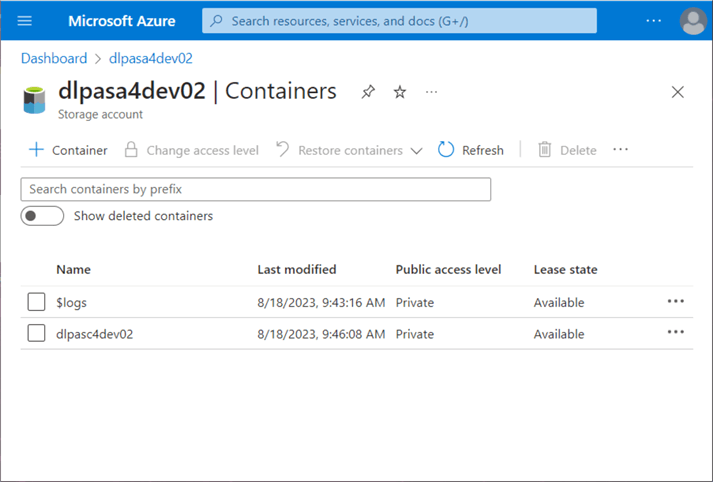
The key ingredients for an Azure Data Lake are a storage account and storage container. Type the words “storage accounts” in the search box. A list will appear with any existing accounts tied to your subscription. Use the (+) plus button to start the creation process. Make sure you select Gen 2 storage with hierarchical name spaces.
Once the storage account is deployed, you can select the new account. Choose the containers option on the left to see existing containers. Use the (+) plus button to create a new container. The image below shows a storage container named dlpasa4dev02, which contains a storage account called dlpasc4dev02. The $logs directory was created when log analytics monitoring was enabled, and a brand-new storage account will not contain this directory.
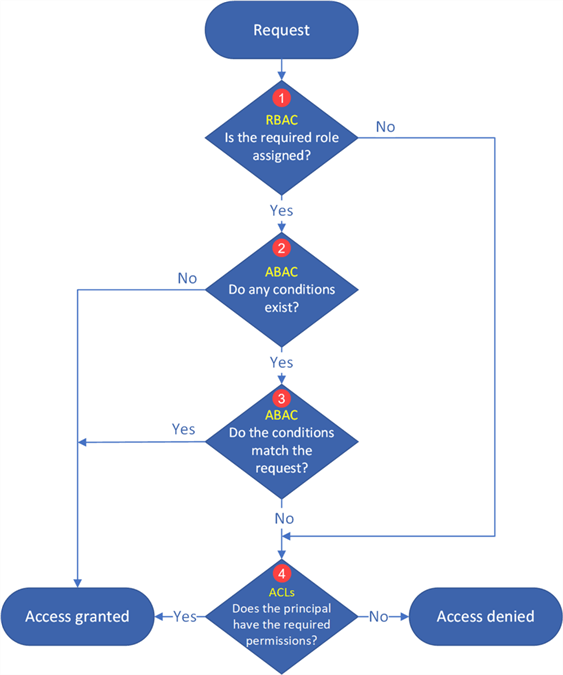
Security on the storage container is governed by three levels of authentication:
- Role Based Access Control (RBAC) – this is the typical owner, contributor, or reader;
- Attribute Based Access Control (ABAC) – these role assignment conditions allow you to grant or deny access given specific actions; and
- Access Control Lists(ACL) – this is the typical read, write, or execute given at the folder and/or file level.
I will admit that I have not used ABAC yet. However, RBAC and ACL assignments are key security mechanisms for Azure Data Lake Storage. The logic diagram below shows how security is added. For more information, please check out this MSDN article, Access control model in Azure Data Lake Storage Gen2.
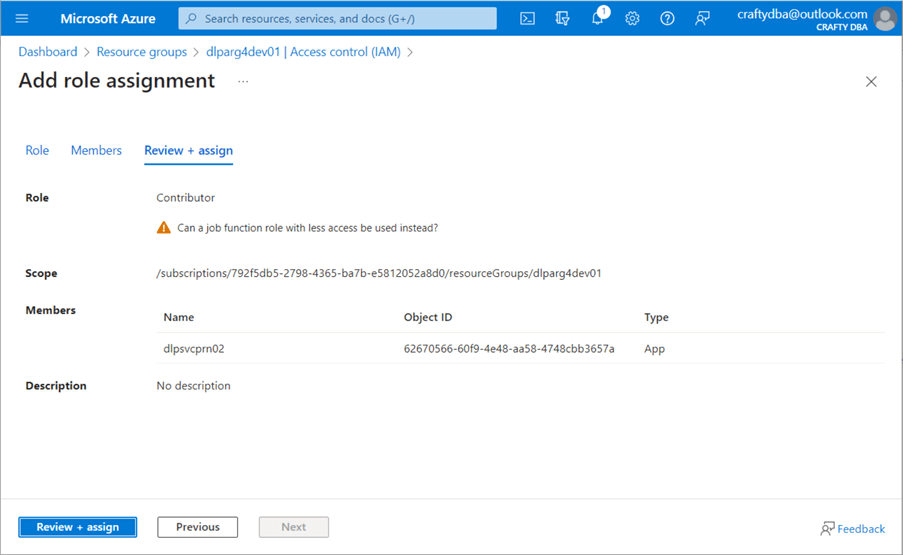
The account or user must have Storage Blob Data rights to use the Data Lake Storage. Since I want the service principle to manage the data lake, I will give the dlpsvcprn02 account contributor rights to blob storage. See the image below for details.

Rights can be given out at any level in the Azure Object hierarchy. Since the service principle will interact with a bunch of services in our Resource Group, giving the account contributor rights at the Resource Group level makes sense. These rights will propagate to objects deployed within the resource group named dlparg4dev01.
Deploying an Azure Storage Account and Azure Storage Container is easy. Junior administrators often forget to give the service principle both contributor and storage blob data contributor rights. Don’t forget to add those rights to your service principle. For more information on best practices, please see this article, Access control and data lake configurations in Azure Data Lake Storage Gen2, for details.
Azure Key Vault Services
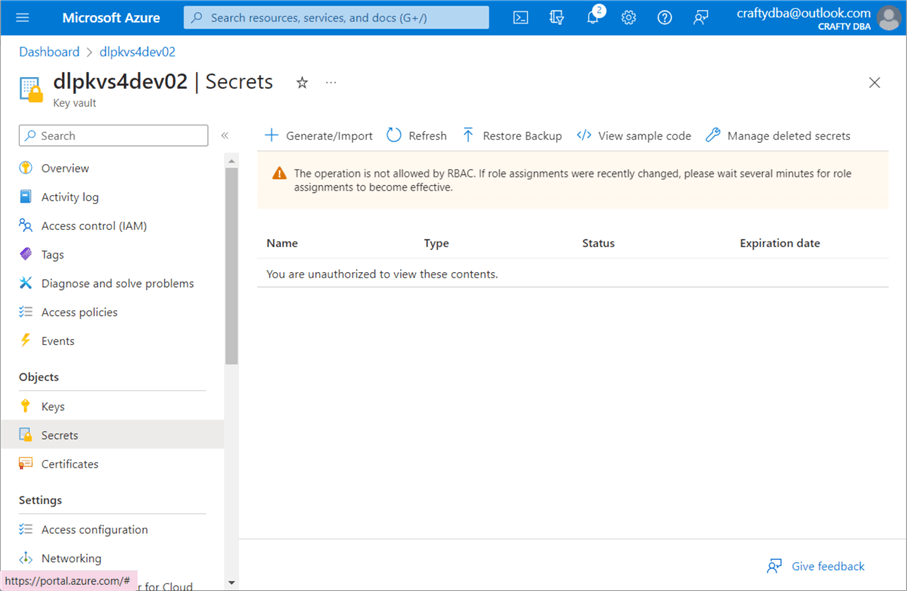
The search box in Azure is the administrator’s quick access button. Search for “key vaults.” Depending on your account, you may see zero or more vaults. Use the (+) plus button to create a new key vault. Use the default options and click Create. The image below shows the secrets section of the vault. Both keys and certificates can also be stored with the service. Currently, my user account, craftydba@outlook.com, does not have RBAC rights to list the secrets.
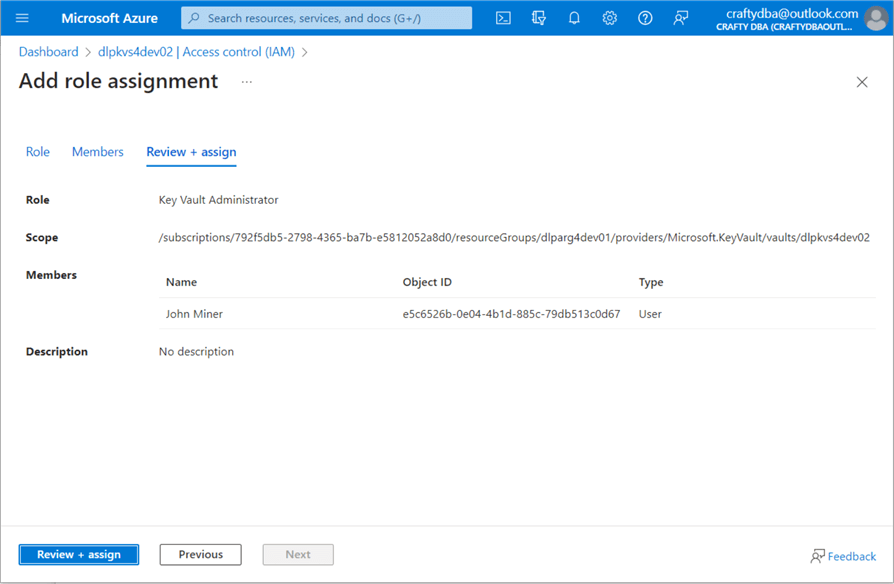
To fix this issue, navigate to the IAM section on the left-hand side of the page. I gave the user named “John Miner” key vault administrator rights. This username maps to the craftydba@outlook.com account.
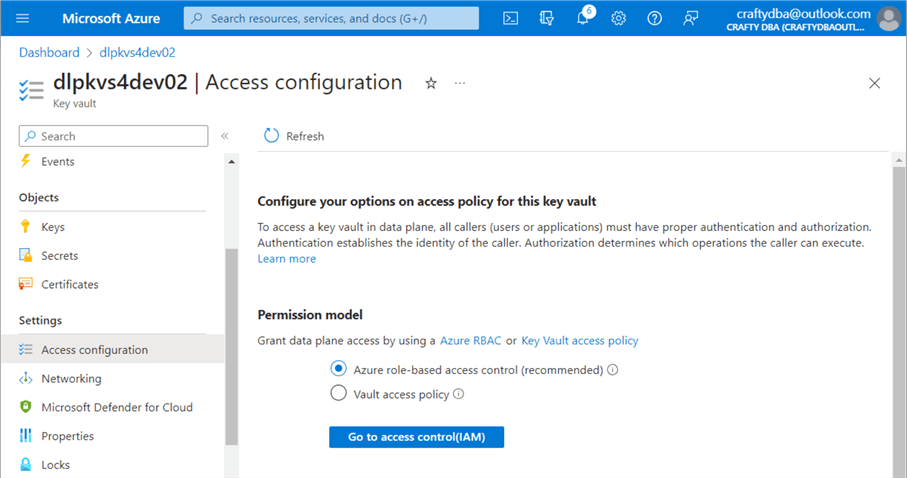
Let’s discuss two ways to set up security for Azure Key Vault. In the past, cloud administrators had access control lists. These permissions were very detailed and specific for each of the three object types (keys, secrets, and certificates). Nowadays, most cloud administrators use RBAC security.
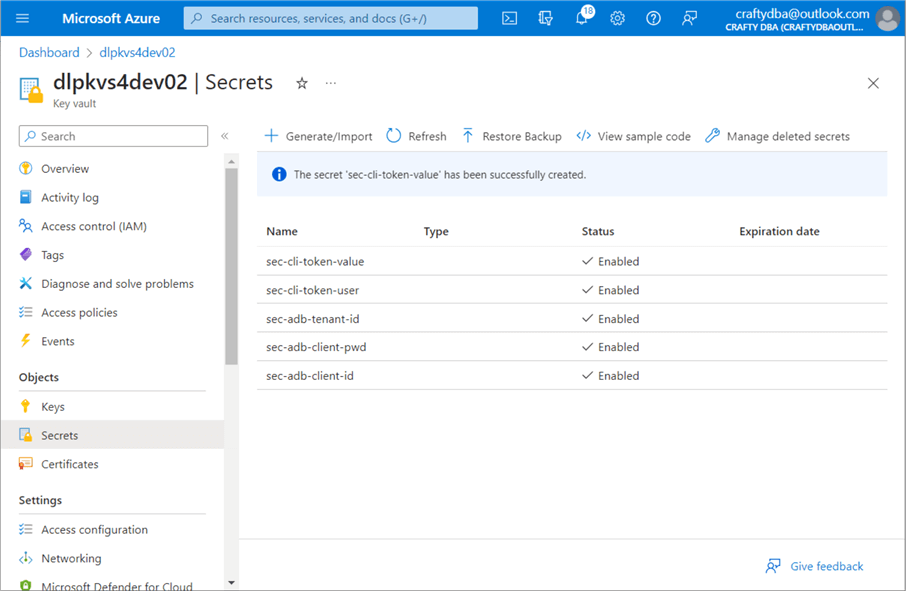
The first two secrets in the vault are for Databricks and the Databricks user, which can be used with the Command Line Interface (CLI). The next three secrets are required by Databricks to use the service principle to access the Data Lake Storage. We can add or delete secrets at will.
The management of secrets for programs has been a requirement for a long time. Azure allows the cloud architect to store key pieces of information as secrets with Azure Key Vault.
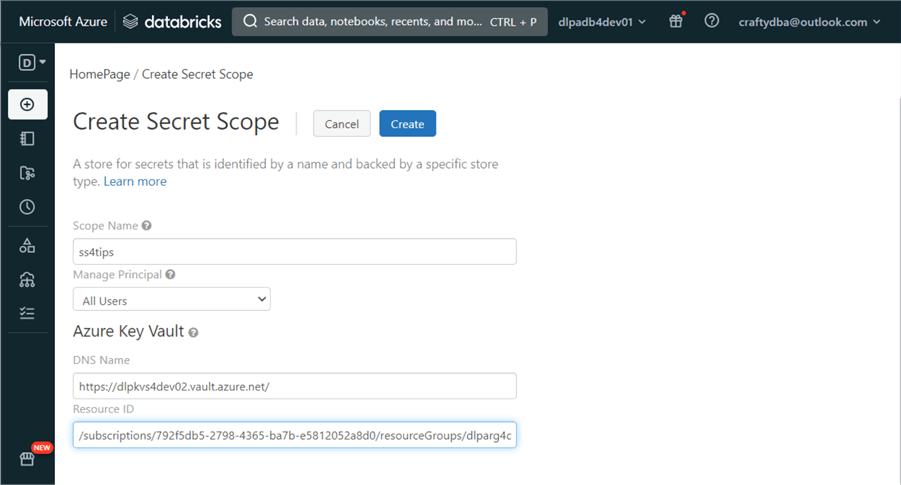
Databricks Secret Scope
Azure Databricks supports both local secret scopes and key vault backed secrets scopes. The developer has full control over the local secret scope. On the other hand, the secret scope backed by the key vault is read-only by Databricks. Creating, updating, or deleting secrets should be done via the Azure Portal. Today, we will deploy a Databricks secret scope that is backed by an Azure Key Vault.
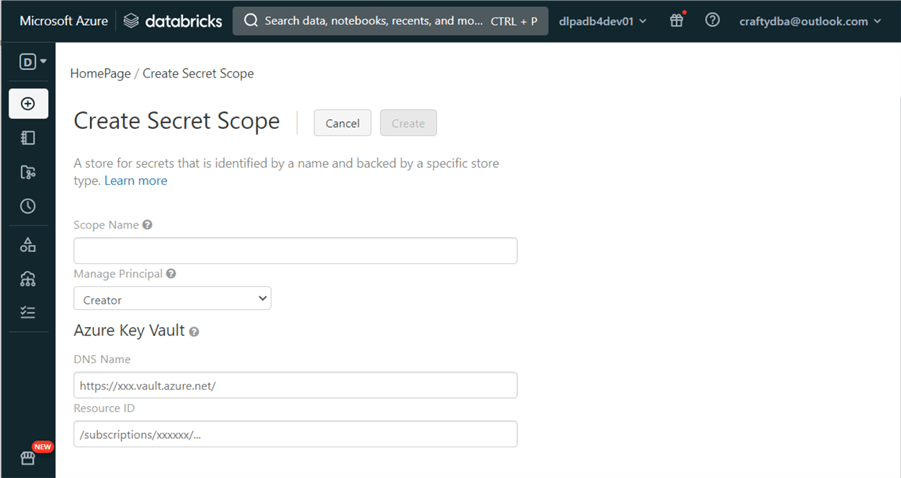
The hardest part of this task is the creation of the URL for the Databricks service. The code below worked for my workspace. Find your workspace identifier by looking at the web browser URL when using the Databricks service, which will be in the format adb-xxxxxxxxxxxxxxx.x. There are two text boxes that we need to fill in with Azure Key Vault information.
https://adb-623884071162434.14.azuredatabricks.net#secrets/createScope
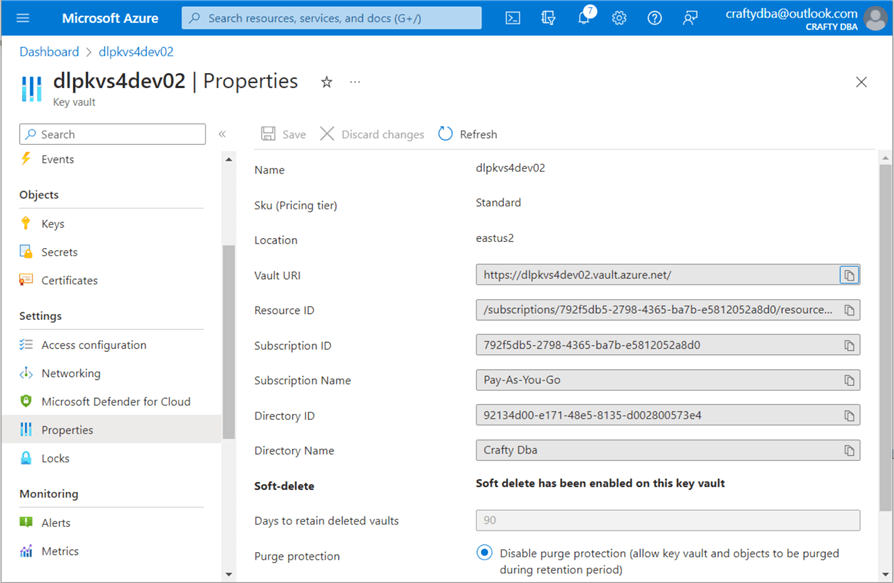
The information required by the secret scope creation page is the Vault URI and Resource ID. Both pieces of information can be found on the properties page of the Key Vault.
The image below shows the text boxes filled out. Hit Create to create a scope named ss4tips that is usable by everyone.
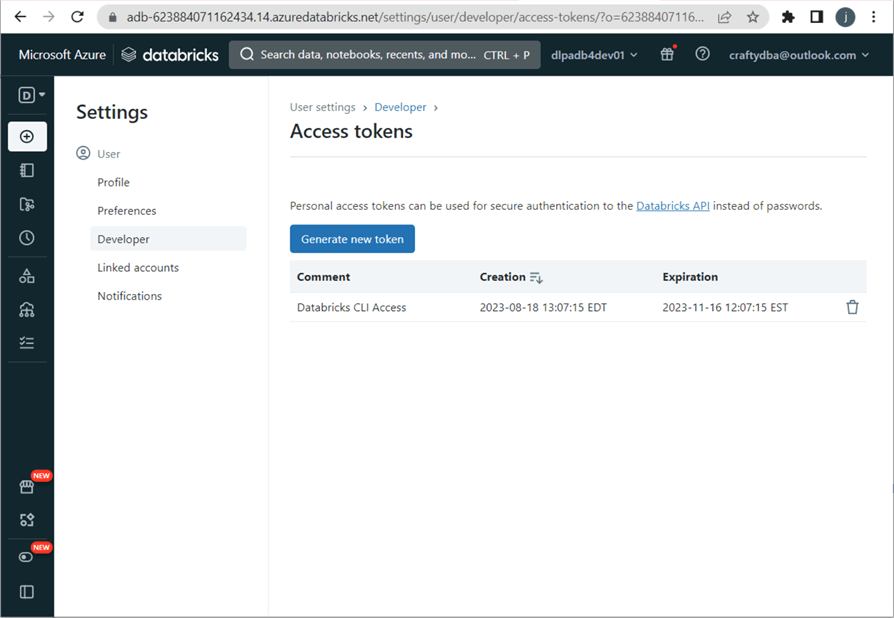
I will use the Databricks Command Line Interface shortly. We will need a user access token. Click on your user at the top right. Choose the User Settings from the drop-down box. Next, choose the Developer settings on the left and click the manage access tokens on the right. Click the “Generate new token” button to start the process. Add a descriptive comment and lifetime in days. Capture the token and store it in the Key Vault for later use. The image below shows a user token for craftydba@outlook.com.
Now, let’s try to access the Key Vault secrets from Databricks using Python. As you can see, the Python cell in my notebook is trying to retrieve the tenant id, client id, and client secret from the secret scope. There is an access issue with the dbutils.secrets.get() call. See the dbutils library for methods to manage secret scopes.
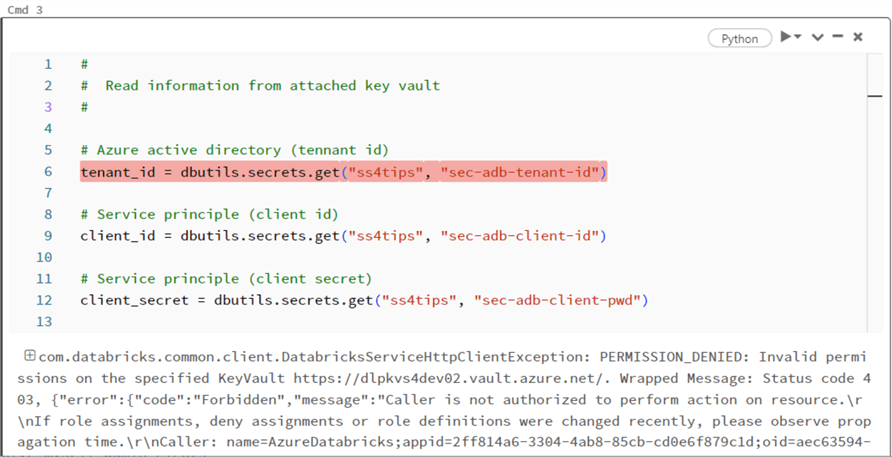
Why is this happening?
The Azure Databricks service has not been given any RBAC roles within the Key Vault. Thus, we get a permission denied message when we try to access the secret scope. We must give the service at least the Key Vault Secrets Reader role to fix this issue. I decided to give the service the officer role instead since it has a few more permissions.

We can either test access to the secret scope that is backed by Azure Key Vault by using the notebook cell above or use the CLI command within the Azure Portal, as seen below. We can see that all five secret names are listed in the Cloud Shell.
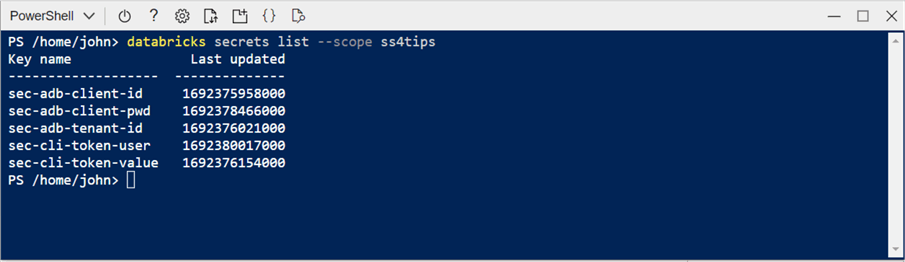
The default user interface to manage secret scopes in Azure Databricks is the command line. When a secret scope is backed by an Azure Key Vault, the management of the secrets can be done via the graphical interface of the Azure Portal. Therefore, many organizations use this method to maintain secrets needed by the Databricks notebooks.
Mounting ADL Storage
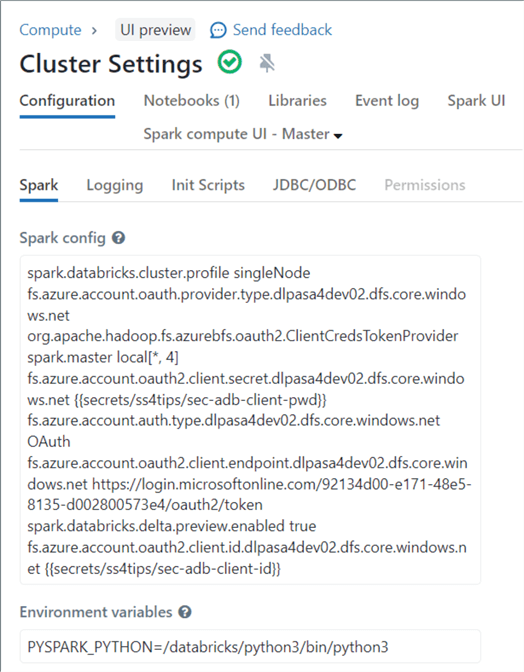
The preferred way to mount storage nowadays on Databricks is to add cluster start-up settings that set the spark session variables using the Service Principle. This is a great way to control user access to the Data Lake since we can control who has access to the cluster. The sample code below is configured for our workspace. It uses calls to the Secret Scope to retrieve key pieces of information for the connection.
fs.azure.account.auth.type.dlpasa4dev02.dfs.core.windows.net OAuth
fs.azure.account.oauth.provider.type.dlpasa4dev02.dfs.core.windows.net org.apache.hadoop.fs.azurebfs.oauth2.ClientCredsTokenProvider
fs.azure.account.oauth2.client.id.dlpasa4dev02.dfs.core.windows.net {{secrets/ss4tips/sec-adb-client-id}}
fs.azure.account.oauth2.client.secret.dlpasa4dev02.dfs.core.windows.net {{secrets/ss4tips/sec-adb-client-pwd}}
fs.azure.account.oauth2.client.endpoint.dlpasa4dev02.dfs.core.windows.net https://login.microsoftonline.com/92134d00-e171-48e5-8135-d002800573e4/oauth2/token
The image below shows a new cluster that I created for this demonstration. The above cluster settings have been added.
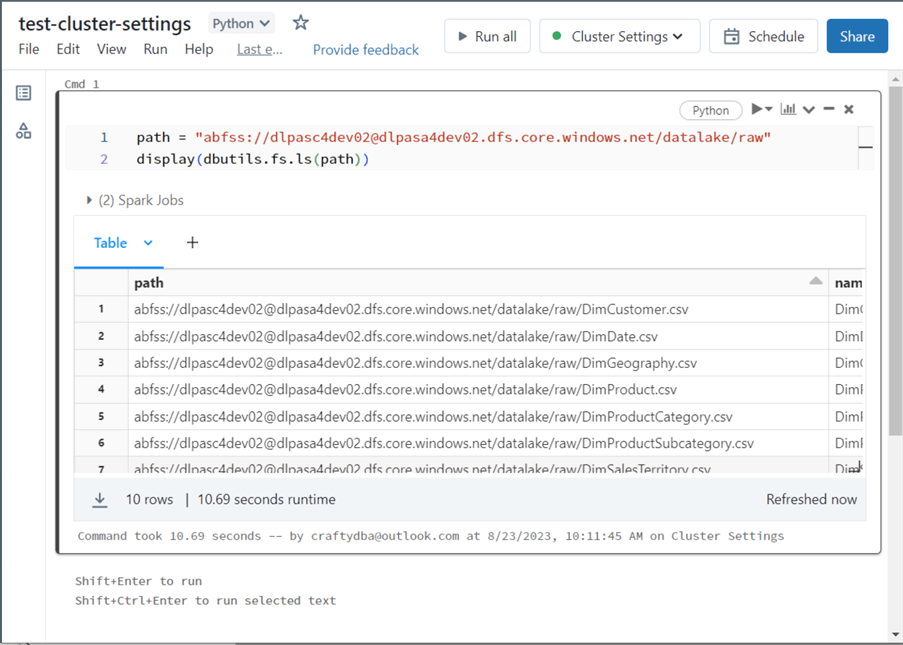
Once the cluster is started, we can use the list contents command of the dbutils library to test that we have access to the Storage Account. See the image below for the output.
The drawback of using this technique is that all storage must reference a URL. Not all Python libraries and Linux commands are URL-aware. An older approach that Databricks no longer advocates is mounted storage. Once mounted, anyone can see the data lake files. However, table access controls can be used to limit the end users to a set of delta tables. That is a discussion for another time. In short, I like mounted storage since I have access to prebuilt Python libraries.
We must write a program to create mounted storage without a URL. The first step in our program is the definition and retrieval of the mount point, storage account, and storage container as widgets. We will want this information passed to our notebook named nb-mount-adls-fs. The widgets module in the dbutils library will help us with the request. Using widgets (parameters) allows a notebook to be re-used for repetitive business processes.
The code below defines the variables the first time.
#
# Input parameters for notebook
#

# define parameter 1
dbutils.widgets.text("mount_point_path", "/mnt/advwrks")

# define parameter 2
dbutils.widgets.text("file_system", "dlpasc4dev02")

# define parameter 3
dbutils.widgets.text("account_name", "dlpasa4dev02")
The code below reads the widgets (at the top of the notebook) into local variables.
#
#  Read input parameters
#

# grab mount point
mount_point_path = dbutils.widgets.get("mount_point_path")

# grab file system
file_system = dbutils.widgets.get("file_system")

# grab account name
account_name = dbutils.widgets.get("account_name")
The second step in our program is to retrieve the required secrets from the secret scope named ss4tips. Again, the dbutils library has a secrets module that we can use to accomplish this task.
#
#  Read information from attached key vault
#

# Azure active directory (tennant id)
tenant_id = dbutils.secrets.get("ss4tips", "sec-adb-tenant-id")

# Service principle (client id)
client_id = dbutils.secrets.get("ss4tips", "sec-adb-client-id")

# Service principle (client secret)
client_secret = dbutils.secrets.get("ss4tips", "sec-adb-client-pwd")
The last step is to unmount any existing storage and remount using the newest parameters. The code below unmounts a given path to prevent errors. This pattern allows for updates to a mount path.
#
#  Unmount storage (prevents errors)
#

# unmount storage
try:
  dbutils.fs.unmount(mount_point_path)
except:
  print("The volume {} is not mounted".format(mount_point_path))
The code below performs our final task: mount the ADLS storage.
#
#  Mount storage
#

# Make tenant str
tenant_str = "https://login.microsoftonline.com/"  + tenant_id + "/oauth2/token"

# Config dictionary
configs = {"fs.azure.account.auth.type": "OAuth",
       "fs.azure.account.oauth.provider.type": "org.apache.hadoop.fs.azurebfs.oauth2.ClientCredsTokenProvider",
       "fs.azure.account.oauth2.client.id": client_id,
       "fs.azure.account.oauth2.client.secret": client_secret,
       "fs.azure.account.oauth2.client.endpoint": tenant_str,
       "fs.azure.createRemoteFileSystemDuringInitialization": "true"}

# Try mounting storage
try :
    # exec command
    dbutils.fs.mount(
    source = "abfss://{}@{}.dfs.core.windows.net/".format(file_system, account_name),
    mount_point = mount_point_path,
    extra_configs = configs)

    # debug message
    print("Successfully mounted volume {}".format(mount_point_path))

except Exception:

    # debug message
    print("Failure when mounted volume {}".format(mount_point_path))
    pass
The image below shows the execution of the list command. The magic command %fs is an abbreviation for dbutils.fs.ls. To use a Linux shell, use the %sh magic command. See this blog for a complete list of commands: Databricks magic command list.

The Databricks workspace supports two ways to connect to Azure Data Lake Storage. The cluster settings design pattern requires that the developer specify fully qualified paths using URLs. On a positive note, the security to ADLS can be controlled by the access list to the cluster. On a negative note, many existing Python libraries will not work since they were designed for physical file paths. The mounted storage design pattern allows the developer to use both local file paths and all the existing Python libraries. On a negative note, anyone can access the mount. I suggest using table access storage with the Delta Lake tables to secure the data at the table level.
Create Structured Directories
Planning out your data lake directory structure is very important. Otherwise, the end users might not find the files that they are looking for. This section will discuss an automated way to create the directory structure using a control file.
The first step is to give the service principle named dlpsvcprn02 access to our storage container named dlpasc4dev02. Remember that we gave this account RBAC rights earlier. Now, it is time to assign ACL rights. Use Azure Storage Explore to investigate what security is in place. The service principle missing from the ACL list is seen below.
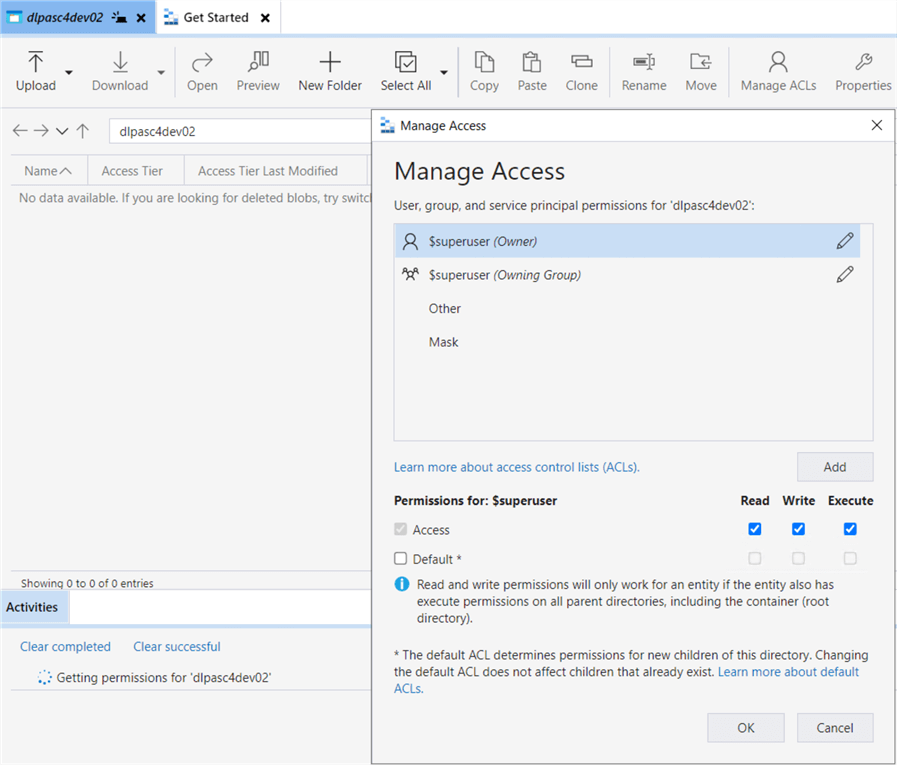
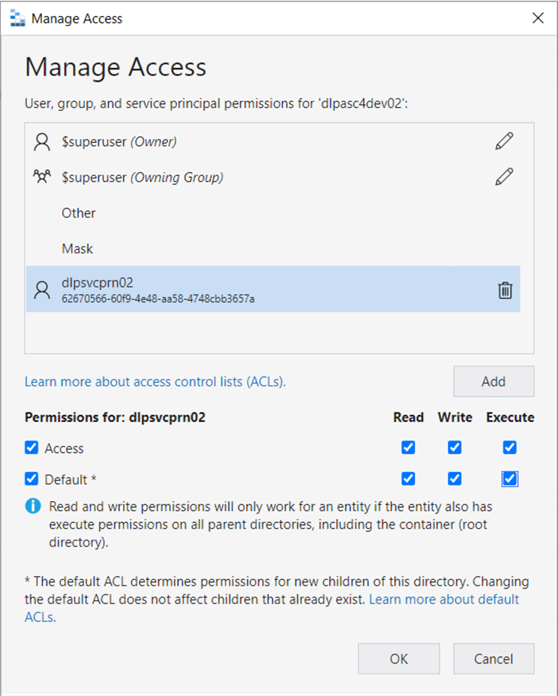
Click Add to start the process. We can search for the service principle by name. Once added, we want to give access and default permissions. Access permissions are for the current folder and/or file. The default permissions make sure any new folders or files are accessible by the service principle.
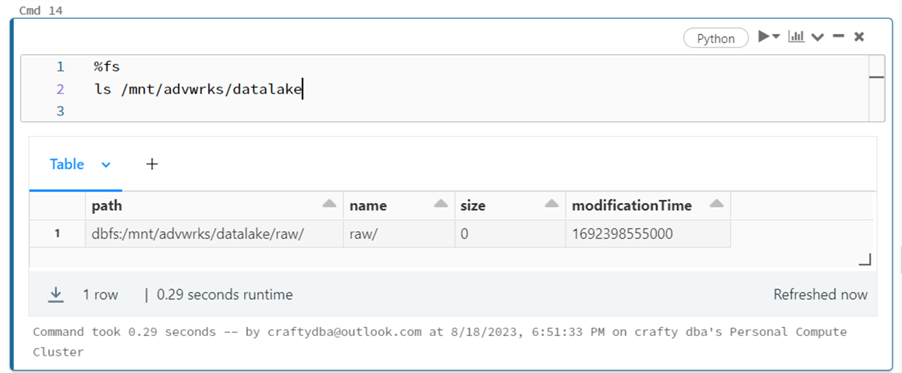
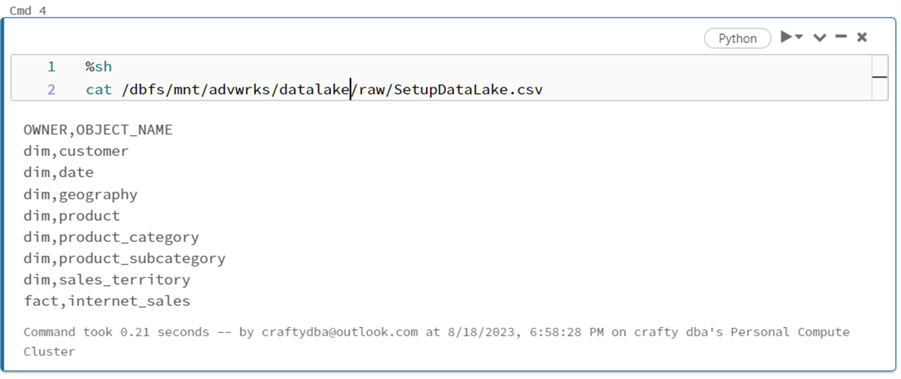
We can see if the rights have been applied by executing a magic command in Databricks to list the folders in the Data Lake. To date, we have just one folder called raw. This is where unprocessed raw data files are dropped.
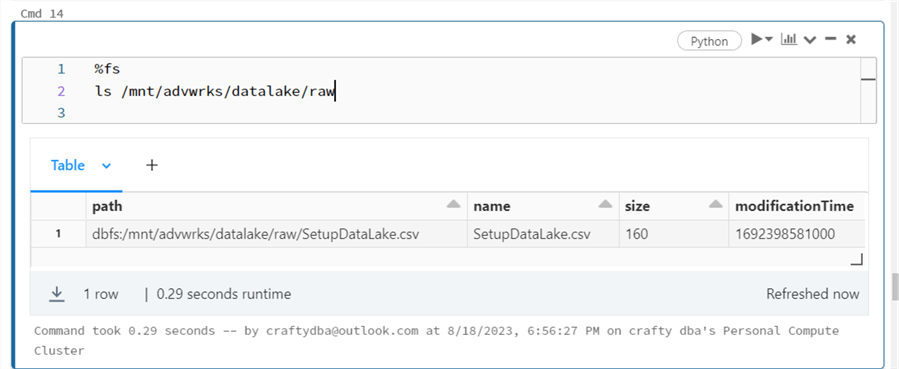
The one file in the raw directory we are interested in is SetupDataLake.csv. The image above shows the raw directory and the image below shows the control file.
The control file is a comma-separated values list of schemas and tables. This list matches the structure of the tables in the Adventure Works Sales LT database. The image below shows the cat Linux command being used to view the contents of the file.
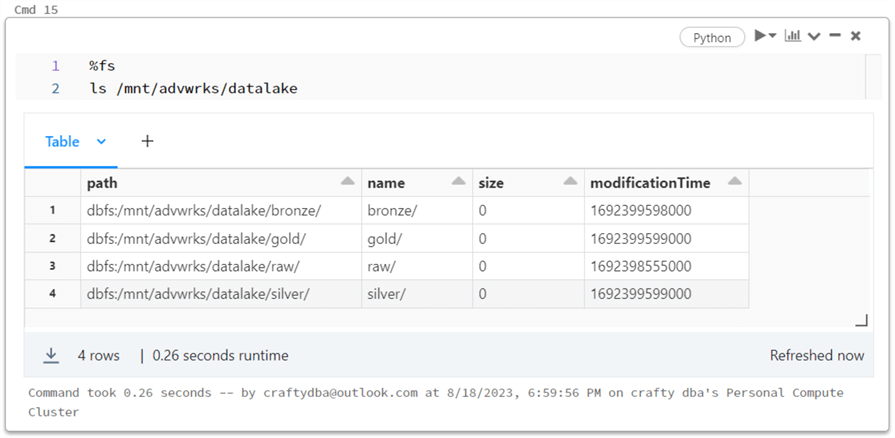
The following three images cover the expected results from executing a notebook called “nb-create-datalake-folders” that we’ll review. Typically, a Data Lake has at least three main directories:
- bronze– a copy of the raw data that might contain the source file name and process date,
- silver– a refined set of the data in which deduplication might have occurred, and
- gold– if data has been curated for the end users.
The image shows the additional directories that have been created.
A source system data file should have directories in the bronze and silver zones. I am going to organize the data by schema. Thus, all the dimension files will be located under the dim directory. The same thing could be said about the fact directory.
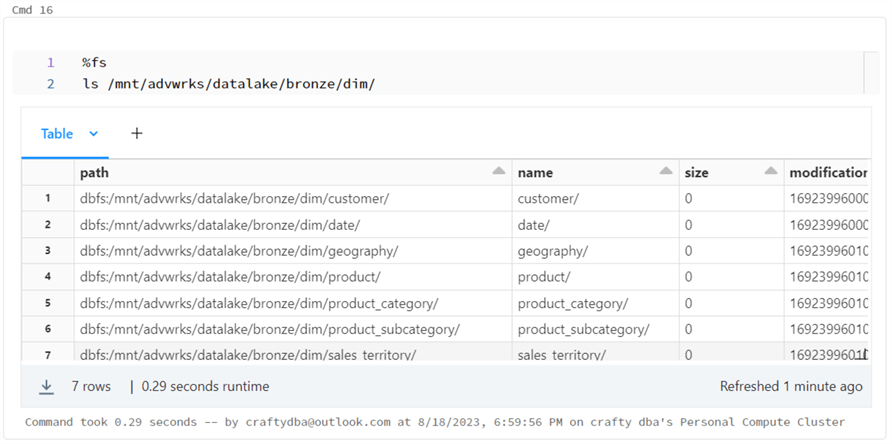
The image above shows the seven data directories for the dimension files. The image below shows the one directory for the fact file.

So, how did this notebook accomplish this task?
I will be going over the code that was used now. To make this notebook (program) dynamic, we want to define widgets for both the control file and the data lake root folder.
#
# Input parameters for notebook
#

# define the ctrl file
dbutils.widgets.text("ctrlfile_path", "/mnt/advwrks/raw/SetupDataLake.csv")

# define the datalake folder
dbutils.widgets.text("datalake_path", "/mnt/advwrks/datalake")
To use our control file, we first need to load the data file into a dataframe.
#
#  Read file into dataframe
#

from pyspark.sql.functions import lower, col

ctrl_df = spark.read.format("csv").option("header", "true").load(dbutils.widgets.get("ctrlfile_path"))
display(ctrl_df)
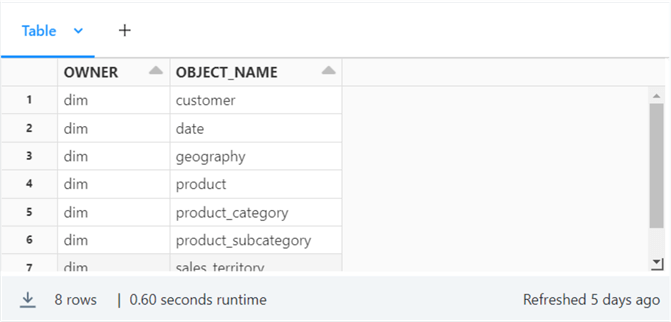
The image below shows the eight data files corresponding to SQL Server tables in the source system. This data is stored in a variable representing the control file dataframe.
For each entry in the control file dataframe, we need to create a subdirectory on the corresponding owner (schema). The code below gets a distinct list of owners as a dataframe.
#
#  Grab owner (schema) folders
#

from pyspark.sql.functions import lower, col

owner_df = ctrl_df.drop_duplicates(["owner"]).select(lower(col("owner"))).withColumnRenamed("lower(owner)","owner")
display(owner_df)
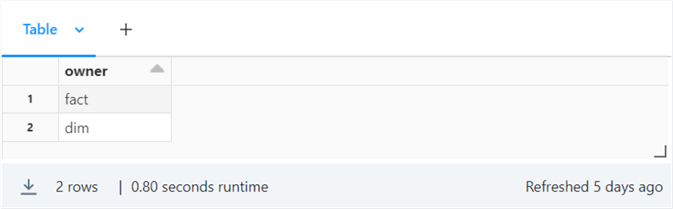
The owner dataframe has two entries: one for dimension tables and one for fact tables.
If the folder exists, we do not want to perform any work. If the folder does not exist, we want to create it. The user-defined function named make_file_folder implements this logic.
#
#  Make missing directory
#

# define function
def make_file_folder(path_txt):

  # does the path exist?
  try:
    dbutils.fs.ls(path_txt)

  # create the path
  except Exception:
    dbutils.fs.mkdirs(path_txt)
For loops are a very powerful construct. The snippet below defines a list of three different zones. Next, we iterate over the list to create top-level directories.
#
#  Make standard quality directories
#

zones = ["bronze", "silver", "gold"]
for zone in zones:
  path = dbutils.widgets.get("datalake_path") + "/" + zone
  make_file_folder(path)
  print(path)
The same technique can be used for the interior and leaf directories. The rdd.collect function retrieves all the data from the worker nodes and creates a list at the driver node. Caution should be used for very large datasets. For our use case, using this function is fine.
#
#  For bronze + silver zones, create owner + table directories
#

zones = ["bronze", "silver"]
for zone in zones:

  #
  #  Make owner dirs - bronze
  #

  for row in owner_df.rdd.collect():
    path = dbutils.widgets.get("datalake_path") + "/" + zone + "/" + row[0]
    make_file_folder(path)
    print(path)

  #
  #  Make table dirs - bronze
  #

  for row in ctrl_df.rdd.collect():
    path = dbutils.widgets.get("datalake_path") + "/" + zone + "/" + row[0] + "/" + row[1]
    make_file_folder(path)
    print(path)
Creating an easy-to-understand folder and file structure is critical for your users to adopt the company’s data lake.
Azure Log Analytics
The Databricks workspace does a good job of tracking notebook and workflow executions. However, we might want to figure out how long a job takes to execute each step (cell) in a notebook. That is a hard task in Databricks but an easy task in Log Analytics using the Kusto query language. Today, we will discuss using this service to provide enhanced logging for our data engineering notebooks.

Deploying the Log Analytics (LA) service is as easy as typing the keywords in the Azure Search box. Use the (+) sign to create a new LA workspace. See the image above for details. Like many services, this one uses a workspace ID and primary key to give applications access to create new log entries. The image below shows the two pieces of information required by our program.
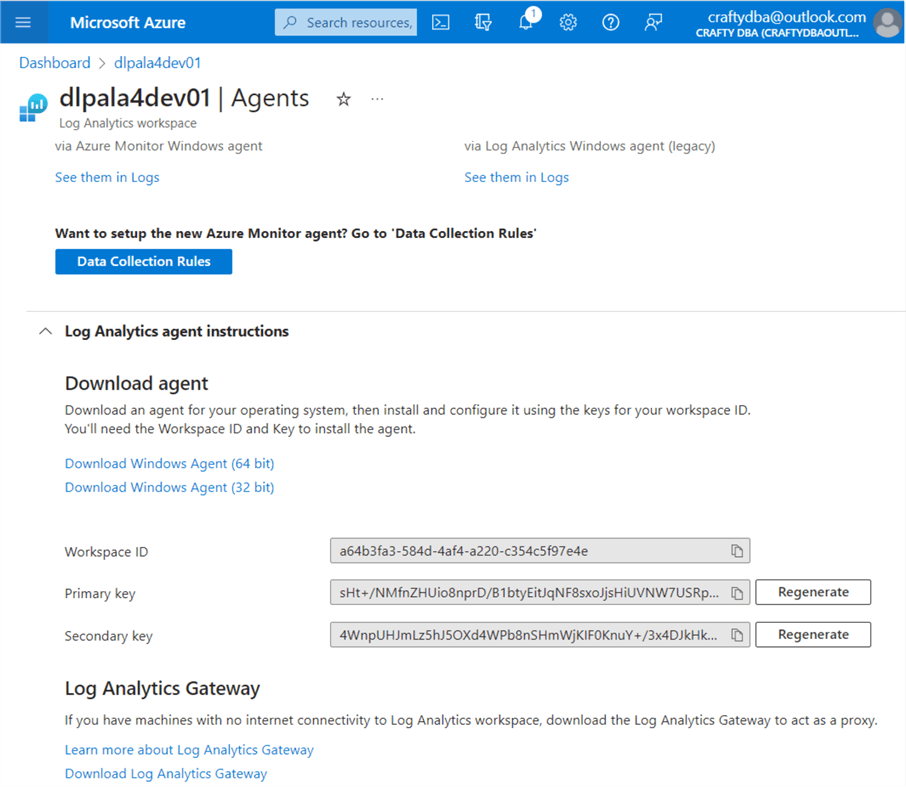
I am enclosing the nb-write-2-log-analytics notebook at the end of the article as part of the code bundle. It uses a Python REST API call to an Azure that I have demonstrated in a prior article. Two secrets need to be added to the key vault: sec-la-workspace-id and sec-la-workspace-key. See the above image for my values. Replace them with yours. The image below shows the custom log table named AdvWrksDl, created by the first call to the REST API.

The code snippet below has been taken from our data engineering notebook, that we will work on next time. Its primary purpose is to list the parameters we envision we need for the notebook (program) to move a raw data file through the bronze and silver quality zones.
This notebook is parameter-driven so that it can be used for each of the eight files that we receive from our on-premises Adventure Works system. The first task of the code snippet below is to create the owner (schema) and object (table) names from the widgets. Next, we have to create a JSON document that contains the data that will be sent to Log Analytics. Finally, using the REST API, we call the post_log_data function to write the JSON document to the Log Analytics service.
#
# Libraries
#

import uuid
import json

#
# Input parameters for notebook
#

# define parameter 1
dbutils.widgets.text("lake_path", "/mnt/datalake/bronze")

# define parameter 2
dbutils.widgets.text("dat_folder_name", "/dim/customer")


#
#  Read input parameters
#

# grab lake_path
lake_path = dbutils.widgets.get("lake_path")

# grab data folder name
dat_folder_name = dbutils.widgets.get("dat_folder_name")


#
#  Write start msg to log analytics
#

# remove slash from dir path, split into parts
path_parts = (dbutils.widgets.get("lake_path") + dbutils.widgets.get("dat_folder_name")).split("/")

# which file are we processing
nb_parm = "process [{}].[{}] file".format(path_parts[4], path_parts[5])

# Custom log in workspace
log_type = 'AdvWrksDlp'

# Create start message
json_data = [ {
  "id": str(uuid.uuid4()),
  "platform": "Azure Data Bricks",
  "software": "Adventure Works - Data Platform",
  "component": "nb-full-load-delta-table",
  "action": "Start Program",
  "parms": nb_parm,
  "version": 1.01
} ]
body = json.dumps(json_data)

# Post message to log analytics
post_log_data(body, log_type)
Note: This code snippet above requires the notebook below to be executed first. The %run magic command places the required functions in memory.
%run ./nb-write-2-log-analytics
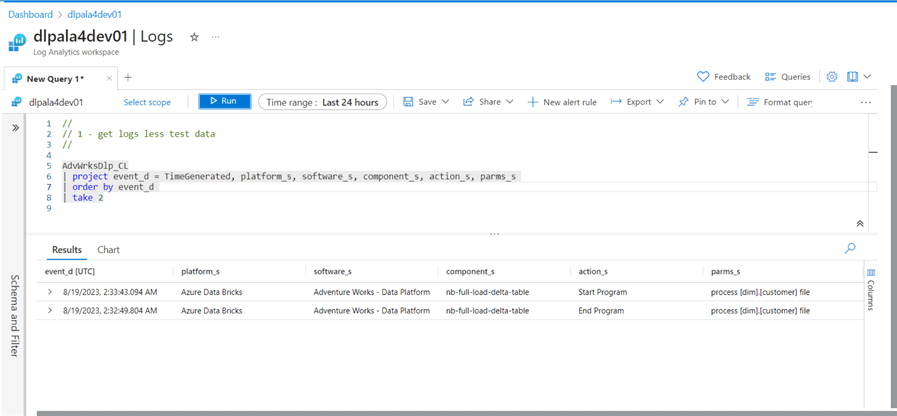
The image below shows the last two log entries created by executing the data engineering notebook. Since our notebook is a stub, it only contains the widgets (parameters) we might use. It does log the start/end of the notebook. See the action_s column below.
Let’s talk about parameters we might need to perform a full load of comma-separated data from the raw, bronze, and silver directories. We will need the folder path to our data lake, the source file name, and the destination file name. Since our path is nested, we need to break apart the owner and object names. Not every program runs correctly the first time; therefore, we might want to have a flag to turn on additional logging when bugs occur. To read a CSV file correctly in Spark, we should supply the file schema instead of inferring it. Since partition is helpful in a distributed system, we might want to pass the number of partitions to randomly break the file into. Finally, if we want to MERGE data into a delta file (table), we must know the columns (key) that make a record unique.
To summarize, logging is very important. While data engineering products like Databricks and Data Factory keep job timings, it is tough to query the data from these systems. The Log Analytics Service was created with a query language built in to solve these problems. There are a whole bunch of features that I did not cover on the service. Namely, alerts and dashboards can be beneficial when monitoring a production system.
Summary
If your company is considering using a Delta Lakehouse design, your engineering staff needs to know about four key Azure services. Azure Active Directory (AAD) allows the designer to create a service principle to connect the Databricks workspace to the Data Lake storage. Databricks can be configured so that secret scopes are backed by Azure Key Vault services (AKVS). The graphical user interface of the portal is preferable over the Databricks CLI. Azure Data Lake Storage (ADLS) can be accessed from Databricks by configuring cluster settings and/or mounting remote storage to the local file system. One should know the pros and cons of each designed pattern before choosing it. Have a folder and file naming convention plan in place before creating your data lake. Otherwise, your users will get frustrated when searching for data. Finally, use Azure Log Analytics (ALA) to store detailed logging of your engineering notebooks. The Kusto query language supplied with ALA will allow your support team to find surprising information from your production system.
To recap, the Delta Lakehouse design uses four key Azure Services. We covered how to deploy and configure each component. Enclosed is a zip file that has the Python notebook code that was covered in this tip. Next time, we will discuss how to create a parameter-driven notebook that will allow us to quickly fill in the bronze and silver data lake zones.
Next Steps
- Download the Python notebook code for this article.

John Miner is a Senior Data Architect at Insight Digital Innovation helping corporations solve their business needs with various data platform solutions.
He has over thirty years of data processing experience, and his architecture expertise encompasses all phases of the software project life cycle, including design, development, implementation, and maintenance of systems.
His credentials include undergraduate and graduate degrees in Computer Science from the University of Rhode Island. Also, he has earned certificates from Microsoft for Database Administration (MCDBA), System Administration (MCSA), Data Management & Analytics (MCSE), Data Science (MPP), Databricks Certified, and Fabric Certified.
John has been recognized with the Microsoft MVP award nine times for his outstanding contributions to the Data Platform community.
When he is not busy talking to local user groups or writing blog entries on new technology, he spends time with his wife and daughter enjoying outdoor activities. Some of John’s hobbies include wood working projects, crafting a good beer and playing a game of chess.
- MSSQLTips Awards: Author of the Year – 2019, 2022, 2023 | Champion (100+tips) – 2023