Overview
Now we know how to create database objects, it’s time to load Snowflake data.
Explanation
In this part of the tutorial, we’ll look into the COPY INTO statement, which is able to load data quickly and efficiently into a table. The COPY INTO statement can read various file formats, such as CSV, XML, JSON, AVRO, ORC and Parquet.
Create a Stage
The COPY INTO statement will read data from files stored inside a cloud location. This location can be an internal stage of table or an external stage, such as Azure Blob Storage. Let’s create a stage pointing to a blob container. In the left menu, choose data > databases.
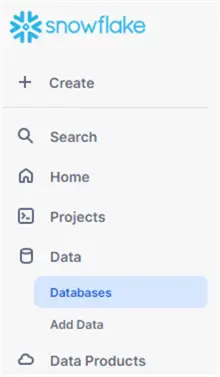
In the list of databases, choose the database and schema for which you want to create a stage.
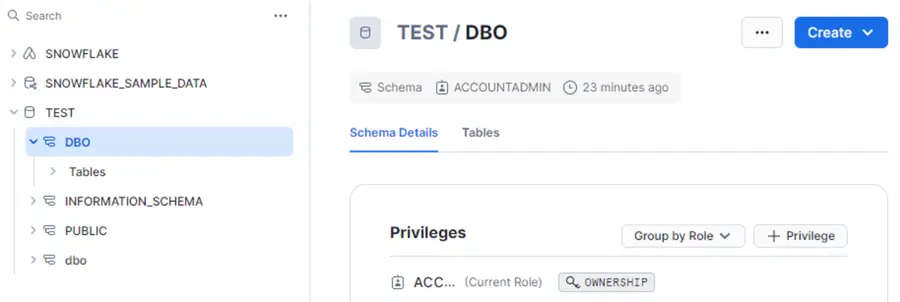
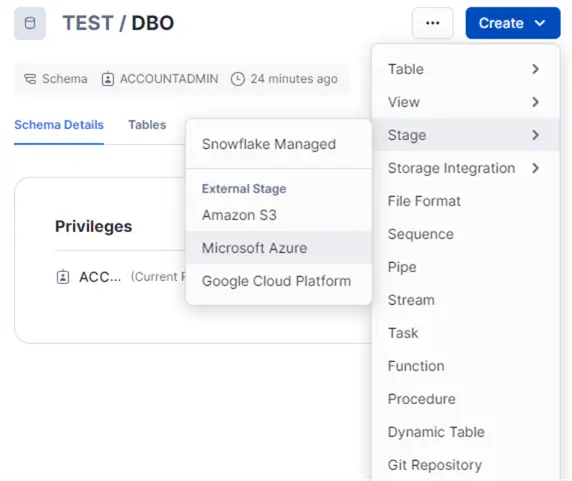
Next, click on the Create button in the top right corner and choose Stage > Microsoft Azure.
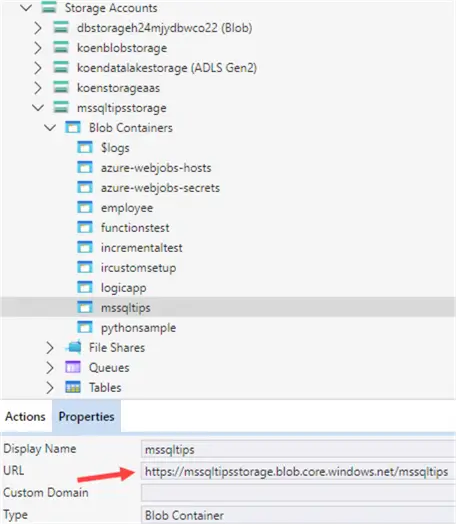
To create the stage, we need the URL of the container and a SAS token. Both can be retrieved using Azure Storage Explorer. When selecting the blob container, you can see the URL in the properties:
Right-click on the container and select Get Shared Access Signature.

Select a date for into the future and choose the appropriate permissions:

Both a URL containing the SAS token and the token itself are generated.

Copy the token and the URL and paste them into the Snowflake dialog:

If you want to see the DDL needed to create the stage using SQL, click on the SQL Preview at the bottom.

Once the stage is created, you can view all the files in the browser:

You can also list the files in the stage using the LIST command (make sure the right database and schema are selected in the context of the worksheet):

Load Data with COPY INTO
In this example, we’ll load a simple csv file from the stage we created in the previous paragraph. We can verify the data by using a SELECT statement:
CREATE OR REPLACE FILE FORMAT myformat
    TYPE = 'CSV'
    FIELD_DELIMITER = '|'
    ENCODING = 'WINDOWS1252'
    SKIP_HEADER = 1;

SELECT t.$1 AS Movies
FROM @AZUREBLOBCONTAINER/TestCopyInto(FILE_FORMAT => myformat) t;

The file format is needed to specify the configuration of the csv file, so Snowflake knows how to read it. Notice we didn’t specify a file name, but only a directory (TestCopyInto). This means Snowflake will try to read any file it finds in the directory and its subdirectories. Let’s load the csv file into a table by using a wizard. In the Data section, go back to the stage and browse to the folder where the file is located. Click the ellipses next to the file and choose Load into table.

In the dialog, leave the default to create a new table and specify a name for the table:

On the next page, Snowflake will parse the data and it allows you to deselect columns or change their data type.

In the bottom left corner, click on Show SQL.

The wizard generates 3 statements:
- A CREATE TABLE statement
- A CREATE FILE FORMAT statement
- And finally the COPY INTO statement to copy the data from the CSV into the newly created table
To go back to the wizard, click on Hide SQL. Hit Load to transfer the data into our new table.

When you want to load multiple files, you can use pattern matching with regex:
COPY INTO dbo.Movies
FROM @AZUREBLOBCONTAINER/TestCopyInto
    file_format = (format_name = myformat)
    pattern='.*[.]csv';
Keep in mind the destination table must already exists before running COPY INTO. If everything went successfully, you’ll see a line for each file load, together with the number of rows parsed and how many errors were encountered.

The COPY INTO is a powerful and flexible statement. It can also read compressed files (such as gzip compression). To get optimal performance, you can split very large files into files of about 100MB compressed. The COPY into statement will load these parallel into the destination table.
Alternatives
Are there other options to get data into Snowflake? Let’s take a look at some alternatives:
- Any existing ETL tool should be able to write to Snowflake. There are ODBC and JDBC connectors available. Keep in mind Snowflake is a data warehouse solution, not an OLTP database. If the ETL tool writes data row by row, it’s going to be extremely slow. Batches are preferred, or maybe staging the data in gzipped flat files and then loading them into Snowflake using the COPY INTO statement.
- There are also .NET and Python libraries available for working with Snowflake. There’s even a Kafka connector.
- You can use the Snowflake command line tool for uploading data to a stage.
- The Snowpipe feature allows you to load streaming data (in the form of micro-batches) into Snowflake.
- And of course, you can use Azure Data Factory. You can load data into Azure Blob Storage using ADF, then run a COPY INTO statement to pull the data into the table, or you can load the data directly using a Copy activity. You can also use ADF as an orchestrator for executing SQL scripts on your Snowflake database with the Script activity.
Additional Information
- To learn more about SAS tokens in Azure blob storage, check out the documentation.
- The COPY INTO statement has many optional parameters and can handle multiple file formats. Check out the docs to see what’s possible.
- You can use COPY INTO also in the opposite direction: to dump data from a table into a stage.
- You can combine the COPY INTO statement with a SELECT statement (using the $ sign to access individual columns as shown earlier). This can be useful when you want a different column order, leave out columns or if you want to apply some transformations such as checking for white space or null values.

Koen Verbeeck is a seasoned business intelligence consultant with over a decade of experience with the Microsoft Data Platform. He holds several certifications, including Azure Data Engineer. He’s a prolific writer, with over 375 articles on technologies such as Microsoft Fabric, SSIS, ADF, SSAS, SSRS, MDS, Power BI, Snowflake and Azure services. He has spoken at various events such as PASS, SQLBits, dataMinds Connect and many others. He frequently delivers educational webinars on MSSQLTips.com. For his efforts, Koen has been awarded the Microsoft MVP data platform award for many years.
- MSSQLTips Awards:
- Leadership Award (200+ Tips) – 2021
- Author of the Year – 2014/2020/2022
- Author Contender – 2024/2025
where can i find the excel file csv files you’ve used.
Hi Richard,
this tutorial is already a couple of years old, so the screenshots are a bit outdated. Snowflake has upgraded to a new UI called “Snowsight”. However, you should be able to switch to the “classic console” and then the screenshots should match.
Regards,
Koen
My Snowflake doesn’t have a screen like this page, and I can’t see any way to create a Stage, am I doing something wrong?