Problem
Most companies are faced with the ever-growing big data problem. It is estimated that there will be 40 zettabytes of new data generated between 2012 to 2020. See the Computerworld article for details. Most of this data will be generated by sensors and machines. However, only a small portion of the data is available for users. How can IT professionals help business lines gather and process data from various sources?
Solution
There have been two schools of thought when dealing with big data. Please see the article from The Data Warehouse Institute on this subject.
Schema on write is represented by the traditional relational database. Raw data is ingested by an extract, transform and load (ETL) process. The data is stored in tables for quick retrieval. Each column in the table is declared as a particular data type. This ensures domain integrity of the information. Constraints are added to the tables to ensure entity and referential integrity. Typically, changes to these systems can be time consuming and costly. Only a portion of the total data owned by the company resides in the database.
Schema on read is represented by technologies such as Hadoop or PolyBase. These technologies process stored data as simple text files. It is assumed that data integrity was applied during the generation of these text files. The actual definition of the table is applied during the read operation. Therefore, changes can be done quickly at the query level and do not take a-lot of time. Almost all the company’s data can be placed in blob storage or a logical data lake. Data Scientist can investigate this data to add predictive analytics to the company’s repertoire.
Today, we are going to talk about how to load data from Azure Blob Storage into Azure SQL data warehouse using PolyBase. This technology was introduced by Microsoft in 2012 to allow a relational database such as Parallel Data Warehouse (MPP) to talk to files stored on Hadoop’s Distributed File System (HDFS). Please see this ZD Net article covering its first introduction. Since its release, the technology has grown to read data off different storage media and different file formats.
Business Problem
There are many financial companies that invest in the stock market via mutual funds. Our fictitious company named Big Jon Investments is such a company. They currently invest in the S&P 500 mutual fund but are thinking of investing in individual funds starting in 2017. The investments department will need historical data to make informed choices when picking stocks. Our boss has asked us to pull summarized daily trading data for the 505 stocks that make up the list. Last year’s historical data should be stored in comma delimited files and will be the start of a new data mart in Azure. We accomplished creating the comma delimited files in a prior tip.
Now, our boss wants us to copy the comma delimited files to Azure blob storage and load to Azure SQL data warehouse table to the combined results.
How can we solve this business problem?
We are going to use a combination of techniques that we learned in prior articles to accomplish the following tasks.
| Task | Description |
|---|---|
| 1 | Use PowerShell to sign into Azure. |
| 2 | Create and load an Azure blob container. |
| 3 | Create and define an Azure SQL data warehouse. |
| 4 | Defining an external data source. |
| 5 | Leverage PolyBase to create external tables |
Sign into Azure
We must log in with a valid subscription owner before we can do any work in the PowerShell ISE. You will be prompted for credentials which is a valid user name and password. The new sign in experience breaks this process into two dialog boxes or tasks.
The first task is to supply a valid user name.

The second task is to supply a valid password.

A user account might have several subscriptions associated with it. The output below shows the subscriptions associated with jminer4bm@outlook.com user name or account owner. The last step is to choose the correct subscription to work with. This step does not apply since I have only one subscription linked to my user name.
In a nutshell, you need to be logged into Azure with a validate account and subscription before any work can start.
Create Blob Container
Most of the objects you create in Azure are contained inside what is called a resource group. For this project, I am going to create a resource group named rg4tips18, a storage account named sa4tips17 and a blob container named sc4inbound. Please see my article on “Using Azure to store and process large amounts of SQL data” for the PowerShell cmdlets to accomplish these tasks. Each of the commands was executed in the PowerShell Integrated Scripting Environment (ISE).
The image below shows the newly created resource group named rg4tips18.

The storage account is a container for objects like blob storage, table storage, file shares and message queues. The image below shows the newly created storage account named sa4tips18.

I decided to create two storage containers. The sc4inbound container will hold the newest text files that need to be loaded into the data warehouse. The sc4archive container will be a landing zone for files that have been processed but are being saved according to our company’s retention period. We will be using the first container in this article. When we automate this process in the future, we will write code to move the processed files from inbound to archive containers. See image below for details around storage containers.

After running a PowerShell script, I like to validate the creation of the objects for the project before proceeding. The image below was taken from the Azure portal and shows the two storage containers in our one storage account.

To recap, there is a hierarchy of objects when defining Azure storage. One might compare this hierarchy to the Russian Matryoshka doll in which dolls or objects fit inside another.
Load Blob Container
Now that we have our container defined in Azure, let us take a look at the data files that we want to load. The S&P data for the year 2017 is comprised of 505 comma separated value files located on a on my laptop’s solid-state drive. I am enclosing a zip file that contains this data so that you can follow along with the examples.

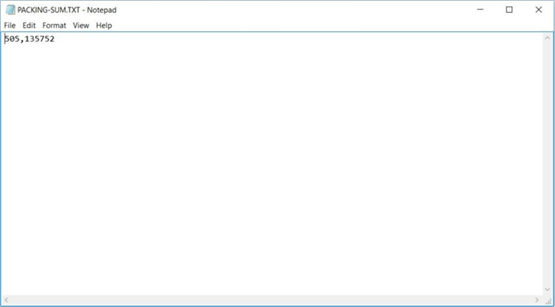
There are two additional files that I want to load. The first file is called a packing list. It is obvious that the file contains a list of all the comma separated value files that need to be processed.

The second file is a summary of the data files to load. It contains the number of files to process and the total records contained by the files. This information is important when creating an automated process. It allows the developer to write a validation check after load process has completed.
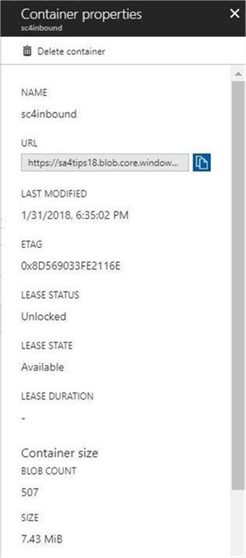
The image below, taken from the Azure portal, shows the total number of S&P 500 stock data files loaded into the storage container. This includes the two packing list control files. Enclosed is the PowerShell script that was used to create and load data into a blob storage container.
Since the packing list file is key to the load process, I am going to validate its existence. The image below was taken from the Azure portal. All of the files that are stored in the sc4inbound directory can be displayed via paging provided by this screen. While Azure Blob Storage does not support directories per se, you can add pathing to the name of the blob file. The portal interface will display the files in a structured manor resembling directories. Below, the new path was added to each file and the files were filtered by the letter P.

Access to Azure blob storage can be defined by using storage access keys or shared access signatures. The database scoped credential used by PolyBase supports only storage access keys. The screen shot from the PowerShell ISE shows the two keys associated with our account. We will use this information later in the article.

To summarize this section, each of the data files was loaded into a blob storage container. The two packing files are used to control and validate the load process.
Creating the Azure SQL Server
Almost everything in Azure is contained by a resource group. For this project, I am going to define a logical SQL database server named sql4tips18 inside the resource group named rg4tips18. The administrator account or user name for the server is jminer and the password is MS#tIpS$2018. Please see my article called “Deploying Azure SQL Database Using Resource Manager PowerShell cmdlets” for the details on these tasks.
The image below, taken from the PowerShell ISE command window, shows the Azure SQL server residing in the East US 2 region.

Security is a very important concern by every company. That is why Microsoft blocks all connections to the database by using a firewall. The image below shows a firewall rule named fr4laptop being added to allow my laptop access to the database server.

The enclosed PowerShell script contains the cmdlets used to create this logical server.
Defining the Azure SQL data warehouse
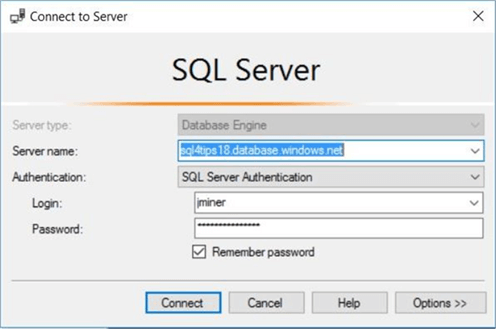
I am going to use SQL Server Management Studio to manage my new Azure SQL server. We need to connect to the server to start crafting Transact SQL scripts. Choose the database engine as the server type. Enter the fully qualified name of the Azure SQL Server. Pick SQL Server authentication as the security option and supply the login/password of the server administrator. The image below shows a typical connect to server login window.
By default, you should be in the master database. Right now, there is one user defined database named dw4stocks. Creation of an Azure SQL Data Warehouse can be done via PowerShell or T-SQL. Please see my article on “Deploying Azure SQL Data Warehouse Using Resource Manager” for the PowerShell cmdlets to accomplish these tasks.
The T-SQL code below drops and recreates the existing database using a DW1000 service object or performance tier and maximum storage capacity of 10 TB.
--
-- Create [dw4stocks] Azure SQL DW
--

-- Delete existing database
DROP DATABASE IF EXISTS dw4stocks
GO

-- Create new database
CREATE DATABASE dw4stocks
(
MAXSIZE = 10240 GB,
EDITION = 'datawarehouse',
SERVICE_OBJECTIVE = 'DW1000'
)
GO
The Azure offerings from Microsoft change on a monthly basis. In November 2017, Microsoft announced the addition of the Compute performance level tier. The number of concurrent queries, compute nodes, distribution per compute nodes, memory per distribution and maximum memory per data warehouse have been increased significantly. The prior offering has been renamed as the Elasticity performance tier. Change the service objective to DW1000c to start using this new tier.
I want to create three user defined schemas. The ACTIVE schema will have the combined data. The STAGE schema will contain intermediate results and auditing information. The BS schema will contain the external table defined for blob storage. I thought about using ET as the abbreviation for external tables. However, I did not want people to think of Steve Spielberg’s block buster movie named E.T. which is about a visitor from another planet.
The following tables are key to our solution.
| Schema | Table | Description |
|---|---|---|
| ACTIVE | STOCKS | The final table with surrogate id. |
| STAGE | STOCKS | The staging table w/o surrogate id. |
| STAGE | AUDIT | Audit trail of T-SQL statements. |
The [ACTIVE].[STOCKS] table will contain all of S&P 500 historical data.
--
-- Create ACTIVE table
--

CREATE TABLE [ACTIVE].[STOCKS]
(
  ST_ID INT IDENTITY(1, 1) NOT NULL,
  ST_SYMBOL VARCHAR(32) NOT NULL,
  ST_DATE DATE NOT NULL,
  ST_OPEN REAL NULL,
  ST_HIGH REAL NULL,
  ST_LOW REAL NULL,
  ST_CLOSE REAL NULL,
  ST_ADJ_CLOSE REAL NULL,
  ST_VOLUME BIGINT NULL
)
WITH ( DISTRIBUTION = ROUND_ROBIN );
GO
The [STAGE].[AUDIT] table keeps track of the actions performed by our load process.
--
-- Create AUDIT table
--

CREATE TABLE [STAGE].[AUDIT]
(
  AU_CHANGE_ID INT IDENTITY (1,1) NOT NULL,
  AU_CHANGE_DATE [datetime] NOT NULL,
  AU_CMD_TEXT [varchar](1024) NOT NULL,
  AU_CHANGE_BY [nvarchar](256) NOT NULL,
  AU_APP_NAME [nvarchar](128) NOT NULL,
  AU_HOST_NAME [nvarchar](128) NOT NULL
)
WITH ( DISTRIBUTION = ROUND_ROBIN );
GO
Please note there are no primary key constraints or default constraints on these tables. That is because the Azure SQL data warehouse is not fully compliant with T-SQL.
There is a new concept that you have to worry about during table creation. How is the data going to be distributed to the 60 files that are spread across the compute nodes? There are two ways to distribute data. First, we can use hash distribution on a given column. The stock symbol might be a good candidate if data is equally distributed. Second, we can use a round robin distribution if we do not know a good hash key. I choose the second method given the fact that our data size is very small. Please read this MSDN article on distributed table design.
If you successfully executed the enclosed Transact SQL script, your object explorer window should have three newly defined tables. The image below also contains an external table for the packing list, a view to dynamically create T-SQL statements and a stored procedure to load data from blob storage using external tables (PolyBase). More information on these objects to follow later in the article.

In short, the Azure SQL data warehouse can be managed by SQL Server Management Studio just like any other database. While some T-SQL constructs are the same in this offering, there are many features that are not supported. I suggest you refer to the T-SQL documentation often to make sure a feature is available.
Defining an external table
Up to this point, I have not talked about anything new. In order for the Transact SQL commands to access the Azure blob storage, we need to define an external table. The technology behind external tables is PolyBase. There are five simple steps that are required to create this object.
First, we need to create a master key from a given password. I suggest using a strong random password generated by one of the free online password sites such as https://www.random.org/passwords/. The screen shot below shows the newly created master key.

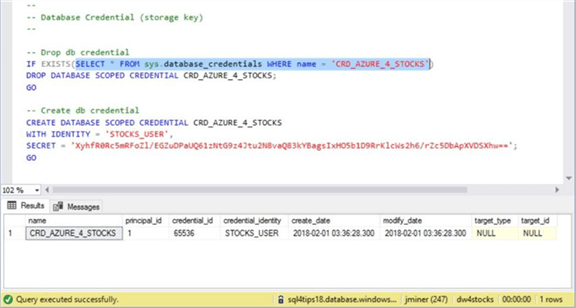
Second, we want to define a database credential called ‘CRD_AZURE_4_STOCKS’. The secret is the storage access keys that we captured above. The identity string can be any valid name. The screen shot below shows our newly defined credential.
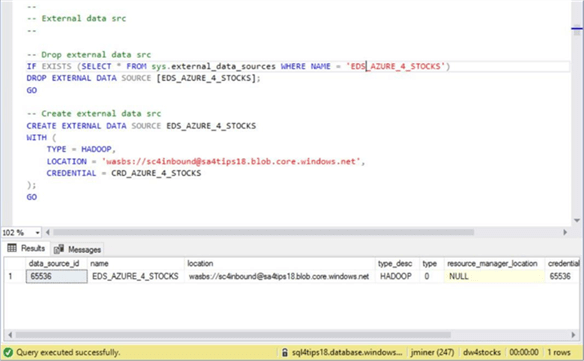
Third, we must create the external data source named ‘EDS_AZURE_4_STOCKS’ using database credential we just created. Make sure you choose the type as HADOOP. The location is the fully qualified path to the Azure blob storage container. Use the newly defined database credential to access the blob storage.
Fourth, we require an external file format named ‘EFF_AZURE_4_STOCKS’ to be created. This object defines the format of the files stored in blob storage.

The fifth and final step puts all the pieces together by defining an external table. The location parameter is full name of the file that is saved in the storage container. The data source and file format parameters use the database objects we previously defined. It is best to state the fields in the external table as strings or variable characters. That way, bad data in the file will not cause an error when reading from the external table.

External tables act like read-only versions of regular tables. Only a SELECT statement is valid with these tables. Therefore, the following T-SQL will list all the entries in the packing list file.
--
-- Show packing list data
--

SELECT * FROM [BS].[PACKING_LST];
GO
The image below shows the first 9 records in the packing list file.

To rehash this section, there are five objects (steps) that are used to define an external table. This collection of technologies is called PolyBase.
Life without cursors
The following algorithm is the pseudo code for our business solution.
Usually, I would create a cursor on the external table for the packing list file. Unfortunately, Azure SQL data warehouse does not support any of the cursor constructs in T-SQL. How do we translate each record in the packing list file into Dynamic T-SQL to do the following: drop an external table, create an external table, and insert data into our staging table from the external table?
| Step | Description |
|---|---|
| 1.0 | Truncate the staging table. |
| 2.0 | Read the packing list file. |
| 3.0 | For each record in the packing list file. |
| 3.1 | Drop existing external table. |
| 3.2 | Create new external table. |
| 3.3 | Insert data from external table to staging table. |
| 3.4 | Insert audit records for each above statement. |
Azure SQL data warehouse does support a WHILE loop statement. The key to this technique is to create a user defined view that has the dynamic T-SQL (text) already built for consumption. Thus, we just need assign each file name a row number so that we can process the view incrementally in the loop.
Since the view represents nothing new in terms of technology, I am enclosing the completed T-SQL script for both the view and store procedure for your review. The image below was captured from the query window within SQL Server Management Studio. The view named TSQL_FOR_PACKING_LST_FILES supplies text or dynamic T-SQL to the stored procedure we are going to define.

Custom Stored Procedure
A custom stored procedure is a great way to package a bunch of T-SQL statements into a repeatable process. The [ACTIVE].[LOAD_FROM_BLOB_STORAGE] takes one parameter as input. The verbose flag indicates whether or not the code displays debugging information to the results window.
The T-SQL code below implements the previously discussed algorithm as a stored procedure. To reduce code, I removed the typical TRY/CATCH logic that I use with my stored procedures.
--
-- Load from blob storage
--

-- Drop stored procedure
IF EXISTS (
    SELECT * FROM sys.objects
    WHERE object_id = OBJECT_ID(N'[ACTIVE].[LOAD_FROM_BLOB_STORAGE]') AND type in (N'P', N'PC')
)
DROP PROCEDURE [ACTIVE].[LOAD_FROM_BLOB_STORAGE]
GO

-- Create stored procedure
CREATE PROCEDURE [ACTIVE].[LOAD_FROM_BLOB_STORAGE]
    @VAR_VERBOSE_FLAG CHAR(1)
AS
BEGIN

  -- Global variables
  DECLARE @SQL_STMT NVARCHAR(4000) = '';
  DECLARE @DATA_FILE VARCHAR(128);

  -- Loop variables
  DECLARE @FILE_CNT INT = (SELECT COUNT(*) FROM [STAGE].[TSQL_FOR_PACKING_LST_FILES]);
  DECLARE @LOOP_CNT INT = 1;

  -- 1.0 - Clear data from stage
  TRUNCATE TABLE [STAGE].[STOCKS];

  -- 3.0 - While loop replaces cursor
  WHILE @LOOP_CNT <= @FILE_CNT
  BEGIN

    -- Local variables
    DECLARE @CURR_DATE DATETIME = (SELECT GETDATE());
    DECLARE @USER_NAME VARCHAR(128) = (SELECT COALESCE(SUSER_SNAME(),'?'));

    -- Debugging
    IF (@VAR_VERBOSE_FLAG = 'Y')
    BEGIN
        PRINT '[LOAD_FROM_BLOB_STORAGE] - START PROCESSING FILE ' + @DATA_FILE + '.'
        PRINT ' '
    END

    -- 2.0 - Current file name
    SET @SQL_STMT = (SELECT DATA_FILE FROM [STAGE].[TSQL_FOR_PACKING_LST_FILES] WHERE ROW_ID = @LOOP_CNT);

    -- 3.1 - Remove existing external table
    SET @SQL_STMT = (SELECT DROP_STMT FROM [STAGE].[TSQL_FOR_PACKING_LST_FILES] WHERE ROW_ID = @LOOP_CNT);
    EXEC sp_executesql @SQL_STMT;

    -- 3.4 - Insert Audit record
    INSERT INTO [STAGE].[AUDIT] ([AU_CHANGE_DATE],[AU_CMD_TEXT],[AU_CHANGE_BY],[AU_APP_NAME],[AU_HOST_NAME])
    VALUES ( @CURR_DATE, @SQL_STMT, @USER_NAME, 'Drop External Table', 'db4stocks' );

    -- 3.2 - Create existing external table
    SET @SQL_STMT = (SELECT CREATE_STMT FROM [STAGE].[TSQL_FOR_PACKING_LST_FILES] WHERE ROW_ID = @LOOP_CNT);
    EXEC sp_executesql @SQL_STMT;

    -- 3.4 - Insert Audit record
    INSERT INTO [STAGE].[AUDIT] ([AU_CHANGE_DATE],[AU_CMD_TEXT],[AU_CHANGE_BY],[AU_APP_NAME],[AU_HOST_NAME])
    VALUES ( @CURR_DATE, @SQL_STMT, @USER_NAME, 'Create External Table', 'db4stocks' );

    -- 3.3 Insert into staging table
    SET @SQL_STMT = (SELECT INSERT_STMT FROM [STAGE].[TSQL_FOR_PACKING_LST_FILES] WHERE ROW_ID = @LOOP_CNT);
    EXEC sp_executesql @SQL_STMT;

    -- 3.4 - Insert Audit record
    INSERT INTO [STAGE].[AUDIT] ([AU_CHANGE_DATE],[AU_CMD_TEXT],[AU_CHANGE_BY],[AU_APP_NAME],[AU_HOST_NAME])
    VALUES ( @CURR_DATE, @SQL_STMT, @USER_NAME, 'Load Staging Table', 'db4stocks' );

    -- Debugging
    IF (@VAR_VERBOSE_FLAG = 'Y')
    BEGIN
        PRINT '[LOAD_FROM_BLOB_STORAGE] - END PROCESSING FILE ' + @DATA_FILE + '.'
        PRINT ' '
    END

    -- Update date
    SET @CURR_DATE = (SELECT GETDATE());

    -- Increment the counter
    SET @LOOP_CNT +=1;
  END

END
GO
Here are some things to note about the above code. Basically, the code is a work around the lack of cursor support in Azure SQL data warehouse.
Normally, when using a cursor, we would fetch the next row of data until there was no more data. Instead, we get the number of files to process by selecting a total count from the packing list external table. This value is stored in a variable named @FILE_CNT. Next, we set a loop counter variable named @LOOP_CNT to 1. The while loop continues until this counter exceeds the file counter.
Again, if we were using a cursor, the file name would be available to the stored procedure as a variable. We would stitch together dynamic T-SQL within the loop of the cursor. In the code above, we are selecting a single row and single field from the view that has the pre-built T-SQL we want to execute.
Last but not least, audit tables that I have defined in the past come with default values in which I pull in key information such as current date/time and current user. Because Azure SQL data warehouse does not support default values, we need to pass this information along to the INSERT statement.
The T-SQL snippet below calls the above stored procedure. This stored procedure will process the 505 files using external tables and PolyBase. The resulting data is stored in the staging table. We know that some records in the table have zero values since they represent dividends. The final insert statement moves the data from the staging table to the active table when leaving behind these zero value records.
--
-- Test load process
--

-- Import blob files into stage
EXEC [ACTIVE].[LOAD_FROM_BLOB_STORAGE] @VAR_VERBOSE_FLAG = 'Y';
GO

-- Move from stage to active
INSERT INTO [ACTIVE].[STOCKS]
SELECT * FROM [STAGE].[STOCKS]
WHERE ST_OPEN <> 0 AND ST_CLOSE <> 0
GO
The image below shows the completed execution of the load process. While PolyBase makes it easy to load files from Azure blob storage, it is definitely not the fastest technology in the world. It takes 40 minutes and 34 seconds to process the records stored in 505 files.
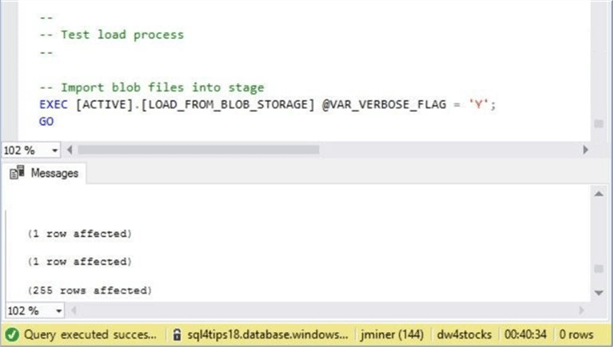
If we take a look at the total number of records and divide by the total process time in seconds, we are able to process about 52 records per second.

The real speed with Azure SQL data warehouse is the ability to aggregate large amounts of data. One of the analysis at Big Jon Investments has asked for the lowest and highest stock sale price by month for all the S&P 500 stocks. The below query returns in less than a second with the answers. The resulting data set is 6,054 records in size.

To make a brief statement about this section, PolyBase allows a relational database to use schema on read technology. The execution time for this technology is not fast. However, the ease of use makes it very attractive. Azure SQL data warehouse is not fully T-SQL compliant. But with enough perseverance, you will find ways to work around these limitations. The real attractive feature about the warehouse is the blinding speed in which huge amounts of data can be aggregated.
Summary
Big Jon’s Investments wanted to collect S&P 500 historical data from a third party and load it into an Azure SQL data warehouse. Azure blob storage was used as a logical data lake for these comma separated files. PowerShell was used to collect and post the historical data to blob storage. Microsoft provided the data warehouse developer with external tables (PolyBase) to read files located in blob storage.
The external table depends on five objects being defined. First, a master key needs to be defined for a given unique password. Second, storage access keys need to be retrieved from the blob storage account. Third, a database credential should be defined using the storage access key. Fourth, an external data source is created for access to the blob storage container. Fifth, an external file format is defined to describe the contents of the file. Last but not least, the external data source and external file format are used to define the external table.
In the past, I wrote an article about “Bulk Inserting Data into an Azure SQL Database with PowerShell”. One issue that we could not address is the 4 TB limit of this offering. Today, I talked about Azure SQL Data Warehouse which can scale up to 240 TB of uncompressed data and almost 1 PB of compressed data using column store technology. However, there are still some outstanding items to address to provide an automated solution.
First, how do we move all the data files and packing list to an archive directory after successful processing? Second, how can we schedule the load from the blob storage process? These topics will be talked about in the near future.
Next Steps
- Using Azure Automation to schedule a PowerShell workflow.

John Miner is a Senior Data Architect at Insight Digital Innovation helping corporations solve their business needs with various data platform solutions.
He has over thirty years of data processing experience, and his architecture expertise encompasses all phases of the software project life cycle, including design, development, implementation, and maintenance of systems.
His credentials include undergraduate and graduate degrees in Computer Science from the University of Rhode Island. Also, he has earned certificates from Microsoft for Database Administration (MCDBA), System Administration (MCSA), Data Management & Analytics (MCSE), Data Science (MPP), Databricks Certified, and Fabric Certified.
John has been recognized with the Microsoft MVP award nine times for his outstanding contributions to the Data Platform community.
When he is not busy talking to local user groups or writing blog entries on new technology, he spends time with his wife and daughter enjoying outdoor activities. Some of John’s hobbies include wood working projects, crafting a good beer and playing a game of chess.
- MSSQLTips Awards: Author of the Year – 2019, 2022, 2023 | Champion (100+tips) – 2023


