Problem
Recently I faced an issue where our overnight bulk insert operations started failing and in the SQL Error log I saw the below error:
IDENTITY to data type int. Arithmetic overflow occurred.
After further investigation, I found that one of the SQL Server tables which was involved in the bulk operation has an identity column. That column had an INT data type defined and the column value reached the maximum allowed limit for the INT datatype. After this occurred and was fixed by resetting the identity seed, I wanted to put together an automated report to let me know if there were any tables where the identify value was reaching its maximum allowed limit.
Solution
I decided to create a weekly Excel report which generates a list of identity columns where the integer datatype was reaching its maximum allowed limit for the integer data type. In this tip, I am going to show how can we create an Excel report to get a list of identity columns which are about to reach the maximum allowed limit using SQL Server Integration Services.
In this demo, I am going to perform the below tasks:
- Explain the script, which will populate the list of identity columns that are close to reaching the maximum allowed limit of the integer datatype from all databases.
- Create a SSIS package that has:
- Execute SQL Task to populate a list of identity columns reaching the maximum allowed limit and store them in a table.
- Data Flow Task to create an Excel report from the table created by the above task.
- Execute SQL Task to email the Excel report.
- Test the package.
SQL Script to Find Identity Values Reaching the Maximum Value
I created a SQL script which will populate the list of identity columns from all databases. I used the below DMVs to get the data:
- sys.tables
- sys.identity_columns
The script will create a table to save the list of identity columns. Later, the table will be used by the SSIS package to generate the report. The following code will create the table.
USE DemoDatabase
GO
CREATE TABLE DataType_Max_Limit_Report
(
   databaseName varchar(350),
   TableName varchar(500),
   ColumnName varchar(500),
   IdentityValue bigint,
   Percent_Occupied numeric(3,2)
)
GO
The script will iterate through all databases with the identity column information and create two temporary tables. One table is #UserDatabases, to store all user databases and another table is #IdentityColumns, to store the list of identity columns that have integer data types. The following code will create the tables.
IF EXISTS (SELECT name FROM tempdb.sys.tables WHERE name = '#UserDatabases')
   DROP TABLE #UserDatabases
CREATE TABLE #UserDatabases (
   databaseName varchar(max)
)

IF EXISTS (SELECT name FROM tempdb.sys.tables WHERE name = '#IdentityColumns')
   DROP TABLE #IdentityColumns
CREATE TABLE #IdentityColumns (
   Id int identity (1,1),
   databaseName varchar(350),
   TableName varchar(max),
   ColumnName varchar(max),
   IdentityValue bigint,
   percent_occupied numeric(3,2)
)

INSERT INTO #UserDatabases
SELECT name
FROM sys.databases
WHERE database_id > 4
Create a dynamic SQL query, which will iterate through all the databases and populate the identity columns that have an integer datatype and insert them into the #IdentityColumns table.
SET @DBCount = (SELECT COUNT(*) FROM #UserDatabases)

WHILE (@DBCount>@LoopCount)
BEGIN
   SELECT TOP 1
      @DBName = databaseName
   FROM #UserDatabases

   /*Generate command to iterate SQL query accross all the databases*/
   SET @SQLCommand = '
     insert into #IdentityColumns select ''' + @DBName + ''',b.name,a.name, convert(bigint,last_value)
     from '+ @DBNAme + '.Sys.identity_columns a inner join
     '+ @DBNAme + '.sys.tables b  on a.object_id=b.object_id  where a.system_type_id !=127'
EXEC sp_executesql @SQLCommand
   DELETE FROM #UserDatabases
   WHERE databaseName = @DBName
   SET @LoopCount = @LoopCount + 1
   EXEC @SQLCommand
END
To calculate the percentage of the values, the script will store the maximum allowed limit of the integer datatype in a local variable @MaxLimitValue. Then it will calculate the percentage occupied by the identity column based on @MaxLimitValue and insert the data from #IdentityColumns to Datatype_Max_Limit_Report table where the identity value is more than 95% of the total limit for the integer datatype.
Declare @MaxLimitValue bigint
Set @MaxLimitValue=(select power(cast(2 as varchar),(32) -1) from sys.types where name in (‘INT’))
Insert into DataType_Max_Limit_Report (databaseName,TableName,ColumnName,IdentityValue,Percent_Occupied)
SELECT  databaseName,TableName,ColumnName,IdentityValue, Convert(bigint,IdentityValue)*100/ @MaxLimitValue  FROM #IdentityColumns where Convert(bigint,IdentityValue)*100/ @MaxLimitValue>95
drop table #IdentityColumns
drop table #UserDatabases
The entire script is below.
IF EXISTS (SELECT name FROM sys.tables WHERE name ='DataType_Max_Limit_Report')
   DROP TABLE DataType_Max_Limit_Report
CREATE TABLE DataType_Max_Limit_Report
(
   databaseName varchar(350),
   TableName varchar(500),
   ColumnName varchar(500),
   IdentityValue bigint,
   Percent_Occupied float
)
DECLARE @DBCount int
DECLARE @DBName varchar(500)
DECLARE @LoopCount int =0
DECLARE @SQLCommand nvarchar(max)
DECLARE @MaxLimitValue bigint

IF OBJECT_ID('tempdb..#UserDatabases') IS NOT NULL
   DROP TABLE #UserDatabases
CREATE TABLE #UserDatabases
(
   databaseName varchar(max)
)

IF OBJECT_ID('tempdb..#IdentityColumns') IS NOT NULL
   DROP TABLE #IdentityColumns
CREATE TABLE #IdentityColumns
(
   Id bigint identity (1,1),
   databaseName varchar(350),
   TableName varchar(max),
   ColumnName varchar(max),
   IdentityValue bigint,percent_occupied float
)

/*Gather list of user databases*/
INSERT INTO #UserDatabases
SELECT name FROM sys.databases Where database_id > 4

SET @DBCount = (SELECT COUNT(*) FROM #UserDatabases)

WHILE (@DBCount>@LoopCount)
BEGIN
   SELECT TOP 1 @DBName = databaseName FROM #UserDatabases

   /*Generate command to itarate SQL query accross all the databases*/
   SET @SQLCommand = '
     insert into #IdentityColumns (databaseName,TableName,ColumnName,IdentityValue) select
     ''' + @DBName + ''' AS ''Database Name'',
     b.name as ''Table Name'',
     a.name as ''Column'',
     convert(bigint,last_value) as ''Current Identity Value''
     from '+ @DBNAme + '.sys.identity_columns a inner join
     '+ @DBNAme + '.sys.tables b  on a.object_id=b.object_id  where a.system_type_id !=127'

   EXEC sp_executesql @SQLCommand
   --Print @SQLCommand
   DELETE
   FROM #UserDatabases
   WHERE databaseName = @DBName

   SET @LoopCount = @LoopCount + 1
END
SET @MaxLimitValue=(select Power(cast(2 as varchar),(32) -1) from sys.types where name in ('INT'))
INSERT INTO DataType_Max_Limit_Report (databaseName, TableName, ColumnName, IdentityValue, Percent_Occupied)
SELECT databaseName,
   TableName,
   ColumnName,
   IdentityValue,
   Convert(bigint,IdentityValue)*100/ @MaxLimitValue
FROM #IdentityColumns where Convert(bigint,IdentityValue)*100/ @MaxLimitValue > 95
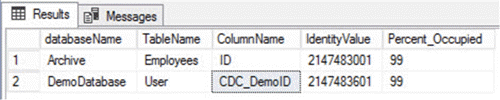
The SQL script output will look like the below screenshot.
Create SSIS package with File System Task, Data Flow Task and Execute SQL Task
For this demo, I am using SQL Server Data Tools 2015. First, I will create a new Integration Services project, the project name is “Identity_Column_Report”.
Create File System Task
Integration Services has one component called File System Task, which is used to perform file level operation like cut, copy and paste. As mentioned above, I am going to save the identity columns in an Excel file. I will create an empty Excel file that will be used to write the output and when the package runs it will copy the empty Excel from ‘E:\ExcelFile’ location to ‘E:\Files’ location. I created an Excel file named IdentityColumns_Report.xls and copied this to both locations.
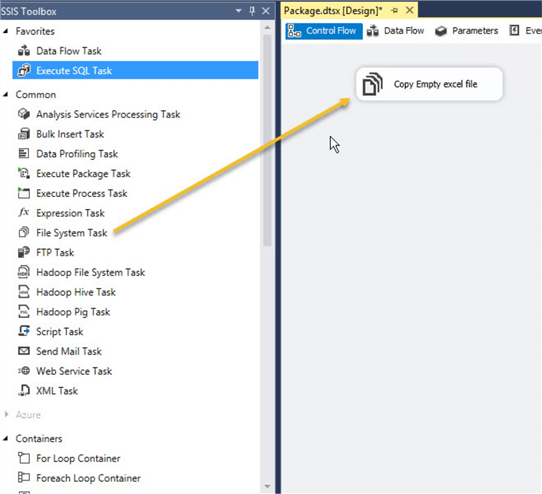
To accomplish this task, first drag and drop the File System Task to the Control Flow section and rename it to ‘Copy Empty Excel file’ as shown in the below image.
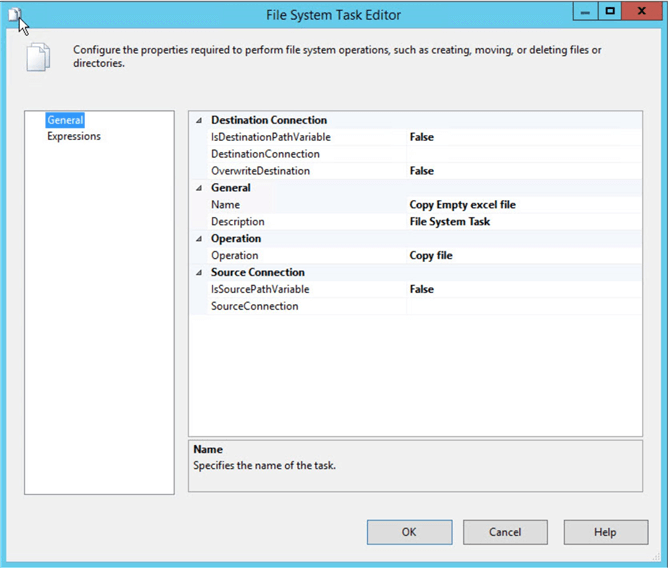
Secondly, I will have to configure the source and destination location in file system task. To do that, double click on ‘Copy empty Excel file’ and a dialog box ‘File System Task Editor’ will open as shown in the below image.
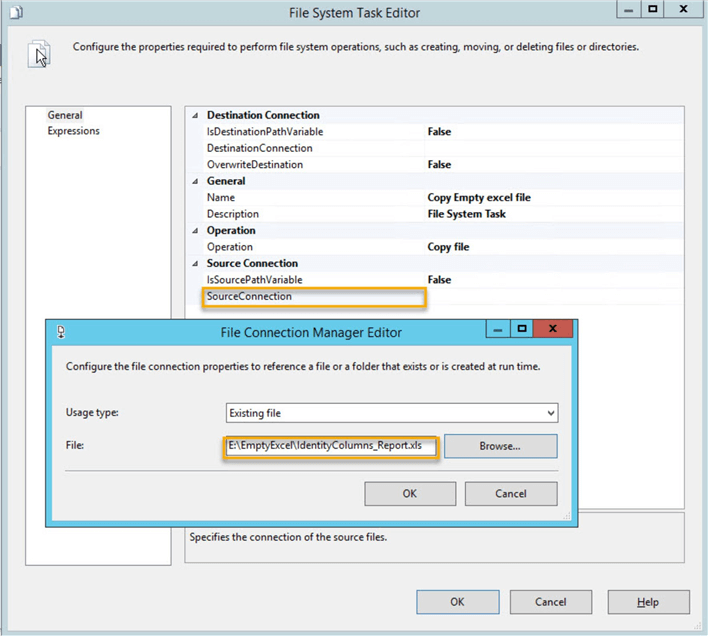
I will provide the source directory where the empty Excel file is located. To do that, double click on the SourceConnection drop down of file system task editor and click on <New Connection>. A dialog box, File Connection Manager Editor will open. Provide the path of the empty Excel file and click OK as shown in the below image
I will provide destination directory where the empty Excel file is located. To do that, double click on the DestinationConnection drop down of file system task editor and click on <New Connection>. A dialog box, File Connection Manager Editor will open. In that provide the path of the empty Excel file and click OK as shown in the below image

As I mentioned above, I will replace the empty Excel file with existing file which has data, I will set the OverwriteDestination as True. This option allows me to overwrite the existing file. To do that, click on the OverwriteDestination drop down box and select True as shown in the below image.

Execute SQL Task to populate the Identity Columns
After configuring the file system task, I will have to run the SQL script which I had created to populate the identity columns reaching the maximum allowed limit for the integer datatype.
Integration Services has a component called Execute SQL Task, which is used to execute any custom script in the SSIS package. I want to execute the script as explained above. To add the SQL task, drag and drop it from the SSIS toolbox into the control flow section. Rename it to Populate Identity Columns as shown in the below image.

After adding the SQL task, configure the connection manager to execute the script on the specific database. To do that, double click on Populate Identity Column and a dialog box will open as shown in the below image.
Now click on New and another dialog box will open to configure the connection properties, see the below image.

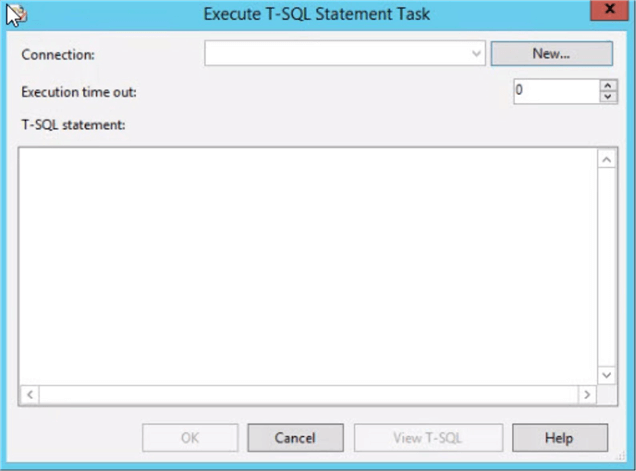
After creating the connection, copy and paste the created T-SQL statement as follows.

The SQL task will populate the identity columns details from all databases and store it to a table.
Create Data Flow Task
Drag a Data Flow Task to the Control Flow and rename it Generate Excel report. Double click the Generate Excel report task and add a “ADO NET Source” and “Excel Destination” as shown in the below image.

Double click “ADO NET Source” to configure the connection. A dialog box “ADO.NET Source Editor” will open, click on New as shown in the below image.

After clicking on New, another dialog box will open, where you can configure the ADO.NET connection. In the dialog box select the name of database server instance where the table has been created. Configure the appropriate authentication type. Lastly, select the database where the table has been created. In this demo, I am connecting to my local machine, so that server name will be the name of the database server. The authentication type will be Windows Authentication and the database will be the demo database. After adding the details, click OK.

To fetch data from a table, select Table and view as Data access mode and select the name of the table from the drop down as shown in the below image.

For the destination, I am going to use an Excel file. I have already added an Excel destination manager from the SSIS toolbox. Double click on the Excel destination manager. A dialog box Excel Destination Editor will open, click on New as shown in the below image.

When you click on New, a dialog box will open as shown in the below image. Enter the path of Excel file where the data from table will be stored. Browse to the path and click OK. I have already created an Excel file “IdentityColumns_Report.xls” which will be used for this demo.

Now the Excel destination manager will look like the below image. The Data access mode will be Table and view. We did not give any name to worksheet in the Excel file, so the default name of Sheet1$ will be used. Now click OK.

Once the Excel destination manager configuration is complete, we need to map the columns. To do that drag the blue data path arrow from the ADO.NET Source (SQL Source) to the Excel Destination (Excel Destination) as shown in the below image.

Now, I will map the table columns with Excel worksheet columns. To do that click on Mappings in the left pane of the Excel Destination editor dialogue as shown in the below image.
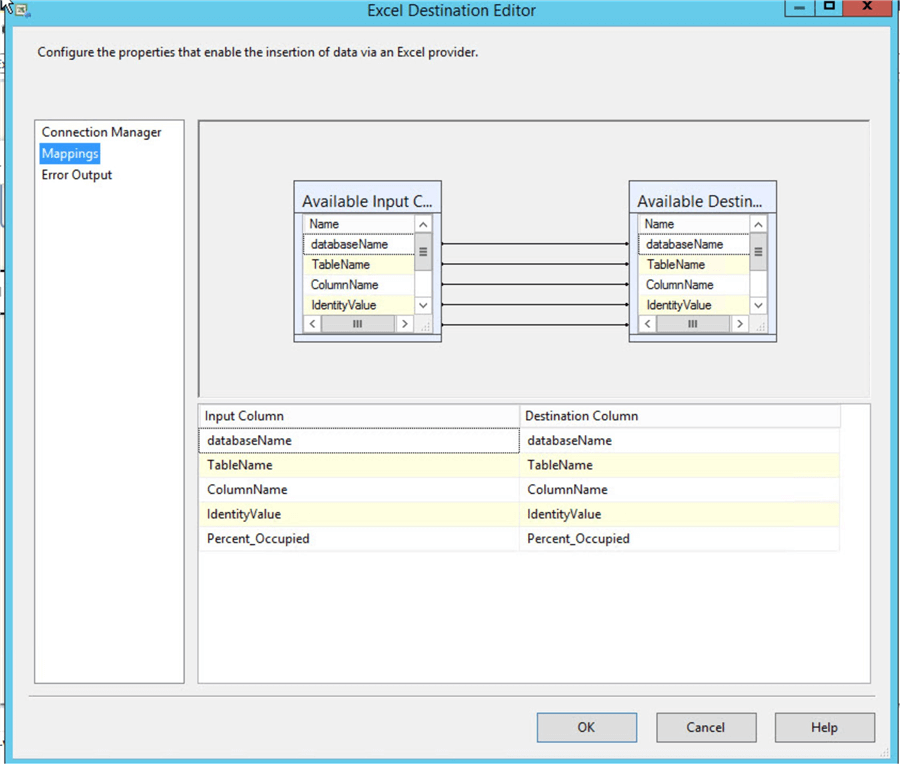
Here, the input column is the column name of SQL table as well as destination column in the Excel worksheet. In this demo, the column names of SQL table and Excel file are same, so the Excel destination editor will automatically map the input and output columns.
Execute SQL Task to send report in Excel
Now I will add another Execute SQL Task to send the Excel file via database mail. You can refer to the example above of how to configure the SQL Task.
Now this report should be sent to DBA or other concerned persons. I have already created a SQL Mail account and SQL Mail profile in my local computer. I have created a script, which will send the Excel report to the specified recipients. To configure SQL Mail account and profile please refer this article. I have configured an email account using Microsoft outlook SMTP settings. To configure that, please see this article.
Tithe below script will send the Excel report using SQL database mail.
declare @file as nvarchar(max) elect @file = 'E:\Files\IdentityColumns_Report.xls'
DECLARE @s VARCHAR(200)
SET @s = 'SQL Report - Identity Columns reaching maximum allowed limit of integer data type'

EXEC msdb.dbo.sp_send_dbmail
    @profile_name = 'DBASupport',
    @recipients = 'xyz@outlook.com',
    @subject = @s,
    @file_attachments=  @file
END
SSIS Package Testing
Now, connect all four components with each other to execute in sequence as shown below.

Once execution is complete, the concerned person will receive the email with an Excel report as shown below.

Summary
Follow this process to build your own process to report on identity column issues.
Next Steps
- How to create Execute SQL Task, Data Flow Tasks.
- Read: Monitor Identity column values to prevent arithmetic overflow error.

Nisarg Upadhyay is a SQL Server Database Administrator and Microsoft certified professional who has more than 5 years of experience with SQL Server and 2 years with Oracle 10g including: database design, performance tuning, backup and recovery, HA and DR setup, database migrations and upgrades. He has completed the Bachelors in Information Technology from Ganpat University. When Nisarg is away from computers, he loves travelling, reading books and watching Sci-Fi movies.
- MSSQLTips Awards: Rookie of the Year Contender – 2018
The script runs well on most instances in our environment but failed when we had oddly named databases.
The solution what to quotename the database name. The old code was:
insert into #IdentityColumns
select ”’ + @DBName + ”’,b.name,a.name, convert(bigint,last_value)
from ‘+ @DBNAme + ‘.Sys.identity_columns a inner join
‘+ @DBNAme + ‘.sys.tables b on a.object_id=b.object_id where a.system_type_id !=127′
The new code is:
insert into #IdentityColumns
select ”’ + quotename(@DBName) + ”’,b.name,a.name, convert(bigint,last_value)
from ‘+ quotename(@DBName) + ‘.Sys.identity_columns a inner join
‘+ quotename(@DBName) + ‘.sys.tables b on a.object_id=b.object_id where a.system_type_id !=127’