By: John Martin | Comments (7) | Related: > Azure
Problem
Do you have databases that would be a perfect fit for Azure SQL Database, except for the fact that there are a few SQL Server Agent Jobs that you use with these databases? This has traditionally meant that you would either have to fallback to running SQL Server in an Azure VM or move all your jobs to Azure Automation.
Solution
This is where the new Azure Elastic Database Jobs comes in, acting as if it is the Azure SQL Agent albeit with a few limitations. Here we will look at how to get Elastic Database Jobs setup in your Azure subscription and what the boundaries are.
What are Azure Elastic Database Jobs?
Elastic Database Jobs are the replacement for Elastic Jobs that have been available in Azure for some time. This incarnation of the service is more streamlined and easier to setup and use for managing scheduled activity within the jobs we create.
At the highest level the resources required for this are the Job Agent and an Azure SQL Database at S0 or above. The Job Agent will then read the data for the jobs in the database and use this to execute them against the target databases. The targets for Elastic Database Jobs can be singleton Azure SQL Databases, Elastic Pools, Azure SQL Servers (PaaS), Shard Map, or manually maintained custom groups. In the case of specifying an Elastic Pool, Azure SQL Server, or Shard Map these will be enumerated to identify all databases present and then allow for job execution to occur. It is also possible to provide a list of exclusions on which you do not want to run Elastic Database Jobs where an Azure SQL Server or Elastic Pool has been specified.
Setting Up Elastic Database Jobs
Prerequisites
While it is possible to create the various components as we go when setting up Elastic Database Jobs, I am a firm believer in doing some work up-front to ensure naming and placement of services. As such, we need to create the following items:
- Resource Group
- Azure SQL Server
- Azure SQL Database (Standard – S0)
- When creating Azure SQL Database resources there are now two different scale measures. The traditional DTU system with Basic, Standard, and Premium tiers, then the new vCore based on General Purpose and Business Critical tiers. At the time of writing, it is not yet possible to make use of the vCore model.
Create Prerequisites – Azure CLI
az group create --name "eus-mssqltips-jobs-rg" --location "East US"
az sql server create --name "eus-mssqltips-sql-01" --location "East US" --resource-group "eus-mssqltips-jobs-rg" --admin-user john --admin-password "[Your Really Strong Password]"
az sql db create --name "eus-mssqltips-sqldb-01" --resource-group "eus-mssqltips-jobs-rg" --server "eus-mssqltips-sql-01" --edition "Standard" --service-objective "S0"
az sql server firewall-rule create –-name “Firewall Rule” –-start-ip-address 1.1.1.1 –-end-ip-address 1.1.1.1 --resource-group "eus-mssqltips-jobs-rg" --server "eus-mssqltips-sql-01"
AZ sql server firewall-rule create –-name “Allow Azure” –-start-ip-address 0.0.0.0 –-end-ip-address 0.0.0.0 --resource-group "eus-mssqltips-jobs-rg" --server "eus-mssqltips-sql-01"
Create Prerequisites – PowerShell
$ServerArguments = @{
    ServerName = "eus-mssqltips-sql-01"
    Location = "East US"
    ResourceGroupName = "eus-mssqltips-jobs-rg"
    SqlAdministratorCredentials = (Get-Credential)
}
$AzSqlServer = New-AzureRmSqlServer @ServerArguments

# Set a firewall rule to let in the IP address for the system I am using.
# Ref: https://gallery.technet.microsoft.com/scriptcenter/Get-ExternalPublic-IP-c1b601bb
$ip = Invoke-RestMethod http://ipinfo.io/json | SELECT -exp ip
$PublicIPFirewallRule = @{
    FirewallRuleName = "Firewall Rule Name"
    StartIpAddress = $ip
    EndIpAddress = $ip
    ServerName = $AzSqlServer.ServerName
    ResourceGroupName = $AzSqlServer.ResourceGroupName
}
New-AzureRmSqlServerFirewallRule @PublicIPFirewallRule

# Set a firewall rule to allow Azure Resource access, needed for bacpac deployment.
$AllowAzureFirewallRule = @{
    ResourceGroupName = $AzSqlServer.ResourceGroupName
    ServerName = $AzSqlServer.ServerName
    AllowAllAzureIPs = $true
}
New-AzureRmSqlServerFirewallRule @AllowAzureFirewallRule

$DBArguments = @{
    DatabaseName = "eus-mssqltips-sqldb-01"
    ServerName = $AzSqlServer.ServerName
    ResourceGroupName = "eus-mssqltips-jobs-rg"
    Edition = "Standard"
    RequestedServiceObjectiveName = "S0"
    MaxSizeBytes = 2GB
}
New-AzureRmSqlDatabase @DBArguments
Now that we have created the prerequisites, we have all the components in place. The database that we created here will be used by the job agent as the repository for job control information, essentially the equivalent of MSDB for Elastic Database Jobs.
Create Job Agent
Once the prerequisite resources are in place we can now create the Elastic Database Job Agent. This can be done via PowerShell or via the Azure Portal. At the time of writing this service is still in preview and requires a different version of the AzureRM PowerShell Module, as such we will perform this action via the portal.
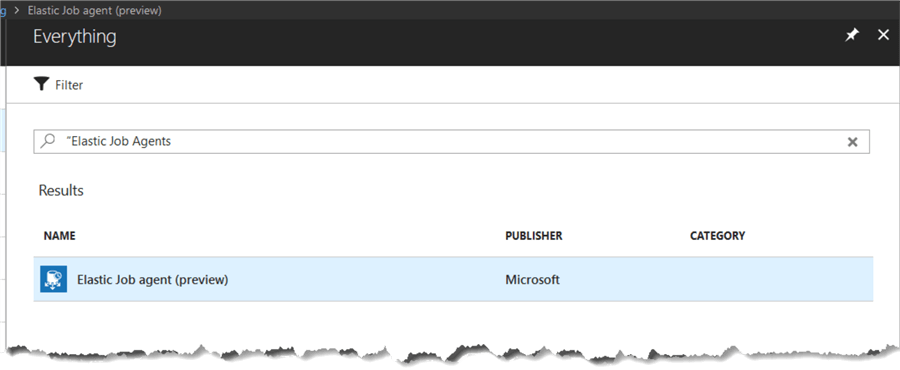
Click on “Create a resource” and then search for “Elastic Job Agents”, then click on the Elastic Job agent row that is returned. Then click on the “Create” button in the blade that appears.

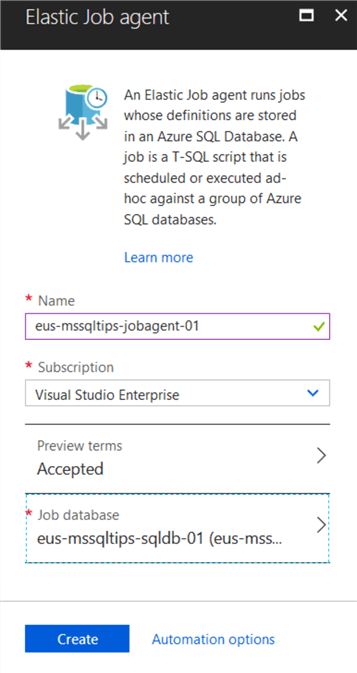
Now in the “Elastic Job Agent” blade, enter the required data by providing a name and then selecting the database that we created in the prerequisites section. Once this has been filled in then click the “Create” button at the bottom of the blade.

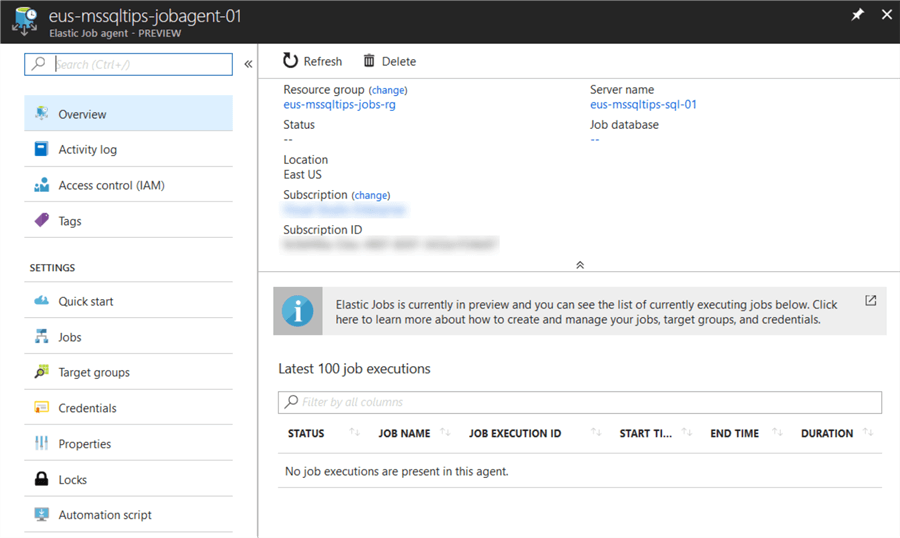
Once the resource has been created then select it and review the resource blade to review the details for our new Elastic Job Agent.

Elastic Database Job Security
Elastic Database Jobs connect to Azure SQL Databases via Database Scoped Credentials. These need to be created in the Job Database and then the associated logins in the Master database on the Azure SQL Servers that host the databases that we will be executing jobs against. Once the logins are created users need to be created in the target Azure SQL Databases so that jobs can execute. It is important that when the users are created that they have the permissions needed for the jobs to perform the actions that we are going to be performing.
More details on the prerequisites for using Database Scoped Credentials can be found here.
Security Recommendations
Given that the job database will contain credentials that can potentially connect to many Azure SQL Databases it is vital that access to this resource is limited to those that need it. While credential details are encrypted, if a user has access to the job database with high enough privileges then they can create jobs that can execute code on all the databases that have been configured for access.
There are two parts to the way in which Elastic Database Jobs use these credentials, one is needed to enumerate the collection when a group is created (find databases in a server/pool/shard map). And one that is used for the execution of the jobs.
I have always been an advocate for using Credentials and Proxies with SQL Server Agent Jobs in SQL Server. I would strongly recommend a similar approach to compartmentalize security as much as possible. Create multiple logins/users and credentials and then use them as needed. This could range from one per-job or allow for re-use over multiple jobs. There needs to be a balance of administrative overhead vs. security. It is important to remember that there is no one-size fits all approach and requirements will differ between implementations.
Create Database Scoped Credentials
There will need to be a minimum of one Database Scoped Credential created to execute Elastic Database Jobs however, I would strongly recommend multiple credentials. For this example, I will create one credential that will be used at the group level to enumerate the databases and another that will be specified for job execution.
Target Enumeration Credential
First, we need to create a credential that can be used to enumerate the databases that we want to target. This needs to be created in the Job Agent Database. The username and password used here will need to be used when creating the appropriate login and user on a target Azure SQL Server.
--// Check to see if we have a Database Master key, if not then create one.
IF NOT EXISTS(SELECT sk.[name] FROM sys.symmetric_keys AS sk)
BEGIN
   CREATE MASTER KEY ENCRYPTION BY PASSWORD = N'ReallyStrongPassword!';
END
--// Create Database Scoped Credential for group enumeration
CREATE DATABASE SCOPED CREDENTIAL [GroupRefreshCredential]
   WITH
      IDENTITY = GroupRefreshCredential,
      SECRET = 'StrongLoginPassword'
;
GO
Job Execution Credential
Now we need to create a credential that we will specify for the job steps which we will create later, to use when executed. Again, we need to create this in the Job Agent Database.
--// Create Database Scoped Credential for Job execution
CREATE DATABASE SCOPED CREDENTIAL [JobExecCredential01]
   WITH
      IDENTITY = JobExecCredential01,
      SECRET = 'StrongLoginPassword'
;
GO
Creating Jobs
Once we have our Elastic Database Job system setup and configured we now need to create the groups and jobs that we want to perform actions on targets with. For this example, I have created two Azure SQL Servers and deployed sample databases to them.
Prerequisites – Target Database Logins
Before we can start creating the jobs, we need to ensure that we have created the logins and users in the target databases so that our jobs can connect and execute their actions.
Create login and user in Master on the Azure SQL Database Server for the enumeration account.
CREATE LOGIN [GroupRefreshCredential]
   WITH
      PASSWORD = N'ReallyStrongPassword!'
;
GO

CREATE LOGIN [GroupRefreshCredential]
   FOR LOGIN [GroupRefreshCredential];
GO
Create login in Master for job execution account.
CREATE LOGIN [JobExecCredential01]
   WITH
      PASSWORD = N'ReallyStrongPassword!'
;
GO
Create Logins in each Azure SQL Database on the Azure SQL Database Server, (execute in each database). Because I am going to create a job that will rebuild indexes I will place this user in the db_ddladmin database role. The security permissions of your login will depend on what your intentions are for the jobs, it is recommended that you use the principal of least privilege when assigning permissions.
CREATE LOGIN [JobExecCredential01]
   FOR LOGIN [JobExecCredential01];
GO

ALTER ROLE db_ddladmin
   ADD MEMBER [JobExecCredential01];
GO

GRANT VIEW DATABASE STATE TO JobExecCredential01;
GO
Create Target Group and Add Server
Before we can create jobs, we need to create a group that we will target with the job(s). Here I will be configuring the group to so that it contains one of the servers that I have in my sample environment. This will result in all the databases being selected for our jobs to execute against.
DECLARE @TargetGroupName NVARCHAR(128) = N'Index Maintenance Group'

EXEC jobs.sp_add_target_group @target_group_name = @TargetGroupName;

DECLARE @MembershipType NVARCHAR(50) = N'Include'
DECLARE @TargetType NVARCHAR(50) = N'SqlServer'
DECLARE @RefreshCredName NVARCHAR(128) = N'GroupRefreshCredential'
DECLARE @ServerName NVARCHAR(128) = N'eus-mssqltips-sql-91.database.windows.net'

EXEC jobs.sp_add_target_group_member @target_group_name = @TargetGroupName,
                                     @membership_type = @MembershipType,
                                     @target_type = @TargetType,
                                     @refresh_credential_name = @RefreshCredName,
                                     @server_name = @ServerName
;
GO

SELECT tgm.target_group_name,
   tgm.membership_type,
   tgm.target_type,
   tgm.server_name,
   tgm.refresh_credential_name
FROM Jobs.target_group_members AS tgm
;
Create Job
In much the same way that we use SQL Server Agent, the Elastic Database Jobs hierarchy is based around having a job which then has job steps. Compared to the options available to us in SQL Server Agent, Elastic Database Jobs are focused on the execution of T-SQL only. Additionally, there is no ability to branch to different job steps based on the success/failure/completion of steps. As such, the jobs which we create will simply follow the chronological order of the steps in which we add them. Presently there is no facility to re-order job steps, whether this will change I do not know.
In the example below, I am using a very simplistic example that will find some indexes to rebuild. This should not be considered a recommendation on how to perform index maintenance with Elastic Database Jobs, merely an example of what is possible.
--// Create a job that will run once a day.
DECLARE @JobName NVARCHAR(128) = N'Index Maintenance Job'
DECLARE @JobDescription NVARCHAR(512) = N' Daily job to rebuild indexes as needed.'
DECLARE @Enabled BIT = 1
DECLARE @ScheduleIntercalType NVARCHAR(50) = N'Days'
DECLARE @ScheduleIntervalCount INT = 1
DECLARE @ScheduleStart DATETIME2 = N'20180817 22:00:00'

--// Create Job
EXEC jobs.sp_add_job @job_name = @JobName,
                     @description = @JobDescription,
                     @enabled = @Enabled,
                     @schedule_interval_type = @ScheduleIntercalType,
                     @schedule_interval_count = @ScheduleIntervalCount,
                @schedule_start_time = @ScheduleStart
;

DECLARE @JobStepName NVARCHAR(128) = N'Rebuild Indexes'
DECLARE @Command NVARCHAR(MAX) = N'DECLARE @Indexes TABLE
   (
      ObjectSchema SYSNAME,
      ObjectName SYSNAME,
      IndexName SYSNAME,
      FragmentationPCT FLOAT,
      Command AS (REPLACE(REPLACE(REPLACE(N''ALTER INDEX {IndexName} ON {ObjectSchema}.{ObjectName} REBUILD;'',N''{IndexName}'',IndexName),N''{ObjectSchema}'',ObjectSchema),N''{ObjectName}'',ObjectName))
   )
;
INSERT INTO @Indexes
(
    ObjectSchema,
    ObjectName,
    IndexName,
    FragmentationPCT
)
SELECT QUOTENAME(SCHEMA_NAME(SO.schema_id)) AS ObjectSchema,
   QUOTENAME(SO.name) AS ObjectName,
   QUOTENAME(I.name) AS IndexName,
   IPS.avg_fragmentation_in_percent
FROM sys.dm_db_index_physical_stats(DB_ID(),NULL,NULL,NULL,N''Limited'') AS IPS
JOIN sys.objects AS SO ON SO.object_id = IPS.object_id
JOIN sys.indexes AS I ON I.index_id = IPS.index_id
   AND I.object_id = IPS.object_id
WHERE IPS.avg_fragmentation_in_percent > 15
ORDER BY IPS.avg_fragmentation_in_percent DESC
;

DECLARE @TsqlCommand NVARCHAR(MAX);

DECLARE IndexRebuilder CURSOR LOCAL FAST_FORWARD
   FOR
   SELECT I.Command
   FROM @Indexes AS I
;

OPEN IndexRebuilder

   FETCH NEXT FROM IndexRebuilder
   INTO @TsqlCommand
   ;

   WHILE @@FETCH_STATUS = 0
   BEGIN

      EXEC sp_executesql @Command = @TsqlCommand;

      FETCH NEXT FROM IndexRebuilder
      INTO @TsqlCommand
      ;

   END

CLOSE IndexRebuilder
DEALLOCATE IndexRebuilder
;
'
DECLARE @CredentialName NVARCHAR(128) = N'JobExecCredential01'
DECLARE @TargetGroupName NVARCHAR(128) = N'Index Maintenance Group'
DECLARE @Parallelism INT = 3
--// Create Job Step
EXEC jobs.sp_add_jobstep @job_name = @JobName,
                         @step_name = @JobStepName,
                         @command = @Command,
                         @credential_name = @CredentialName,
                         @target_group_name = @TargetGroupName,
                         @max_parallelism = @Parallelism
;

--// Show job step information
SELECT JS.job_name,
       JS.job_id,
       JS.job_version,
       JS.step_id,
       JS.step_name,
       JS.command_type,
       JS.command_source,
       JS.command,
       JS.credential_name,
       JS.target_group_name,
       JS.target_group_id,
       JS.initial_retry_interval_seconds,
       JS.maximum_retry_interval_seconds,
       JS.retry_interval_backoff_multiplier,
       JS.retry_attempts,
       JS.step_timeout_seconds,
       JS.max_parallelism
FROM jobs.jobsteps AS JS
This has now created a job and job step that will run daily at 22:00, you will also notice that in the table that is returned for the job step there are options around retry logic. These are set to the defaults however, you can specify these at job creation if you want to customize these values.
Now it is just a case of waiting for the job to execute. However, if you would like to start the job manually then you can achieve that by using the following command:
EXEC jobs.sp_start_job @job_name = N'Index Maintenance Job'
All the job execution history gets stored in the job database for a default of 45 days. We can view this history by querying the database view using the following query:
SELECT [job_execution_id],
       [job_name],
       [job_id],
       [job_version],
       [step_name],
       [step_id],
       [is_active],
       [lifecycle],
       [create_time],
       [start_time],
       [end_time],
       [current_attempts],
       [current_attempt_start_time],
       [next_attempt_start_time],
       [last_message]
FROM [jobs].[job_executions];

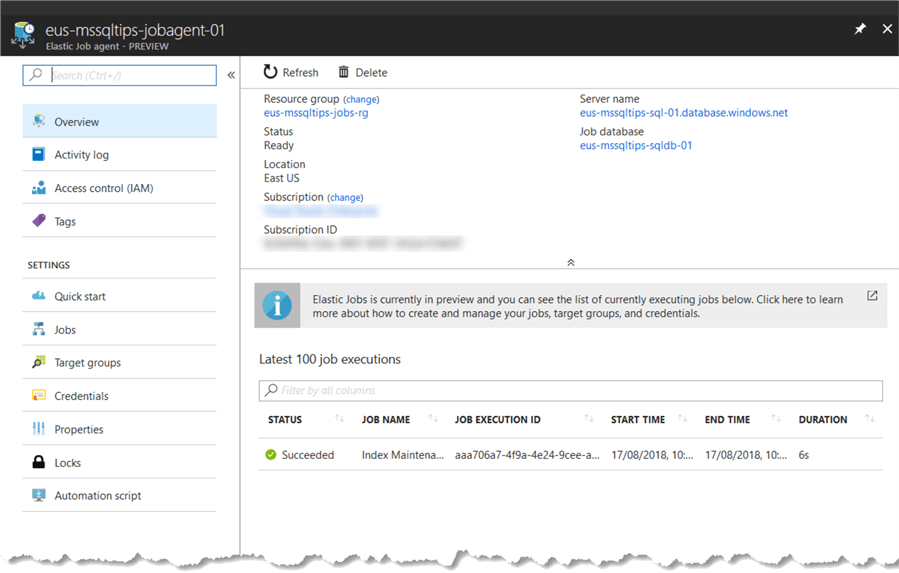
The Job history data is also visible in the Azure Portal for the Elastic Job Agent blade.

Summary
Here we have explored the new Elastic Database Jobs service in Azure, even while it is in preview it is still a big step up over the older Elastic Jobs service which it replaces. This service now gives us more options that are better integrated than Azure Automation or writing our own App Services frameworks for scheduling and running activity on Azure SQL Database.
We have touched on the essentials for getting up and running with Elastic Database Jobs, there are more advanced options including;
- Returning results from job steps and storing them in databases
- Controlling retry logic for jobs that fail
- Inclusion/Exclusion of databases/pools/servers/shard maps from job execution
Lack of effective job scheduling for activities such as maintenance operations has been one of the main blockers for migrating to Azure SQL Database. With Elastic Database Jobs this is another step in removing that barrier. As this service moves from preview to GA I think that it should solve a lot of the problems where scheduled activity we need.
Next Steps
- Adding Users to Azure SQL Databases
- How to use Azure SQL Database features and settings
- How to use the Azure SQL Database DTU Calculator
- Learn how to Migrate a SQL Server database to SQL Azure server
- Deploying Azure SQL Database Using Resource Manager PowerShell cmdlets
- SQL Azure Migration Wizard
- Guide to Getting Started with SQL Azure
- Long Term Storage for Azure SQL Database Backups
About the author
 John Martin is a Data Platform Engineer working in the financial sector as well as Director-at-Large for the PASS organisation and currently a Microsoft Data Platform MVP.
This author pledges the content of this article is based on professional experience and not AI generated.
View all my tips


