By: Ron L'Esteve | Comments | Related: > Azure Databricks
Problem
For ETL scenarios where the schema of the data is constantly evolving, we may be seeking a method for accommodating these schema changes through schema evolution features available in Azure Databricks. What are some of the features of schema evolution that are available in Azure Databricks and how can we get started with building notebooks and writing code that can accommodate evolving schemas?
Solution
Since every data frame in Apache Spark contains a schema, when it is written to a Delta Lake in delta format, the schema is saved in JSON format in the transaction logs. This allows for a few neat capabilities and features such as schema validation, to ensure quality data by rejecting writes to a table that do not match the table's schema and schema evolution, which allows users to easily change a table's current schema to accommodate data that is may be changing over time. It is commonly used when performing an append or overwrite operation to automatically adapt the schema to include one or more new columns.
In this article, we will 1) explore schema evolution capabilities & limitations with regular parquet format, and 2) explore schema evolution features and capabilities through delta format with inserts, appends, and overwrites.
Schema Evolution Using Parquet Format
Before we explore the features of schema evolution with delta format, let's attempt to apply schema evolution to regular parquet files in Data Lake Storage Gen2 using the following example in which we will start by creating an Azure Databricks Python notebook with a Spark Cluster.
The following code will create a data frame containing two new columns along with sample values.
df1 = spark.createDataFrame(
    [
        (100,2019), # create your data here, be consistent in the types.
        (101,2019),
    ],
    ['newCol1', 'Year'] # add your columns label here
)

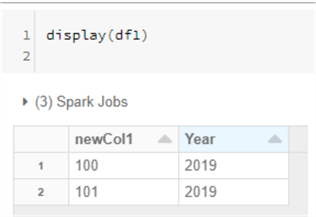
We can then run display() command to explore the structure and content of the data frame.
display(df1)
The next step would be to specify a parquet file path in our mounted Azure Data Lake Storage Gen2 account. A path could look similar to the following.
parquetpath = "abfss://[email protected]/raw/delta/schema_evolution/parquet"

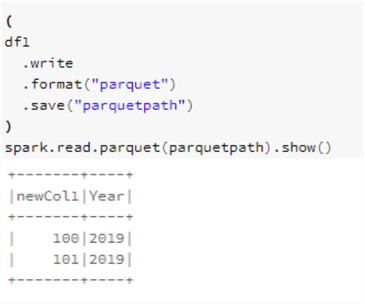
We can then write the data frame to the specified parquet path and show the contents of the parquet file by running the following code.
(
df1
  .write
  .format("parquet")
  .save("parquetpath")
)
spark.read.parquet(parquetpath).show()
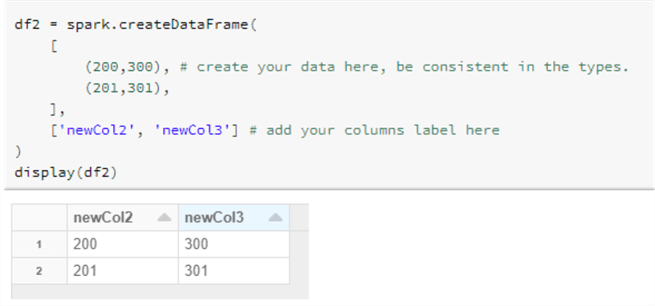
Next, let's try to append two new columns to our existing data by first creating a data frame containing the two new columns along with their values.
df2 = spark.createDataFrame(
    [
        (200,300), # create your data here, be consistent in the types.
        (201,301),
    ],
    ['newCol2', 'newCol3'] # add your columns label here
)
display(df2)
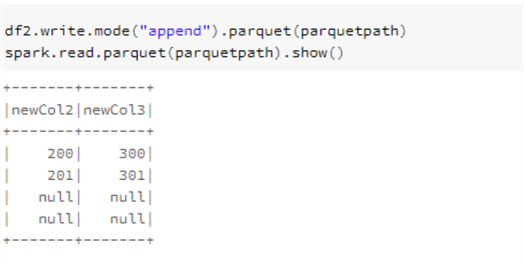
The following code is intended to append the new data frame containing the new columns to the existing parquet path.
However, from the results we can see that the new columns were created, however schema evolution was not accounted for since the old columns schema were overwritten despite the fact that we specified 'append' mode.
This is a fundamental limitation of regular parquet format files and schemas and as a result we will need to leverage Delta format for true schema evolution features.
df2.write.mode("append").parquet(parquetpath)
spark.read.parquet(parquetpath).show()
Schema Evolution Using Delta Format
Insert
Now that we have seen some of the limitations of schema evolution with the regular parquet file format, let's explore the capabilities of schema evolution with delta parquet format.
As we recall from the previous example, data frame 1 (df1) will create a data frame with two ne columns containing values.
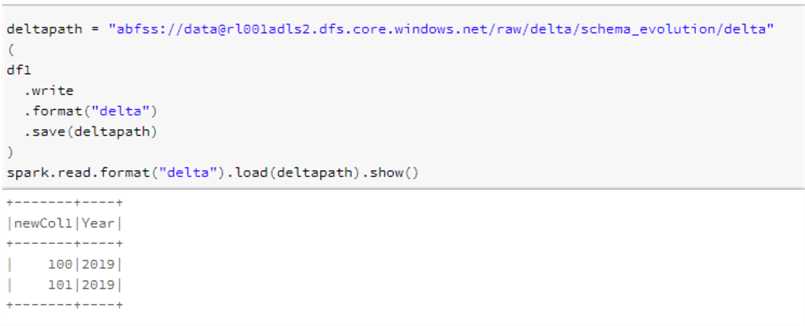
In this delta example, we will take the same df1 and write it to delta format in ADLS gen2 using the following code.
deltapath = "abfss://[email protected]/raw/delta/schema_evolution/delta"
(
df1
  .write
  .format("delta")
  .save(deltapath)
)
spark.read.format("delta").load(deltapath).show()
Append
Next, we can test the append features of delta lake along with the 'merge schema' option. Columns that are present in the DataFrame but missing from the table are automatically added as part of a write transaction when: write or writeStream have '.option("mergeSchema", "true")'. Additionally, this can be enabled at the entire Spark session level by using 'spark.databricks.delta.schema.autoMerge.enabled = True'. It is important to note that when both options are specified, the option from the DataFrameWrite takes precedence. Also, schema enforcement will no longer warn you about unintended schema mismatches when enabled.
Other important considerations to note are that mergeSchema is not supported when table access control is enabled (as it elevates a request that requires MODIFY to one that requires ALL PRIVILEGES) and mergeSchema cannot be used with INSERT INTO or .write.insertInto()
The following code will leverage the mergeSchema command and load to the delta path.
(
df2
  .write
  .format("delta")
  .mode("append")
  .option("mergeSchema", "true")
  .save(deltapath)
)
spark.read.format("delta").load(deltapath).show()
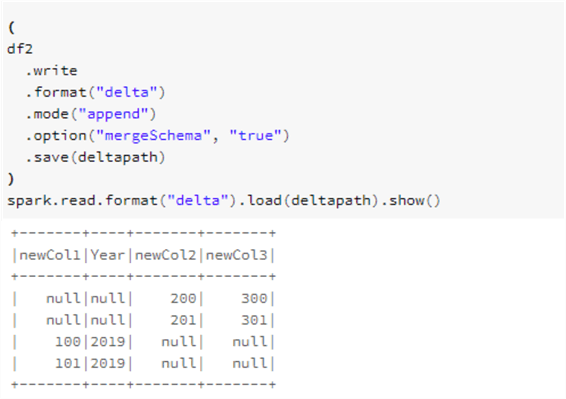
From the results above, we can see that the new columns were created. Additionally, the existing columns were preserved in the schema and filled with nulls when no values were specified, which demonstrates schema evolution.
Next, let's try to append a new file containing two of the four columns and we can begin the process by creating yet another data frame by using the code below.
df3 = spark.createDataFrame(
    [
        (102,302), # create your data here, be consistent in the types.
        (103,303),
    ],
    ['newCol1', 'newCol3'] # add your columns label here
)

We can then write the data frame to the delta format using append mode along with mergeSchema set to True.
(
df3
  .write
  .format("delta")
  .mode("append")
  .option("mergeSchema", "true")
  .save("abfss://[email protected]/raw/delta/schema_evolution/delta")
)
spark.read.format("delta").load(deltapath).show()
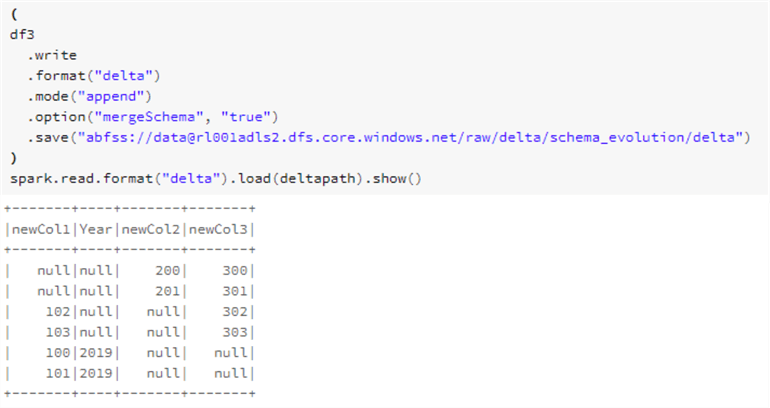
Again, from the results above, we can see that the new data was appended to the delta path and any missing columns and data were recorded as nulls.
Overwrite
This next example is intended to test the overwrite capabilities of delta formats when combined with mergeSchema = True by using the following code.
(
df3
  .write
  .format("delta")
  .mode("overwrite")
  .option("mergeSchema", "true")
  .save(deltapath)
)
spark.read.format("delta").load(deltapath).show()
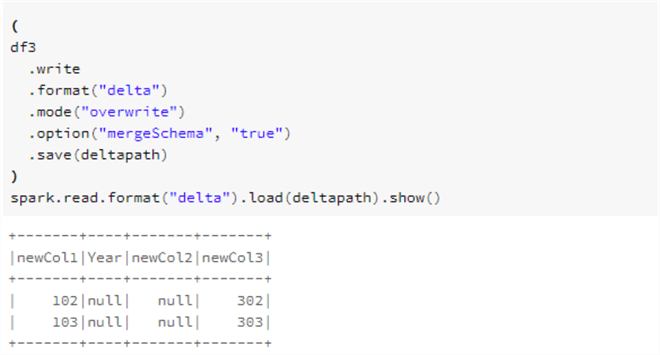
The results from above indicate that although the overwrite command worked and maintained the structure of the latest schema, it no longer displays any of the historical data and only shows the latest data frame that was written using overwrite mode combined with mergeSchema = True.
Seeing some of the flaws of the previous code, lets also test this next block of code which again uses delta format, however, this time we will use the overwriteSchema = True option combined with overwrite mode instead of mergeSchema.
OverwriteSchema will address some limitations of mergeSchema such as the need to account for changing data types on the same columns (eg: String to Integer). In this scenario all parquet data files would need to be written. OverwriteSchema can account for dropping a column, changing the existing column's datatype, and/or renaming columns names that only differ by case.
In the following code, we are using the overwrite mode in combination with the overwriteSchema=true option.
(
df3
  .write
  .format("delta")
  .option("overwriteSchema", "true")
  .mode("overwrite")
  .save(deltapath)
)
spark.read.format("delta").load(deltapath).show()
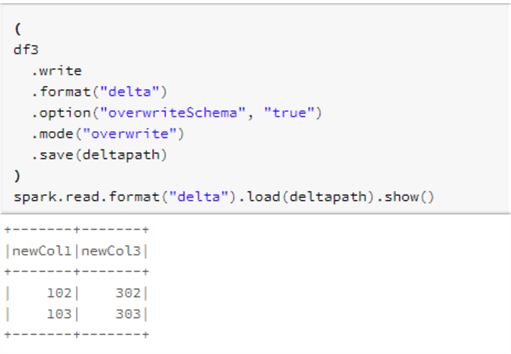
Based on the results above, we can see that in this scenario, the entire schema was overwritten so that the old schema is no longer being displayed and only the newly written data frame is being displayed.
Next Steps
- Read more about Schema drift in mapping data flow for alternative methods of handling schema evolution and drift in Azure Databricks.
- Read more about Diving Into Delta Lake: Schema Enforcement & Evolution
About the author
 Ron L'Esteve is a trusted information technology thought leader and professional Author residing in Illinois. He brings over 20 years of IT experience and is well-known for his impactful books and article publications on Data & AI Architecture, Engineering, and Cloud Leadership. Ron completed his Masterís in Business Administration and Finance from Loyola University in Chicago. Ron brings deep tec
This author pledges the content of this article is based on professional experience and not AI generated.
View all my tips


