Problem
Auto Loader is a Databricks-specific Spark resource that provides a data source called cloudFiles which is capable of advanced streaming capabilities. These capabilities include gracefully handling evolving streaming data schemas, tracking changing schemas through captured versions in ADLS gen2 schema folder locations, inferring schemas and/or defining schemas through schema hints. Auto Loader automatically creates an Event Grid subscription within a topic and there is an Azure limitation of 500 hundred subscriptions per topic. Since Auto Loader can be set up within Databricks by writing a few lines of code, how can we programmatically manage Auto Loader resources within a Databricks notebook?
Solution
Auto Loader automatically creates an Event Grid subscription and passes incoming files to a storage queue which is then read by a Databricks data frame via the cloudFiles source. The process of setting up Auto Loader involves running a few lines of code in a notebook after granting appropriate access to the necessary resources. Since there are numerous Azure Event Grid quotas and limits including 500 event subscriptions per topic, there are efficient methods of managing these subscriptions programmatically within a Databricks notebook to prevent some of these quotas and limits from being reached. In this article, you will learn about methods for managing Auto Loader resources. As a pre-requisite, ensure that you have created an Azure Data Lake Storage Account and container, loaded data into the container, created a Databricks Account, cluster and notebook, and ran the necessary Auto Loader cloudFiles scripts.

Read a Stream
Once you register Auto Loader, run the spark.readStream command with the cloudFiles source, while accounting for the cloudfile and Additional options. This will setup a data frame which will begin listening for streaming data within the defined ADLS gen2 folder path.

Here is the readStream code that you will need to run by pre-defining the cloudFiles options and storage location mount point.
df = (spark.readStream.format("cloudFiles")
      .options(**cloudfile)
      .options(**AdditionalOptions)
      .load("/mnt/raw/Customer_stream/"))
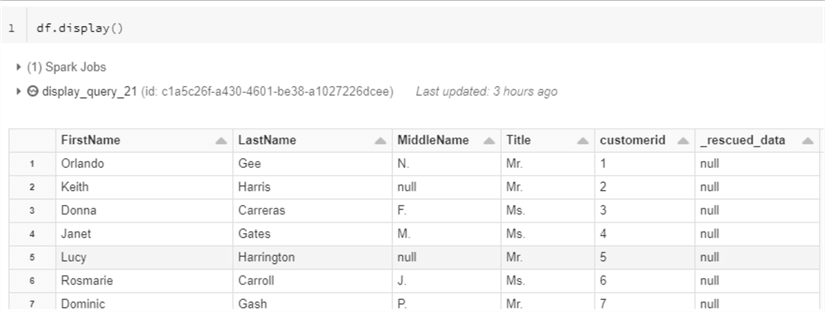
For the purpose of visualizing the data, run the following df.display() command to get an understanding of the structure of the data that is being streamed into the data frame.
Write a Stream
One of the advantages of Auto Loader is that you have the capability of writing the stream as Delta format. Note that Auto Loader is currently an append only output mode. The code listed in the figure below will append the incoming Auto Loader stream to the defined location in Delta format. Once the code is run, notice that is will generate an ID. This ID is the unique identifier of the writeStream query. Keep track of this ID which you will use to keep track of the Auto Loader resource management process along the way.

Here is the code that you will need to run to append the data stream in Delta format to the defined location.
StreamDf = (df.writeStream
.format("delta")
.trigger(once=True)
.outputMode("append")
.option("checkpointLocation", "/mnt/raw/Customer_stream/_checkpoint/")
.start("/mnt/raw/Customer_stream/data/")
           )
Once you read and write the streaming data into Delta format in ADLS gen2, you can begin to view and manage the Auto Loader resources programmatically.
Manage Auto Loader Resources
The following code will provide metrics about the streaming data frame. Please continue to note the unique ID of this particular query which we will continue to track through this process of managing auto loader resources.

As part of the Delta writeStream process, a metadata file will be created in the ADLS gen2 _checkpoint folder. This file will contain the id of the writeStream query that you ran in the notebook.
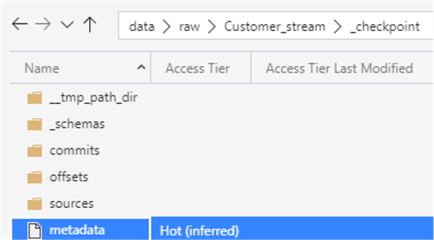
Upon opening the metadata file, notice that is contains the same query id that you have been tracking thus far from you define stream query.

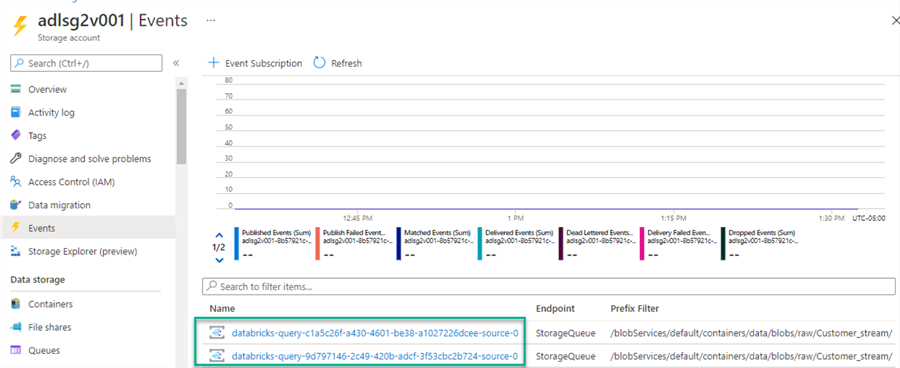
Additionally, notice that a new Event Grid Subscription has automatically been created by the Auto Loader resources within the ADLS gen2 storage account’s Event Grid Topic. Notice also how it includes the same stream ID and references the Customer_stream as the prefix filter.

By drilling into the Storage Queues, notice that the same query has been added to the queue.

Next, go ahead and create a new Scala Databricks notebook next so that you can begin working with the Auto Loader Resource Manager programmatically. Begin by running the following command which will import the Cloud Files Azure Resource Manager.

Here is the code which will import the CloudFilesAzureResourceManager.
import com.databricks.sql.CloudFilesAzureResourceManager
This next block of code will get the secrets which are required by the Auto Loader resources. Ensure that you have created the necessary secret scope in Databricks for your Azure Key Vault. These secrets will give Auto Loader the appropriate access to be able to create Event Grid Subscriptions and queues within your Azure subscription.

Here is the Scala code that will get the necessary secrets from your Azure Key Vault.
val subscriptionId = dbutils.secrets.get("akv-0011","subscriptionId")
val tenantId = dbutils.secrets.get("akv-0011","tenantId")
val clientId = dbutils.secrets.get("akv-0011","clientId")
val clientSecret = dbutils.secrets.get("akv-0011","clientSecret")
val resourceGroup = dbutils.secrets.get("akv-0011","resourceGroup")
val queueconnectionString = dbutils.secrets.get("akv-0011","queueconnectionString")
val SASKey = dbutils.secrets.get("akv-0011","SASKey")
You will also need to run the following CloudFilesAzureResourceManager specific code which will take your defined secrets and then create the necessary Auto Loader Resource manager.
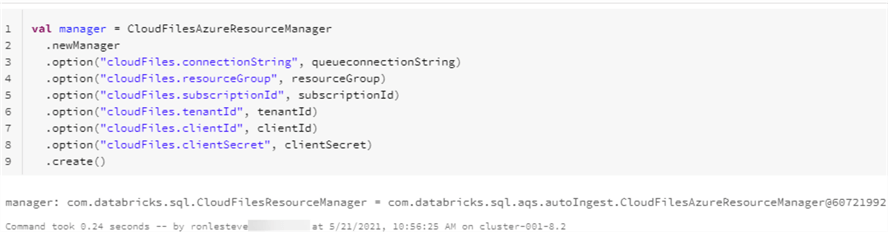
Here is the code that you will need to run to create the necessary Auto Loader Resource Manager.
val manager = CloudFilesAzureResourceManager
  .newManager
  .option("cloudFiles.connectionString", queueconnectionString)
  .option("cloudFiles.resourceGroup", resourceGroup)
  .option("cloudFiles.subscriptionId", subscriptionId)
  .option("cloudFiles.tenantId", tenantId)
  .option("cloudFiles.clientId", clientId)
  .option("cloudFiles.clientSecret", clientSecret)
  .create()
Alternatively, you have the option of manually setting up an Event Grid subscription and storage queue by specifying the associated path in the code below. This option demonstrates the flexibility of either setting up the Auto Loader Resource manager manually or automatically, as needed.
// Set up an AQS queue and an event grid subscription associated with the path used in the manager. Available in Databricks Runtime 7.4 and above.
manager.setUpNotificationServices()
Run the following code to list the notification services that are created by Auto Loader.

Here is the code that you will need to run to list notification services created by Auto Loader.
// List notification services created by Auto Loader
val NotificationSvc = manager.listNotificationServices()
Run the following display(NotificationSvc) command to view this list of notification services created by Auto Loader. Notice the Stream ID that you have been tracking previously is also displayed in this list.

Through this Auto Loader Resource manager, you also have the option to delete Event Grid subscriptions by defining the stream Ids to delete and then running the following tearDownNotificationServices(streamId) command. Notice from the results below that the queue and event grid subscription has been deleted.
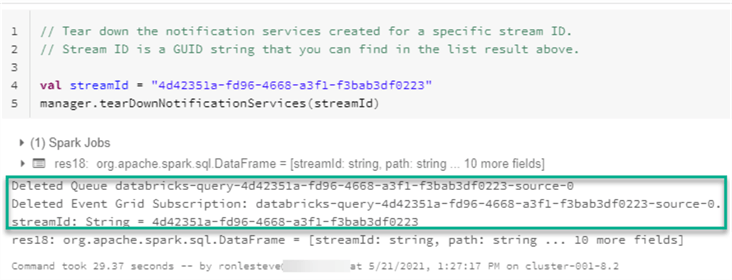
Here is the code which will delete the specified ‘streamID’ storage queue and Event Grid subscription of the registered Auto Loader resource.
// Tear down the notification services created for a specific stream ID.
// Stream ID is a GUID string that you can find in the list result above.

val streamId = "4d42351a-fd96-4668-a3f1-f3bab3df0223"
manager.tearDownNotificationServices(streamId)
At this point, you can get more creative with your resource filtering process by running the following code which will filter your list based on a pattern. In this particular case, there are multiple queries which contain paths that reference ‘abfss’ rather than my mount point ‘mnt’. So we want to list and delete the resources that were created with the ‘abfss’ and only keep resources that were created by ‘mnt’ location.

Initially, run the following code to first identify this filtered list of queries within the Auto Loader resources.
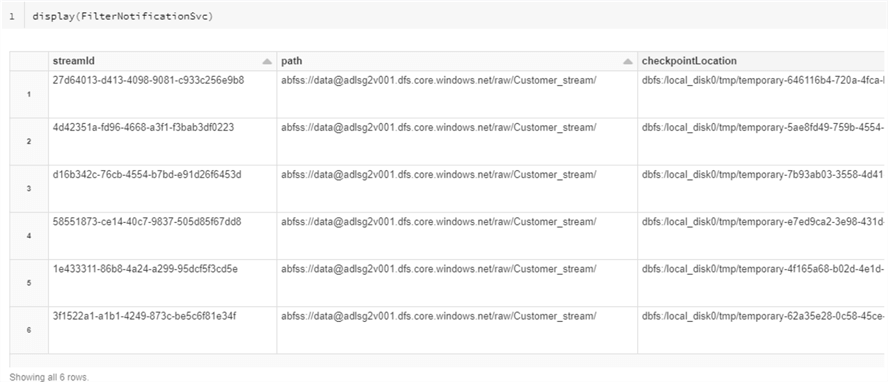
val FilterNotificationSvc = NotificationSvc.filter("path like '%abfss%'")
Run the following display(FilterNotificationSvc) command display the list Auto Loader resources containing ‘abfss’ paths. Notice that there are 6 resources listed which will need to be deleted.
Next, run the following code which will take the filtered list of the 6 Auto Loader resources from the step above and will then loop through the list and delete every Auto Loader Resource that has been defined in this filtered list.

Here is the code that you would run to collect and delete the list of filtered Auto Loader resources.
for (row <- FilterNotificationSvc.collect())
{
  val streamId = row.get(0).toString()
  manager.tearDownNotificationServices(streamId)
}
At this point, run the following command to re-list the registered Auto Loader resources and notice that all paths associated with ‘abfss’ have been deleted, as expected.

As a final check, navigate to your Storage account’s Event Grid topic and notice that there are now only 2 Event Grid subscriptions that are available and linked to the correct mount point ‘mnt’.
Summary
In this article, I demonstrated how to get started with programmatically working with Auto Loader Resource manager in a Scala Databricks notebook to list, filter, and delete Auto Loader resources from your Azure Subscription. This process is particularly useful to prevent any Azure Event Grid specific quotas and limits from being reached and to properly and efficiently manage your Auto Loader Resources programmatically from your Databricks notebook. Additionally, I discussed how it is possibly to manually register Auto Loader resources programmatically, as needed. Equipped with the knowledge of how to use this Auto Loader Resource manager capability, you will be able to better control and monitor your Auto Loader resources that will be created within your Azure subscription.
Next Steps
- For more information on Azure Event Grid quotas and limits, read Quotas and limits – Azure Event Grid – Azure Event Grid | Microsoft Docs
- For more information on Auto Loader Cloud resource management, read Load files from Azure Blob storage and Azure Data Lake Storage Gen1 and Gen2 using Auto Loader – Azure Databricks – Workspace | Microsoft Docs

Ron C. L’Esteve is a Data and AI Leader and professional Author residing in Chicago, IL, USA. He is well-known for his impactful books and article publications on Azure Data & AI Architecture, Engineering, and Leadership. Ron holds a Master of Business Administration (M.B.A.) and Master of Science in Corporate Finance (M.S.F.) from Loyola University Chicago. Ron possesses deep technical skills and experience in designing, implementing, leading, and delivering modern Azure Data & AI projects for numerous clients around the world. He is a Motorola Certified Six Sigma Green Belt, a Microsoft Global Challenger, and also holds numerous additional Microsoft, Snowflake, and Databricks professional certifications in Big Data Engineering, Artificial Intelligence, Apache Spark and Data Platform Architecture.
- MSSQLTips Awards: Champion (100+ tips) – 2023 | Author of the Year – 2020-2021 | Rookie of the Year – 2019


Hi Ron,
Thank you for this excellent and very detailed article. This approach is a clever way to manage Auto Loader streams, and it was a huge inspiration for me. We even used a similar management solution for a while.
I wanted to share a recent development for others who might find this article. Databricks has now released a feature in public preview called “File Events” which is designed to solve the underlying quota limitations that made a manager utility like this necessary. It allows multiple streams to use a single event grid subscription, which is a game-changer.
I was really interested in this specific problem, so I did a deep dive into the limitations of the old approach and how the new “File Events” feature works. I wrote an article about it and made sure to reference your post as a key resource. For those interested, it goes into more detail on the technical specifics.
Blog: https://medium.com/@robjanssens/databricks-file-events-shattering-auto-loader-s-quota-limits-09b2a14ca2a5
Thanks again for sharing your expertise—it’s a great contribution to the community!